


Detail P850: Surge Basin Drain Design
In WaterShapes’ most recent Beneath the Surface, Dave Peterson described and diagramed suction outlet fittings assemblies (SOFAs) for pool and spa applications, a topic also covered by Steve Barnes in a recent Wolfpack Webinar Wednesday. This time the focus shifts to suction in surge tanks, where safety isn’t the concern, but debris certainly is.
By Dave Peterson
Drain covers and SOFAs that are generally exposed to the swimmers often don’t work in a surge basin for a waterfeature, splash pad, or detached tank for a vanishing- or slot-edge project.
The first and foremost problem with covers in a surge basin is debris. While all open vessels can have debris in them, most are relatively easy to access and clean, which may include vacuuming or using a net to clear leaves that couldn’t get through the cover’s grille. This is far more difficult in a surge basin that is usually below grade and accessed through a relatively small door that does not facilitate easy use of an extension pole for a vacuum head or net.
Instead, what if debris, like leaves, acorns, dirt and parts of dead bugs, had a clear path to the pump where the debris could be removed at the basket strainer? Looking here at Detail P850, there are no suction outlet covers. Instead, the entrances to the pipes are through an open flange supported off the floor by fiberglass all-thread and nuts.
Debris that finds its way across the floor towards these flanges will be pulled into the pump. It’s somewhat “self-cleaning” but we are going to get into that subject when we look at surge basin geometry in a future Beneath the Surface.
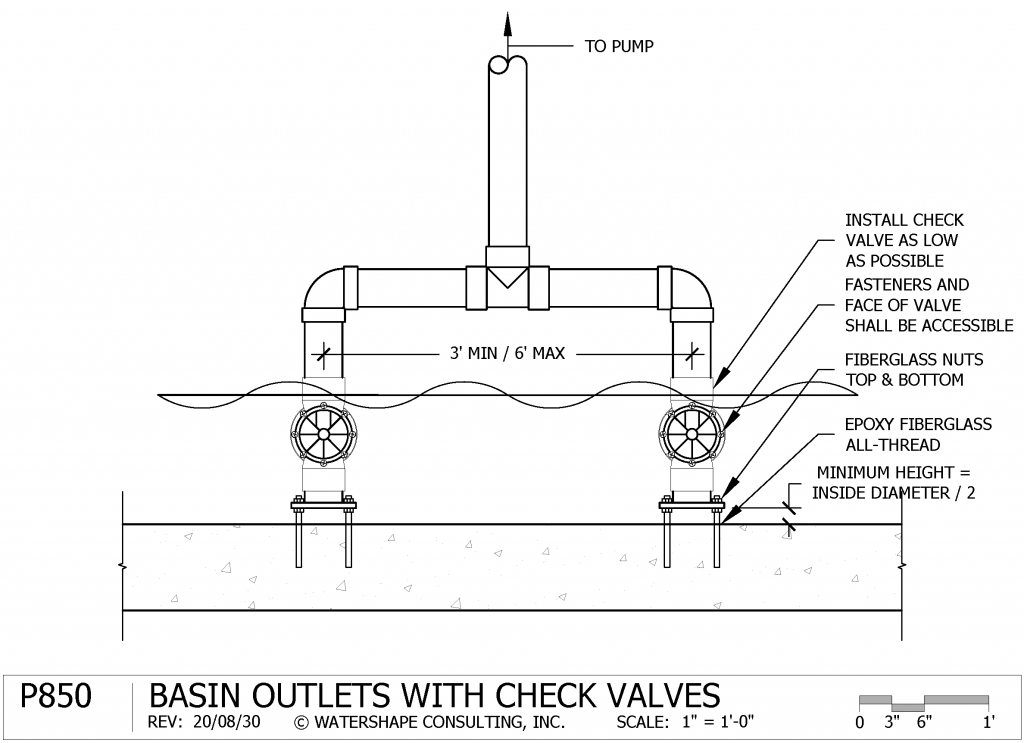
Another big issue for many surge basins is the need for check valves. When the pump sits much higher than the minimum operating level (shown at 12 inches in this detail) then check valves will be required for pump priming. Where would the check valves be located if the plumbing exits the basin through the floor with suction outlet covers? In this detail, the check valves are in the basin, exposed and accessible for maintenance.
This detail is repeated twice in my own surge basin – one with a 4-inch edge-pump line and again with a 2-inch waterfeature line. A few years ago, one of the check valves got jammed up with some stringy Mexican Feather Grass that overhangs one of the gutters. I simply removed the clear housing, pulled the stuff out, and reinstalled the clear housing (with its attached swing-check valve) but I only used 3 of the screws to reinstall.
Because it’s on the suction side of the pump it is never under pressure (5-feet static max) so all of the screws are not necessary. If repeated removal wears out the threads in the plastic, I can simply put the three screws into different holes (there are eight total). Fortunately, the grass has never jammed up the valves again.
[] Fiberglass all-thread and nuts eliminate the equipotential bonding requirements that stainless steel fasteners would require. [] This detail is shown using 3-inch plumbing and check valves. For larger diameters, wafer check valves could be positioned between another pair of flanges. [] The minimum height above the finished floor is calculated by matching the cross-sectional area of the pipe (pi * r2) to the area of the opening below the flange (2 * pi * r * h). [] This detail does not address waterproofing and finishes.David J. Peterson, P.E, IWI, is co-founder of Watershape University and president of Watershape Consulting, Inc. For additional assistance with this detail, he can be reached at dave@watershapes.com.