


A Stream Comes to Life

Now comes the fun part.
The final stage of building a stream is where all of the planning and close attention to the stream’s earthen substructure, transitions in elevation, liner alignment and hydraulics come into play as you move to build in details that effectively mimic nature.
In the first two installments of this series (click here for part 1, here for part 2), I discussed in detail how you excavate and grade the site, place the major transition stones, lay in the liner and install the pond skimmer and headwater system. I’ve talked about the importance of checking and rechecking the work from key focal points as you go. Most important, I’ve stressed the fact that many of the biggest design decisions can only be made on site, as the job proceeds.
Now it’s time to step back once again and take a long look before the final phase begins and we start working with focal stones, river rock, pea gravel and aquatic plants and get down to details, from adjusting the contours of the edges to blending those all-important edges with their surroundings.
FOCAL STONES
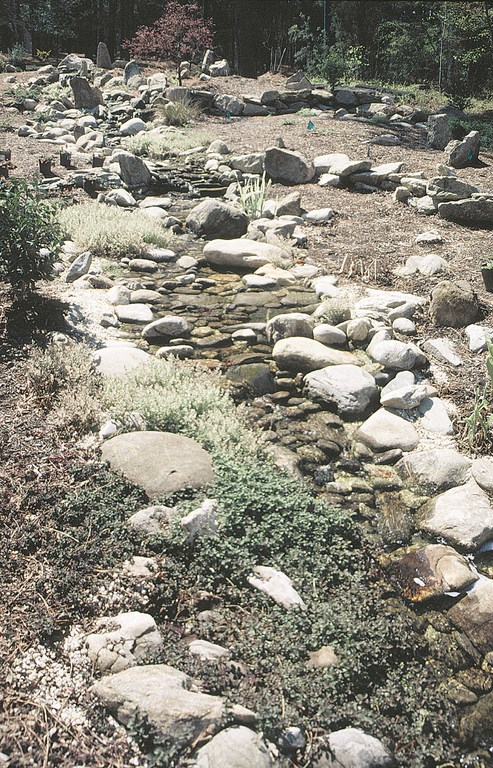
Let’s reset the scene: We’re covering the installation of a 90-foot stream that terminates into a 30-by-25-foot pond. Most of the elevation change – a scant four-and-a-half feet – occurs with three main waterfall areas, leaving only slight inclines in the meandering stretches of the streambed.
At this point, the transition stones that form the waterfalls are already in place. The liner has been pulled into position and secured by the placement of these critical stone structures. The edges have not yet been trimmed. The pond skimmer with the system’s pump is installed at the base of the watershape and is plumbed to the headwaters/bio-filter unit at the top of the stream.
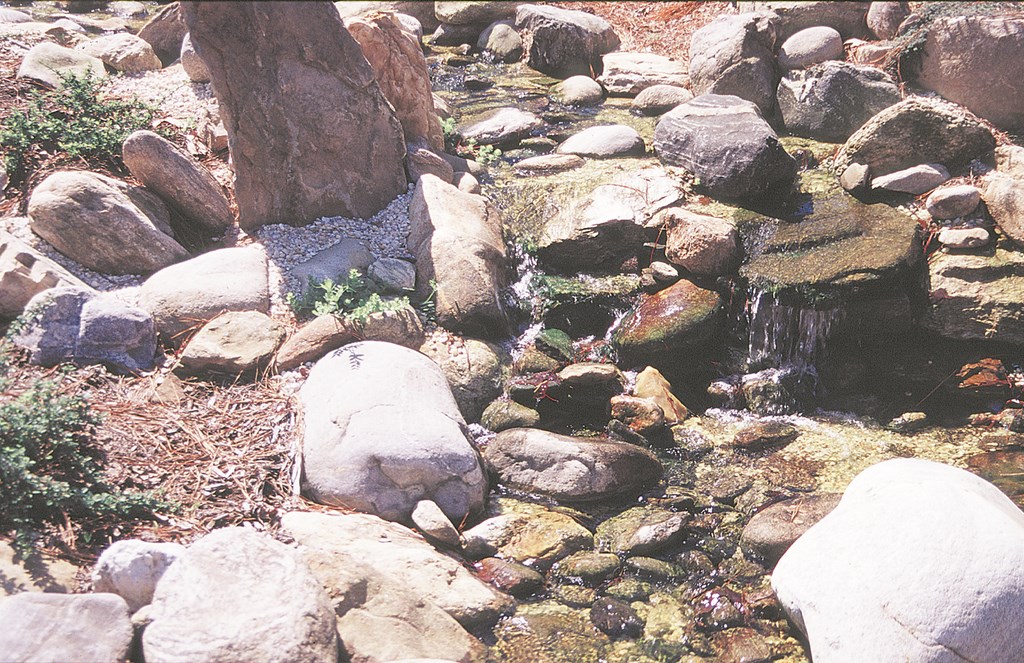
The final phase begins with the addition of what I call the “focal stones.” These are pieces that I’ve set aside because I think they’ll look great – an opinion I usually form by wetting all of the rocks I have at hand to determine what they’ll look like in the streambed. Stones with interesting quartzite or feldspar patterns are given the highest priority.
The stones I most often choose to work with are metamorphic rocks that show clear signs of having been weathered by the action of thousands of years of water. They have character along with swirls, striations and interesting colors and textures. On the project pictured here, for example, I’ve brought in lots of gneiss, a stone native to North Carolina. This gneiss has large amounts of quartz and feldspar and is particularly eye-catching when wet.
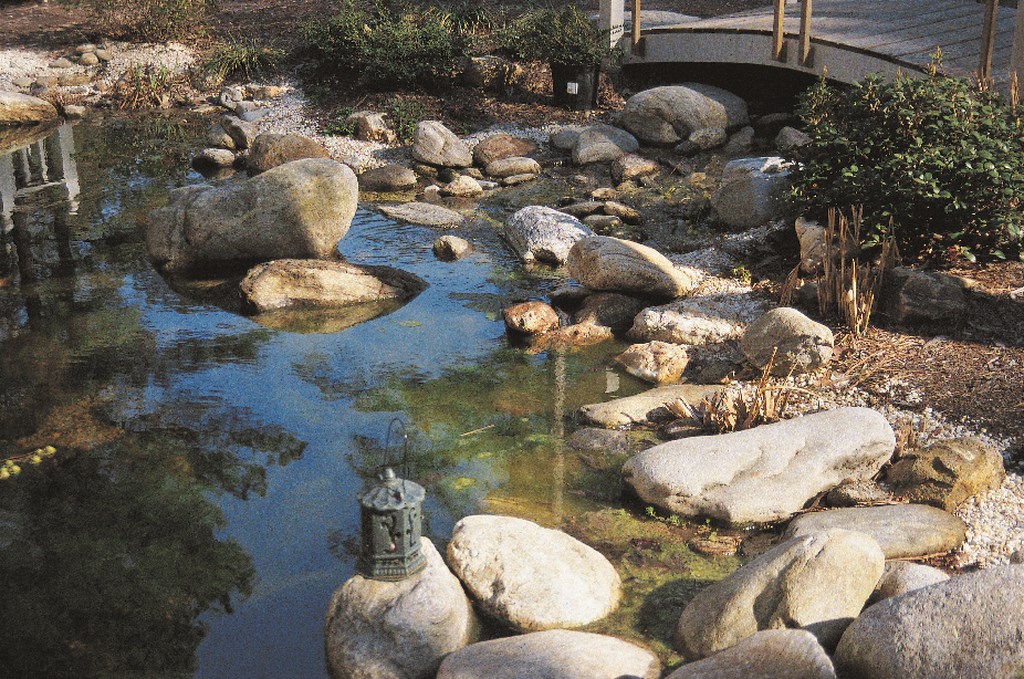
| I took the first of this pair of photos of the stream’s headwaters right after completion of the project (left). The key for me here was making certain the vertical elements at the falls and in the background framed this cascade in the way I wanted. I also sought to make certain the bio-filter box was completely hidden. By the time a second photo was taken eight months later (right), the plantings had begun to take hold and complete the picture. Note how the foreground stones anchor the view and guide your eye to the falls. |
Now I place these stones where I’m sure they will get wet and be shown to best advantage. This usually means placing them right in the streambed, either adjacent to the transitions at the waterfalls, in the middle of the stream or at a junction where they’ll catch a lot of splash. All of these stones are placed inside the liner, further helping to secure (and hide) it. Just as the rocks would be found in a natural stream, I’ll scatter them somewhat randomly, but with greater concentrations in and adjacent to the waterfall transitions.
(Note: In the photos seen here, I didn’t wet the stones outside of the watercourse so you can see the transitions between wet and dry areas – and how I’ve placed several of my focal stones so they’re wet and really stand out against the dry rocks.)
Up to this point, the work has proceeded only in the anticipation of the water’s flow. When I give the system a test run later on, I’ll make more adjustments to the placement of the focal stones to maximize their beauty – and control the flow of the water for both appearance and sound.
Once the focal stones are in place, I turn my attention to the edges by placing what are typically smaller, more ordinary-looking stones at the liner’s edge, further securing the liner and beginning the process of blending the liner’s edge with the surrounding ground. Working deliberately to form a random edge line with the stones, I try to set up areas that look as though rock outcroppings are reaching into the stream as well as areas where it looks as though the stones have migrated or tumbled into position.
A NOBLE CHANNEL
As I place these edge-securing stones, I simultaneously work with the contours of the channel or trough of the stream. This is perhaps the most critical part of the entire job with respect to functionality. It’s also where many watershapers really miss the mark aesthetically.
I spend a great deal of time here, lifting up a few inches of liner’s edge at a time and tucking soil underneath it to create subtle mounding along the stream’s banks. Having excess liner is crucial for this process, which is why I always observe my job-site motto: “Cut no liner before its time.”
Inch by inch, I contour the edges to blend with and embrace the edge stones and any focal stones I’ve placed near the edge. In short, I do everything I possibly can to avoid having edges that look like curbing.
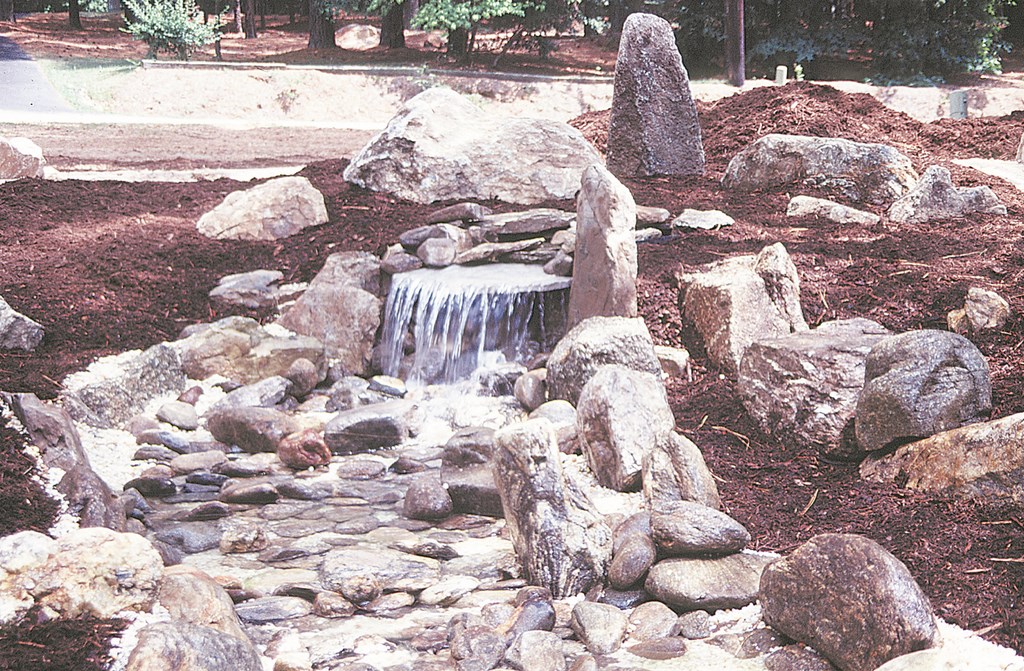
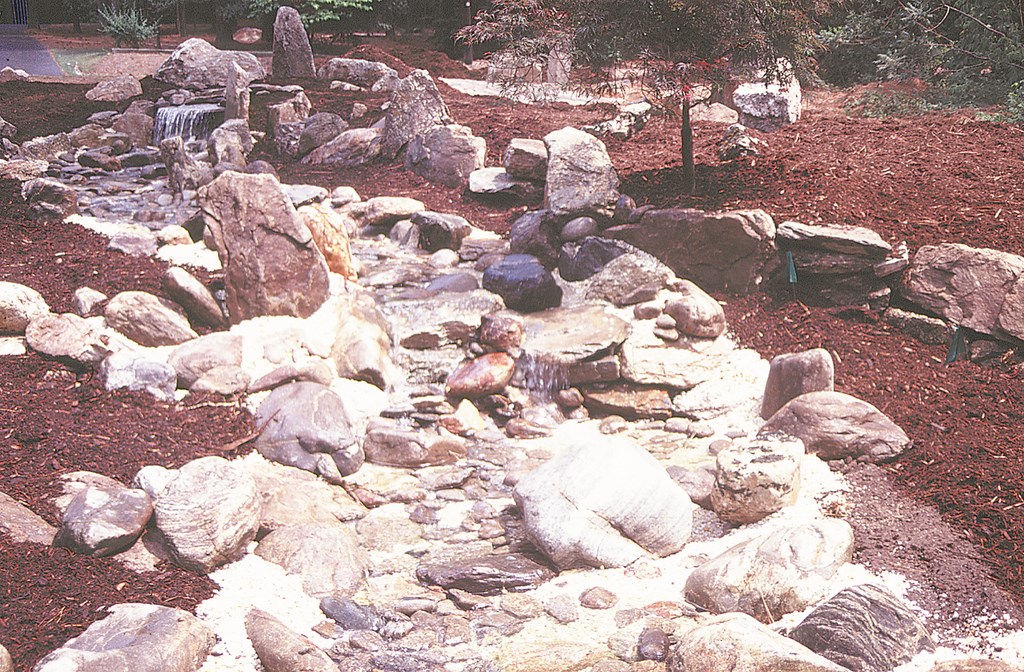
| In another pair of photos taken upon completion (left) and then eight months later (right), you can see the jumble of stones I’ve amassed to create a variety of interesting water flows and sounds. I worked very hard here to make the edges blend seamlessly into the surrounding terrain. I also avoided using too much stone along the upper embankment to avoid cluttering the area where water pools behind the weir stones. |
The project depicted here is an example of a babbling-brook approach, as opposed to a crashing river or whitewater effect. This design choice has a strong influence on the way I worked the 180 feet of edge in this particular watershape: The stream meanders along in a channel from three to six feet wide at an average depth between one and two inches – a very slow stream. This allowed me to create an extremely soft and shallow edge.
The edge creates the channel containing this flow of water, so it is obviously and absolutely critical that the edges be above the waterline to keep the water from leaking away. But we’re talking subtle elevations: Because I want to have only a little bit of liner to hide, I’ll be working only an inch and a half to two inches above the waterline in shaping the edges.
The soil I use for backfill is always compacted with a tamper. This is extremely important: In most cases, you will see some settlement after any stream has been in operation for a while. Compacting the soil at the edges prevents severe settlement that could, in a worst-case scenario, allow the stream to drain into the surrounding yard or even into the home itself. (I get into this issue a bit more in the sidebar below.)
|
Managing Settlement Settlement of the surrounding ground is inevitable in any stream project, so I always include enough cash in my bids to cover two post-completion visits. I’ll come back a week or two after the stream has been completed to make sure the water is staying put and that nothing has moved out of place. I’ll make adjustments as needed, such as moving stones or adjusting pea gravel and river rock. I make a second return visit after the first rain. This is when you’re most likely to see the effect of runoff from the surrounding ground or any erosion or undermining of the liner. At this point, if I need to buttress an edge I’ll lift the liner, pack in the requisite dirt or stone and then reposition the stream stones. On the project pictured in the accompanying text, I found three small areas where settlement was allowing water to trickle out of the stream. As I’ve emphasized here, water is unpredictable and opportunistic, so you probably have to be more on the lookout for tiny trickles than areas of large spillovers. Nobody wants to get a call from a client about a stream overflowing its banks and flooding the yard or a neighbor’s yard. Nor do you want to get a call saying that water is being lost but the client can’t see where it’s going; here, you need to be patient and look yourself for telltale signs of moisture. So if you get into streams, be sure to plan for these follow-up visits to keep things flowing smoothly within the streambed you worked so hard to establish. – R.A. |
Bottom line: In my work, I push the envelope by creating tight, low-profile edges. I do this for purely aesthetic reasons, even though it means I have to work the edge literally inch by inch, lifting the liner, adding soil, tamping it in place, positioning and repositioning stones and always stepping back to reevaluate the look. The added time I spend here allows for seamless transition into the landscape.
There’s a tendency in building streams to take the easy way out by building streambeds that look more like troughs with steep sides that may rise eight inches to a foot or more. Yes, it’s easier to contain the water that way, but I believe this leaves the work with an extreme visual deficit and what I call a “drainage-ditch/rip-rap effect.” In other words, a deep trough with rocks piled up the side will make the work look artificial, as though the rocks have been dumped in place to stop erosion.
It may be tougher to do it my way and shape imperceptible rises along the edges, but in my book it’s the only way to maintain the illusion of a real stream.
SIZE DISTRIBUTION
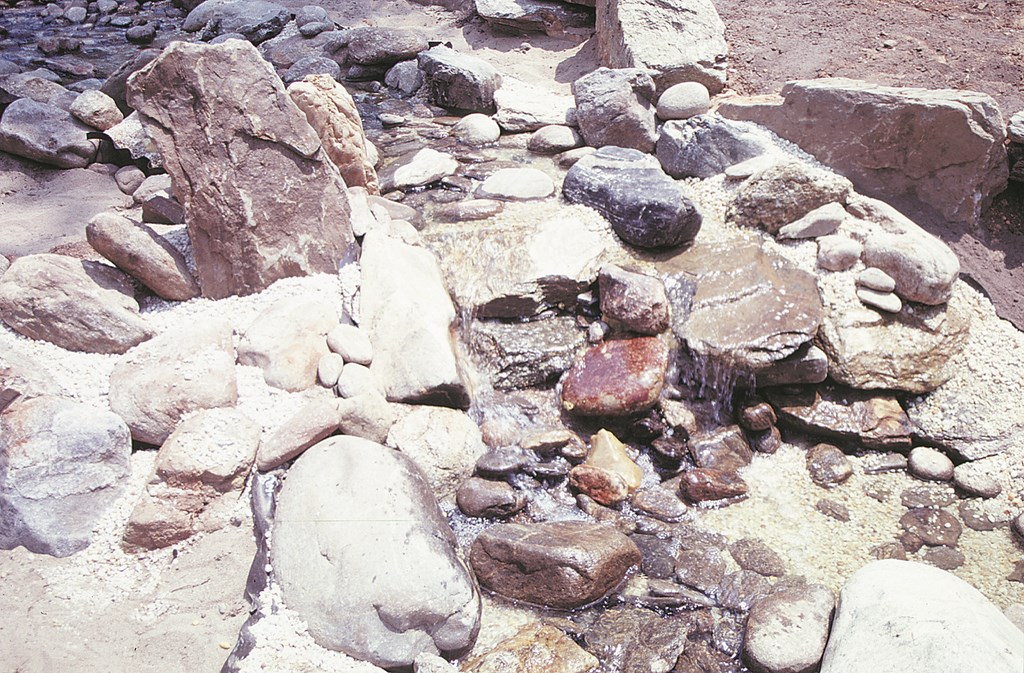
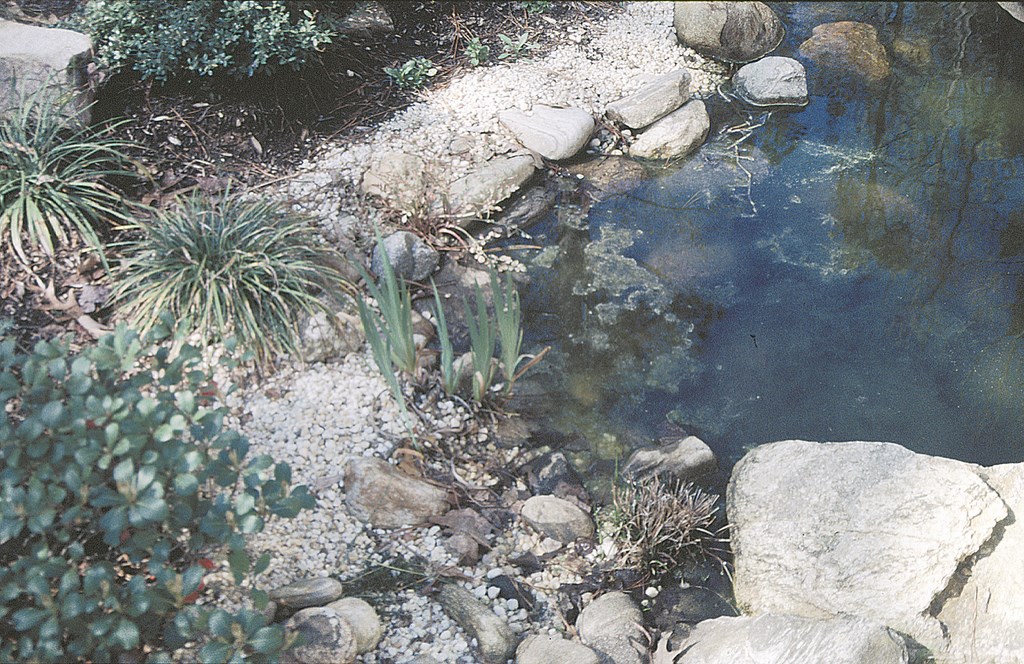
Once I’m satisfied with edges (or close to satisfied, anyway), it’s time to add pea gravel and river rock to the remaining exposed portions of the liner in both the stream and the pond.
On this job, I used about seven cubic yards of small river rock – smooth, water-worn stones ranging in size from one to three inches in diameter. I also used six yards of pea gravel, which consists of very small particulate stones of less than 3/8-inch diameter.
I usually sling the pea gravel and river rock for a totally random look. This mixture of varying sizes helps with the natural feel of the system. I’ll then go back through and hide any liner left showing.
(I’m among those, by the way, who believe that lining the bottom of the stream and the pond with a bed of small rock material is critical to the appearance as well as the function of the overall system. For starters, there’s no more effective way to hide the liner; it also looks very natural, works as a filtration system and houses beneficial bacteria.)
| These photos also show the stream’s development in the eight months after completion. The earlier view (left) shows how I worked to blur the edge between the streambed and its surroundings. I think I did a good job, but the plantings truly obliterate any sense of a border between the aquatic environment and the adjacent terrain (right). |
When you get out and study waterways in nature, one of the things you notice is the wide range of rock sizes you’ll see in streams and rivers. By using large stones as well as smaller river rock and pea gravel, you give the work variety and contrast in size and texture. This adds interest and looks great.
The gravel-and-rock bed also provides a very healthy environment for plants and fish. And contrary to what some watershapers believe, the presence of the small rock materials keeps the overall system much cleaner than is the case with systems that lack a rock bed. I’m sure there are builders of closed systems, especially those that house koi, who totally disagree with me – especially when it comes to pond bottoms.
With the rock in place, I step back again and look at the whole stream, top to bottom. If I’ve done my job, it already looks decent as a dry streambed.
At this stage, I may make a few more adjustments in stone placement and may spot some places where I need to adjust the size distribution of my rocks. Now it’s time to put some water in and see what happens.
TESTING THE SYSTEM
For this trial run, I fill up the pond to a point about midway up the skimmer mouth and turn the system on. As the system lurches into action, I hose down the stones upstream to flush the system and be sure that everything is as clean as possible.
Once the water begins to flow, I’m almost certain to find places where the water may be slipping over the edge or flowing over a stone in a way I didn’t anticipate. This brings up a major point about water: For all of its wonderful spiritual and aesthetic qualities, it is also very opportunistic. Beautiful but insidious, water will always find the path of least resistance – a path often not anticipated. Particularly in a large stream like this, in fact, the water is almost certain to do some things that were not planned.
As a result, I use this first run for an initial round of troubleshooting and adjustment. I may reposition some stones so that they become wet or slow down the flow here or there. I’ll also make sure the pea gravel and river rock are staying in place – and I may add a few more stones for purely aesthetic reasons.

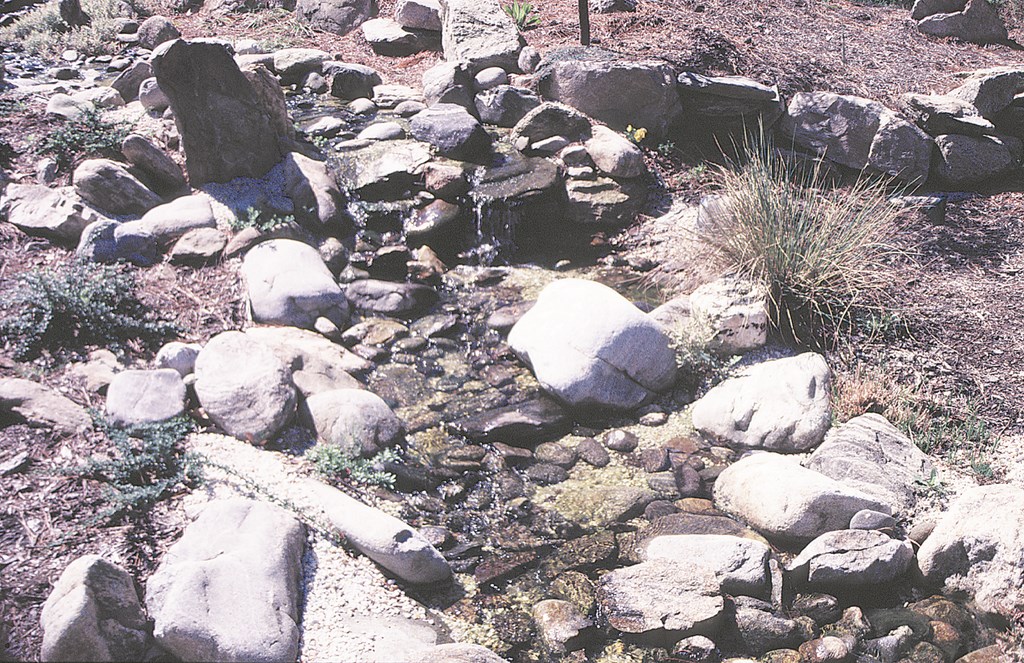
| When you work with stones of great character, the possibilities for making unique edges multiply. Here, you can see how I’ve used native Carolina gneiss in and up out of the water (left) and used aquatic and terrain plants to meld the edge and make it all flow together (right, taken eight months later). Burying the stones in this way not only improves their long-term stability both physically and visually. It also increases the sense that the stones are natural and have been there for ages. |
Once I’m satisfied that the system is working smoothly, I’ll shut it down and pump out the water using a sump pump set in the deepest part of the pond. Even though I’ve done my best to make sure that all excess dirt is off the stones that are inside the liner, this first filling will be pretty dirty, so it’s best to change out this dirty water.
(Always concerned with water conservation, I do not route the water to a storm drain or the street. Instead, I use the water on the customer’s grass, trees and other plantings. If I have to, I’ll even water the neighbors’ lawns to avoid wasting water.)
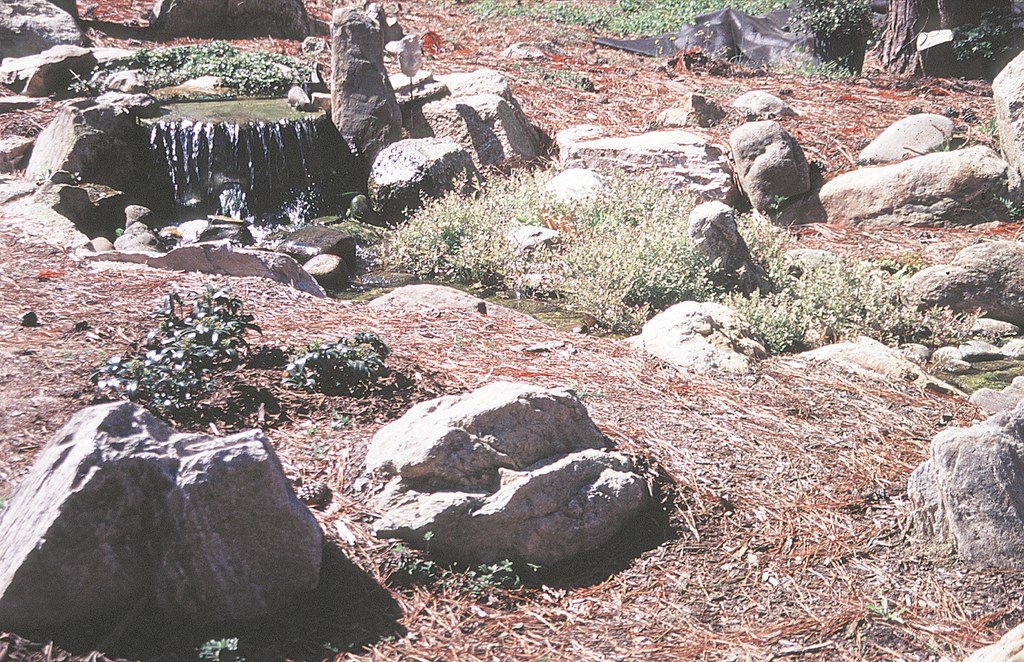
With the stream and pond empty once again, I start adding aquatic plants. In the shallow portions of the stream or pond (what I call the “marginal” areas), I use grasses, water celery, mints and horsetail – all of which are happy in about two to three inches of water. As I place these plantings, I’m always thinking about using marginals to help create seamless edges while establishing them in natural, non-linear patterns.
Down in the deeper areas of the pond, I prefer water lilies. I take them out of their containers and wash away 80% of their soil before planting them directly into the bed of pea gravel and river rock.
THE SECOND FILL
At this point, almost all of the stones and plants are in place and the stream is almost finished. Now I refill the system using a couple of hoses, making sure not to dislodge plants or rocks with the water flow into the pond.
If I need to add fish to the system right away, I’ll use a de-chlorinator. If the fish can wait, I’ll let the system run for three to seven days before adding them. (In the depicted project, my clients waited about a month before adding goldfish.)
Again, I fill the water up to the mid-point on the skimmer face and boot up the pump. In a job like this one, with 90 feet of two-inch plumbing running upslope, it takes several minutes for the water to begin flowing from the headwater system. Once the flow begins, I keep filling until I’m satisfied that the water level has equalized between the pond and skimmer.
Now it’s time to make the final adjustments. This is my favorite part of any project.
| A long view upstream shows the melding of aquatic and terrain plants I’m after at the water’s edge. This part of the stream is very lazy and shallow, which makes the edges easier to work with because less stone is needed to stabilize and hide the liner. This all works because of decisions made in the design stage and in the initial grading that keep the project from looking anything like a drainage ditch. |
At this point, the whole stream looks pretty good (I hope) and all the major elements are in place. Now I go through the whole system step by step, reevaluating the placement of plants and stones and making a variety of adjustments. A lot of what I do here involves tiny adjustments of flow and speed, but much is also tinkering of the purely aesthetic kind.
I usually hold a few really nice focal stones back and place them in spots throughout the system. I may use one, for example, to create an eddy where the water will slow down and become a small pool. (These small, slow pools of water are very attractive to birds.) I’ll also adjust stones around the transitions to manipulate sound. And I’ll continue to work the placement of stones around the edges, always being conscious of places where the water may want to escape.
This is where the time I’ve spent studying nature really comes into play. I constantly ask myself, “Does this part look natural?” “Does it look right from the primary focal points?” “Does it sound right?” “Does it give me a feeling of tranquility and a sense of natural beauty?” Here, the work I’m doing goes well beyond tweaking: For me, it’s the artistic phase of the process, and I’ll spend as much time as it takes to get things right.
Now, with everything in place and running, I can finally get a true sense of the way all the key elements work together. I may add a few more grasses, or maybe some mint or horsetail. I’ll examine every inch of the edge, looking for signs of the water wicking over the edge. Once I’m done, I can trim away any excess liner.
SNIPS IN TIME
I wait to cut off the edges of the liner for a very simple reason: It often comes up in this last tinkering phase that I’ll need to increase the height of the mounding along the edges in a few spots. Leaving the liner intact is a precautionary measure, an insurance policy – and it’s something that has enabled me to fortify many a stream very late in the process.
There does, however, come a moment when you must feel you’ve got it right and the liner can be cut. I use a razor knife, moving carefully along the outer edge of the rockwork that borders the stream, leaving a half-inch or so of liner and then rolling it under and burying it beneath the soil. Then I blur the edge even more by scattering some pea gravel and river rock along the edge, always being careful to make sure nothing looks like it’s in a straight line.
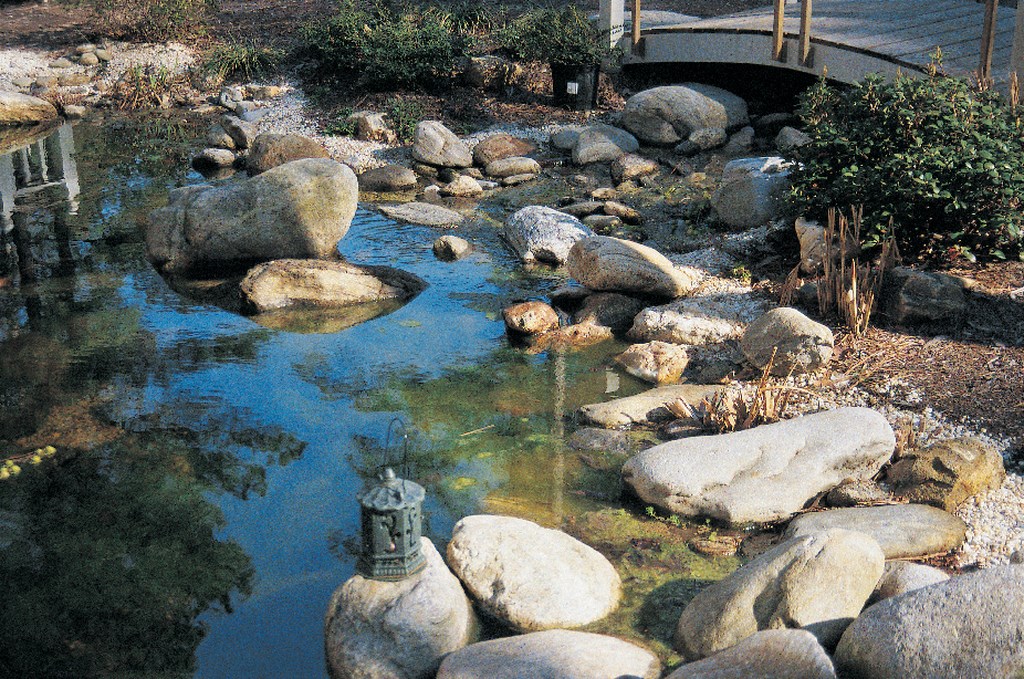
| All flowing water eventually finds its way to a larger body of water. Although we’ve focused mainly on the streambed in this series of articles, as much attention was paid to getting details right with the pond and its edges (left). Note the several stones that break up the plane of the water’s surface (right). Not only do these “islands” add to the natural impression: They also provide shade and shelter for the fish. Add in a nice footbridge and the composition is complete. |
Next, I’ll spread a little gravel out several inches onto the surrounding ground and may add a few more rocks to make sure the transition from the stream to the surrounding ground looks seamless, gradual and natural. (Some people use mulch to blur the edge, but I’ve found that mulch will wick water out of the stream better than most anything else. And if I do use mulch, I’ll do my best to keep it away from the edge of the liner.)
On his job, I spent fully half a day making these tiny (but critical) adjustments. It’s usually at about this point that the customer comes out and drinks it all in. I watch their reactions very carefully: If I’ve done my job, they will be impressed (if not entirely blown away) by the effect.
|
Keeping It Clean Nothing will rob a stream of its beauty faster than dirt. That’s why I hose off all of the stones I place in a streambed before installation and then rinse them again in my trial run: It’s important to keep as much dirt out of the system as possible to avoid clogging the pump or taxing the bio-mats in the filtering system. Also, you prevent any build-up of a film on the stones and plants. When rock is delivered, I always try to put it on a hard surface, such as a driveway or sidewalk, or place it on a tarp so that it won’t spend time sitting on the ground getting dirty. Even if the rock is delivered on a pallet and stays there until I use it, I’ll hose it off before putting it into the stream. – R.A. |
In this case, the customer was extremely involved in the closing stage. In fact, he helped create the seamless edge by installing the surrounding plants. Working with my Whispering Crane co-founder Richard L. Dube, the client had selected some 50 species of plants to surround the stream, including a variety of conifers, hollies, perennials and shrubs.
Streams such as this one are difficult and require large amounts of patience and attention to detail. If you want to build streams that have a chance at looking natural, sound great, and function properly, you must take pride in your work. Doing one well gives you a great sense of accomplishment – although I can’t say that I’m ever truly satisfied.
The big question will always be, of course, is the client happy? That was apparently the case here, because I had a check in my hand before I had a chance to ask for it.
As the plantings have grown and I’ve returned to make a few more minor adjustments, the stream has become, as intended, a true thing of beauty. It can’t rival Mother Nature for streamcraft, but when you do your best and take your time, the resulting stream speaks for itself – and even sings a little.
Rick Anderson is a watershaper with Mulhall’s, a full-service landscape design and installation firm in Omaha, Neb. A designer and artist with more than 22 years of professional experience, Anderson’s work focuses on the use of natural materials, particularly stone, in naturalistic settings. He is the founder of The Whispering Crane Institute, a landscape design “think tank” dedicated to exploring our physical, emotional and spiritual relationships with the land. Anderson is a past director of the Association of Professional Landscape Designers and has contributed numerous articles to a variety of trade and consumer magazines.