


Shining Through

Maximizing the potential of landscape lighting is always about thinking ahead – a philosophy that absolutely applies when it comes to planning and designing the lighting for a watershape.
The process begins with a set of questions that should be considered at the outset of any project: Is the watershape to be the focal point of the composition, or is it to be one among equally important features such as plantings, sculptures or hardscape details? Is the feature to be visually prominent at night, or is it to blend in with the darkness? Will the water you are lighting be in motion, or are you working with a still surface?
Observers and chief vantage points also come into play. If the feature will mostly be viewed from passing automobiles rather than by pedestrians, for example, the issue of glare must be directly considered for safety reasons. If the watershape is to be seen from a lit interior space, then we know that its lighting level must be equal to or greater than that of the interior lighting. Likewise, relative brightness is an issue in making the illuminated watershape work with the rest of an illuminated landscape.
The most important need in all of this is for recognition of the fact that the lighting of watershapes is different from (and often more difficult than) the lighting of other parts of a landscape. Here’s some background in what it takes to increase your opportunities for success.
BRIGHT PROPERTIES
It has often occurred to me in my work as a lighting designer that lots of problems are avoided when the designer or contractor takes the time to consider the physical properties of light and the way it “behaves” in specific conjunction with water.
Those properties can be broken down into four distinct concepts:
[ ] Light acts differently in water than it does in air, basically because water has far greater density than does air and therefore affects the velocity of the light and the angle at which it travels from one medium to the other.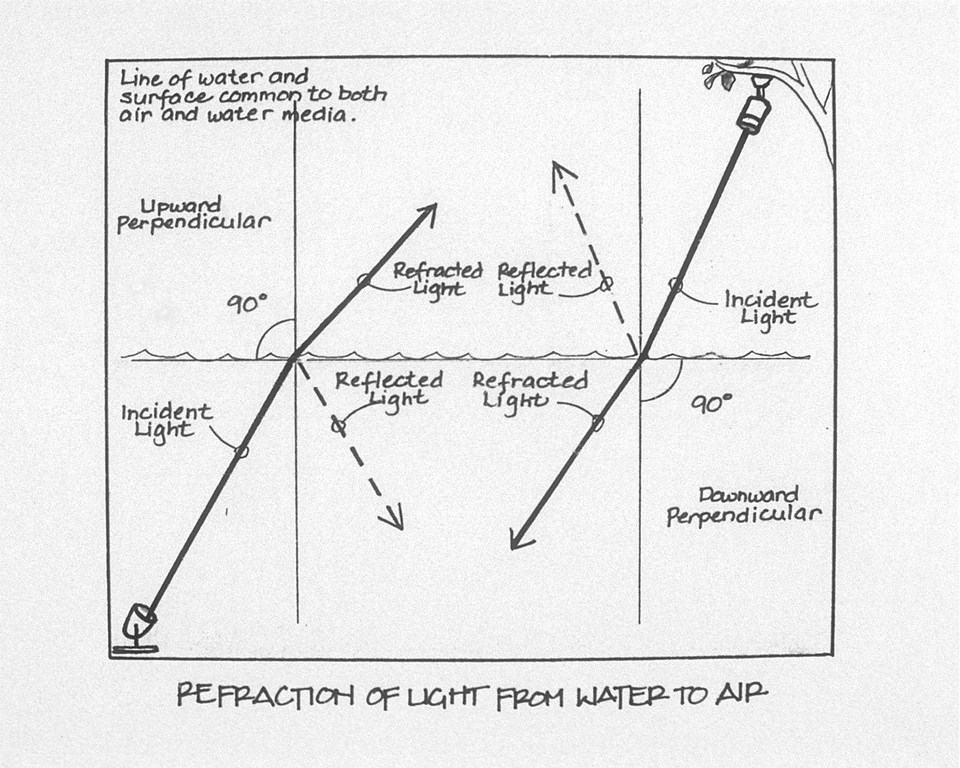
| Figure 1: Whether the light source is inside or outside a pool of water, light ‘refracts’ when it hits the surface (left). You can use this phenomenon to good effect, in one case by hiding the brightness of a subsurface light source by using a flat lens rather than a convex one (right). And you can control the effect even further by using a louver. |
You can use this phenomenon, known as refraction among lighting engineers, to great advantage in certain situations. When seeking to hide the brightness of a fixture in the wall of a pool in a situation where you can’t effectively hide the light source, for example, you can select a flat lens instead of the usual convex lens (Figure 1, above). The flat lens will send more of the light toward the “horizon” directly ahead, meaning there’s less light to shine up into the eyes of someone standing at poolside.
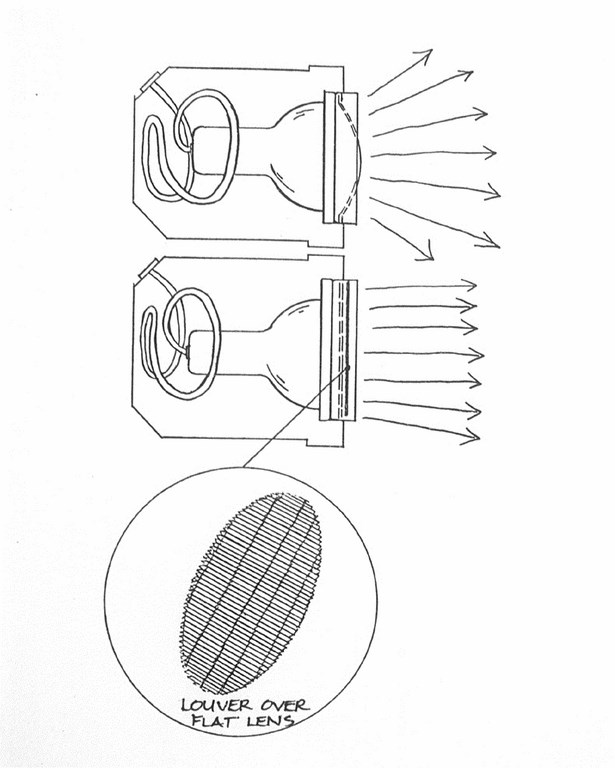
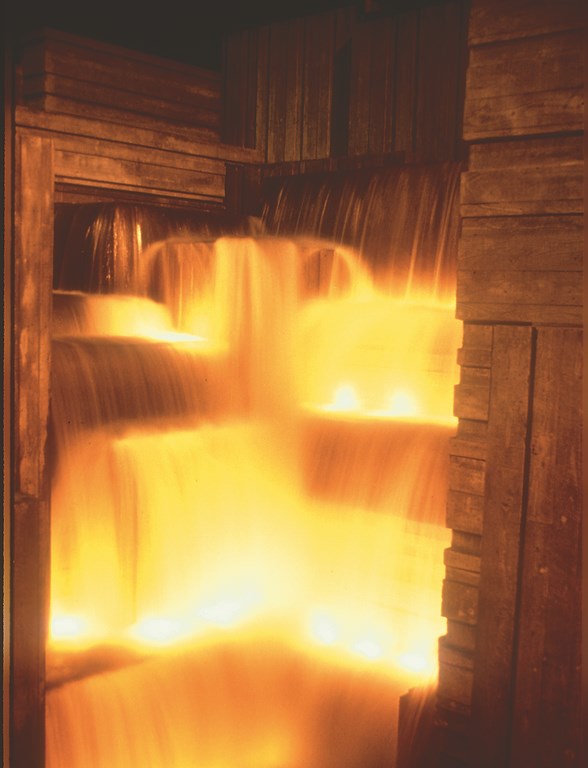
[ ] Light is affected by the presence of aerated or turbulent water. When filled with air bubbles, water directly interacts with the light, taking on a dramatic glow and even assuming the color of the light if you use a colored lens. Light placement is the key to this effect: The fixture must be located below the source of the bubbles – at the base of a waterfall, for example, or directly beneath a vertical-plume nozzle (Figure 2).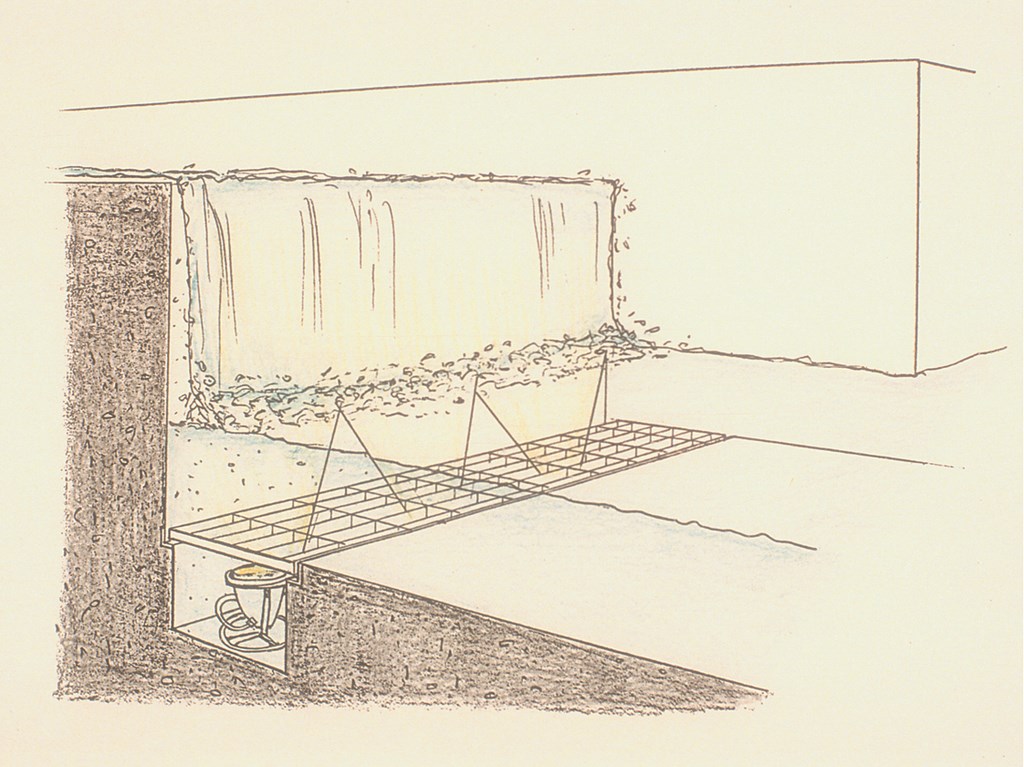
| Figure 2: When planning for the uplighting of waterfalls, it’s important to build a trough wide enough and deep enough to give yourself some room for later maneuvering as you adjust and ‘tune’ the lighting to the specific conditions you encounter when the water starts flowing. |
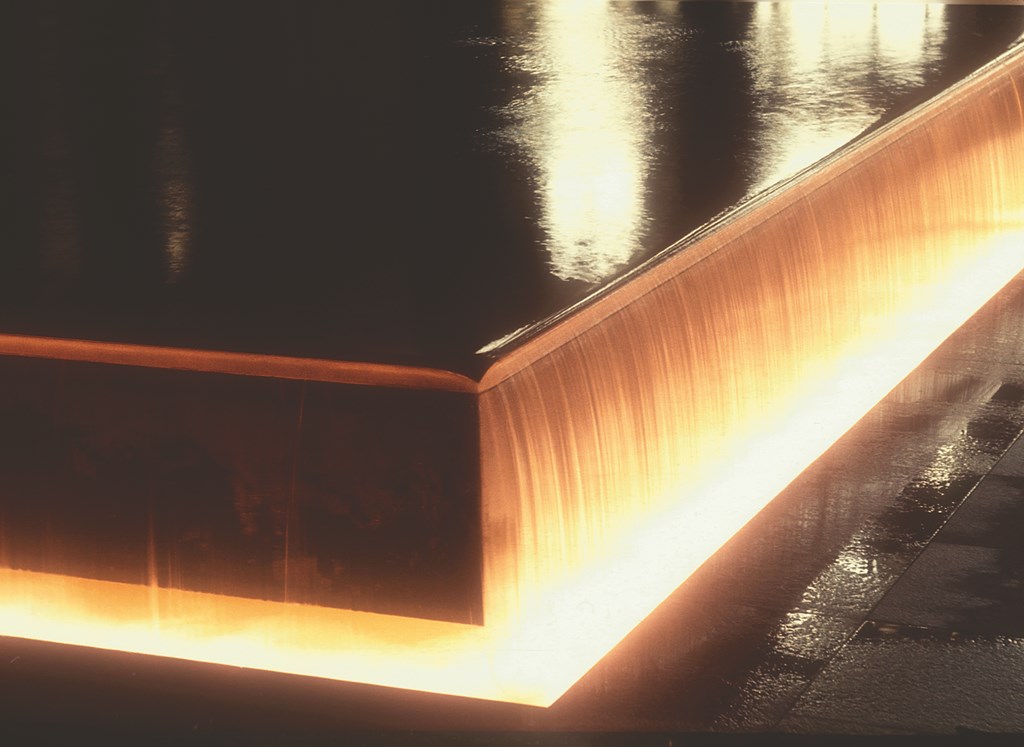
As a rule, smooth waterfalls are lit from the front with fixtures located either inside or outside of the water. What I see as the best available effect – a beautiful shimmering on the surface that becomes a compelling focal point in any space – is achieved on a flat water surface lit from outside the water.
|
Gin Clarity The lighting of cloudy water from beneath the surface simply does not work. The more particulate haze there is in the water, the more diffused, cloudy and muddled the lighting effects will become. This is why many of the attempts at lighting ponds or other living waterfeatures from below the water’s surface meet with failure. This is also why any watershape in which underwater lighting will be used should be designed for crystalline clarity. While it’s no surprise that underwater lighting is primarily a feature of swimming pools or architectural fountains that are filtered and chemically treated, this still doesn’t rule out lighting for pond systems that contain fish and/or plants so long as the client wants it and the designer aims to achieve a suitably high degree of water clarity. — J.L.M. |
In addition to these four principles, anyone trying to light water effects needs to know that perceived brightness is reduced by 10% for every two inches of submersion. This is why lighting a submerged space requires a far greater number of fixtures relative to a dry space. In fact, I’ve found that a given underwater area will require upwards of seven times the number of fixtures relative to a similar-sized area of adjacent landscaping.
EXPLORING SURFACES
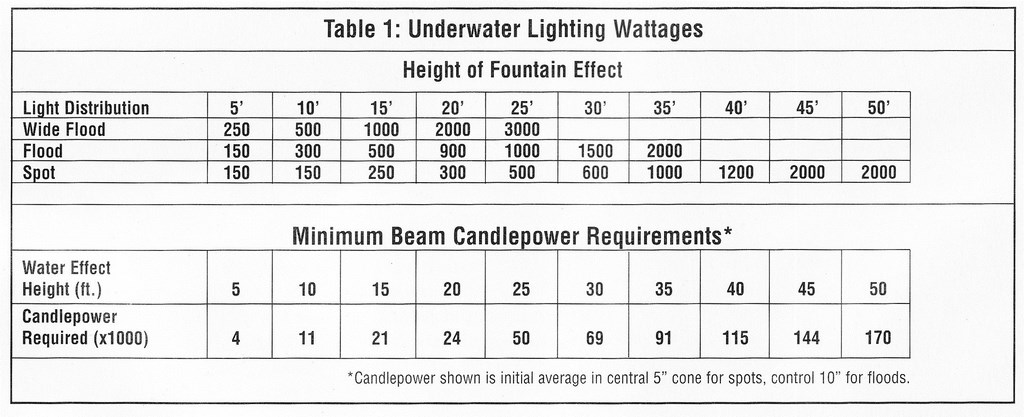
This need for more fixtures (and more light) indicates at a minimum that there’s a difference between the lighting of water and the lighting of areas on land. If you know what you’re doing in a dry landscape, you might be able to create wonderfully appealing effects with a small number of fixtures – but that’s not possible with underwater lighting, basically because even simple effects require a great deal more candlepower (Table I, below).
All of this translates into a dramatic difference in wattage required: 700 to 1,000 watts in water for ever 20 to 50 watts on dry land. This makes a huge difference in system cost and complexity and is one of the big reasons why clear (and early) communication with the client is so important. Obviously, that need is there with any landscape lighting project, but I’ve found that it is especially true with those involving water.
| Figure 3: Depending on the position and angle of the light source, a sheet of clear water will either reflect light (as seen at right) or let it pass through the surface (as seen at left) to give us a glimpse of what’s behind it. |
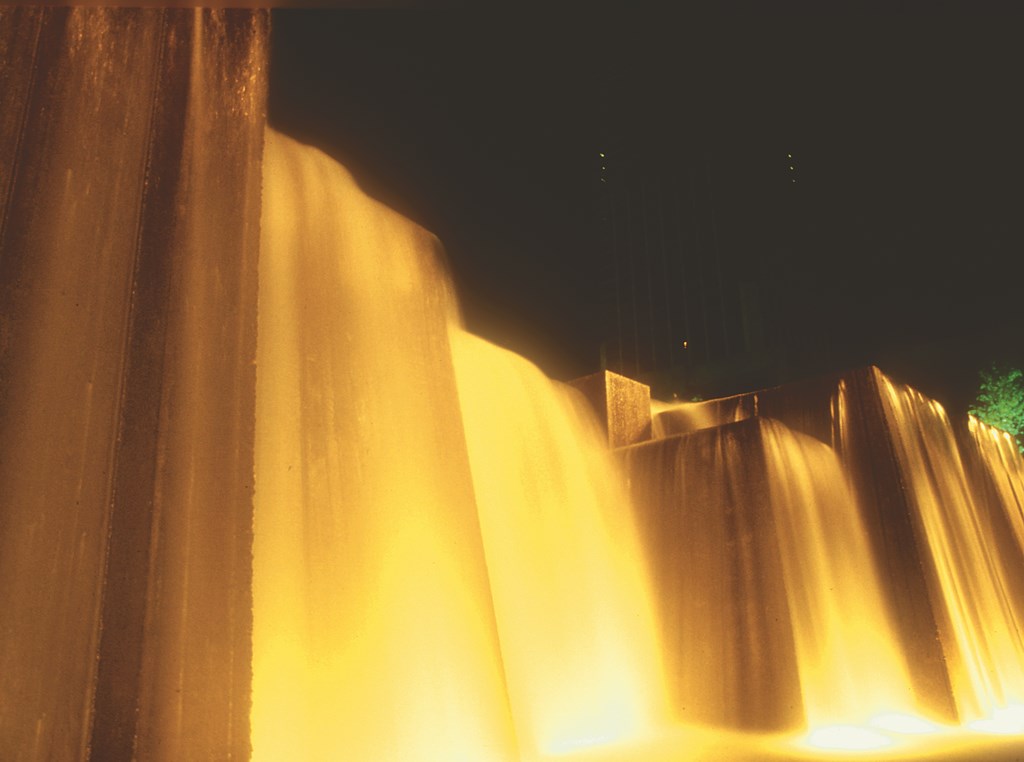
I’ve also found that underwater lighting involves a lot more effort than dry-land lighting, but I see it as an investment more than matched by effects that can be so dramatic when done well that they often become the most attractive features of a space. Think of sprays of water glowing against a night sky, or the radiance of turbulent water as it accentuates its own power and vigor while flowing over rockwork or some other hardscape feature. These and other effects are well worth the thought, planning and extra work involved in achieving them.
The fixtures used to develop such effects can be placed either directly on or recessed within the bottom of a vessel, or they can be set or recessed in a nearby architectural feature of some kind. The “where” of this placement is crucial: Whether lighting a watershape’s waterfalls or jets or nearby plants or sculptures, you must consider all of the influences on the effect you aim to achieve, including refraction, light dispersion and the effects of bubble-filled or smooth water, in deciding where the lights will be placed.
Distance between the light source and the illuminated object is a factor, too. Not only must you consider and be able to adjust the angle of the fixture, but you must also think about basic location, because light from a fixture placed too far in front of or too close to a waterfall (for example) will not be absorbed because the light won’t transfer from the horizontal surface of the water to the vertical surface of the falls.
And of course, these kinds of specific, highlighting effects are not always going to be what you’re after. In swimming pools, for instance, recessed fixtures are well used in washing the walls with light to accent the shape and contours of a body of water or to call attention to exceptional textures and materials, such as exposed-aggregate finishes or tile. It all depends on what your pre-planned objectives are – and what your clients want.
WORKING UNDER WATER
Certainly, equipment selection is all-important in watershape lighting, as it is in any lighting project. High on the list of considerations is the type of lamp with respect to candlepower and beamspread. Furthermore, the type of fixtures you choose must be intended for use beneath the water’s surface.
It may be an obvious point, but equipment you intend for use below the waterline should be designed for the application. Fixtures, for example, must be made to withstand water’s corrosiveness and also need to be completely and reliably water-tight throughout the service life of the fixture. (This is all set forth in Article 680 of the National Electric Code, a document worthy of an article all its own.)
| Properly done, the underwater lighting of watershapes involves much more planning and effort than does dry-land illumination of the same feature. But it’s an investment that more than pays off in the level of visual drama that can be achieved when everything comes together. |
Because underwater features are necessarily of heavier-duty construction than dry-application fixtures – and use more expensive materials while requiring more involved design, engineering and product testing – they are much more costly than their out-of-the-water counterparts. Indeed, submersible fixtures will set clients back roughly three to five times the amount of dry-land fixtures.
Submersible fixtures are typically made of copper, brass or stainless steel and must be entirely sealed to prevent water from entering the lamp housing. They also must have strong locking mechanisms (such as yoke locks) in order to hold the desired aiming angle in the face of turbulence over time.
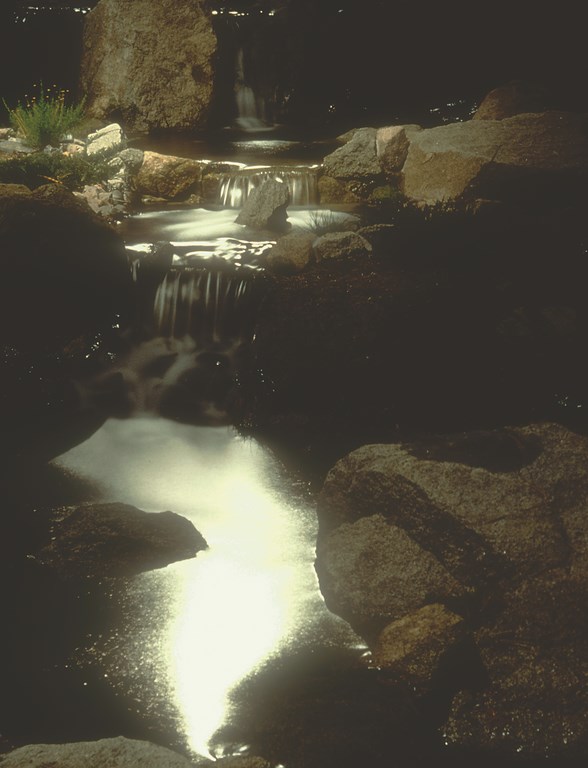
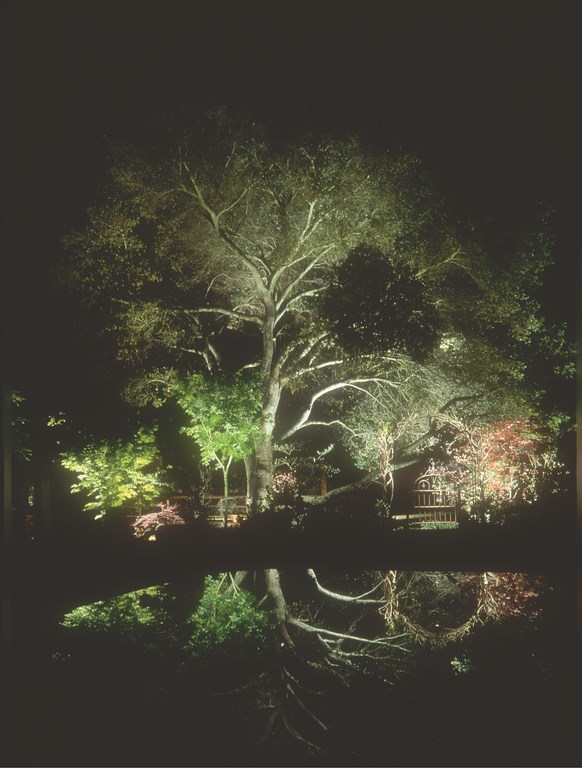
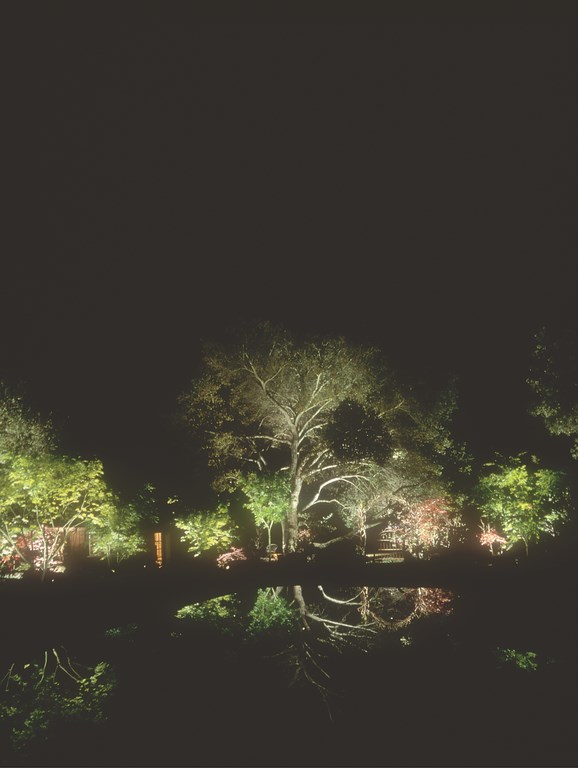
| Lighting watershapes from outside the water opens the visual palette to amazing reflections, as can be seen in the relatively still waters downstream from a waterfall illuminated from above or in mirror images of plants lit up beyond the water. These effects may be more subtle than those to be achieved with underwater lighting, but they have a visual appeal all their own. |
These fixtures are definitely not designed for use above the water level; in fact, they rely on the presence of water to dissipate the heat generated by the lamp, which explains why most have low-water cut-off switches that shut them down when they’re not completely submerged. This doesn’t mean they need to be in deep water. In fact, the recommended minimum depth for most underwater fixtures is only two or four inches below the waterline.
For the most part, incandescent lights still dominate in aquatic applications, and it is the lamps themselves that create the effects. It’s no small advantage that they offer controllability and the wide range of wattages needed to match the requirements of a broad range of applications – a spectrum that stretches from 75 to 1,000 watts.
|
The Maintenance Imperative Perhaps more than any elements in an overall landscape lighting program, those related to a watershape require the clearest and most committed plans for maintenance. No matter whether it’s a residential or commercial application, it is critical that clients understand from the outset that lamps will need to be replaced when they burn out, which in the case of watershapes can involve working with submerged lighting fixtures. This is such a key issue largely because when one lamp goes dark, it inevitably leaves a “hole” in the composition that can in many situations ruin the visual effect.
Maintenance in these cases requires either the ability to remove the fixture from the water or the ability to access it in place, which means in the latter case that you either have to drain the body of water or get wet to change the lamp. In large bodies of water with multiple underwater fixtures, it’s not unusual for maintenance to require two people and a small boat: One person will steady the boat while the other pulls a fixture to the surface and changes the lamp. In other cases, maintenance requires wading or swimming to the feature – which in extreme cases can involve the use of scuba gear. Given the significance of good maintenance routines, clear communication about lamp replacement and setting up expectations about exactly what will be involved (and how often) is of critical importance – certainly something that should be discussed very early in the design process. — J.L.M. |
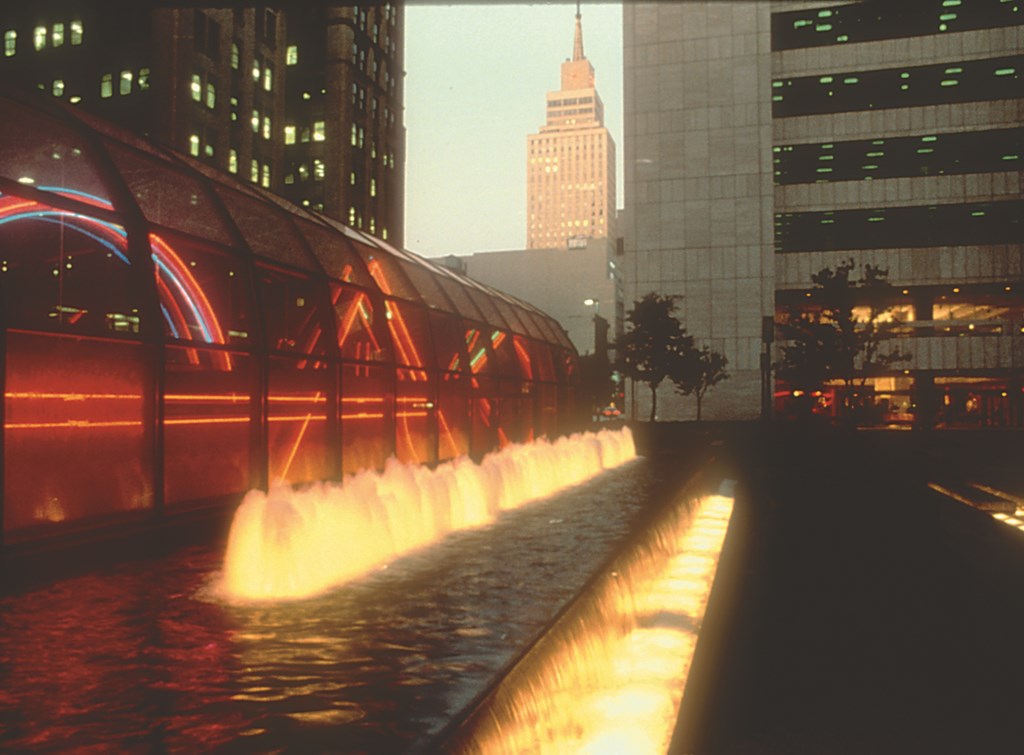
The height and width of a watershape will determine the wattage and beamspread of the selected lamp. Tall falls and fountains require high wattages and spot distribution, while a floodlight approach using somewhat lesser wattages will work well with single-jet effects or groupings of small multiple effects where there’s basically a one-to-one height-to-width ratio in coverage. A third option is wide beamspreads, which work well with large, multi-jet configurations using two-to-one height-to-width ratios.
Lest anyone forget, maintenance is always an issue in designing systems that use incandescent underwater lights. (For more information, see the sidebar at right.)
As an alternative, fiberoptic lighting has become far more popular for underwater applications in recent years. I still prefer incandescent lights for their flexibility and the warm appearance of the light itself, but there’s no question that many projects benefit from the use of fiberoptic technology.
For starters, the myriad safety issues and restrictions that attend the underwater use of incandescent fixtures are not factors when it comes to using fiberoptics, mainly because none of the electrical components are located in the water. Furthermore, fiberoptic lighting is quite wonderful at creating subtle pinpoints of light or for banding pool perimeters – but less wonderful in creating drama of the kind usually desired for waterfalls or sculptures.
ABOVE AND BEYOND
Lighting a watershape from beyond the water is generally easier than working under the water. For one thing, it has the advantage of giving you the opportunity of avoiding high-cost, heavy-duty fixtures. It also usually involves a less-complex installation process and ultimately requires simpler maintenance.
The effects to be created are generally quite effective, but it’s my view that they are often far less dramatic (or subtle) than those that can be developed by fixtures placed in the water itself.
|
Lights and Fish Underwater lights can have significant effect on the health of fish. There are two key issues here: First, fish need to be able to escape the light and are no different from humans in needing dark refuges. (Just imagine living in an environment where it was never dark – what torture!) This is not much of a problem in pond systems where, for example, a waterfall is lit from within a body of water that is otherwise mostly dark. In a situation where the surface of the water is lit from outside, however, the designer needs to be aware of the fact that darkened areas must be provided to accommodate the fish. Second, consideration must be given to temperature and the heat generated by lighting fixtures – incandescent ones in particular. In areas with heavy concentrations of fixtures, the increase in water temperature can adversely affect the fish. To be sure, neither issue is of much concern in truly large bodies of water, but it is something to consider where fish are asked to share a small space with numerous lighting fixtures. — J.L.M. |
Agitated or aerated water will capture more of the light you shine into it than will still surfaces or clear sheets of falling water. Indeed, aerated water will glow even as it reflects some of the light, creating what can be a beautiful, sparkling surface. And don’t forget that flat surfaces offer great reflections of lit objects arrayed around a pool!
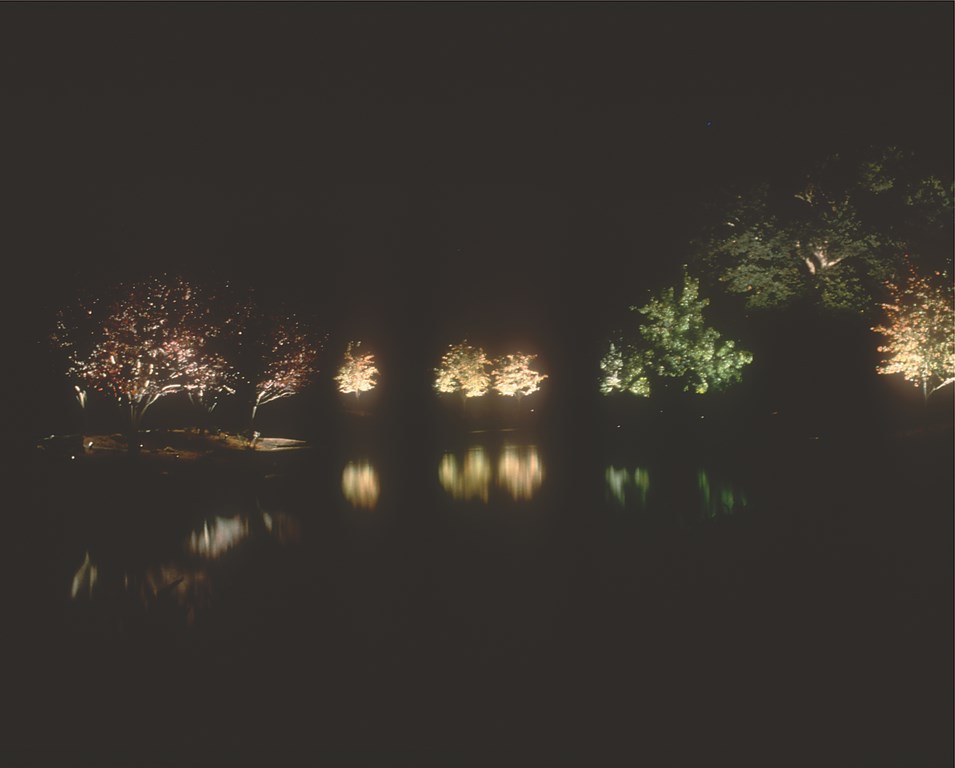
For the most part, water illumination is achieved through use of down-lighting with fixtures mounted on nearby architectural structures or trees. There are, however, situations in which fixture are best mounted at ground level and aimed up at a waterfeature – an approach often used to good effect with waterfalls or multi-tiered fountains, for example.
One of the common mistakes made in lighting water from outside has to do with glare. This phenomenon can be terribly distracting and can greatly diminish the appreciation of lighting effects in watershapes. What’s needed is careful control of aiming angles to no more than 35 degrees above the horizontal axis or use of louvers to shade the lamp and minimize direct light transmission.
Another great effect of stepping outside the water to work on lighting effects is budgetary: When lighting from beyond a watershape, any outdoor lighting fixture can be used – typically good news for clients’ bank accounts.
Whether done inside or outside the water, however, it’s important to note that the lighting of watershapes is far more challenging than general landscape lighting. Truth be told, the achievement of sophisticated and truly dramatic effects can require practiced expertise that goes far beyond any discussion of the fundamentals contained in an article such as this one or even in an entire book.
| What’s a pretty picture during daylight hours can become even livelier and richer when the sun goes down – and the nighttime effects in particular will invariably work best where planning for them occurs in the earliest phases of the design process. |
You can nonetheless design appealing effects by stepping back, taking your time and fully considering the range of options you have right from the outset. It can also pay to know when to seek help from lighting suppliers or professional lighting designers. No matter how it comes together, the most important point to consider is that lighting cannot be an afterthought!
When you weigh the possibilities and align them with the desires and objectives of your clients as well as the needs and potential of the setting – and fully discuss those possibilities and potentialities during the planning stages of the project – you can build a systematic lighting approach based on clear objectives. When that happens, you will be far likelier to find that your best watershapes take on their greatest character and beauty mainly when the sun goes down.
Janet Lennox Moyer is founder and principle designer for MSH Visual Planners, a landscape-lighting-design firm in Brunswick, N.Y. She started her career as an interior designer for commercial and residential clients before shifting her focus exclusively to landscape lighting in 1983. Since then, she has designed a broad array of highly prestigious projects worldwide. In 1991, she wrote The Landscape Lighting Book (John Wiley & Sons, Inc.), the second edition of which will be published in 2005. Moyer has lectured extensively and is widely considered one of the world’s foremost experts in the field of landscape lighting.