


The Making of a Great Wall

Retaining walls are used for one simple reason: to hold something back. Whether you need to terrace down to a lower yard, hold up a house on a hillside lot or provide a level area for watershape installation, these walls are indispensable when you lack the room needed to grade a sloped area gradually.
Of course, this notion of holding back the forces of ground movement is no small challenge, and proper engineering and construction are critical. Do the job well, and a retaining wall will hold up indefinitely. But if you cut corners or don’t take prevailing soil conditions and geology into account, chances are better than good that you’ll be called back to the site, this time to deal with a disaster.
The key to success is working with each site on its own merits and making decisions appropriate to its unique characteristics. Once those practical decisions are made, retaining walls themselves come in an infinite variety of shapes and sizes – and can become a significant design element within the overall project. However you treat a given wall – strictly for support or as a thing of beauty – your goal is always the same: Build it to stand the test of time!
KNOW YOUR GROUND
The way you build your retaining walls depends entirely on your area’s prevailing soil conditions.
Absolutely, you need to understand what you’re dealing with in terms of soils and geology before you can even begin to engineer and build adequate walls. Yes, you can work with your knowledge and experience if you’re certain of the soils composition of the slope you’re holding back, but in many cases, you just can’t do the job right without a detailed soils report.
At least half of my projects involve a wall of some kind. These vary from critical load-bearing walls or terraces that provide access to doorways all the way through to free-standing stone walls. I’m careful even with the free-standing walls, because my area of operations in upstate New York offers a range of conditions from silty sand up near Lake Ontario to hard clay or gravel-rich soils in glacial deposit areas south of Rochester. We even encounter slate in the area around the Finger Lakes.
|
Choosing a Material Retaining walls can be made successfully with a broad range of materials. From wooden timbers or pre-cast interlocking systems to steel-reinforced cinder-block walls or walls made of natural stone, just about any construction material can be used so long as the fundamentals of wall design are observed. As I mention in the accompanying article, I prefer working with natural stone, mostly because I find it the most aesthetically pleasing of the options. That’s not to say I don’t work with interlocking materials, because I frequently do and find they can result in beautiful wall systems. Cinder blocks work well, but can be unusually labor intensive, so I work with other options first. Many customers like the idea of retaining walls made of timber for their cost and ease of construction, but I generally advise against this material because it deteriorates faster than any concrete or stone material. It’s important to note, however, that a timber retaining wall properly engineered and installed will last far longer than a concrete or rock wall that’s not engineered for the soil conditions! – B.Z. |
Given this spectrum of soils, we are cautious about making any assumptions – even though we probably have the knowledge and experience to tackle virtually any circumstance we might encounter: Often, it just makes sense to involve another set of eyes, and the knowledge that a soils engineer brings to a site evaluation far outweighs the cost of bringing one aboard and any delays his or her involvement might cause.
For my projects, I end up calling in an engineering service whenever I am the least bit unsure of soil stability. (I’ve also found that calling in an expert helps in cases in which my clients may think I’m suggesting extraordinary measures simply to pad my bill rather than to serve their best interests!)
As a last step before we begin designing the wall, we consider what the engineers call angle of repose – that is, the angle from the horizontal at which a pile of soil will settle if left on its own. Each different soil type has its own angle of repose and its own influence on wall design.
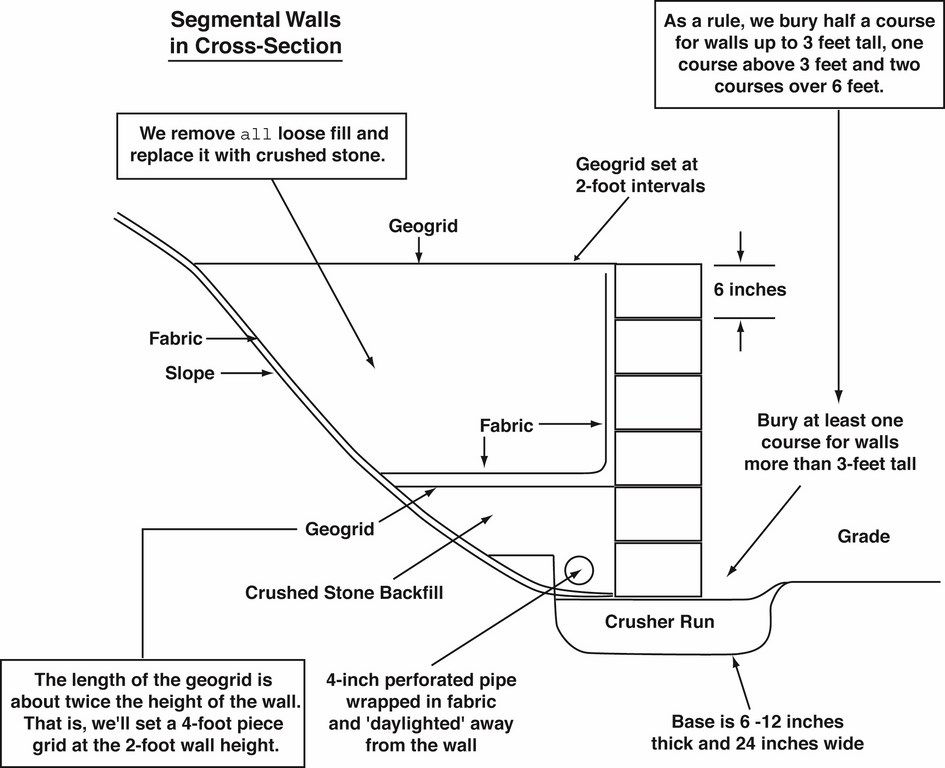
We always design our walls so they are retaining only the material we backfill. In other words, we don’t cut into the angled “pile” of soil, so the only material the wall is supporting is our backfill material (mostly crushed stone), which has almost no moisture-retention capacity nor any potential for movement.
Once we’ve studied the angles and all the soil specifications are known, then we can begin drawing up plans based on what we’ve learned along the way. Soil conditions have a lot to say about how we proceed: If we’re faced with pure clay, for instance, we’ll go to great lengths to make sure we have an adequate base and a good drainage plan; we’ll also worry about frost-heave, which can do an incredible amount of damage in this sort of soil.
Things are different if we’re working in gravel-rich soil: They carry almost no water, so drainage isn’t generally an issue and they do not experience frost-heave so much – our most pressing concern in the Frost Belt. The point is, we have to know what we’re working with to make these decisions with confidence!
BASIC ELEMENTS
Once you know your soil conditions, it’s time to focus on the fundamentals and the three main factors of building a wall:
[ ] Base preparation: There’s one thing you can always count on: If its base is not properly prepared, just about any wall will settle.
To avoid this problem, you must dig down to solid, undisturbed soil, then add a base material and tamp it to a 95% compaction level. (We use what is known as “crusher run” here in New York; this stone material is so stable when compacted that it’s used under driveways and concrete slabs.)
Adequate compaction is crucial: This base is what keeps the wall level as it withstands the stresses and strains of the pressure behind it. Once we reach solid, undisturbed soil, we’ll dig down another six inches or so and set our pad, working in 4-inch lifts and tamping each layer with a walk-behind plate tamper. (In clay soils, we generally remove more soil, with gravel, a bit less.)
 Also, we bury at least one course (and sometimes two or three) of whatever material we’re using – block, stone or treated timber. We do so knowing that most of the weight of the backfill is applied to the lower sections of the wall and that the wall will have a tendency to “blow out” from the bottom if this step is not taken.
We’re also aware of what’s happened on site before we get there: I’ve seen deck crews come in and dig their standard 42-inch-deep footings right after home builders have backfilled around a foundation with 15 feet of soil – and then wonder why the deck eventually settles!
[ ] Drainage: The single most important thing that you can do to ensure the success of a retaining wall is to make certain it has adequate drainage. Water can destroy a wall with hydrostatic pressure in any region – or with frost heave here in New York and elsewhere up north.
In our area, we know that it’s absolutely essential to keep water from collecting behind the wall, so we backfill excavated areas upslope of the wall with crushed stone after laying in a perforated pipe to channel away any water flowing down the slope.
We place 4-inch perforated pipes wrapped in fabric sleeves at the base of the wall. We then bury the pipe and backfill the whole area with #2 crushed stone all the way to the top – unless, of course, there are to be plantings at the top of the wall, in which case we’ll place about a foot of topsoil on the crushed stone.
[ ] Proper tiebacks: We always work with wall systems that are tied into the slopes they’re holding. Where the base keeps the wall level, tiebacks keep the wall plumb and true.
When we build a wooden retaining wall, for example, we set up timbers known as dead men perpendicular to the wall and extending back into the slope. With precast concrete walls or walls made of natural stone, we use a product known as geogrid for this purpose. This is a woven plastic that extends into the slope anywhere from 4 to 50 feet, depending on the height and application of the wall.
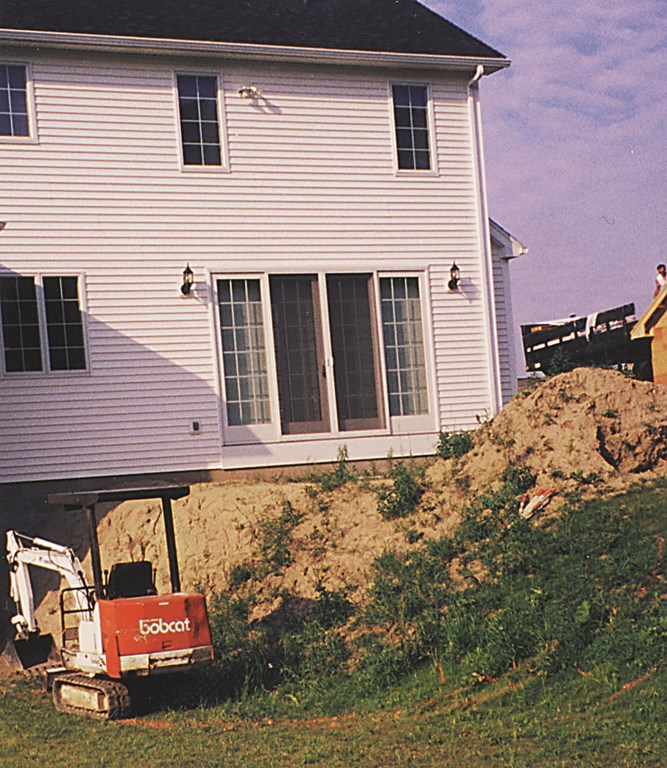

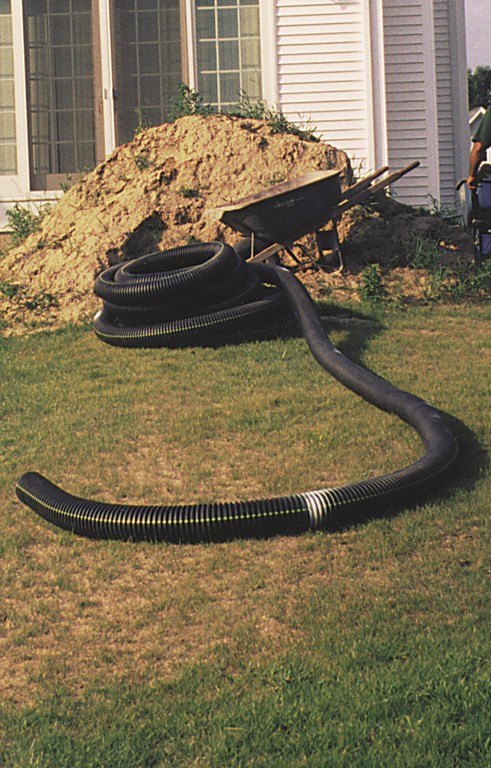
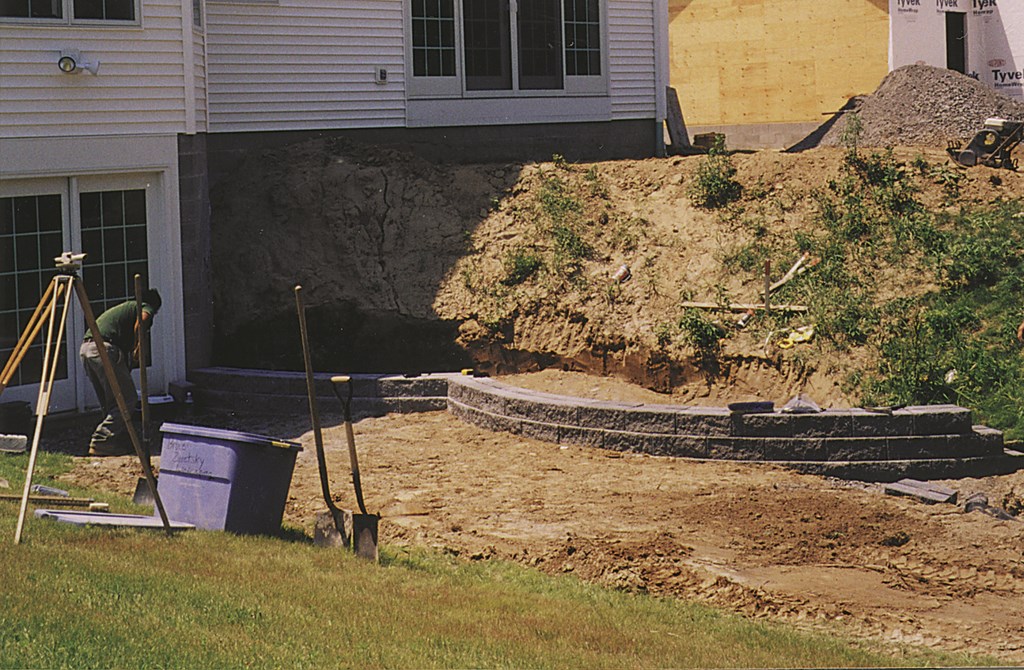
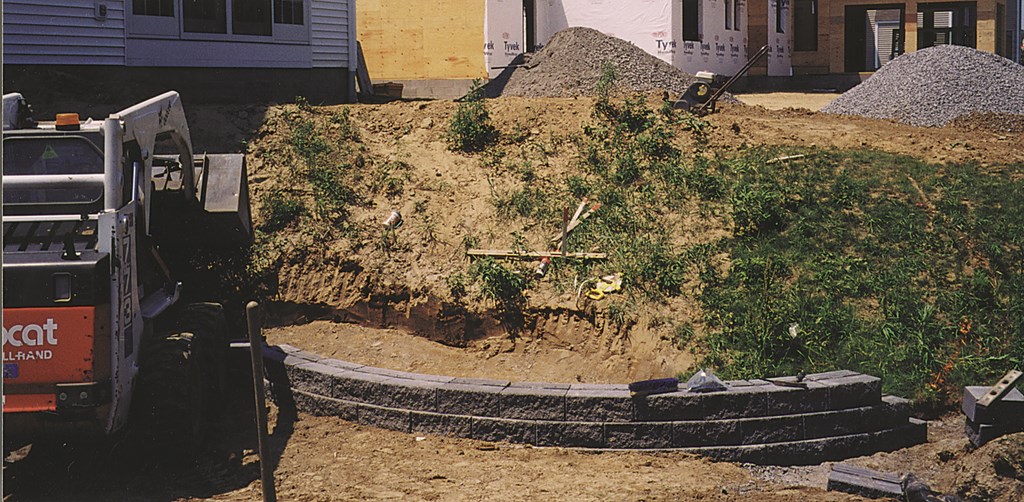
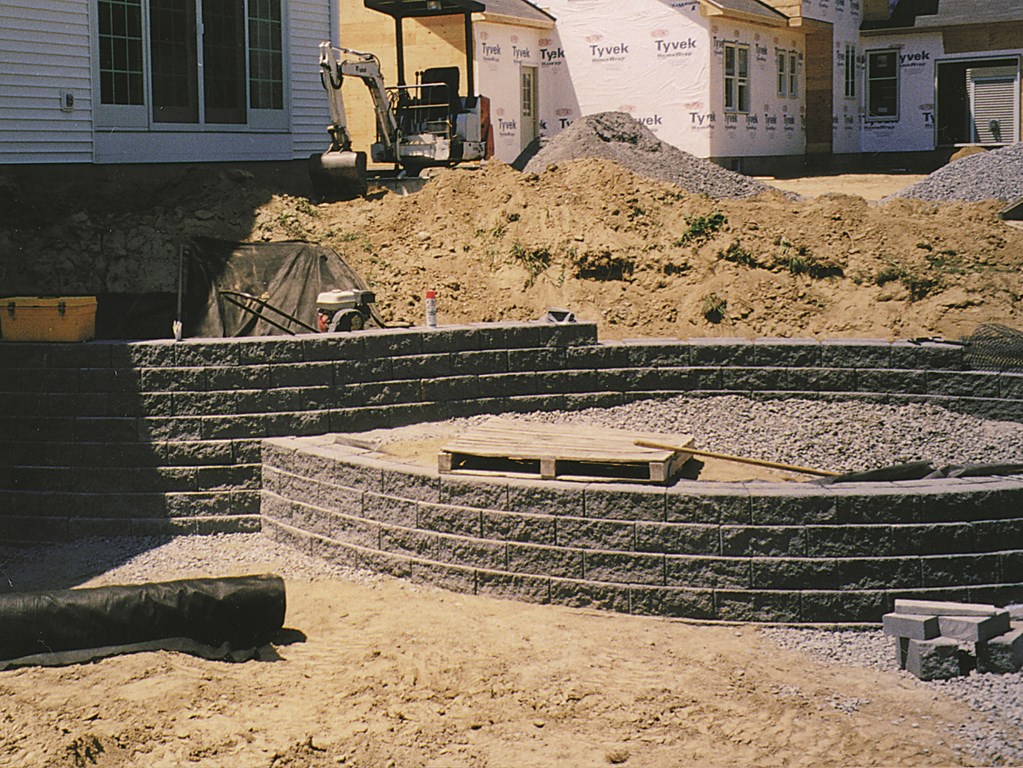
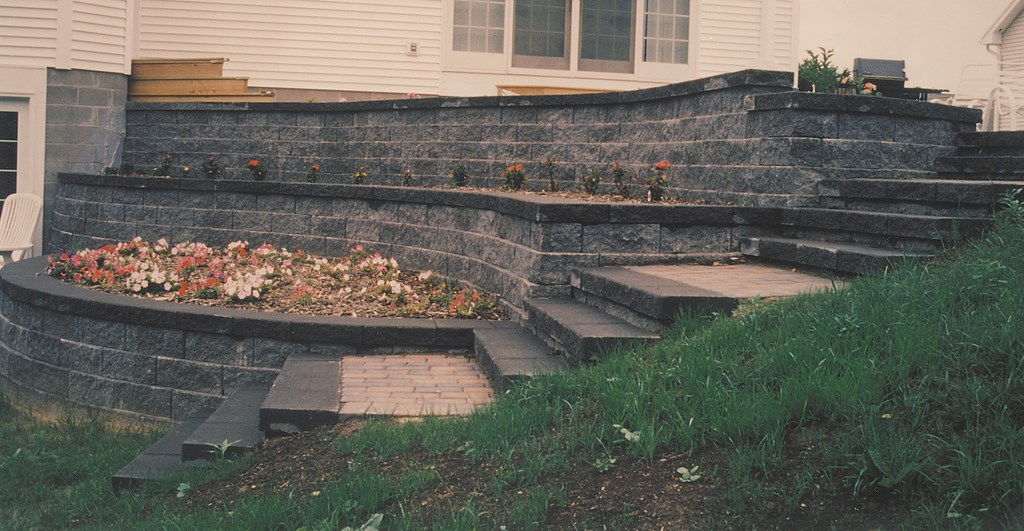
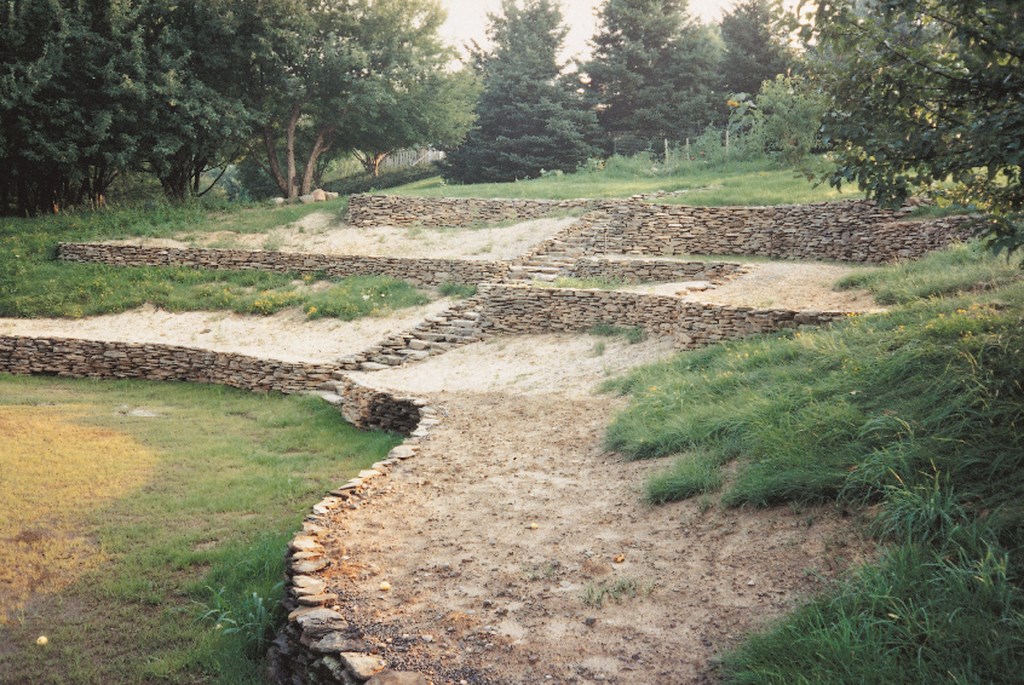
| A site like this (top left) has a clear need for a retaining wall – and the potential to benefit from a beautiful one. Once on site, we used a Bobcat to cut a trench for the wall’s base (top middle left). In the meantime, we brought out everything we needed to get the job done, including 4-inch perforated pipe to place behind the wall (top middle right). We set the crusher run, then laid the first course below grade (top right). At this point, we were ready to cover the undisturbed soil on the slope with fabric before beginning to backfill the new wall with crushed stone (bottom left). The wall rises, course after course. You can just see the fabric on the slope and the tamper we use to compact the crushed rock (lower middle left). Afterwards, the homeowners have a retaining-wall system (lower middle right) that is both functional and an asset to the property. |
The weight of the backfill on the grid helps to hold up the wall. In addition, by placing geogrid at various levels as a wall is stacked up, you’re also using the material to “separate” the soil behind the wall into horizontal components, thereby stabilizing it and minimizing the chance of slumping. Typically, geogrid is placed every two feet vertically in a segmental wall.
If a wall is built without any one of these elements adequately in place, it will fail: Poor base preparation will cause the wall to settle, poor drainage will cause the wall to blow out as a result of hydrostatic pressure or frost heave, and insufficient tiebacks will cause the wall to fall over because of the sheer weight of the soil behind it.
Often, wall failure takes time, with damage occurring gradually over a period of months or even years. Other times, however, it happens in a matter of days. (For a case study in wall failure, see the sidebar just below.)
FUNCTIONAL BEAUTY
Once you get past the planning and engineering that enable a retaining wall to do its job, you have almost limitless options when it comes to making them beautiful as well – truly an integrated element of your exterior design.
|
Anatomy of a Wall Failure If there’s any doubt about the importance of sound engineering, proper base preparation, adequate drainage and the presence of an effective tieback system, all you need to do is take a good look at a failed wall. It’s never a pretty picture, but sometimes the damage is merely unsightly – cracks and the like. Often, however, the damage can be devastating: Structures are destroyed, watershapes cracked and broken, the overall stability of the site severely compromised. No matter the initial appearances, it takes a bit of doing to figure out exactly what’s happened. To illustrate this point, let me relate the story of a site where we found a failed wall – and a variety of critical errors in design and execution. Our firm was called in to bid on replacing an old railroad-tie retaining wall. The job went to the low bidder; we were then hired to replace what they’d installed – and the client ended up paying nearly twice what they would have spent had they hired us the first time around. The failed installation was a double-wall system featuring a 4-foot exposed lower wall backed up by a 4-foot exposed upper wall. When we examined the site, we found that the previous contractor had made critical mistakes in all major areas of wall construction. For starters, the base of the lower wall was set directly atop the crusher run and had not been buried beneath the ground. Also, the backfill was “blow sand,” a cheap fill material, rather than gravel. It had a moisture-retention factor of about 19% – not good in the face of freeze/thaw conditions. For its part, the upper wall had been placed on sand and had settled before falling over. As we progressed through demolition, we also found that the system had been installed without tiebacks or geogrid behind a huge, failed section of the upper wall. Finally – and to our amazement – we discovered that the previous contractor had routed the runoff from four downspouts from the roof gutters directly into the area behind the lower wall. In other words, a good portion of the roof’s drainage was being added to any usual drainage in the critical area behind the wall. Disastrous! Working with an engineering consultant we brought in, we rebuilt the wall with a proper base (crusher run a full 28 inches below grade and two courses of blocks buried below grade). We also laid lengths of geogrid at specified elevations for both the upper and lower walls. Most important of all, we carefully tamped the crushed rock behind the lower wall to provide proper support for the base of the upper wall. Each wall now has two buried runs of drainpipe to carry away water. And, of course, we redirected the down spouts to carry the water far away from the base or back of the wall! – B. Z. |
Yes, walls serve a purpose in holding up a slope or a driveway or a swimming pool, but that’s no reason to make them stout, plain and featureless. In fact, we go out of our way to make them as attractive as possible, which means designing them to fit into the site just like any other architectural element. An old home, for example, probably deserves a stone retaining wall to support a rustic effect. By contrast, a modern home might call for a wall with a bright, seamless plaster or stucco finish.
Given my preferences, I most enjoy working with natural stone. We’ve kept up with the times, riding the wave of pressure-treated timbers through the ’80s and the fashion for segmented wall systems through the early ’90s – but to my mind, nothing beats the timeless, adaptable look of natural stone, especially when we’re working on or around naturalistic watershapes. Our aim here is to use indigenous materials and make our new work look as though it’s been around forever.
We also use retaining walls to define and separate zones in our designs, often associating them with steps that provide access from one level to another or setting them up at the end of pathways as seating areas. They can also be set up as extensions of raised bond beams – or serve as substructures for rock and waterfall features. Tall walls can be an aesthetic challenge to the designer, but they can be adorned with decorative materials to provide dimensionality, break up the expansive surface and provide a dramatic framework or backdrop.
However you choose to incorporate them in your work, it is critical to do everything you can to keep your eye on the ball and make sure your retaining walls are able to do the job of holding back the slope – and thus forever avoiding the day when you receive a distress call from your clients complaining that their backyard is falling down around them.
In that context, any wall built so that it does its job is truly a great one.
Bruce Zaretsky is president of Zaretsky and Associates, a landscape design/construction/consultation company in Rochester, N.Y. Nationally recognized for creative and inspiring residential landscapes, he also works with healthcare facilities, nursing homes and local municipalities in conceiving and installing healing and meditation gardens. You can reach him at [email protected].