


Stone Stepping

Stairs, to borrow an immortal phrase from Rodney Dangerfield, “get no respect.”
In fact, if my observations through the years tell me anything, the stairs set in far too many landscapes are strictly utilitarian objects – no more than a means of getting from one level of a space to another. The only thought that seems to go into some of them has to do with avoiding trip hazards, which is important but hardly the most aesthetically oriented of approaches to take.
In my experience, when stairs are considered in deliberate and creative ways, they can become much more than a conveyance and can indeed lend a great deal of beauty and unique visual interest to almost any setting. You can’t lose track of their functionality, of course, but I’ve always seen them as an artistic detail and do what I can to respect them in that spirit.
This is particularly true for me when I turn to any number of stone treatments to create the treads and risers and have the wherewithal to focus on offering my clients graceful vertical transitions as well as the means to pass among the levels of their gardens.
ELEVATED TRADITION
To be fair, not all steps are treated shabbily. Many architects, for example, design spectacular, grand staircases for upscale homes and make them a vital part of the architectural program. In landscapes, however, too many designers seem to look at slopes and think, “We need a set of steps here” instead of recognizing that these slopes present them with opportunities to create stairways of great beauty.
Sometimes steps don’t have to be anything more than an informal set of stone slabs placed throughout a garden. In other cases, they can be central features in formal landscapes – luxurious affairs made with incredible, hand-cut stone and fitted with broad treads, elaborate railings and strategically placed landings. Either way, if they are built to fit the site and harmonize with a home’s architecture, your clients may be so distracted by their magnificence that they will never notice all the exercise they’re getting in climbing them.
The prime design principle I apply with garden steps is that they should never be daunting or off-putting. That is, they shouldn’t look too steep or in any way seem treacherous, nor should they be visually jarring; rather, they should draw observers to them and invite people to climb their risers, alight on their treads and experience their stability.
In that light, even though I’m generally one who ignores conventional approaches when it comes to landscape design, steps are a specialized functional detail that involve a couple sensible rules of thumb:
[ ] They shouldn’t be too steep – risers never more than eight inches high and preferably no more than six. [ ] Treads should be proportional to the risers – the shorter the riser, the longer the tread. [ ] There shouldn’t be too many steps before a level landing. (My personal preference is such that I rarely set up more than five risers before inserting a landing.) [ ] Steps should be impressive enough to deserve the time anyone invests in climbing them.With those points in mind, there are numerous options when it actually comes to building steps into landscapes.
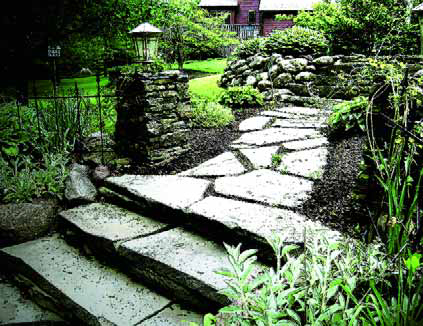
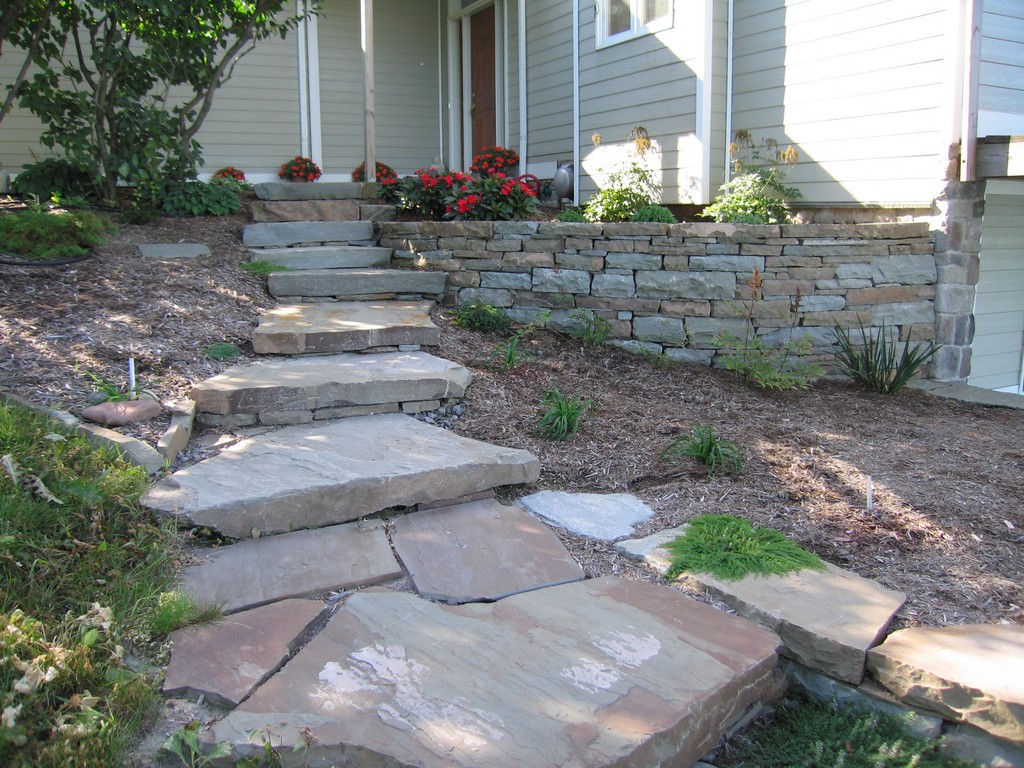
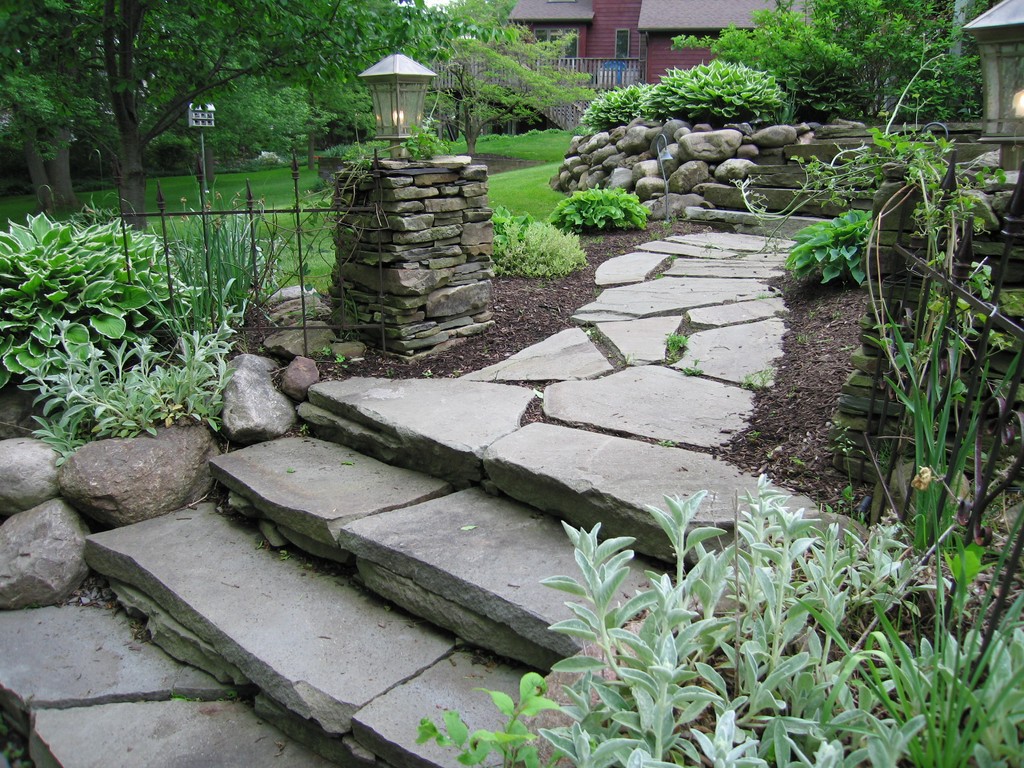
One of the simplest treatments involves cutting out level treads in a slope and either planting them with grass or a groundcover that can withstand the foot traffic. Or, for a nice, informal look, you can cut those same level areas and place stone slabs of somewhat uniform thickness as treads. Precast concrete materials also work, as do mortared treads of brick, stone or any other material (including wood and composites) that work in your particular climate zone and with your particular design. There are also tread-and-riser systems made of stacked stone capped with a flat bluestone or flagstone.
I use the plain-stone-slab approach quite often when traversing levels through gardens: It’s beautiful, natural and hits all four of the key criteria listed just above. It’s also a cost-effective approach with respect to both materials and labor – provided, of course, that you have access to small skid/steer loader or can enlist a number of strong backs. I love the look of a set of these slabs rising amid plants: Done right, they can look as though they are bedrock that has been exposed by generation upon generation of climbers.
VERSATILITY
Sometimes, of course, a setting will call for a more formal or structured look.
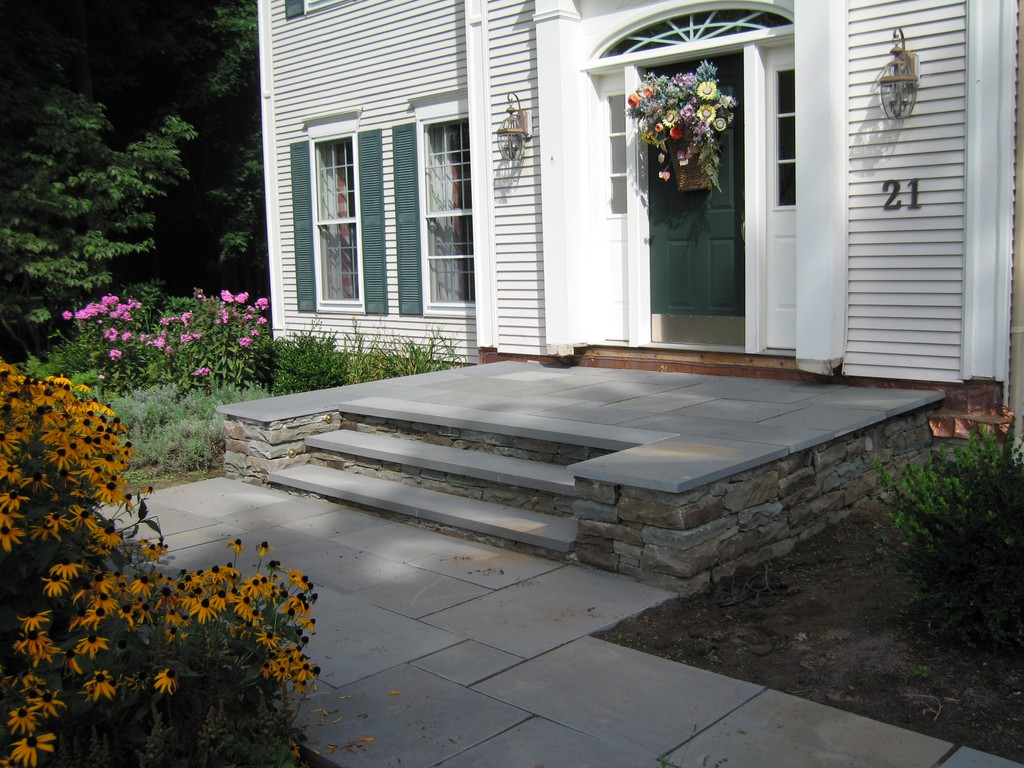
Each year, we build (or rebuild) quite a few terraces leading to our clients’ front doors. In these cases, we always defer to the architecture of the home in the belief that the surrounding landscape should harmonize with it. (In fact, the only time I’ll diverge from that commitment is when a client specifically asks me to do so.)
Thus, if I’m working in front of a brick Colonial, the entry porch will be brick, too – at least with the risers in the event we select some other surface material instead of brick. (I love the look of bluestone and brick together: They have a timeless quality to them, so in many cases I’ll surface a terrace in Bluestone and use bricks for the risers.)
When I’m not using bricks in these formal contexts, Bluestone is often my first option: You can buy it in many sizes and shapes, and for steps, I frequently use what are called Bluestone treads. These come in varying depths, from 12 inches up to whatever size you might need, and are generally two inches thick.
| An informal approach to stone steps involves cutting into a slope and placing stone slabs as treads. I set them up so the riser height is approximately uniform from top to bottom of the stairway; I also try to find slabs of uniform thickness to lend a sense of visual balance. |
For the most part, I use treads that are 12 or 14 inches deep. This works out quite comfortably in most situations, because I like my risers in landscapes to be no more than six inches high unless the slope or some other factor calls for a higher one. These treads, which can be found up to eight feet long, form a solid, stable step at the point where most people want to place their feet as they climb stairs or step up onto a terrace.
When the entry requires a larger terrace, I’ll use the 12-inch treads as a sort of capstone atop stone or brick risers, then fill in behind them with various sizes of cut bluestone.
While my preference is natural stone, I’ve used many of the precast concrete products on the market today. Versa-Lok (Minneapolis) and Keystone (Oakdale, Minn.) have been around for many years now and their lines have improved significantly in both looks and versatility. Many of these include modules designed specifically for use as steps at a variety of riser heights, and because they are modular, it doesn’t take a tremendous amount of experience to install them.
Again, that’s not my first choice, but these products have their place, tend to be cost-effective and, in recent years, have gained significantly when it comes to aesthetics. Indeed, several of these suppliers now offered “tumbled” products that come reasonably close to mimicking real stone. No professional will be deceived, but these products definitely appeal to clients on a budget and deliver consistent, satisfactory results.
As a final option, you might consider pouring concrete steps. I don’t do so myself very often, but when I do, I fully exploit the material’s ability to be textured, colored, acid-stained and formed into virtually any shape imaginable. I’ve even begun using stamped concrete for walkways and pathways in certain situations and have come to appreciate its place in the landscape.
PROPER PROPORTIONS
No matter which material or style you choose for your steps, the most important consideration is making certain they “fit.”
That word, of course, has at least two meanings in this context: First, you need to make sure the steps don’t look like they were plopped in to the space; instead, they should seem as though they were unearthed on site and have proportions suited to the space. Second, they must be designed in consideration of human scale and must be carefully thought out and properly designed.
That first point is a given in any landscape design, but as mentioned above, in my experience far too many stair systems seem to be no more than afterthoughts – and carelessly done at that in aesthetic terms. The second point is more practically oriented, so let’s focus on that one in more detail.
In building steps in the field, you need to give careful thought to the relationship of the rise to the run. The two most common mistakes I’ve seen have to do on the one hand with providing too great a tread depth (in one memorable case, an average-size person would have to take one full step and then a short, foot-shuffling step to reach the next riser) and, on the other, with arranging things so the user steps up with the same foot every time – a tiring, disconcerting process.
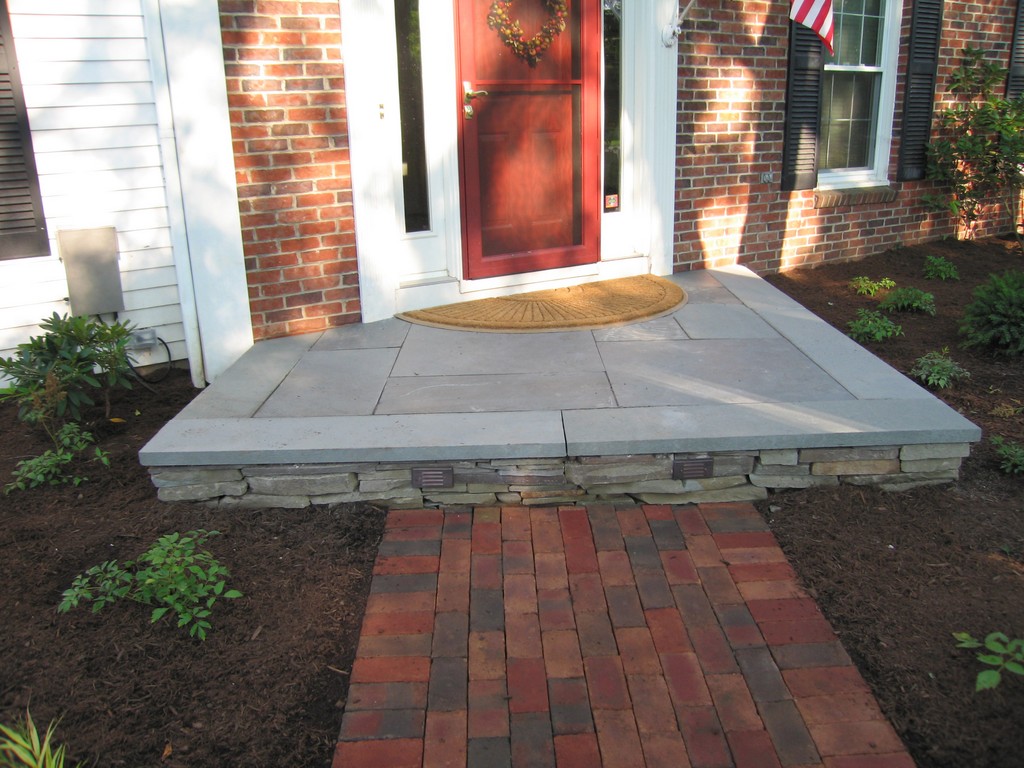
| We work on lots of properties with classic Colonial styling and, often, lots of red-brick details. When I don’t use bricks for steps, I like using Bluestone instead: It’s color and visual texture harmonize perfectly with the architecture and work very well in combination with brick. |
The most comfortable steps allow you to proceed upwards (or downwards) with a natural stride and have you alternating feet as you go, whether it’s a normal staircase or a series of landings. To avoid any problems here, in laying out steps for installation, I’ll always pace off the steps and landings and mark where my opposite foot wants to step up: This is where I’ll place my next step.
I don’t find them to be terribly helpful, but there are formulas used in the step-construction world to determine tread depths based on riser heights. The most common says “tread depth + 2X riser = 27.” Thus, if you want to build a set of steps using a uniform set of six-inch risers (such as a six-by-six pressure-treated timbers, for example), that works out as 27 – (2 x 6) = 15-inch tread depths.
If I use such formulas, I look at them with a bit of flexibility based on experience, instinct and the specific requirements of the site. While I might start with the guideline, in other words, what I pace out in the field is always my best measure in finalizing tread/riser relationships. Sometimes a six-inch riser works beautifully with just a 12-inch tread depth – or maybe it takes 18 inches under slightly different circumstances.
In fact, when I’m working with rough-cut stone (which I often do), I know the material will rarely have anything approaching uniform heights and depths. In those cases, I start by seeking out the most uniform heights, then tweak the stones as needed to get the depth I want. In doing so, I keep all risers at whatever final height within a half-inch range: The biggest mistake anyone can make with steps is to have noticeably inconsistent riser heights!
DOWN TO DETAILS
The whole area of riser heights is actually pretty interesting – especially when you consider them in light of the needs of specific clients. Riser heights of less than four inches are seldom a good idea in general because they present something of a trip hazard rather than a practical rise – but the problem is even more pronounced if your clients are tall.
In some areas, of course, riser heights are covered by building codes. In my area, for example, risers can be no more than eight-and-a-quarter inches high (except for spiral stairs, which are a subject unto themselves).
| Whenever I set up step systems to cover extended distances, I always insert landings after a maximum of five steps. This gives my clients and their guests places to rest, take in the scenery and size up the flight of steps immediately in front of them on their way up or down. |
My general inclination in landscapes is to work with risers of just under seven inches: To my way of thinking, this allows for greater tread depths and a more casual stride in climbing a slope. By contrast, higher risers lead to narrower treads and a faster climb (or descent). That’s the complete antithesis of what I want going on in any of my clients’ garden spaces.
This focus on the way people use the steps is why, as mentioned earlier, I do what I can to keep runs of steps to five at a maximum before I insert a landing: I want to give them an experience rather than a chore. A landing affords my clients and their guests a place to rest, smell the roses, look around the garden from a unique perspective and assess the next steps they’ll be taking. And if they reach that landing with their right feet, I want to make certain they’ll approach the next step up with their left feet.
As another rule of thumb, I consider 24 inches to be an average stride of someone walking casually through a garden and set up my landings accordingly. As always, however, the specifics depend on a number of factors related to the clients and the site, so I tend to use that figure as a point of departure rather than a hard, fast rule.
One final point: Step width is a factor, too. I’ve built steps as narrow as 18 inches using small slabs, simply because it worked with that particular site. I’ve also built steps up to 20 feet wide in cases where the architecture and the site called for it. In general, however, as a matter of comfort (and with some thought given to the user’s sense of physical security), my preference is to make stairs at least three feet wide in gardens.
As I’ve mentioned time and again in this column, what actually happens in step installation is much less about rules than it is about the site and its requirements. Steep or narrow, long and graceful or short and expansive, what it takes to get steps right is making certain they fit – not only in the setting but for the people who will use them.
Bruce Zaretsky is president of Zaretsky and Associates, a landscape design/construction/consultation company in Rochester, N.Y. Nationally recognized for creative and inspiring residential landscapes, he also works with healthcare facilities, nursing homes and local municipalities in conceiving and installing healing and meditation gardens. You can reach him at bruce@zaretskyassociates.com.