


Wiring Simplified


Although the details of a well-organized equipment pad are seldom the object of as much appreciation as are the purely aesthetic touches on a project, they are no less important to its success, says Paolo Benedetti. Here, in the latest installment of his series on design and engineering solutions to common construction challenges, he offers advice on a key part of pad organization – that is, the management of its wiring connections.
With today’s watershape circulation and support equipment becoming ever more complicated, there’s an increasing need to make equipment pads as uncluttered as possible. With that in mind, I’ve developed a few simple wiring strategies that let me keep things neat, organized and serviceable.
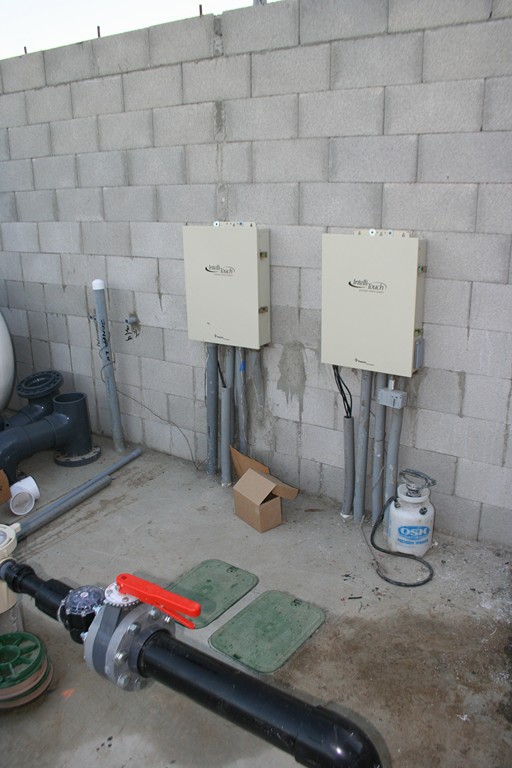
It requires some improvisation, unfortunately, because for all the efforts manufacturers have undertaken to improve product performance, in many cases they have failed to make the wiring task as easy as it should be. A classic example is found in all of the automated-control and circuit panels that just simply do not allow sufficient space or provide enough knockouts for connection of all required conduits.
The standard solution is to add wiring “gutters” around equipment pads, but that can get expensive rather quickly and is far from an elegant solution. I wasn’t satisfied with that approach, so I developed an alternative that not only saves me money, but also allows me to make an almost unlimited number of wiring connections at these panels.
GET STARTED
We begin by turning the two or four standard three-quarter-inch knockouts on the bottom of our panels into two-inch apertures. To do so, my electrician uses a knockout die from LSI/Greenlee (Cincinnati, Ohio) to create clean two-inch holes, using the existing knockouts as guides.
Now that we have a means to run larger quantities of conductors into the panel, we connect runs of two-inch schedule 80 PVC to the expanded openings. These pipes run down into the ground directly below the panel, terminating in an underground utility vault set just in front of the panel. This sub-grade box provides a clean, organized space for all of the cables that might be needed as well as a clear, clean spot to stand or kneel if the area in front of the panel is soil.
Within this utility box we terminate all of the line-voltage conduits from the equipment set, lighting systems, outdoor-kitchen fixtures and more. We may even install multiple vaults or simply get a larger vault if the project requires more than one panel. The conduits that provide the incoming power also run to this vault: Incoming conductors simply loop up into the control panel from there.
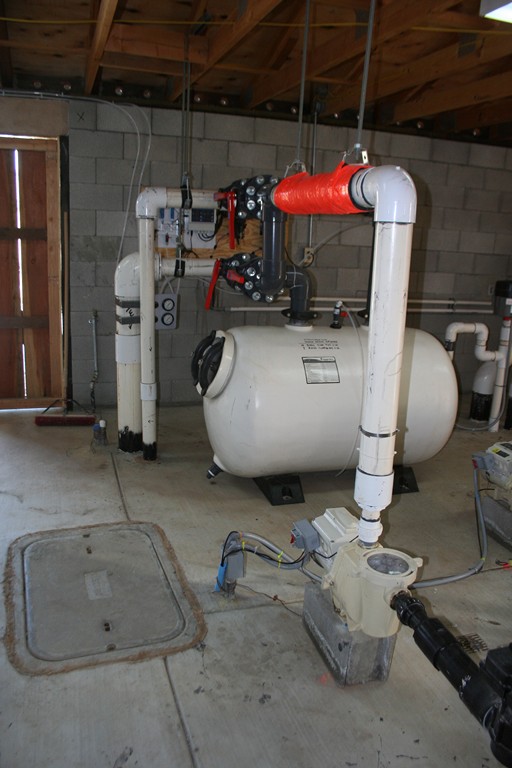
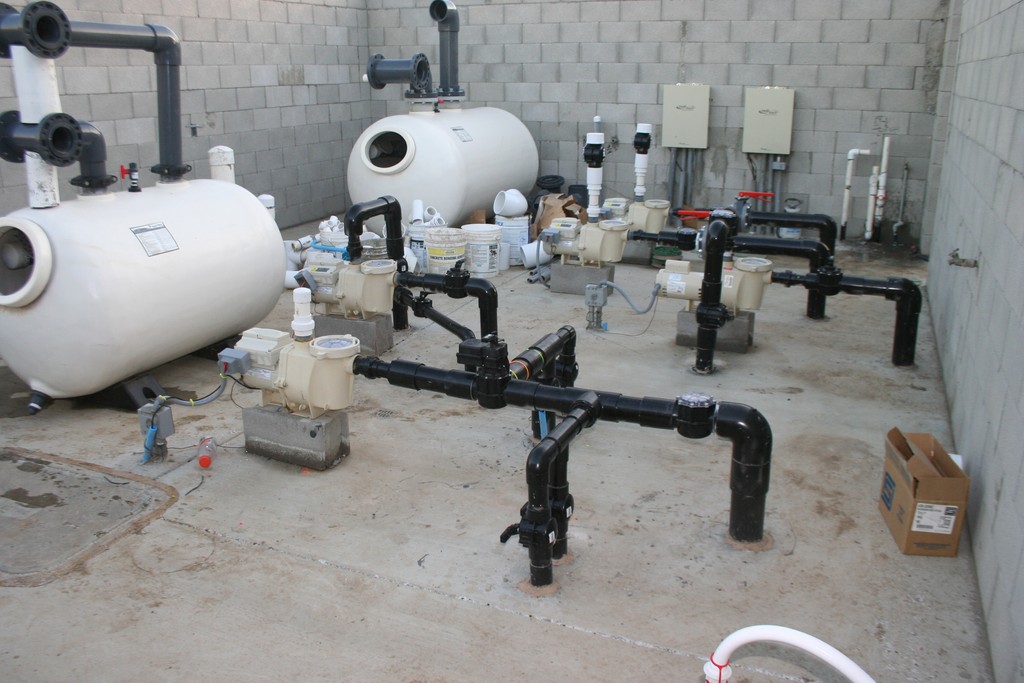
| In planning our equipment pads and their wiring schemes, we decide where the equipment and control systems will be mounted, then figure out where within the slab we need to place sub-grade utility vaults or stub up for above-grade electrical boxes. This degree of organization makes the installation process go more smoothly, but even better, in the long run it makes equipment on the pad more serviceable by eliminating clutter (and trip hazards!) and by making overall systems easier to maintain and expand or alter as need arises. |
To supply electricity to the various devices on, for example, the equipment pad, we run one-inch conduits from the vault under the pad’s concrete slab, stubbing them up between electrical components so that conduits are shared in a way that’s efficient and looks neat in appearance.
These stubbed conduits terminate a few inches above the finish grade of the concrete slab, where we top them with aluminum double-gang electrical boxes. In a second hole in the bottom of these boxes, we install one-inch galvanized pipes with caps on the bottom: These pipes are set into the concrete, which we deepen slightly in these areas, and they provide both support and impact resistance for the boxes.
The caps on the ends of the pipes are important: They prevent groundwater from possibly bubbling up into the boxes. Also, I prefer to use boxes with five one-inch holes, simply because they leave us with three additional connection points we can use as needed.
We locate bonding wires at each of these boxes (tied to the equipment pad’s steel), wrapping the “flying ends” around each box before concrete is poured to keep them out of the way. And if a low-voltage or data feed is required for one of the components, we’ll provide a conduit for that purpose as well. (More on that below.)
PULLING WIRE
Once the concrete slab is poured, my electrician pulls the requisite wiring. Any flexible conduits are attached to the equipment with the “pigtail leads” provided on one end. This end is then attached to the double-gang box, where connections are made with wire nuts within the box.
This arrangement eases the way for future servicing or removal of the equipment, simply by virtue of the fact that the wiring is not one continuous conductor leading all the way back to the control panel.
|
Planning Ahead Many of our projects take place on large estates, and I find it’s always beneficial to discuss future plans with these homeowners – even if they’re only at the daydreaming stage. I look at it this way: We’re already working on site and already have equipment and staff performing similar work, so taking the extra step of installing additional conduits and utility boxes around the perimeter of the estate (or at least around the pool area) is very cost effective. These low- and high-voltage runs allow for easy addition of future data cables, lighting runs, telephone lines or even power from photovoltaic arrays – all without incurring the need to rip up the hardscape and landscape that crews have worked so hard to install. In past projects, I’ve even roughed in gas, sewer and water lines for future pool houses, guest quarters, garages and outdoor kitchens and showers. To be sure, I have had a few clients through the years argue against the need for this work, but every single one of them has called months or years later to thank me profusely for my insistence on performing this work. In two of these cases, there would have been no way at all to insert utilities for planned outbuildings, as our work had effectively “landlocked” the property. That’s the true definition of “value engineering” – spending a few extra dollars now to save thousands of dollars later on! — P.B. |
Bonding is very important in these settings, and we give each piece of equipment its own bonding wire. I could probably save myself $50 worth of bonding clamps by looping one long conductor through the every component on the equipment pad, but the way I see it, that’s a false economy. In fact, the savings would vanish the first time I had to service the equipment.
Besides, I think it’s too risky to rely on a single loop: One breakage and everything in the system loses bond, and the wires also pose a trip hazard in a space that has enough of them without any further help. Furthermore, because the boxes are strategically placed between components, the length of flexible conduit is kept to a minimum, thereby minimizing another trip hazard and making everything more readily serviceable.
We also use this same general approach with low-voltage systems that control valve actuators and connect temperature sensors, remote keypads, spa-side remotes, solar sensors and data communications. The low-voltage side of most panels won’t accommodate two-inch knockouts, however, so we terminate the two-inch conduit about four inches below the panel. We then merely loop the low voltage wiring into the box through the factory-provided grommets.
The two-inch low-voltage conduit terminates within its own low-voltage sub-grade utility box. To ease installation of the low-voltage wiring, we use the electrical nonmetallic tubing (ENT, also known as smurf tube) available at home-improvement stores for these conduits and lay it in the base material for the equipment pad’s slab along with the line-voltage conduits.
The ENT tubing is brought up wherever I want or need a low-voltage wire, eliminating unsightly runs and the need to zip-tie wires to the plumbing. This prevents any damage to these wires that might result from the need to work on the pipes. In addition, being buried beneath the slab protects these lines from incidental damage by errant saw blades or clumsy feet.
Low- and high-voltage wiring that extends to the residence, outbuildings, solar panels, junction boxes and the like also branches out from the sub-grade boxes below the control panels. This lets us keep the wiring organized – and once it’s underground it can run anywhere. And best of all, we keep the wiring neat, serviceable, out of the way and protected.
Paolo Benedetti is principal at Aquatic Technology Pool & Spa, a design/build firm based in Morgan Hill, Calif. He may be reached at [email protected].