


Mastering the Long View

This story is an example of what can happen when preparation meets opportunity. It started way back in 2014, when the client first hired me to build an acrylic fountain at an office building she owns in the Los Angeles area.
Editor’s Note: This feature originally appeared in WaterShapes in October 2020.
She liked the results and asked me get involved at her residence in Rolling Hills, an upscale enclave on the scenic Palos Verdes peninsula overlooking the ocean, where she had a pool that was experiencing significant structural issues.
Among many other pursuits, the client owns her own design firmNina Ritter Design and had lots of ideas about what she did and did not want. We butted heads on occasion but over a few months of lively discussion, she came up with several designs, all more or less resembling what the final product looks like.
Somewhere along the line, the client lit on the near-exact design that would become the built project – but it would take a long time to get there.
START & STOP
Work began early in January 2015 and at first seemed to go smoothly enough. Our geologist said we needed to rebuild the entire hillside below the pool, which was a monumental task. It was also why the original pool failed. Unfortunately, we ran into some strong head winds from the local building department and in late 2015 she tabled the project for the unforeseen future.


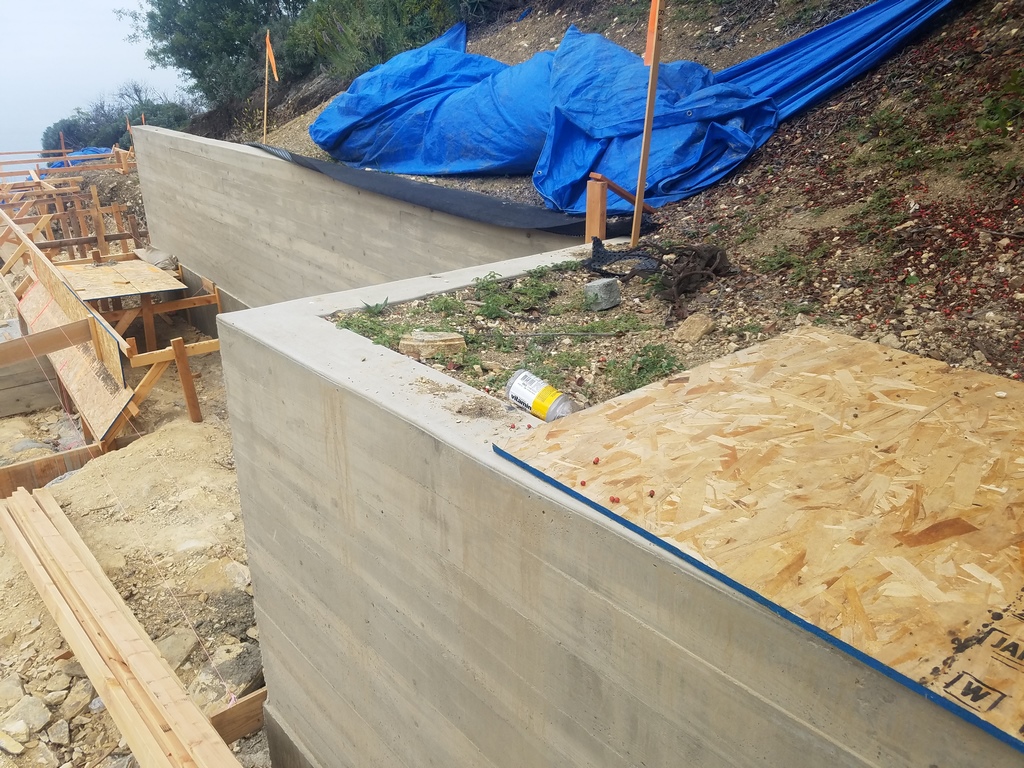
| The geology and soil conditions of the site required rebuilding the slope and pouring a massive solid concrete foundation, and a system of retaining walls to keep everything in place on the geologically active site. |
As it turned out, the delay was a true silver lining. Basically, after 17 years of standing on the fence about taking advanced watershaping classes, there was finally one that was nearby and fit my schedule, as well as my pocket book. It was the initial offering of a new renovations class, and in hindsight the program was one of the more important classes I took.
From the time the project was set aside until I was brought back in, I went through an educational process that changed how I approach my work as a watershaper. By the time the client wanted to get back on track with the project in 2018, I had evolved to the point of being more qualified for the challenge than I had been in the past. I was armed with pure knowledge about the “hows and whys” you do certain things, as well as why you avoid certain things when building watershapes.
When I came back onto the scene, there was a landscape designer in the process of reconstructing the slope and doing some other work on the property. We picked up the process with the design scheme of a long, curvilinear pool with a broad vanishing edge that would highlight the ocean view. (She originally considered using acrylic panels for the vanishing edge wall, but eventually decided against it.)
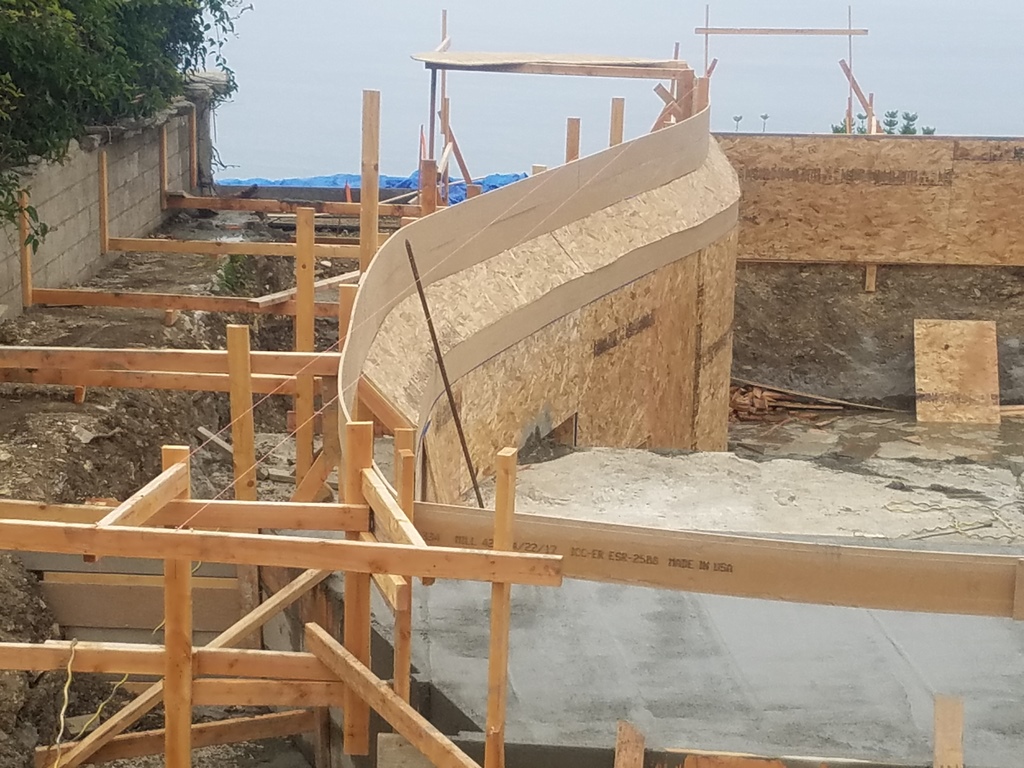
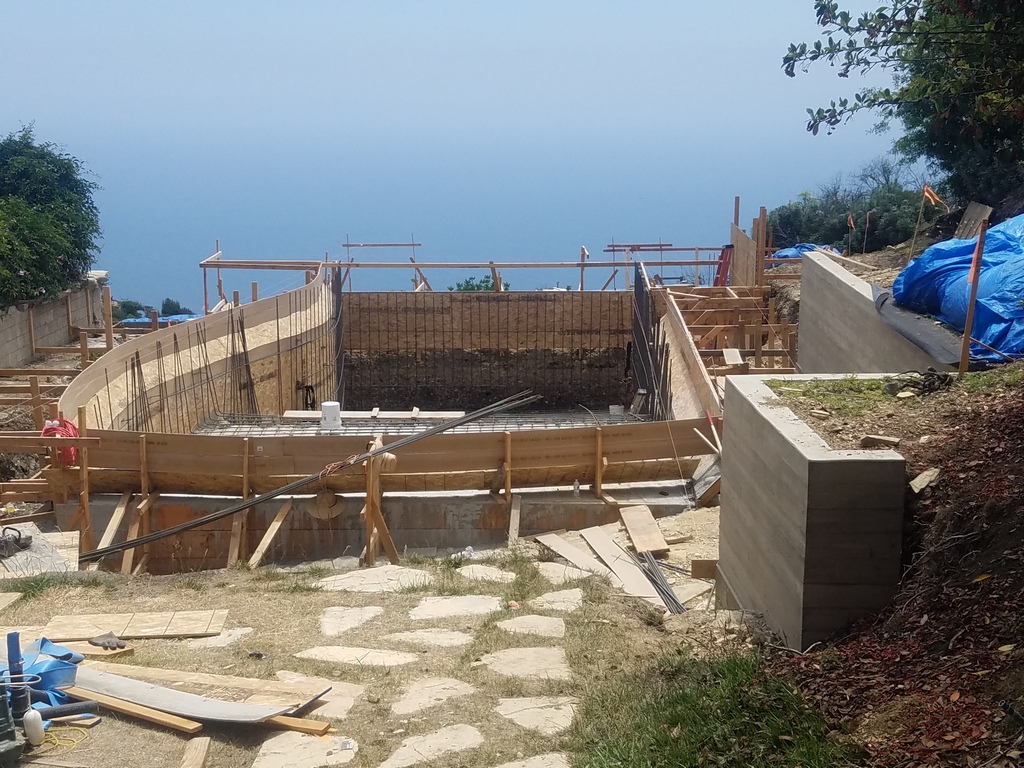
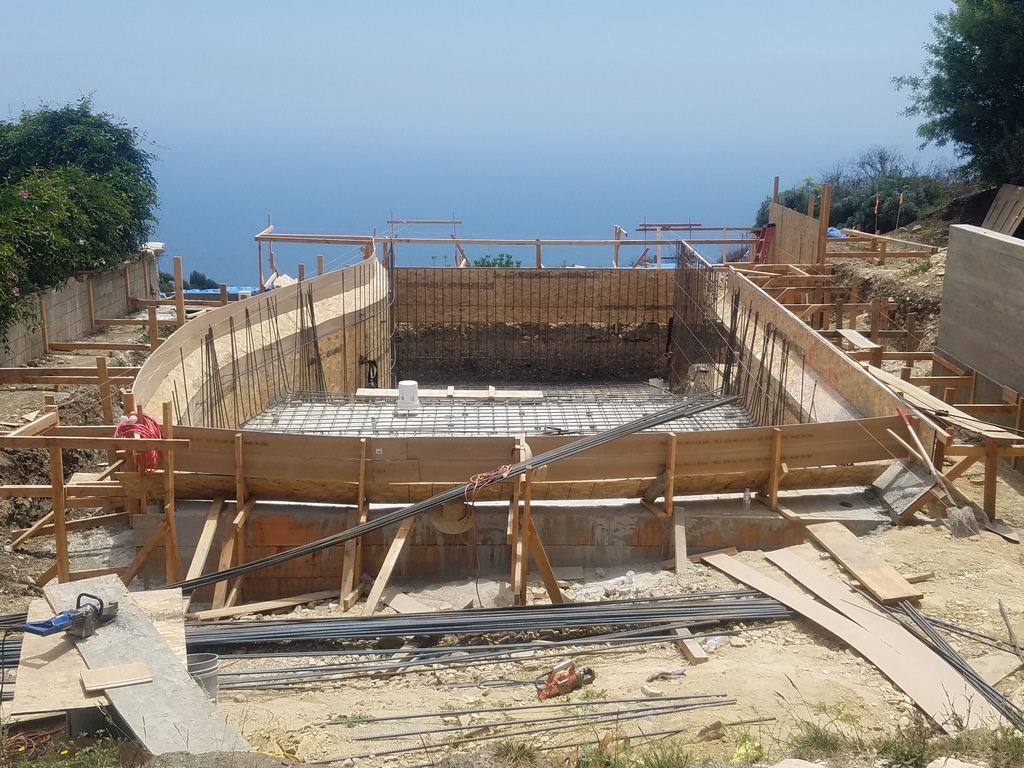
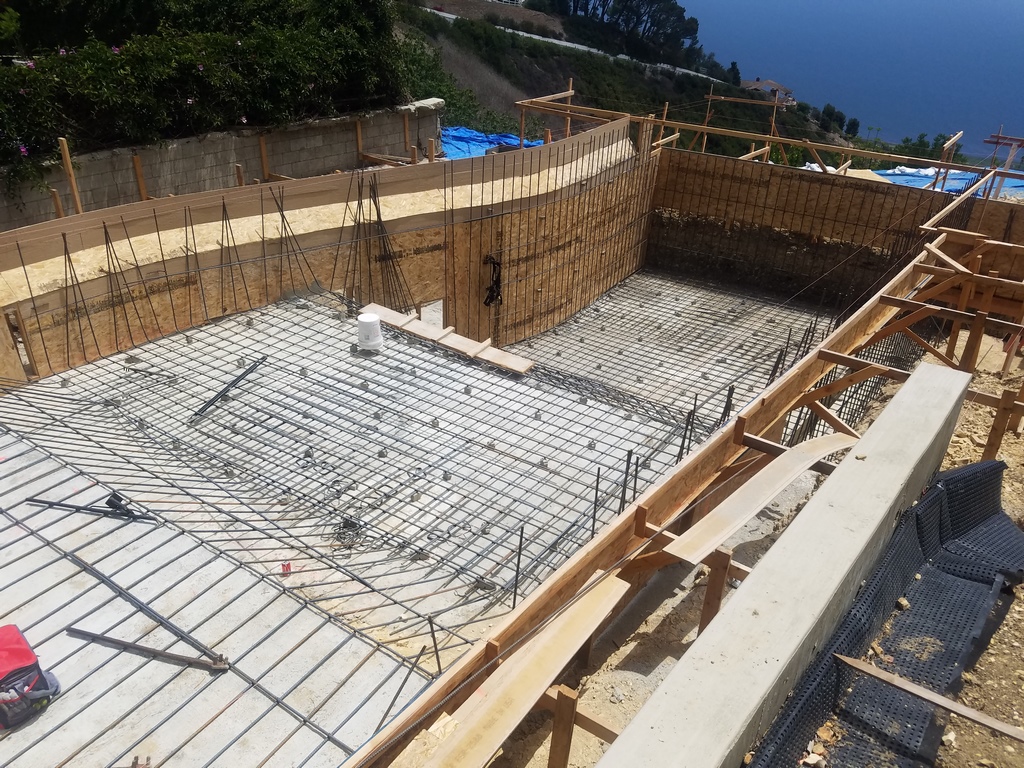


| Forming the pool with its perimeter overflow, vanishing edge, deep catch basin and attached spa meant the closest attention to detail and low tolerances. We also had to be accommodate a number of minor in process adjustments, especially on the “S” shape radial edge. |
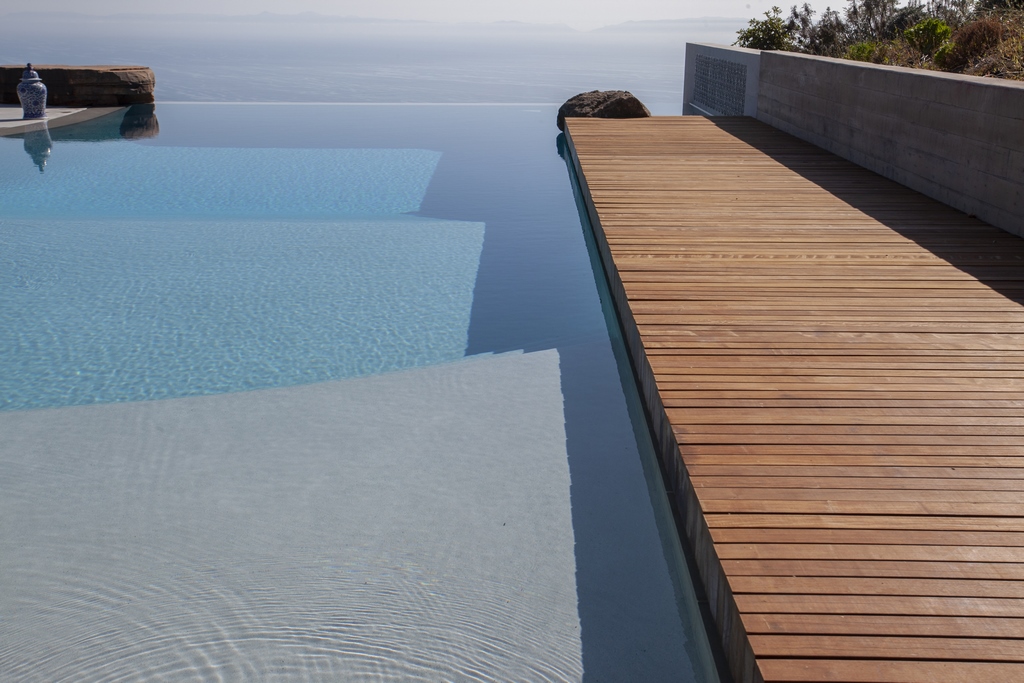
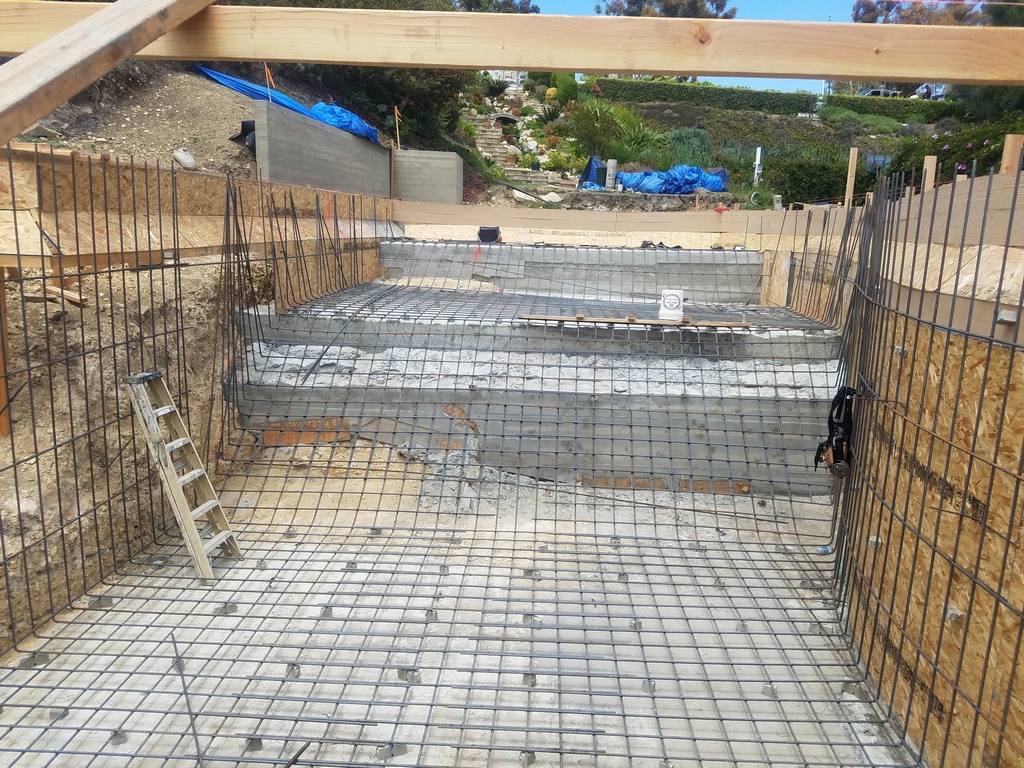
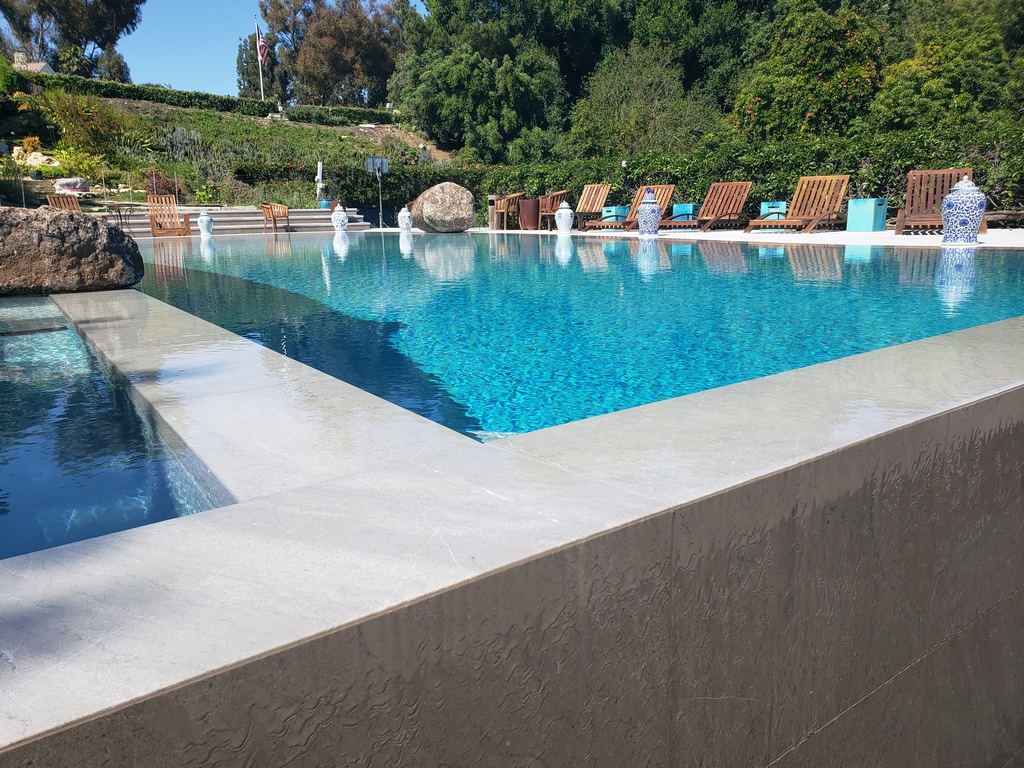
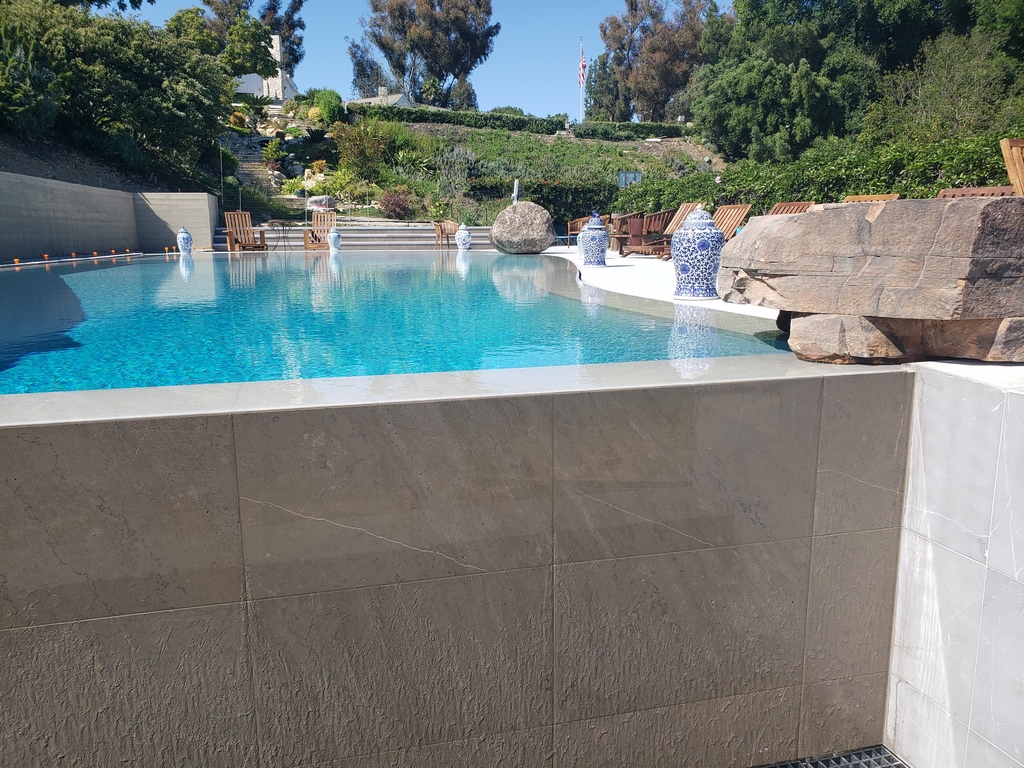
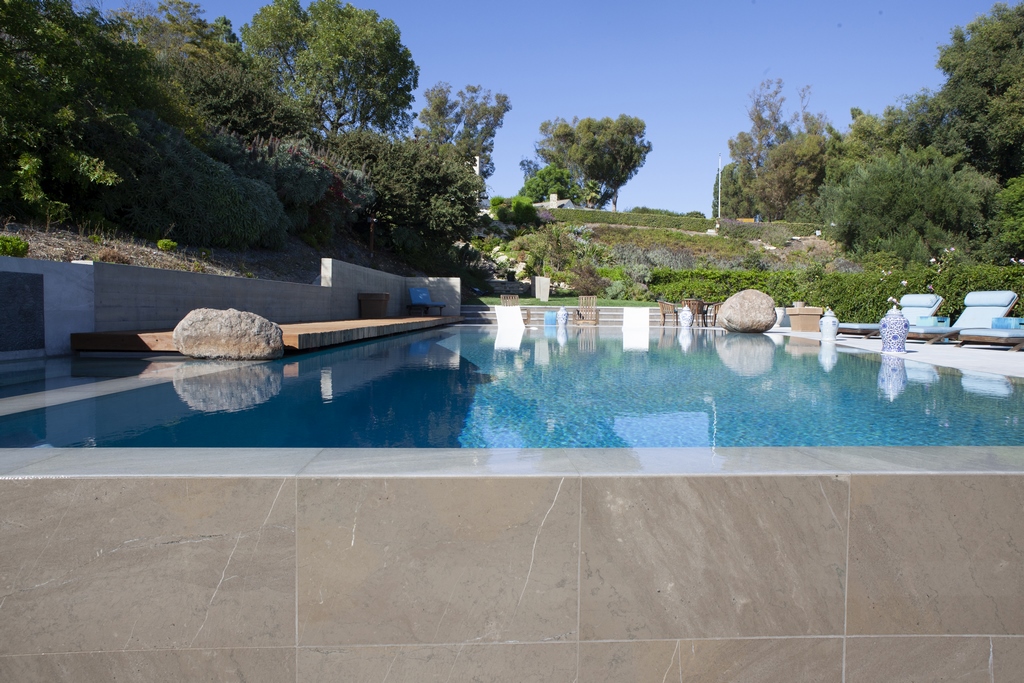
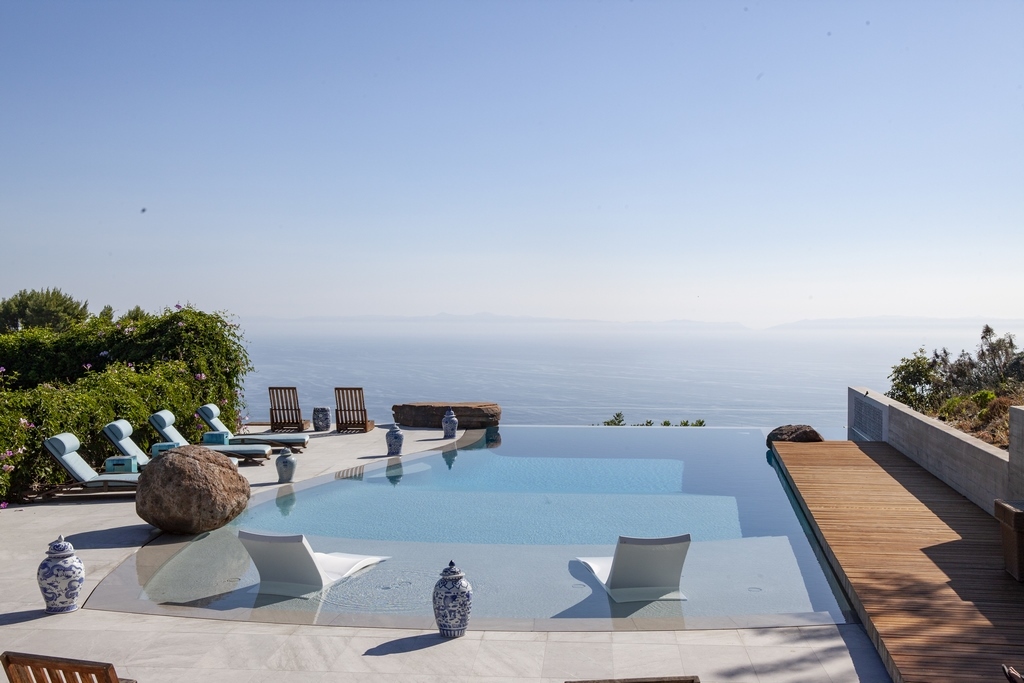
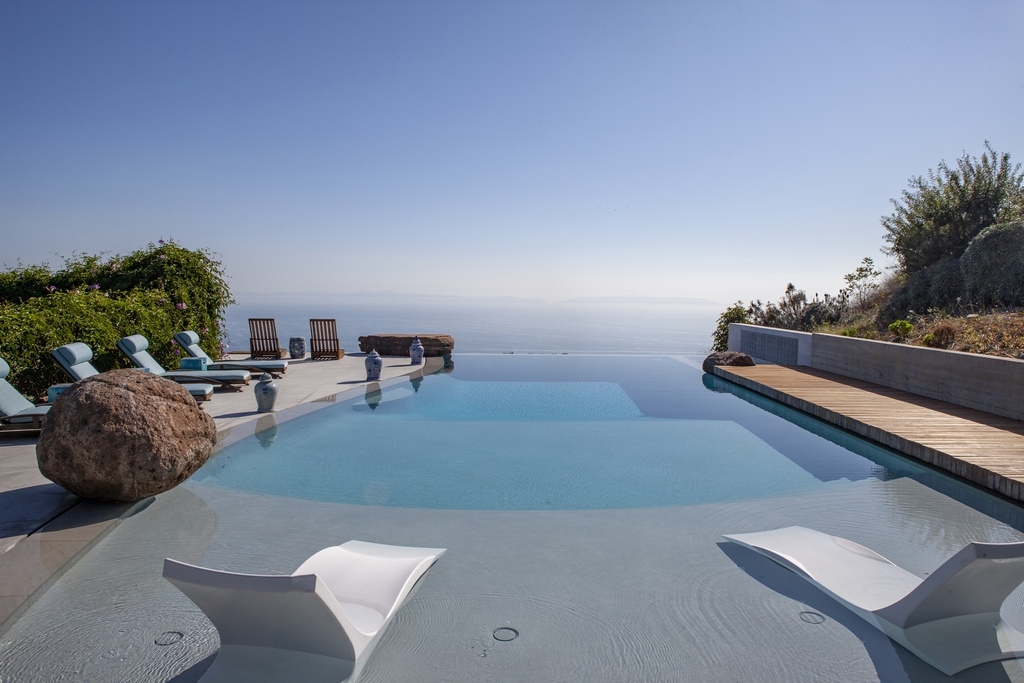
The entire watershape has a very architectural, almost sculptural look, that’s a good fit with the elegant surroundings and beautiful views. The pool measures about 70-by-50 feet, a vanishing edge on the outside with deck-level perimeter overflow around the rest. The pool’s interior graduates in three “terraces” from a shallow lounging area, to a shallow section at four feet down to a 10-foot deep end by the vanishing edge.
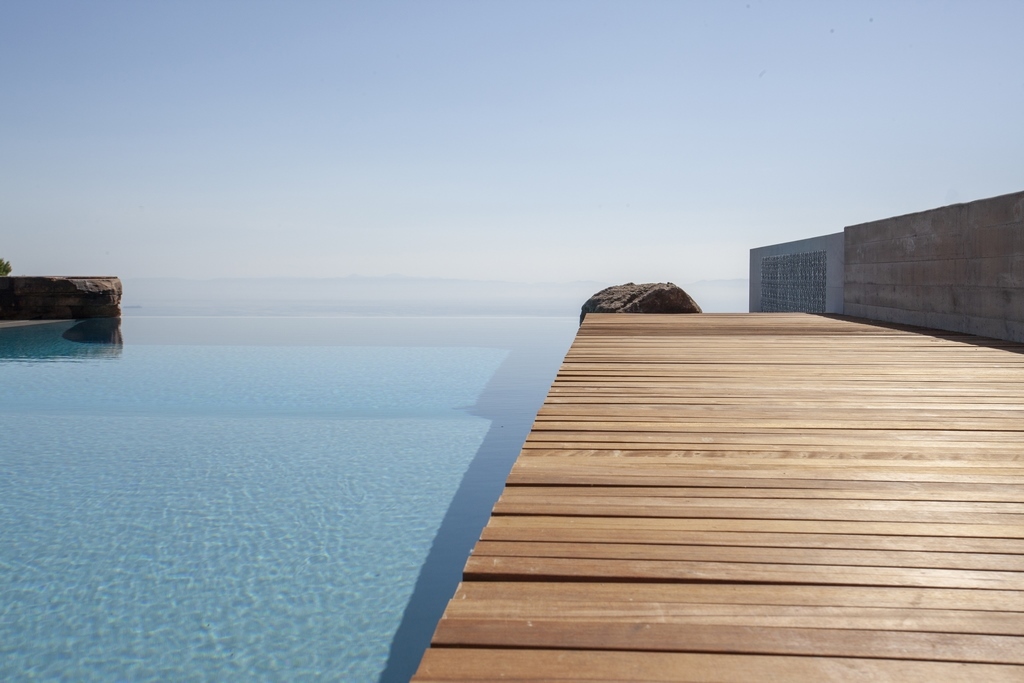
The left side of the watershape features a subtle radial design, while the right side is a straight shot down a long strip of Ipe wood deck that leads to a seven-by-nine-foot, attached, water-level spa that’s perched on the edge. When the spa is in use we created a function to drain three inches of the pool water into the surge tank to separate the pool and spa water effectively.
STEEP CHALLENGE
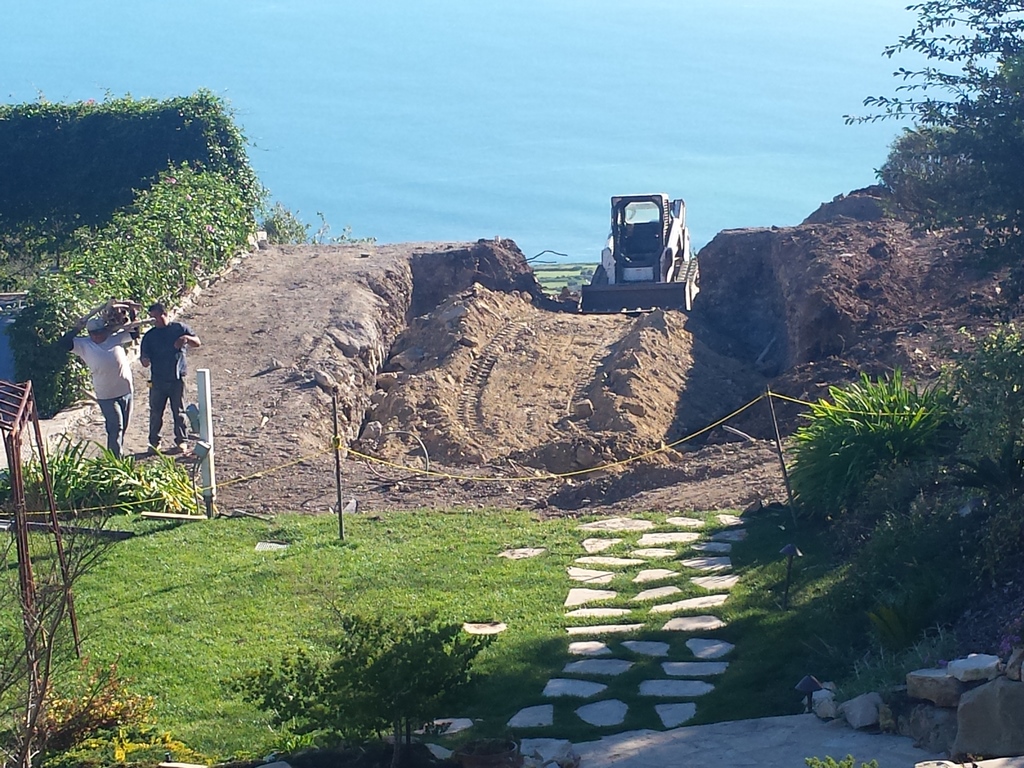
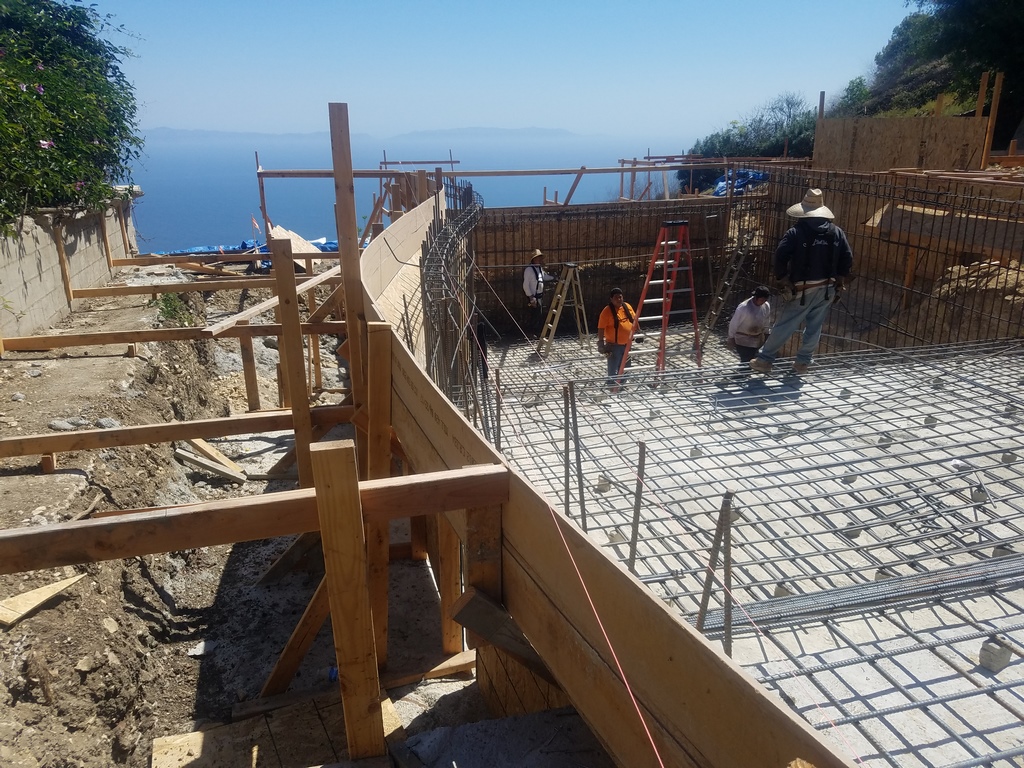
Backing up, when construction started the second time, we were faced with a labor-intensive site, largely because of the hillside. As mentioned above, the slope had been rebuilt, taken down about 40 feet then refilled and compacted in lifts.
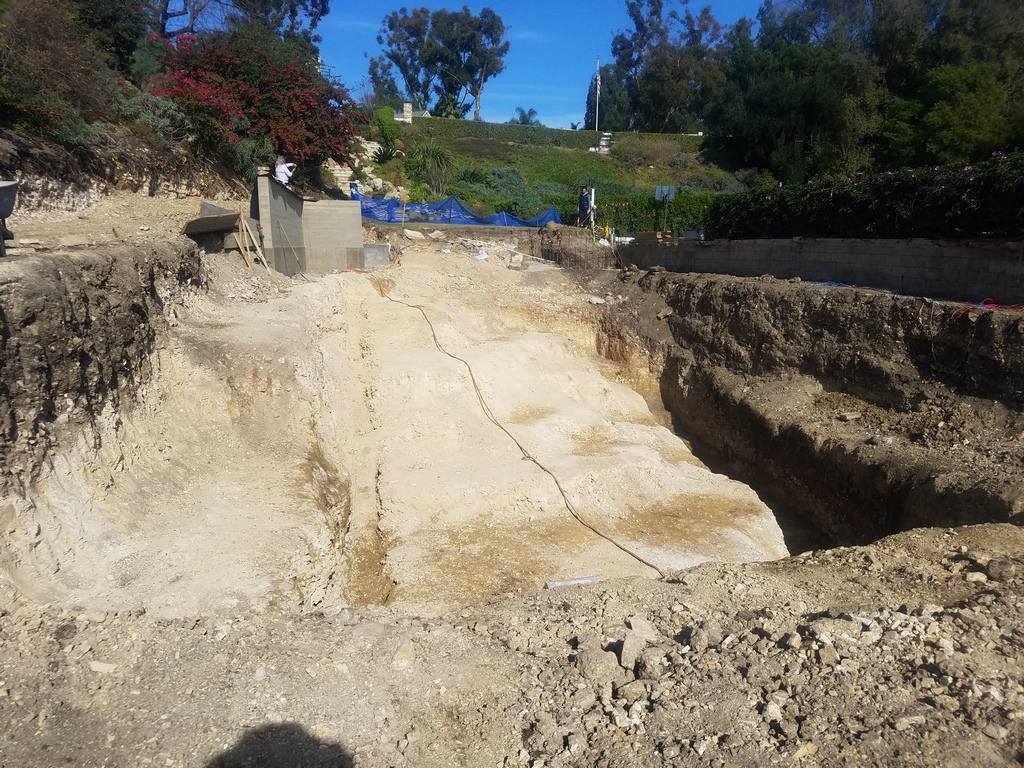
Even though the slope had been rebuilt, the pool still had to be over-excavated and refilled to create a giant concrete foundation. Looking toward the ocean, on the far-left corner, there’s about 25 feet of concrete beneath the pool, going down to competent, load-bearing bedrock. The slope transitioned up to the shallow end where we were right on top of bed rock. In all, we wound up pumping in about 500 yards of concrete for the foundation.

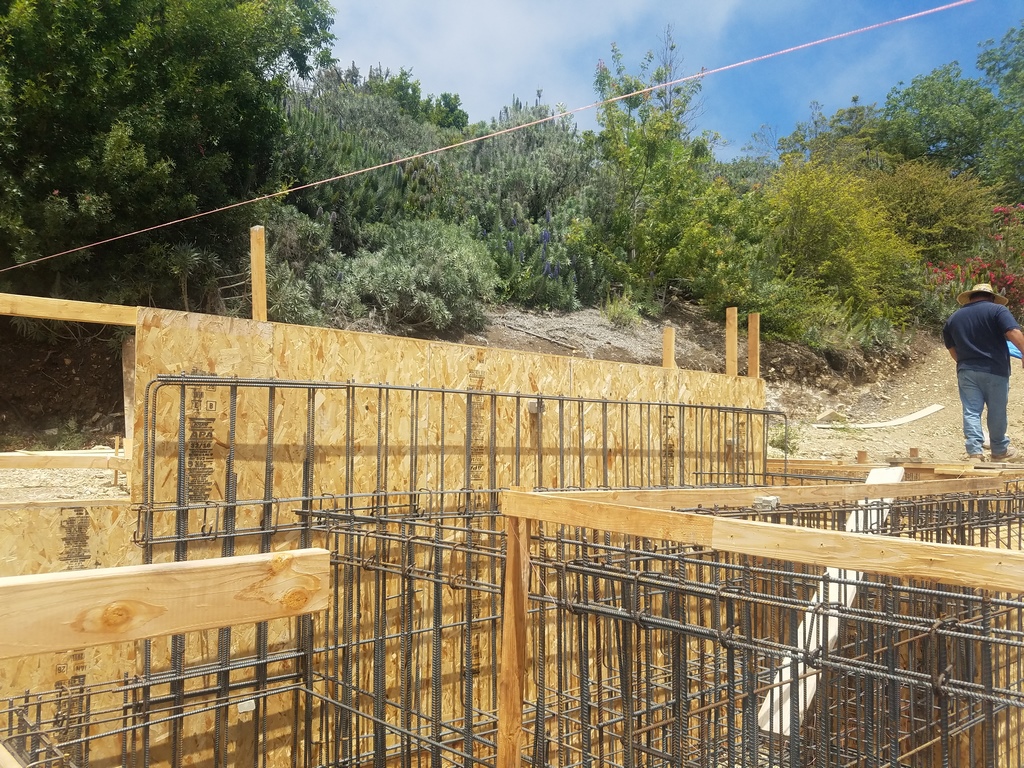
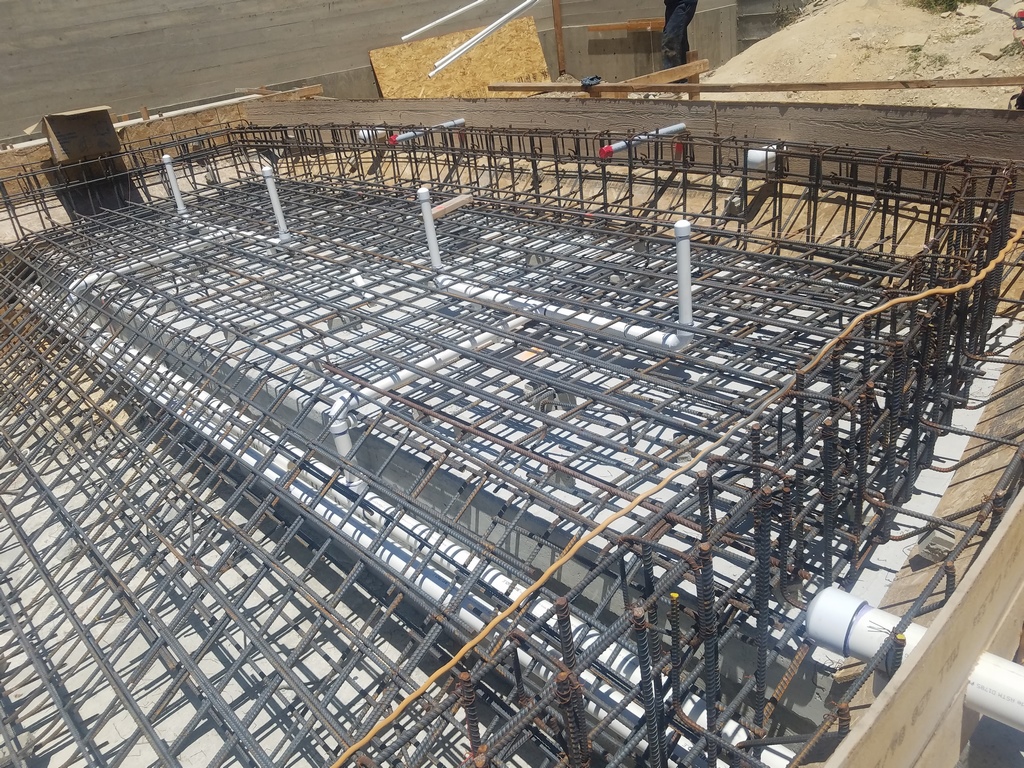
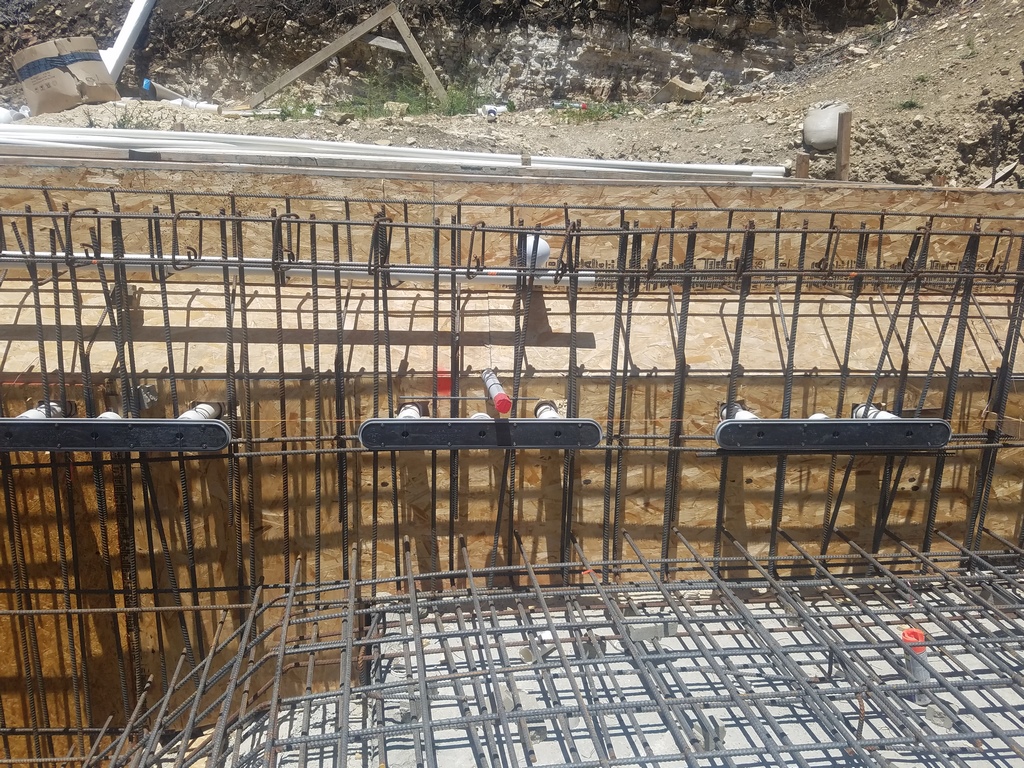
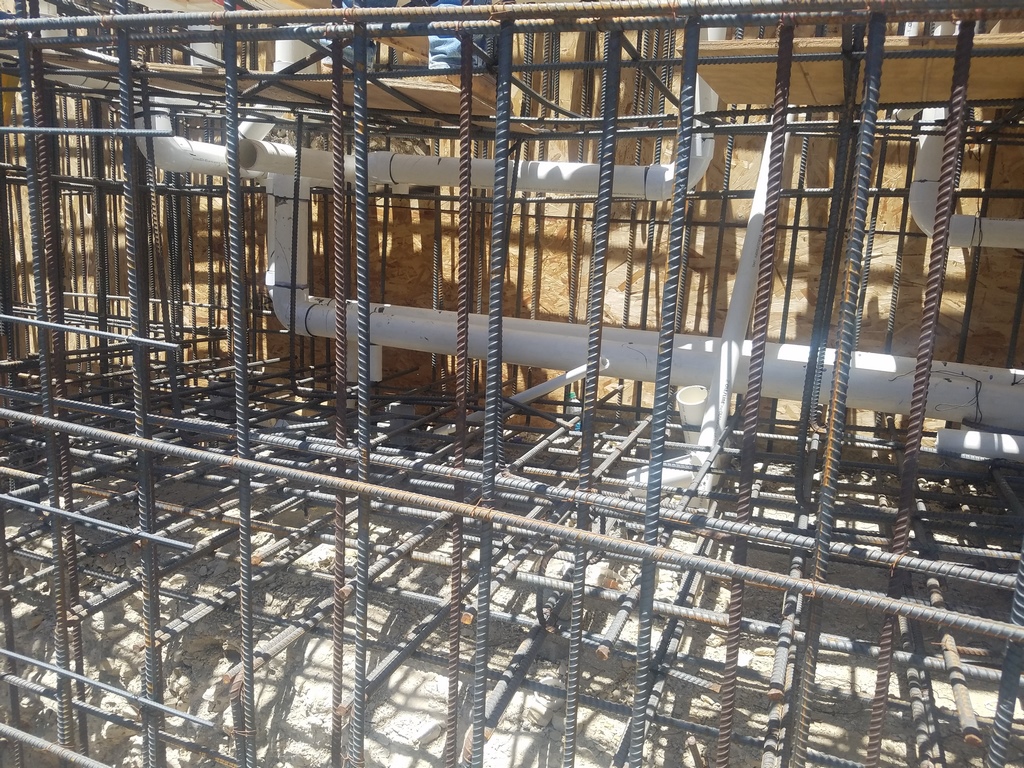
| The structure and robust reinforcing steel design was engineered to withstand any possible movement and prevent cracking that the previous pool had suffered. |
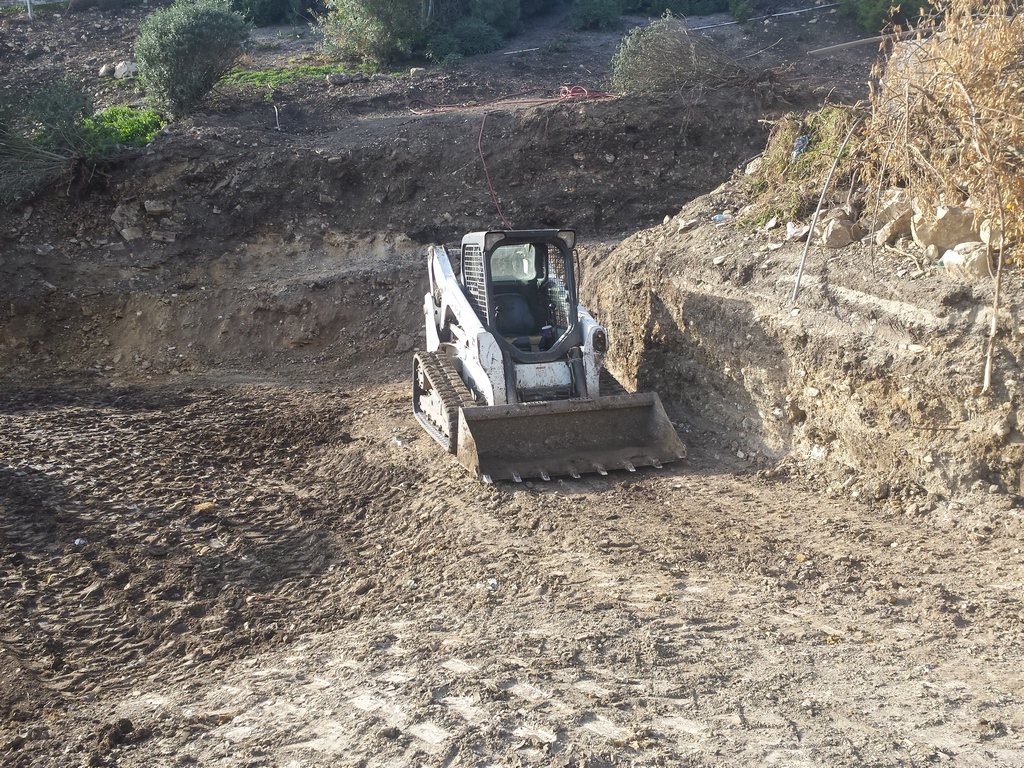
The site itself presented some real challenges beyond the need for the massive concrete foundation. There was simply no good way to access the area on the outside of the pool, so we had to build a temporary road for our bobcats and materials.
The entire site was over-excavated with what amounted to free-standing vertical walls. The soils engineer didn’t want the deck on the existing soil, so it was removed during the excavation and then backfilled with concrete after we built the pool shell.
The water-in-transit details all had to be formed precisely with low tolerances. At one point, the client wondered why a “simple” swimming pool required a complete set of structural and mechanical engineering plans. I explained that pools with these features are prone to failure without proper engineering. We had to reform the “S” turn down the left side to get the contour exactly right to the client’s eyes.
We used a crane to move in some of the materials, including the large specimen boulders located on the bond beam, but it only reached to the outer edge of the deck. The client wanted a two-ton round boulder to be a water feature, which turned into its own small challenge. We had to position this big “bowling ball” boulder using a big gantry crane and a palette jack. Furthermore, we had to drill an inch-and-a-half hole all the way through the boulder, and then flip it over to drill two-inch holes on the bottom side to bolt it in place on the edge of the pool. To achieve the perfect set-angle, we ahad to grind the bottom of the boulder as well.
EDGY DETALS
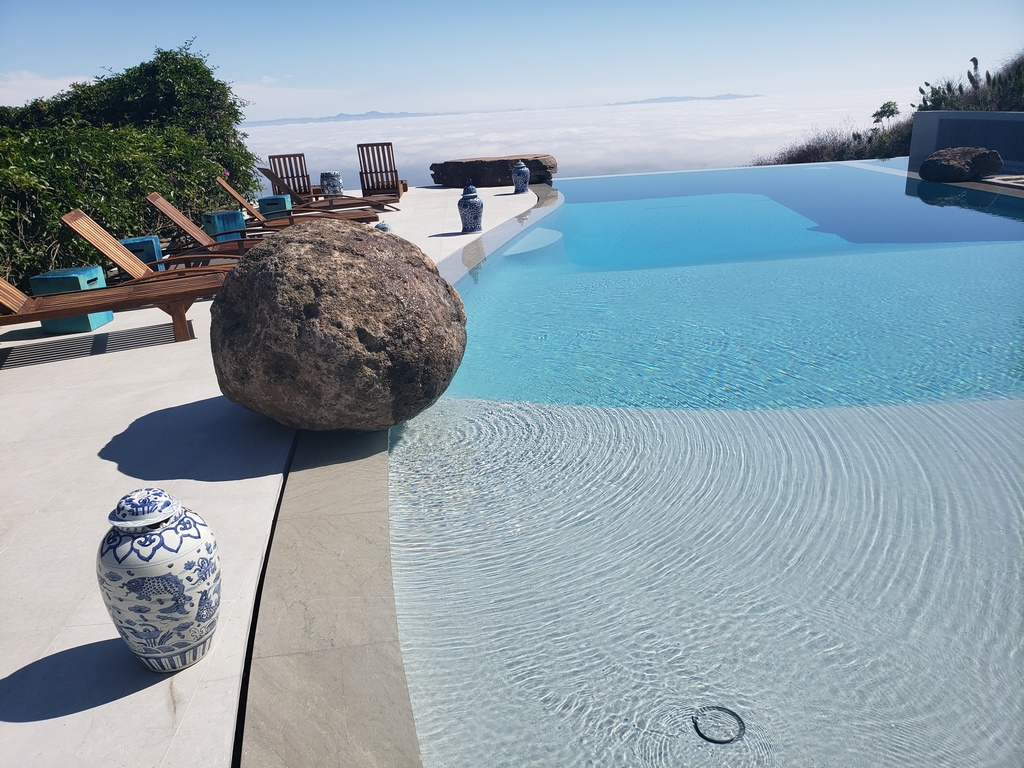
Out on the edge, there’s a flat boulder that also weighs about two tons. Even using the gantry, we weren’t able to get it into the perfect position, so we wound up building this heavy-duty wooden platform on that end of the pool. We cut slots in the deck so we could get our palette jack under the stone and move it into its final resting place. It was quite the production for just that one piece of rock.

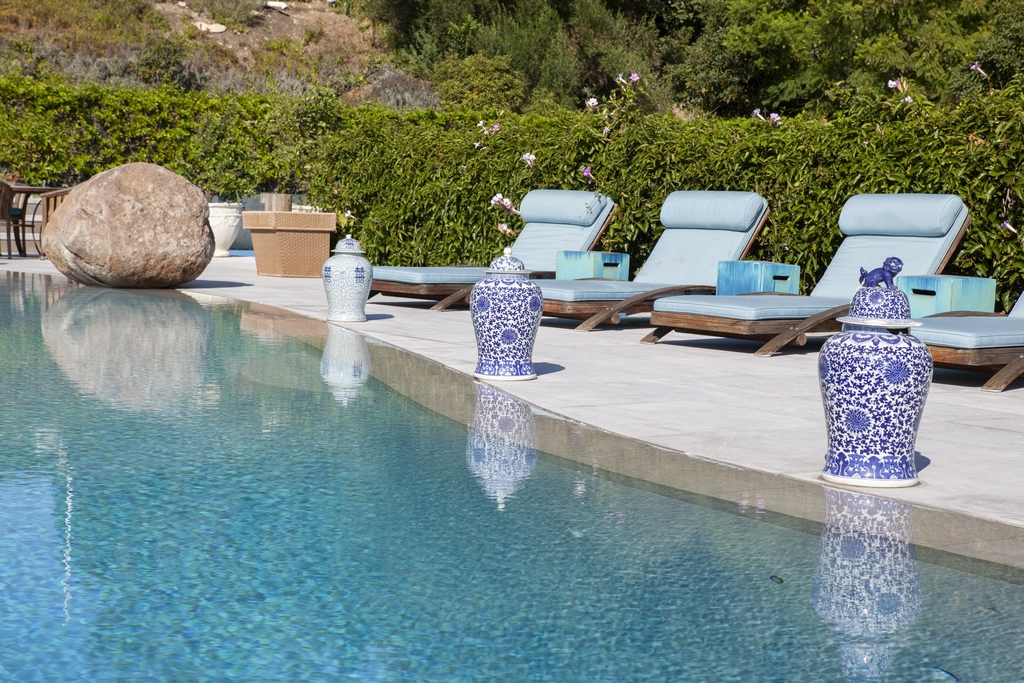
| This design made great use of the edge treatments with specimen boulders decorating the pool’s boundaries, a seamless transition between the pool and the attached water-level spa and a vanishing edge that celebrates the million-dollar view. |
Selecting the stone was a process. The round piece is granite, while the large flat piece is a type of southwest sandstone, the kind of material you see in Zion National Park in Utah. The piece she chose actually has petroglyphs.
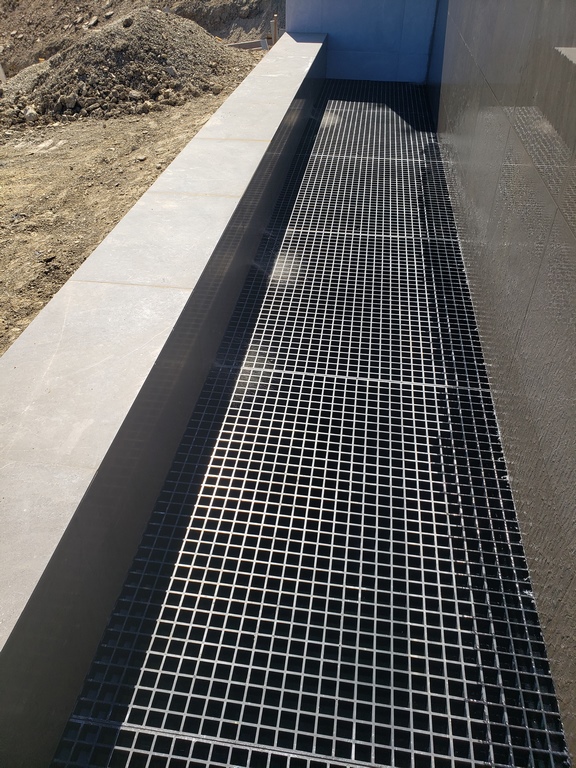
The top of the vanishing edge trough is located three feet below the edge, but extends down eight feet, giving us all of our surge capacity. The trough is covered with a stainless-steel grate that is in turn covered with river rock.
The interior finish is a custom Hydrazzo blend, featuring various gray and green hues. The stone used throughout the setting, including all the deck and coping, is an Italian limestone called Bergerac. The client was in the process of considering a bunch of different finish materials. I was in the process of finishing up another project that had this same material. I had her come over to take a look at it and she fell in love with it.
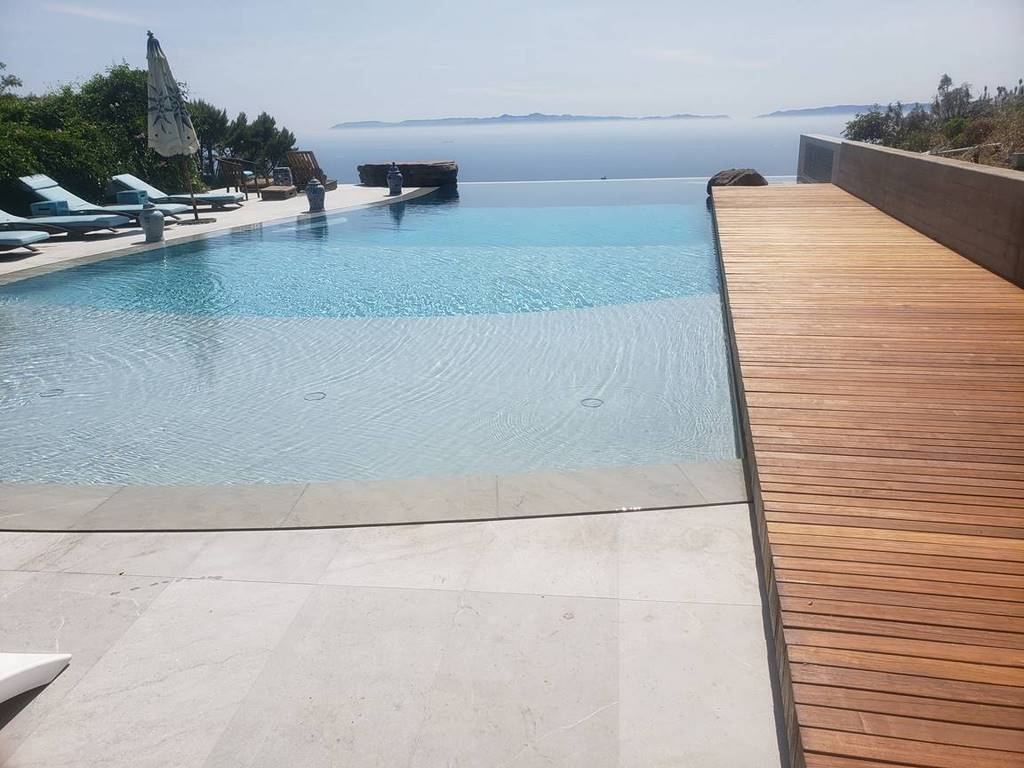
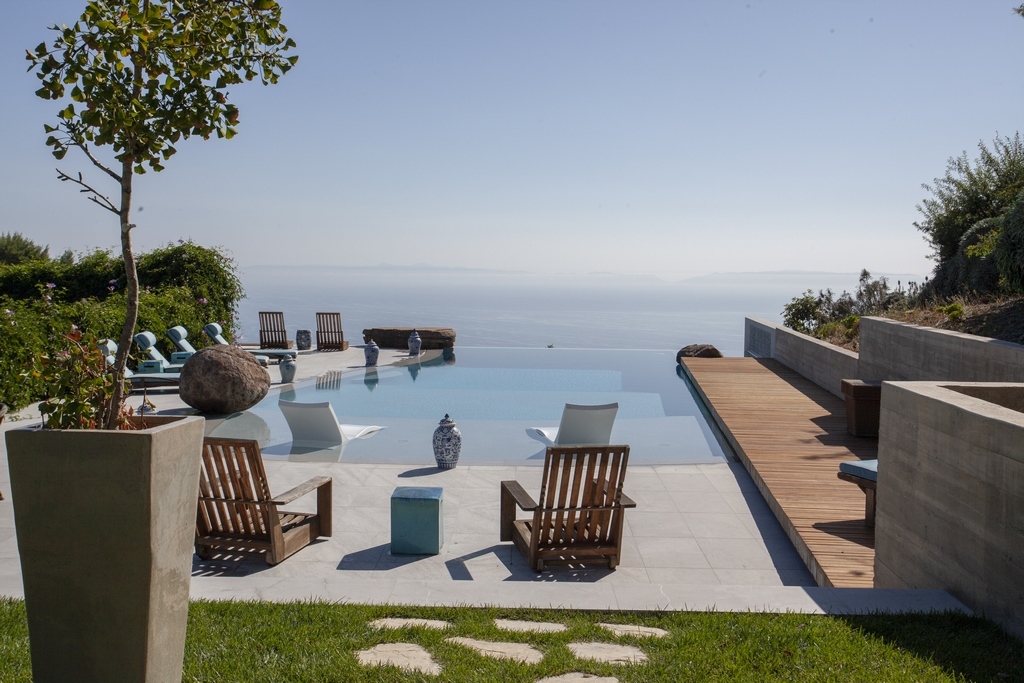

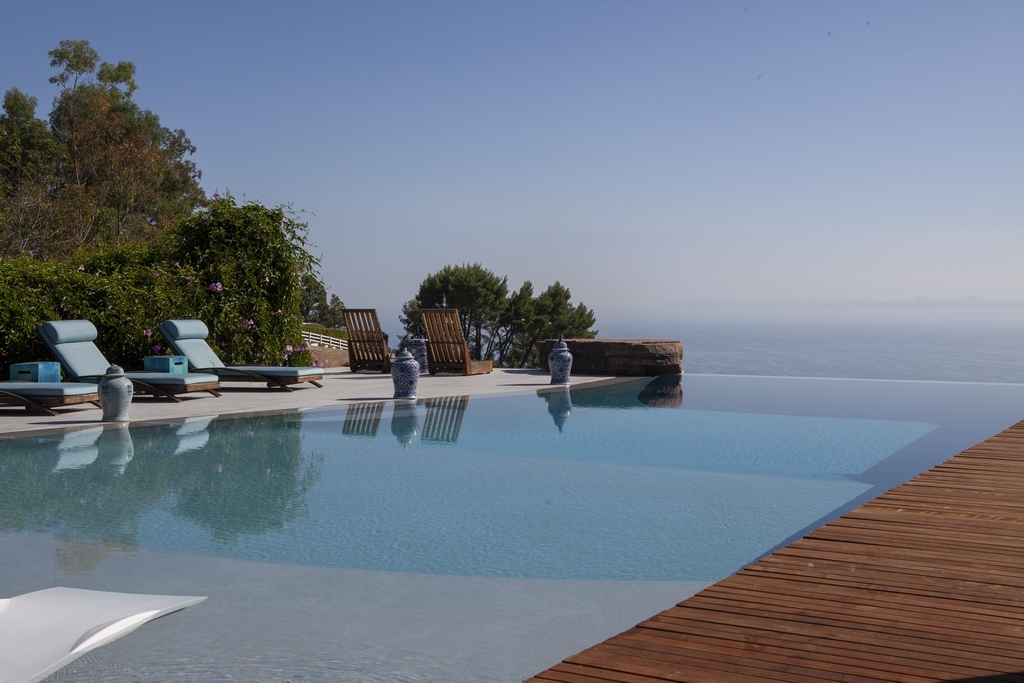
| Located in the verdant heights of the Palos Verdes Peninsula, more than anything this pool and surrounding area exists to maximize the view of the Pacific Ocean. As you move through the space the pool’s architecture and placement in the landscape leads physically and visually into the breathtaking and ever-changing vistas. |
Now it’s one of the visually dominate elements in the entire setting. It’s very subtle with varying shades of off-white, eggshell and cream colors. It’s interesting that as the material ages, there are other colors and veining patterns emerging. It’ll only look better and better as time goes on.
Behind the spa on the raised retaining wall, which encloses the space down the right side of the pool, we mounted a series of hand-carved large carved marble panels from China that the client had on hand and wanted included in the project.
WELL EQUIPPED
Over the years, I’ve become something of a fanatic when it comes to my equipment pads. Time and time again, I’ve seen the work of other builders who leave thoughtlessly designed pads that look terrible and are almost unserviceable in some situations. I go the opposite direction and obsess over the find details of equipment layout and plumbing.
The pad in this case is located right off the end of the pool to the left right next to the tennis court. It’s a generous space chosen largely because we could spread out the equipment for easy access, both for the initial installation and later on for servicing.
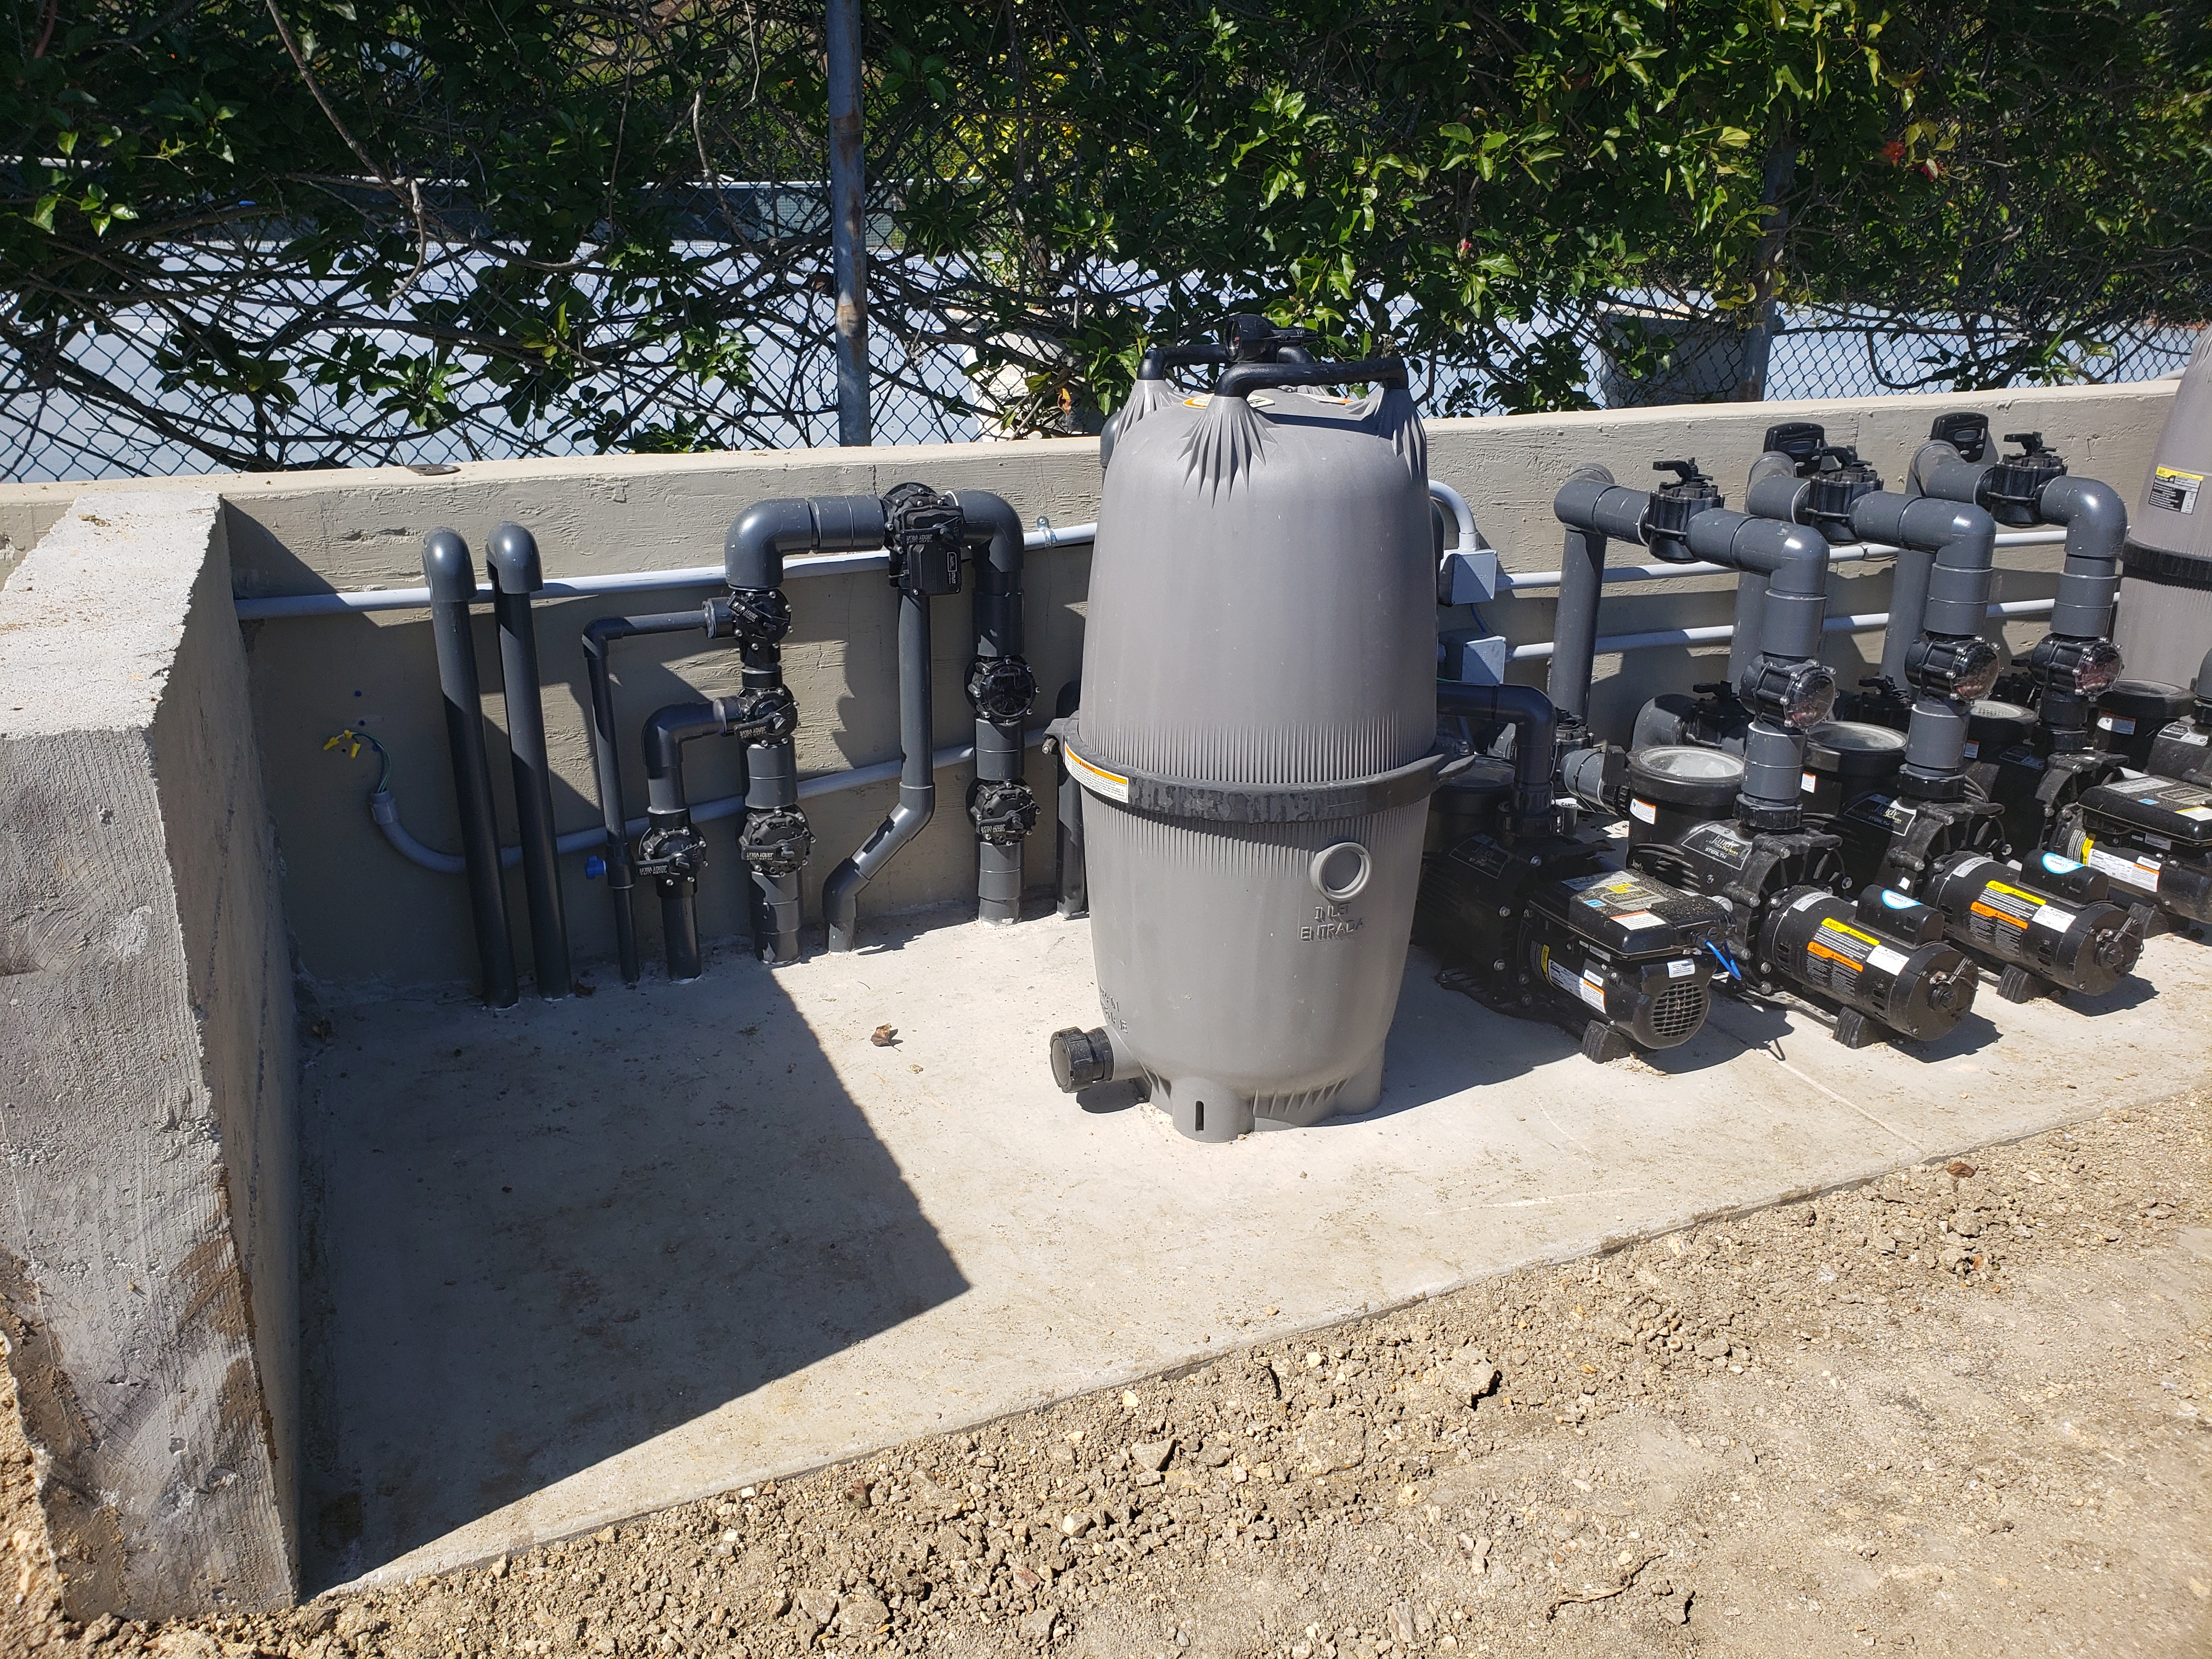


| I take great pride in creating equipment pads that are, in their own way, as “beautiful” as my pools. In this case, we have amply room to layout an equipment set that is orderly and maximizes hydraulic efficiency. |
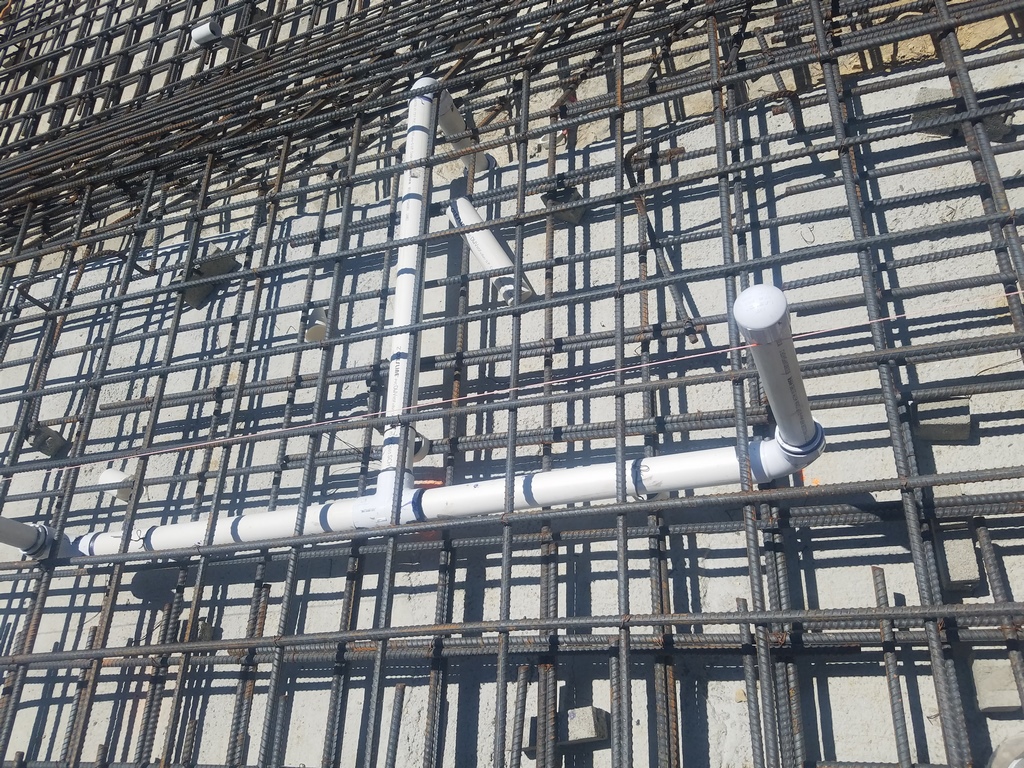
This pool has all Jandy equipment. On this project we installed two pumps for the edge, two pumps for the spa jets and a pump for circulation. The edge and circulation pumps were all variable speed, with single-speed pumps used for the spa jets. We used two cartridge filters, one for the edge system, the other for regular circulation. We have the Jandy high-efficiency heater and the One-Touch control system.The lighting was designed with the newer Jandy Hydrocool LED lights.
The equipment room has a very linear layout with minimal turns and fittings, minimizing head loss through the system. There is no chemical automation on the system, but it is plumbed for the future installation of an ozone system, should the client ever want to upgrade water quality.
In the end, the client was extremely happy with the pool and I was too. We managed to work through all of the various Building Department issues, while designing and installing a pool that meets all of the high watermarks that defines excellence.
After all, this is the kind of project that requires creative problem solving and adherence a set of standards that when faithfully applied can result in work that will stand up to close scrutiny as well as the test of time.
Kevin Cobabe is president of Dynamic Pool & Spa Construction, a high-end watershaping firm based in Redondo Beach, Calif.
Finish photography by Corinne Cobabe Photography Manhattan Beach California