


A Plastering ‘Watch List’
 Taking control of the plastering process is within reach of any quality-oriented designer or builder, declaresKim Skinner. To help you on your way, he offers this step-by-step guide to managing what should happen on site before, during and after plaster application takes place.
Quality is always an important goal in the design, engineering and construction of swimming pools, spas and other watershapes. And that’s particularly true if a watershape is to be finished with white or colored plaster, quartz or pebbles: For most clients, this surface treatment is a crowning touch, which makes selecting the right plastering contractor a key decision in a project’s long-term success.
For many years, I was part of a plastering company and have since moved into the service industry. Along the way, I’ve learned a lot about plaster as a product and plastering as a craft, and in this article, I’ll share some insights – a brief guide to how I’d approach things were I a pool designer, builder or a site supervisor involved in any watershape project where a cementitious finish is to be applied.
Some of what you’ll see here can and should be built into project documentation and contracts as a binding requirement on the plastering company. But success also requires direct observation of the process and on-site management of key background factors – that is, supervision of everything that happens from before the plastering crew even arrives on site until the vessel is filled with water.
It is true that adhering to quality standards will lengthen the time it takes to plaster a pool. Generally, the process should take at least four hours or more with a typical residential pool. If it takes as few as three hours, it might indicate that the work is being done too fast and thatthe result may be the subsequent appearance of plaster problems. And note that during cold weather, the whole process may take a good while longer – up to six hours or more – for plaster applicators to do the right job.
The point is, quality must prevail over quantity to meet the homeowner’s expectation of a good outcome. When it comes time to plaster a pool, it is ultimately the builder’s responsibility to make certain all contractors and subcontractors involved have embraced this commitment.
UP FRONT
As suggested above, successful plaster application is a multi-phase process that begins with the hiring of a qualified, professional plaster applicator. In making that choice, I suggest reviewing a list of critical issues with all likely candidates and then having the chosen firm sign an agreement indicating the following:
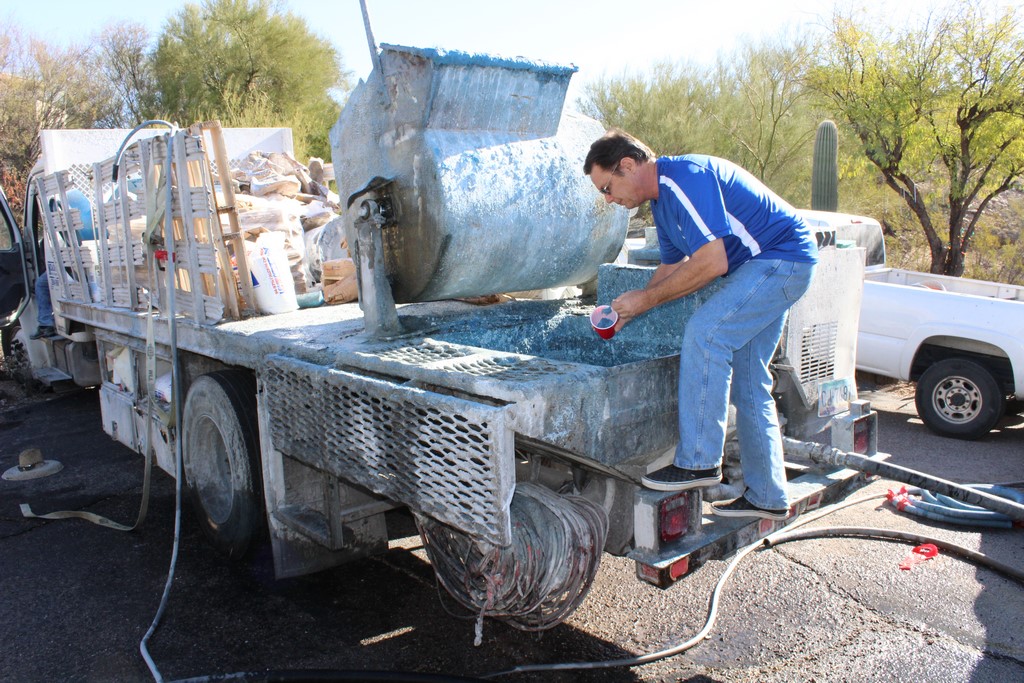
1) Water/Cement Ratio: The contractor must agree to use a maximum water-to-cement ratio of .48, which means adding no more than 5.5 gallons of water for every 94-pound bag of cement (not including the aggregate).
|
Taking It Personally Some 25 years ago, I did not take control of or even watch the plastering of my own backyard pool, and the result was less than optimal. As a result, my pool was in need of replastering after less than 10 years. The second time, Ididtake control of the process and Ididkeep my eyes open – and the result was a good, durable, beautiful finish. With observation and experience, any watershaper can become an expert on the application of cementitious finishes. If you follow the procedures outlined in the accompanying text, a finish can look good for 20 years and more: That’s what I deserved the first time around with my own pool – and what I made certain I’d have just ten years later. — K.S. |
2) Calcium Chloride Additive: The contractor must agree to use no more than a one-percent volume of calcium chloride (a hardening accelerator) relative to the weight of cement (again, aggregate excluded) – and, if the temperature rises above 90 degrees, to use no more than a 0.5% concentration of calcium chloride. For color-pigmented plaster finishes (including pebble and quartz aggregates), only a non-chloride accelerator may be used – no calcium chloride allowed, because using it leads to discoloration and shrinkage cracking.
3) Color Pigments: Specify that no “organic” color pigments are to be used and that only inorganic and color-fast pigments are permitted.
4) Water Troweling: Excessive water troweling is known to cause variation in color, shrinkage cracking, surface weakness and low durability, so specify that only minor trowel lubrication is allowed. Since very little calcium chloride will be used per the terms outlined here, the plaster shouldn’t harden too fast, which makes it easier to time the troweling process properly. And if a colored plaster is being applied, the contractor should be advised to avoid any use of trowel lubrication.
5) Late Hard Troweling: Specify that late, and excessive hard troweling is not permitted, because it leads to a darkening of colors as well as spotting. Helpfully, avoiding or limiting the use of calcium chloride in the plaster mix helps avoid issues of this type.
If the contractor knows these terms ahead of time and signs a contract that puts some strength behind them, the chances for project success and client satisfaction increase dramatically. But that’s not the whole picture, as we’ll see below.
IN THE BACKYARD
Before the plaster company comes on site, the builder or site supervisor has some work to do in gathering background information and performing certain tasks.
1) Source Water Conditions: I would strongly suggest having the tap or source water tested before it is used by the plastering crew in mixing material. This testing should cover metals and contaminants, including iron, manganese, copper and/or sulfates. If any of these possible staining agents shows up, it will be important to filter them out to avoid discoloration after plaster application.
2) Substrate Condition and Preparation: Before plastering day arrives, I would check to ensure that the gunite/shotcrete/concrete substrate is rough, highly porous and generally free of rebound from any source. This roughness is important to help the new plaster finish fully bond to the substrate.
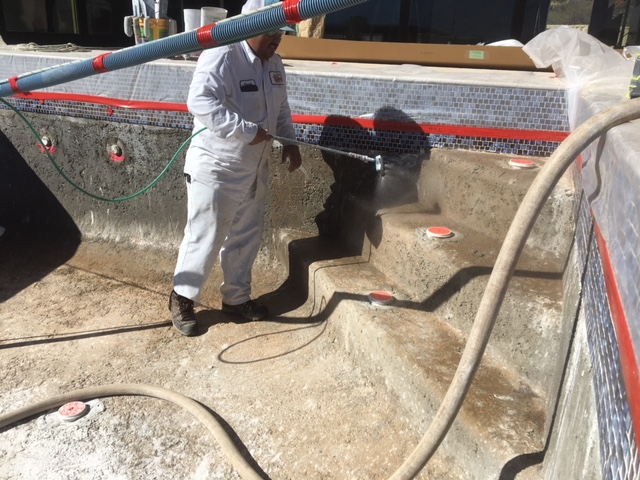
| Washing the substrate is a key pre-plastering step: It sets the shell up for an important visual inspection before plastering begins. |
Note: Power washing may be needed to remove dirt and debris just prior to plastering; sometimes, acid may be needed to etch excessively smooth areas. If acid is used, it must subsequently be neutralized with lots of water and perhaps a dilute solution of sodium bicarbonate, after which the surface should be rinsed again.
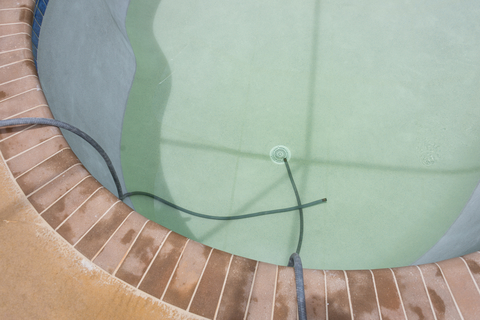
3) Substrate Washing: The pool should be drained a day or two prior to plastering, depending on local weather conditions. As it dries, the surface should be checked for “bleeders” – that is, any water coming through the substrate from the ground around the pool. If there are any such defects, they must be patched or plugged before the plastering crew arrives on site.
4) Water Chemistry: Even before plastering, I would check the status of the water that eventually will be used to fill the pool, measuring its pH, alkalinity and calcium hardness. These factors will have no influence on the plastering process and won’t affect the mix, but it will help determine which start-up program should be used (more on start-ups below).
None of this is particularly complicated. It extends from my observation that there some advantages to taking a step back from the process of completing the pool to make certain that as any possible conditions for success are addressed before the plaster crew arrives on site.
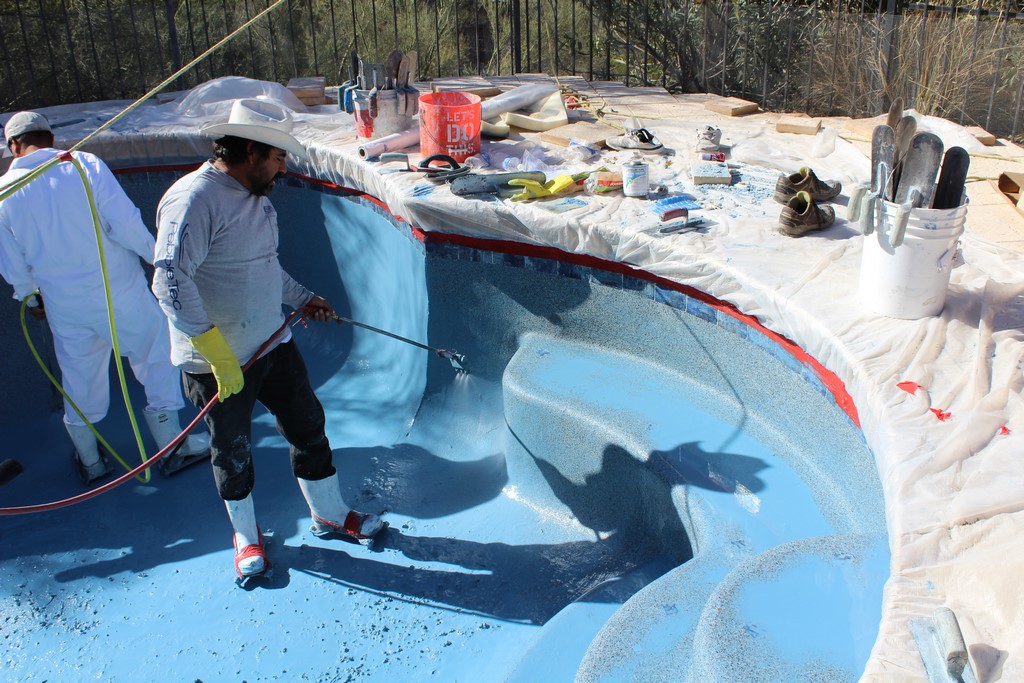
APPLICATION DAY
Once the big day arrives, responsibility for the pool and the success of the project move beyond the direct control of the designer, builder or site supervisor and into the hands of the plaster contractor – but that’s no reason not to be on hand with a watchful eye on the process from start to finish.
Nobody is born knowing what to do at this point: It takes a history of asking questions, paying attention and gaining the experience you need to make the time spent in observing the plastering process as productive and beneficial as it should be. That in mind, here are steps in the operation that I would observe most closely.
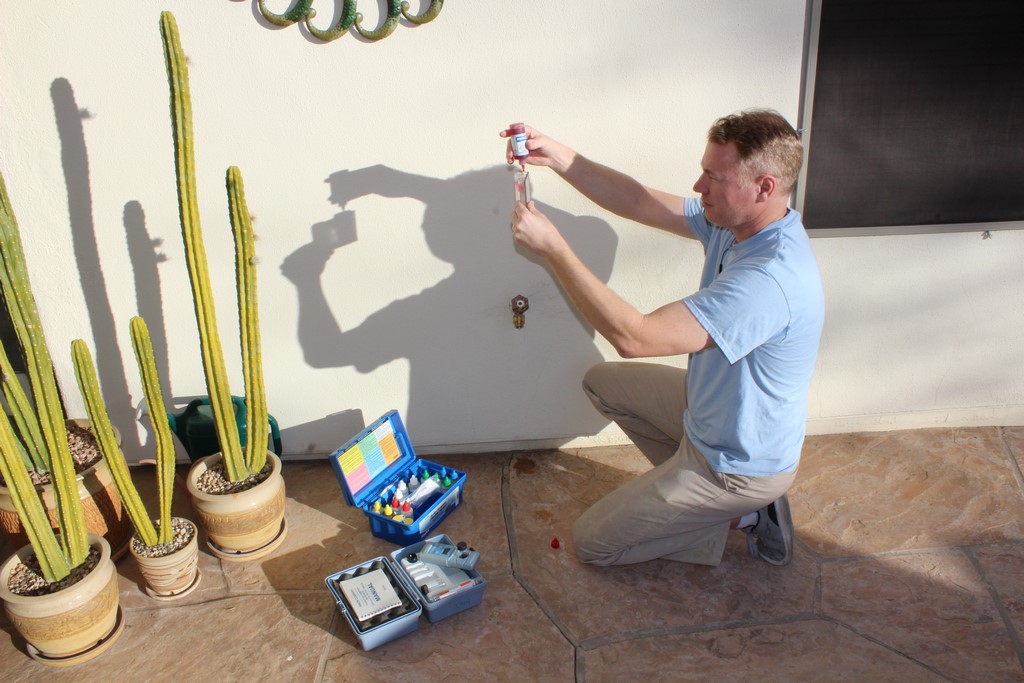
| The water supply that will be used to mix the plaster and, later, fill the pool should be checked before those important steps occur – in the former case to make certain no staining contaminants (such as copper or iron) are present, and in the latter to determine whether its Langelier Saturation Index reading is on target or will need pre-treatment. |
1) Weather Conditions: I would not allow plastering to take place in windy, rainy, excessively hot and dry (above 95 degrees) or extremely cold (below 40 degrees) conditions. All is not lost, however, if the assigned day arrives and the temperatures are extreme: Tenting the site and either cooling or heating the space to bring ambient temperature within the acceptable range is always a possibility. In fact, I’m almost of a mind that tents should be used in all cases if only to protect the finish from anything that might happen, from unexpected gusts or showers to leaf or bird droppings.
2) Surface Readiness: Survey the pool and make sure the washing and cleaning of the substrate has been adequate to ensure a good bond. It would be a good idea, if possible, to make this final inspection with the plastering crew’s chief to benefit from his or her experience – and an extra pair of experienced eyes.
3) Quality Materials: Check to see that the cement and aggregate materials on the truck are, as should be specified in the contract, from reputable material manufacturers; ensure that no “organic” color pigments are being used; and that any coloring agents are inorganic and compatible with other mix materials.
4)Plaster Mixing: Let everyone on hand know that you are watching to make certain that only 5.5 gallons of water are added per every 94-pound bag of cement – and, with the crew chief, enforce a rule that, here and elsewhere, “eyeballing” isnotan acceptable measuring strategy.
5)Additives:Double check the weight of any calcium chloride that will be used as a hardening accelerator in the plaster mix. A one-pound coffee can (1-quart) holds nearly two pounds of calcium chloride, and that’s fine with a 77-percent concentration of calcium chloride. But if the crew shows up with a 95-percent version, the dosage must be reduced by 20 percent. This is important: I would carefully watch the person mixing the plaster to verify and confirm that all terms of the contract are being observed!
| The plaster contractor should be on notice that virtually every key step in the on-site process is either a matter of contractual agreement or a point of craft about which the pool contractor or site supervisor is well informed – and that each of those steps will be observed to make certain, for example, that agreed-upon levels of appropriate additives and colorants are used. |
6) Aggregate Addition: Verify that one 94-pound bag of cement is used for every 150 to 175 pounds of marble aggregate – and more like a 1:1.25 blend if it’s a quartz finish.
7) Samples: I suggest using two paper cups to obtain plaster samples from two different batch mixes. Mark the name and address on the paper cup and retain it for future reference: If a plaster problem develops later on and liability must be ascertained, laboratory analysis will indicate the water/cement ratio, the calcium chloride level and the colorfastness of the plaster samples.
8) Workmanship: Watch and verify that the plasterers lay down material to a minimum thickness of at least three-eighths of an inch – and preferably half an inch – everywhere within the pool. Also, watch and verify that neither water troweling nor late and excessive hard troweling takes place; prohibit the use of “propane torching” to dry and harden the plaster surface; and make certain damp towels are used to clean tile rather than a water spray and that they are dried with a clean towel. Do not allow anyone to walk on the plaster with bare feet or damp/wet socks; in other words, make certain they trowel their ways out of the pool and then stay out.
Once the troweling process of the plaster is finished, I strongly suggest not allowing the filling of the pool to begin until the plaster has hardened for about six hours as measured from completion of all work in the watershape. After that, it’s best to fill the pool as rapidly as is safely possible.
FILL ‘ER UP
Delaying the filling operation is critical, because through this period a cementitious finish is still very fragile and is susceptible to significant erosion and damage if it isn’t allowed to cure and harden sufficiently before water is introduced.
|
Acid or Water?
As I indicated in an article I wrote for WaterShapes.com back in 2014 (clickhere), acid washing is too aggressive and will compromise the cementitious matrix that holds the quartz or pebbles in place. — K.S. |
My own research has shown that submerging pool plaster in water just 30 minutes after final troweling can result in the equivalent loss of approximately eight to 12 pounds of plaster material in a typical 20,000-gallon pool.
There’s also the fact that the bottom or bowl of a pool is usually thelastto be finished – but is submergedfirst. I’m not alone in having seen staining or changes in colors in the hoppers of pools after a period of time; a likely cause is too-early filling.
As important as is the fill timing, however, the chemistry of the fill water is a much larger concern. If the supply-water testing mentioned above detected any metals (such as iron and copper), then steps need to be taken to remove those metals before filling the pool to prevent staining.
In addition, if the fill water is to be beneficial to fresh plaster, it must be balanced and should even have a positive reading on the Langelier Saturation Index (LSI). If it doesn’t, the water needs to be treated beforehand, because the new plaster has a lot of calcium hydroxide – somewhat soluble at a balanced LSI level of 0.0 – at its surface.
|
A Chemical Assist? In most water-filling processes, it’s wise to consider adding sequestering or chelating agents to the pool once it is filled. This will lock up most staining materials and allow them to be pre-filtered from the water before they can do any harm. –K.S. |
If the reading is positive, good things result: Rather than dissolving calcium hydroxide from the surface to cause detrimental porosity, positive LSI water will convert the calcium hydroxide into calcium carbonate to form a dense, hard surface. (This is known in the plastering trades as beneficial “carbonation” of a plaster surface – but note that this carbonation process is different from precipitating calcium from the water, which only forms scale on the surface.)
Start-up approaches are another large topic – and a controversial one. Those concerns reach beyond the immediate subject of this article, but do let me suggest that any method that calls for adding fill water immediately or at any point before six hours have passed should be avoided if your aim is to ensure the integrity of a cementitious surface. With early filling, and with aggressive water, considerable damage can be done before a service technician ever comes on site to balance the water!
The key here is finding a plastering company that recognizes these issues and is willing to work with you under the terms outlined above. Good firms won’t have a problem in complying with your requests, and the results will be positive for everyone involved, from the designers, builders or site supervisors to the plasterers, service technicians and satisfied clients.
The finish is a crowning touch for everyone who has a hand in a project. Why not ensure its beauty?
For more information on the start-up approach I recommend, click here.
Kim Skinner began his work in the pool industry 50 years ago, starting as an employee and eventually becoming manager of Skinner Swim Pool Plastering in Sun Valley, Calif. He later became president of Pool Chlor, a chemical service firm with offices throughout the Southwest. He is also a partner in onBalance, a consulting firm that performs both laboratory and field research on pool-water chemistry and on the relationships between water chemistry and pool plaster surfaces.