


Perfection, Please

Many of the projects we work on could best be classified as show-stoppers: big, elaborate installations with undulating surfaces, multiple planes intersecting at odd angles and elaborate mosaic patterns – interior finishes with a level of technical difficulty that makes lots of tile applicators head in the other direction at a rapid clip.
We at Rock Solid Tile (Calabasas, Calif.) enjoy just that sort of technical challenge. It’s why we invest so much time in training, take our work so seriously and keep expanding the range of what we can accomplish for our clients. But truth be told, we occasionally like tackling installations where a simpler visual effect is the goal – as is the case with the project on display here.
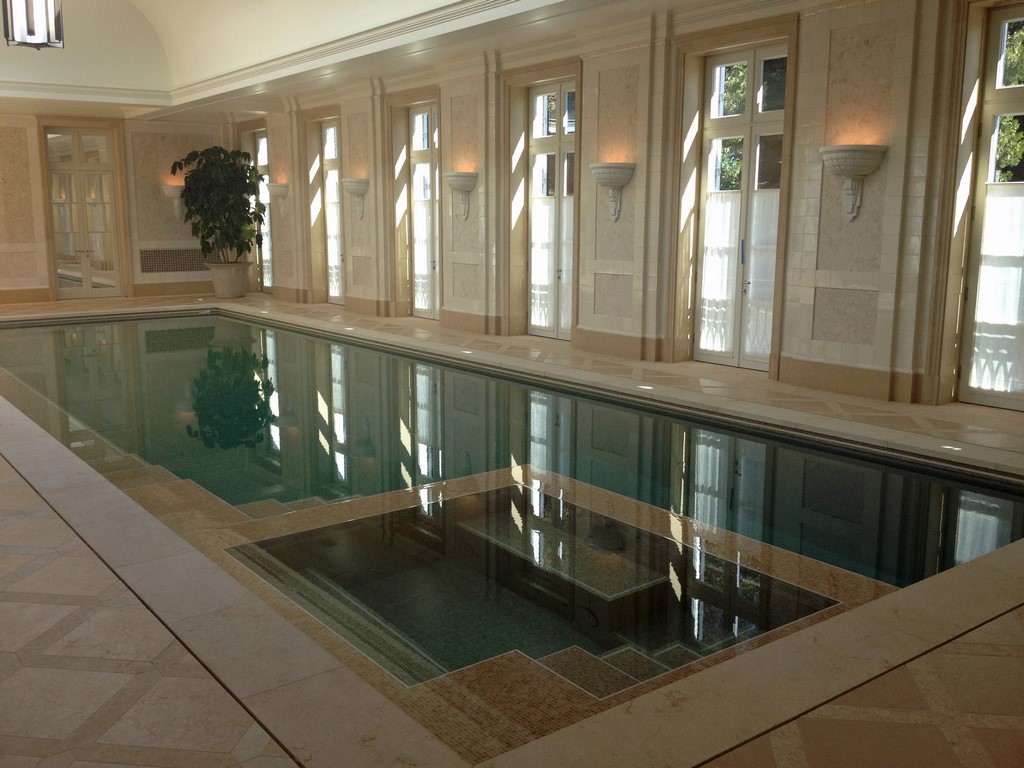
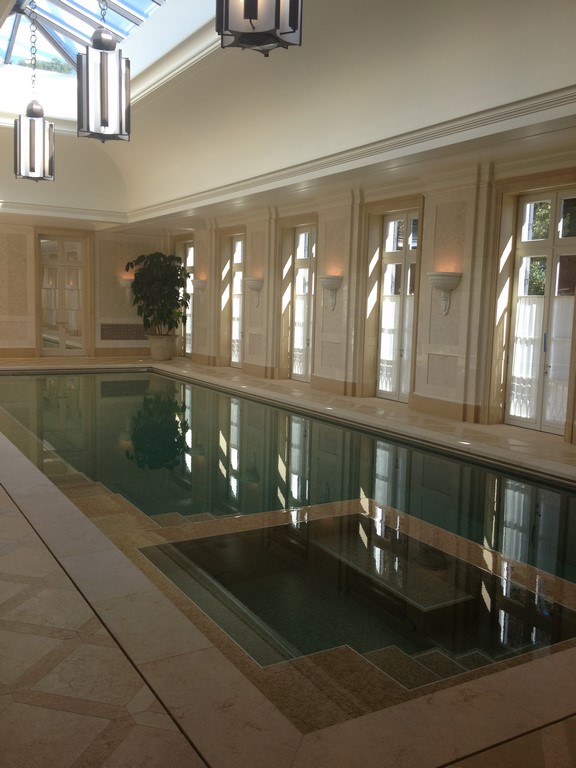
While we do enjoy this elegant, understated sort of project, however, I also have to say that there’s more here in this particular case than meets the eye: The pool may have a clean, simple rectangular shape with straight, coveless transitions and rectilinear steps and benches leading down into the water, but the spare nature of the design and the overall aesthetics of the space left absolutely no room for visual interruption.
Without hesitation, this is exactly the sort of zero-tolerance environment we like tackling because it pushes our skills to the limit.
AN INDOOR STAGE
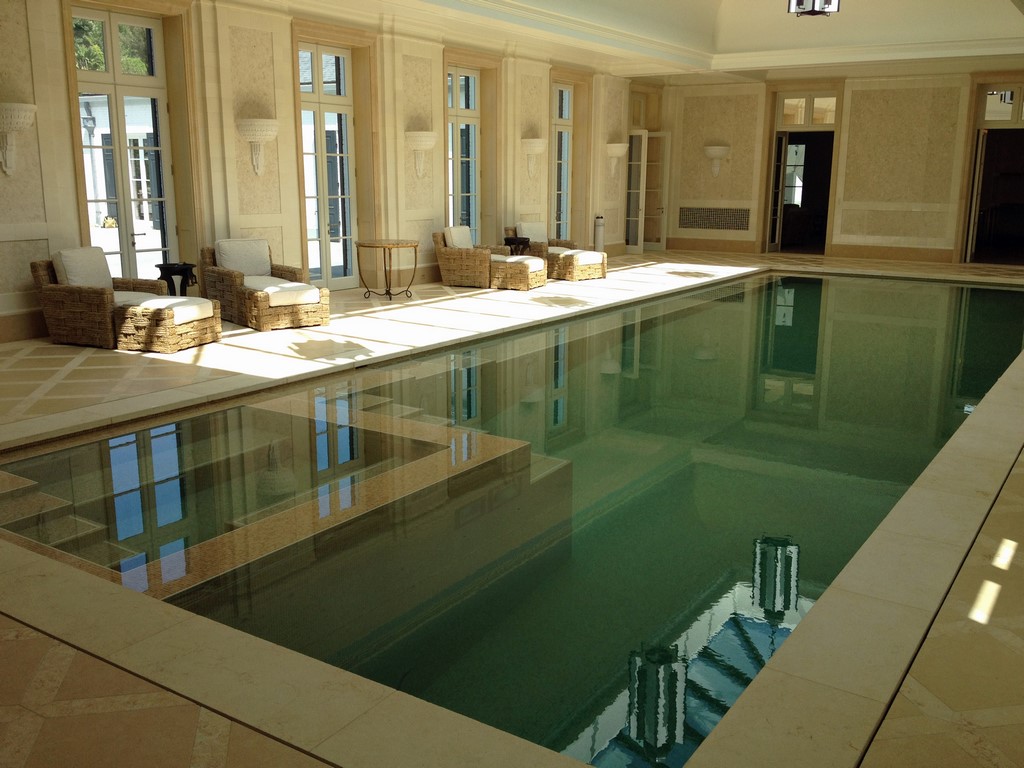
The project is located in Beverly Hills, Calif., on a property with a large, classic, oval-shaped outdoor pool in addition to the indoor watershape we were to tile. This interior pool/spa combination is connected to the massive home’s gym, salon and massage studio.
We never had any direct dealings with the client, which is, for this level of project, not that unusual. In this case, we were hired to take care of the pool tile application by the pool contractor, who had in turn been brought on board by the general contractor who ran the project for a New York-based architectural design firm.
In preparing for our work on site, I spent a good amount of time interacting with mosaic fabricators Rodger Gariano and Rick Skalak of Vita Nova (Pacoima, Calif.), mostly to work out details for the design of the band of waterline tile. This was important consultation: While the architects had specified a general look for the tile treatments, they’d left the specifics of how it would come together up to us.
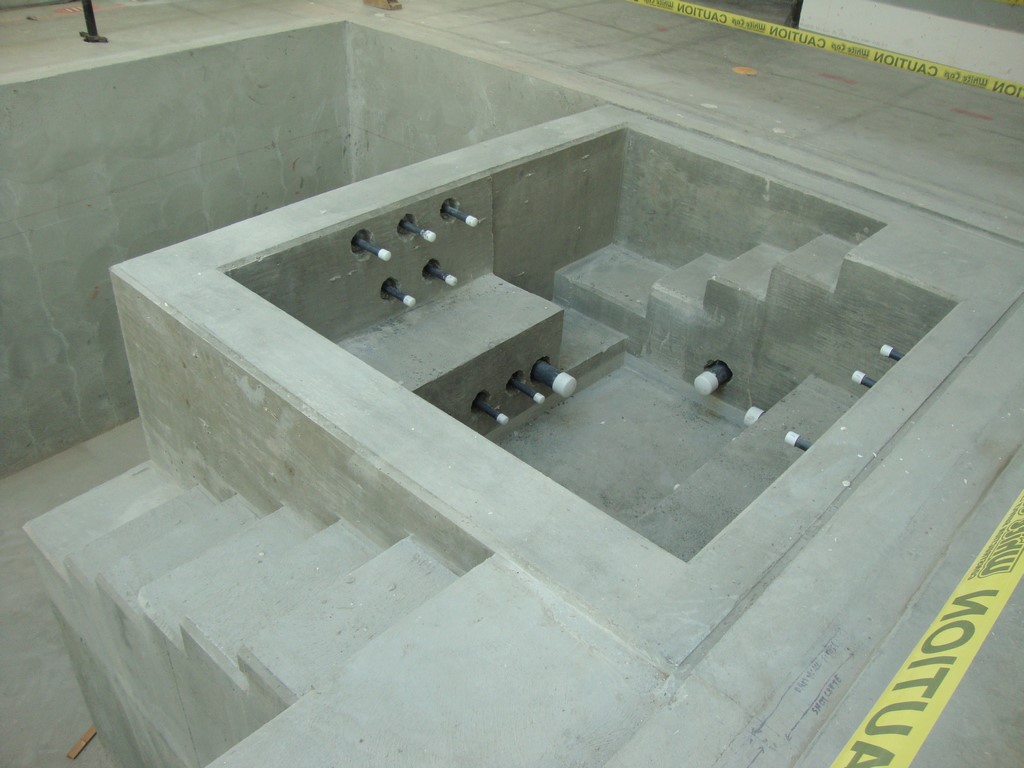
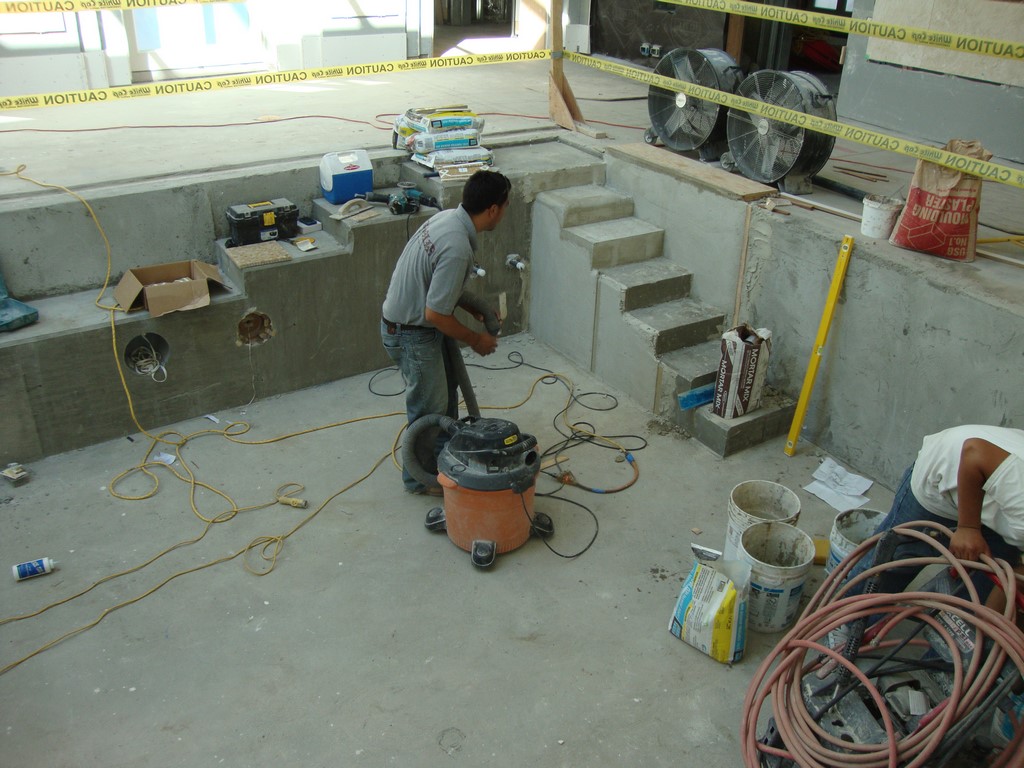
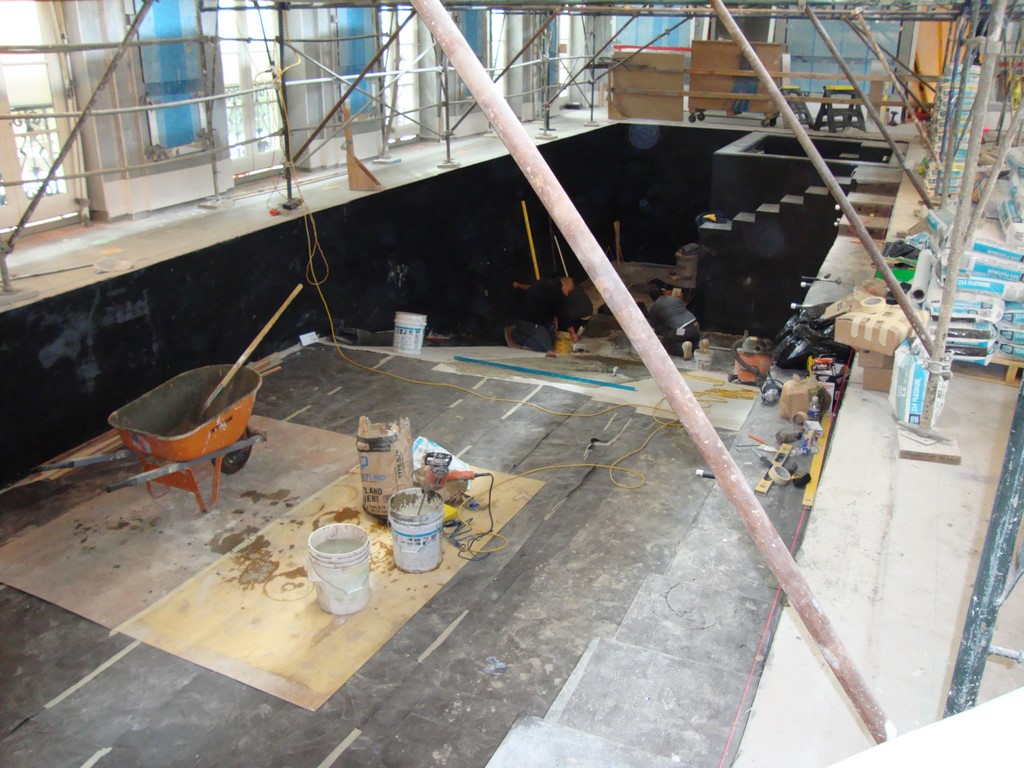
Moving on site, we faced the usual issue of needing to perfect the shell’s interior dimensions and surfaces to receive the tile. And this was true despite the fact that the shell had been formed and poured in place with good planning, great technical skill and a complete, detailed understanding of the critical finish tolerances.
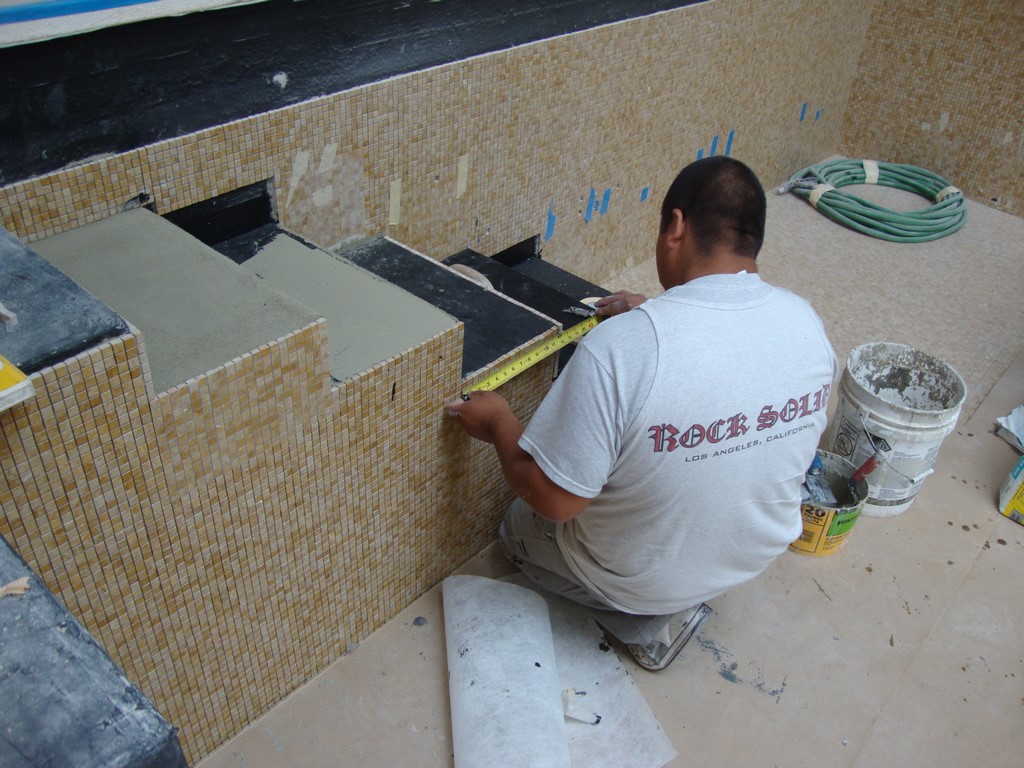
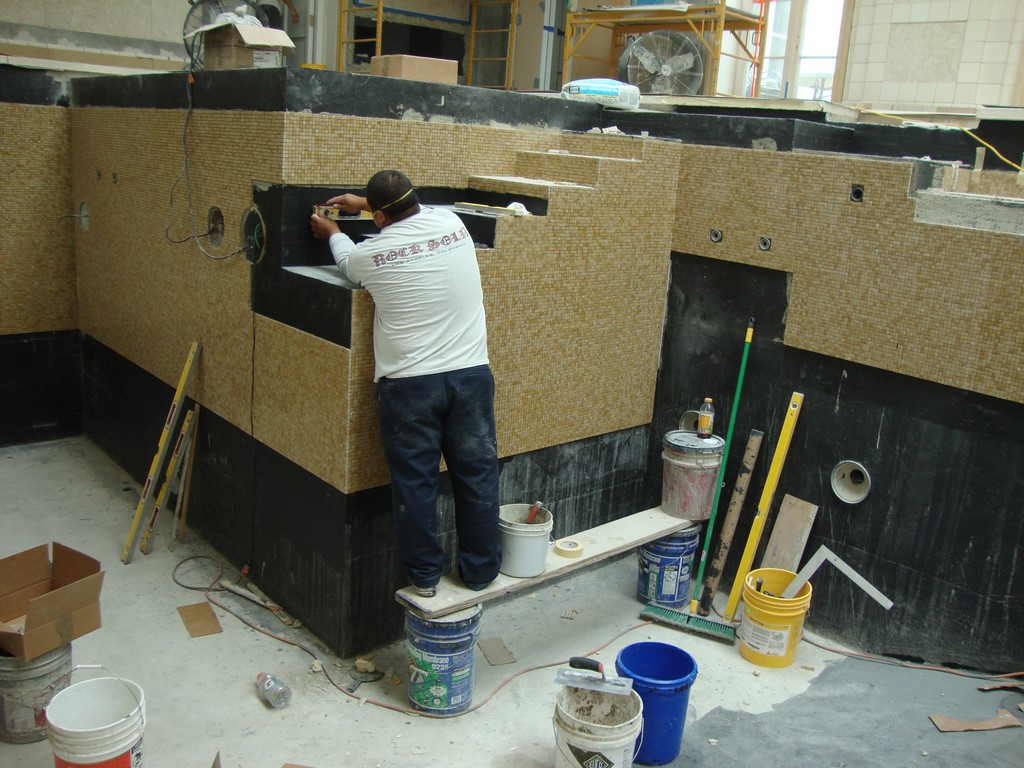
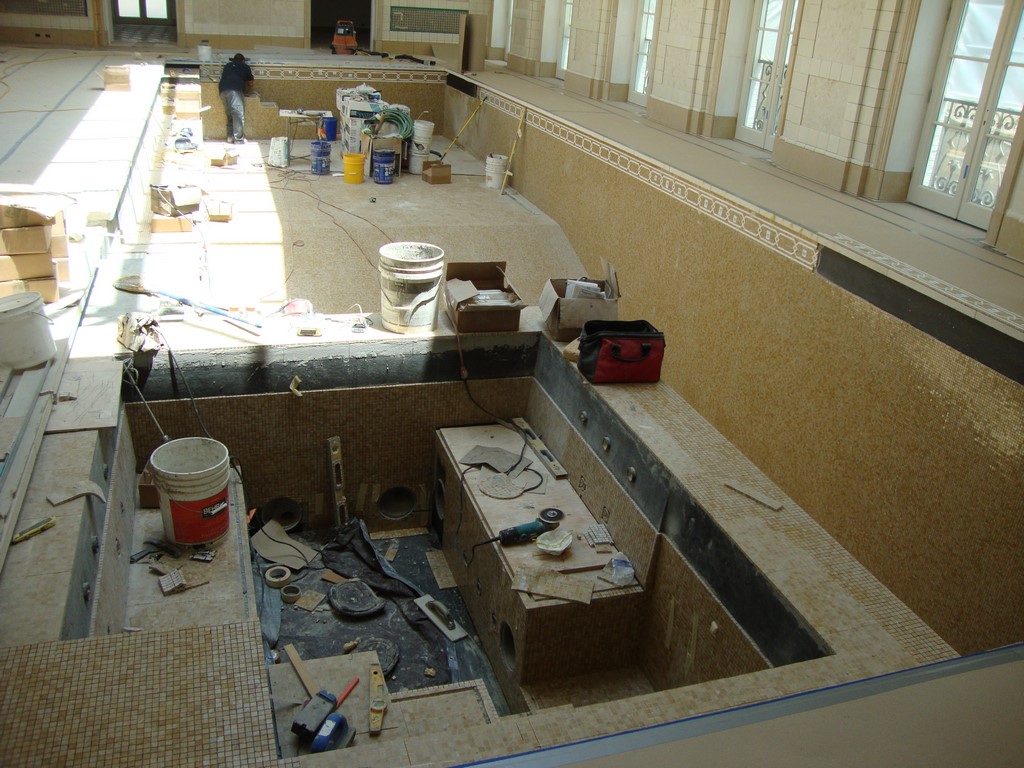
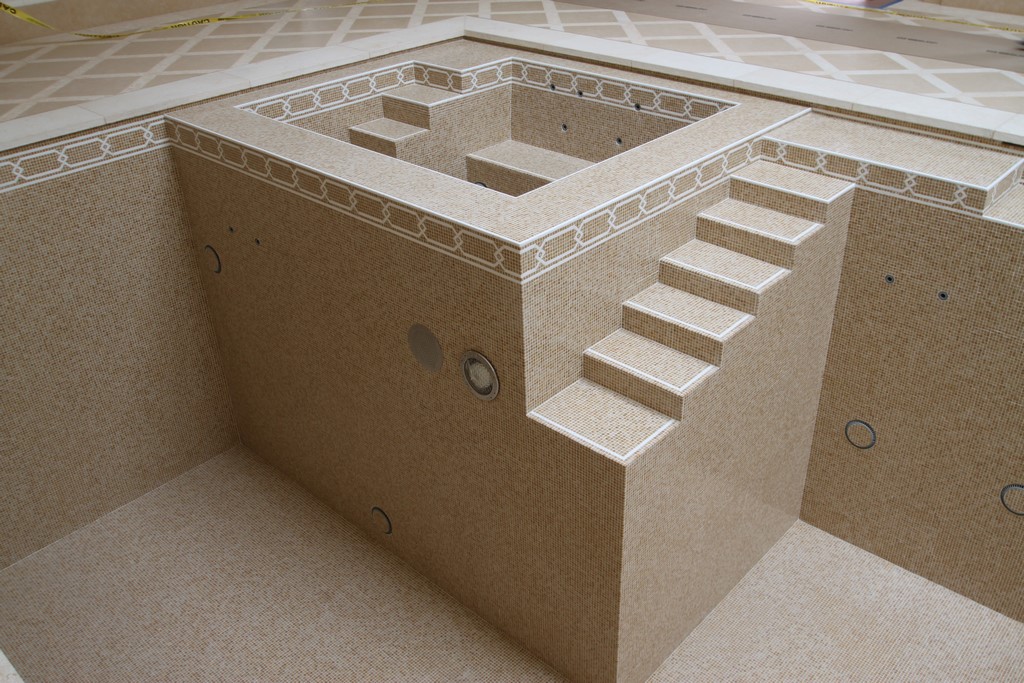
| The poured-in-place shell was beautifully prepared for us (top left), but we still had lots of work to do to make it tile-ready. Following a series of precise measurements, we floated the surfaces to the exact, required levels using float strips to guide us (top middle left), then applied the waterproofing system (middle right). The tile-placing process in a project like this one requires patience and precision – and near-constant checking and rechecking with tape measures and levels (right and bottom left). Finally, we were ready to work with the intricate waterline treatment (bottom right). |
On that surface, we would apply a mortar float onto which the tile was to be placed with no unnecessary cuts and perfect intersections of planes. Inevitably, this means chipping away at some of the transition areas but, to a greater degree, filling in and bringing the installation surface up to exactly the right level. To drive this process, we would be running through a seemingly endless array of calculations and measurements as we finally made ready to apply the waterproofing membrane, adhesive and tile.
We accept all of this as just part of the job, but we also recognize it as a project’s most critical (and time-consuming) phase.
While the plan left details open for us to interpret, the tile design had been drafted by the architects, who had selected the material well before we came on site right down to the colors and textures. We were there to bring one of many finishing touches to a home-building project that ultimately consumed more than five years.
Through it all, the architecture firm’s control was complete and all-encompassing: Every detail within the pool room is coordinated with respect to color, texture, gloss and appearance, with compatible materials and a discriminating eye on an overall aesthetic impression of a cool, refined elegance.
INSIDE THE SHELL
We started with a beautiful concrete shell, which had been poured in placed and offered a relatively good surface to accept our preparation – but, as was mentioned above, needed to be perfected to achieve the precision finish we were after.
We started by meticulously cleaning the concrete. We then moved in with samples of the mosaic material to be applied, laying sheets out in bands across the floor of the pool for measurement and establishing a center line to help us determine exactly how much of the shell we had to manipulate to reach the exact dimensions we needed to make runs of tile fit at full grid without any unnecessary cuts.
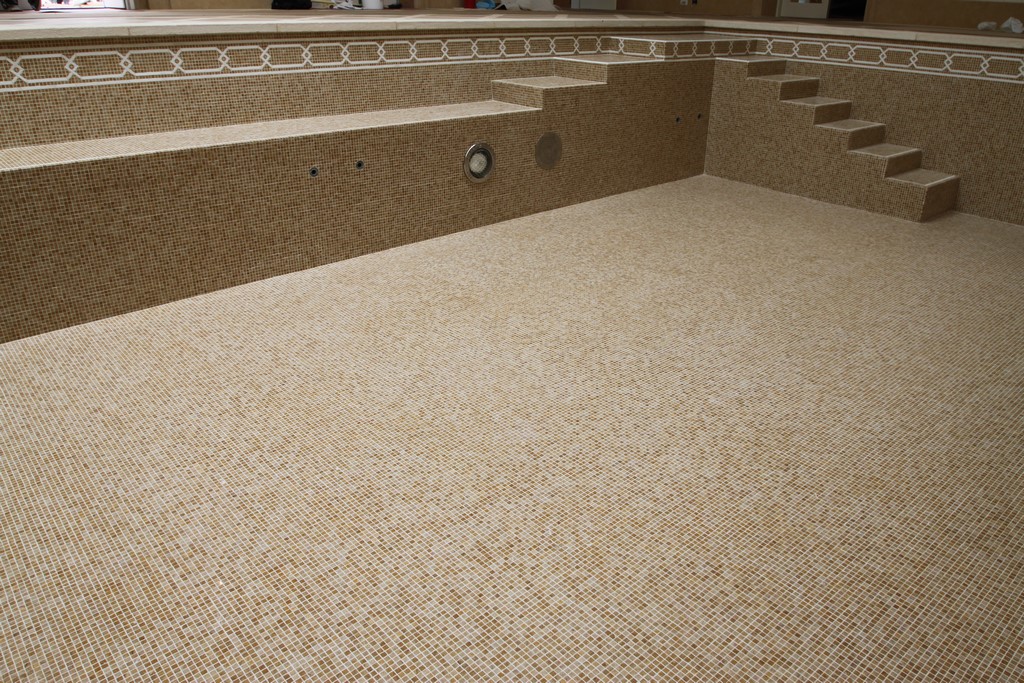
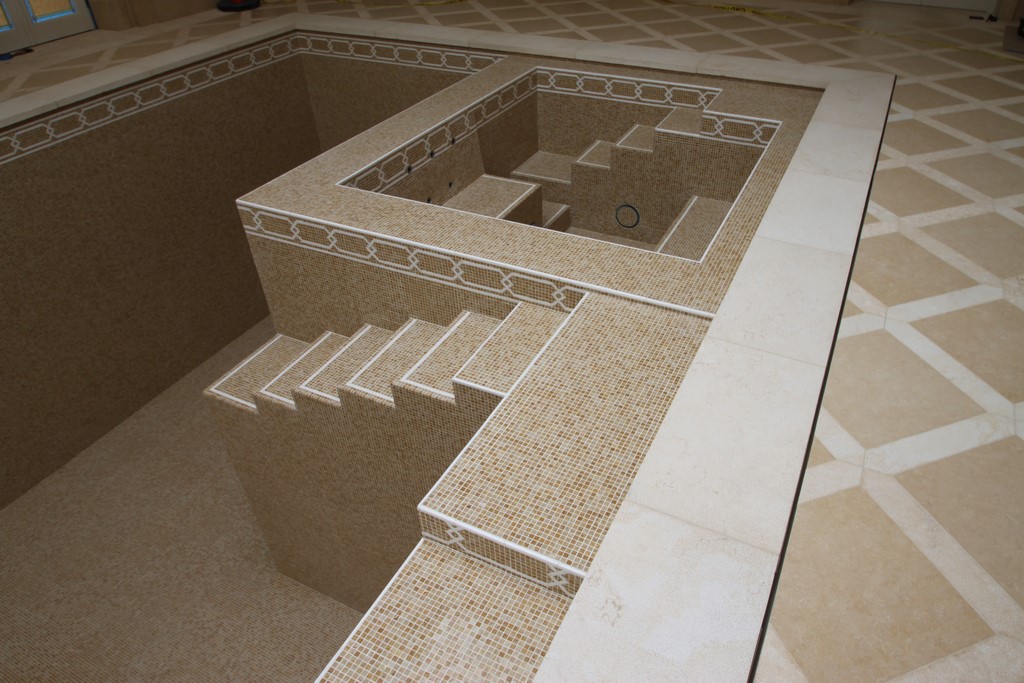
| Scanning the surfaces once all of the tile was applied and the interiors had been cleaned in preparation for adding water, it was easy for us to see what we’d accomplished: No unnecessary cuts, every section of the waterline treatment folding at 90-degree corners exactly in the middle of the link pattern, every vertical and horizontal plane precisely draped in beautiful mosaic tile. And as water was added, the whole composition only became more amazing. |
To this calculation, we added the thickness of the waterproofing material and thinset we would apply to the raw shell as well as the float we’d place to support the tile.
To be sure, that’s a familiar, straightforward process, but in this particular case, there was a unique challenge: The waterline tile treatment involved a woven, interlocking mosaic that had to lay out in such a way that, where it folded on itself at inside and outside corners, the links in the design had to break precisely in half. This was an unusual complicating factor, even for us, and it demanded unusual attention throughout the planning phase of our work.
With all of our preliminary surface preparation and adjusting complete, we were ready to start our floating process, attaching vertical float strips of quarter-inch-thick redwood lath to the walls every several feet or so to guide us in scribing the float. We soaked the lath in water for a few minutes before putting it in place: It had to be moist enough that it would help the thinset bond to the wood rather than sucking out all of its moisture and popping off.
Once the float began to set, we removed the redwood strips, cleared away all the burrs and irregularities, filled the gaps with more mortar and then applied the waterproofing membrane. The result was a very smooth, water-tight surface with straight, flat, true lines and the perfect dimensions for the tiling process we were now ready to tackle.
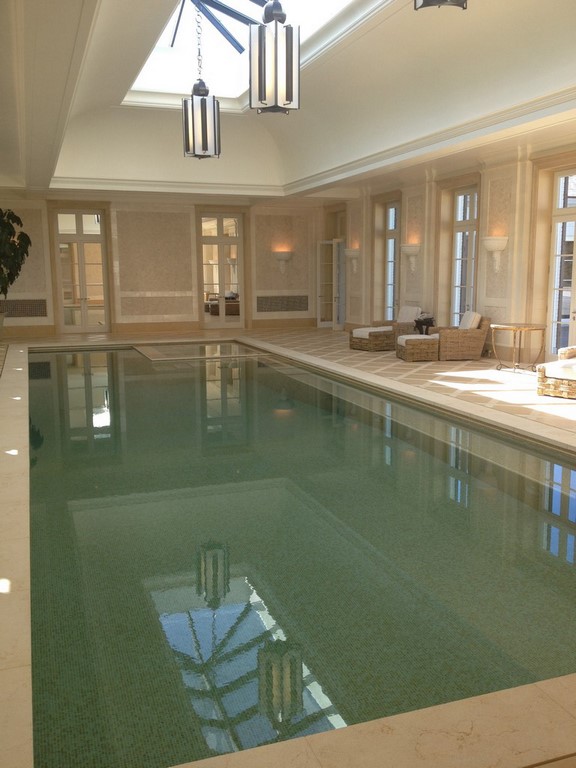
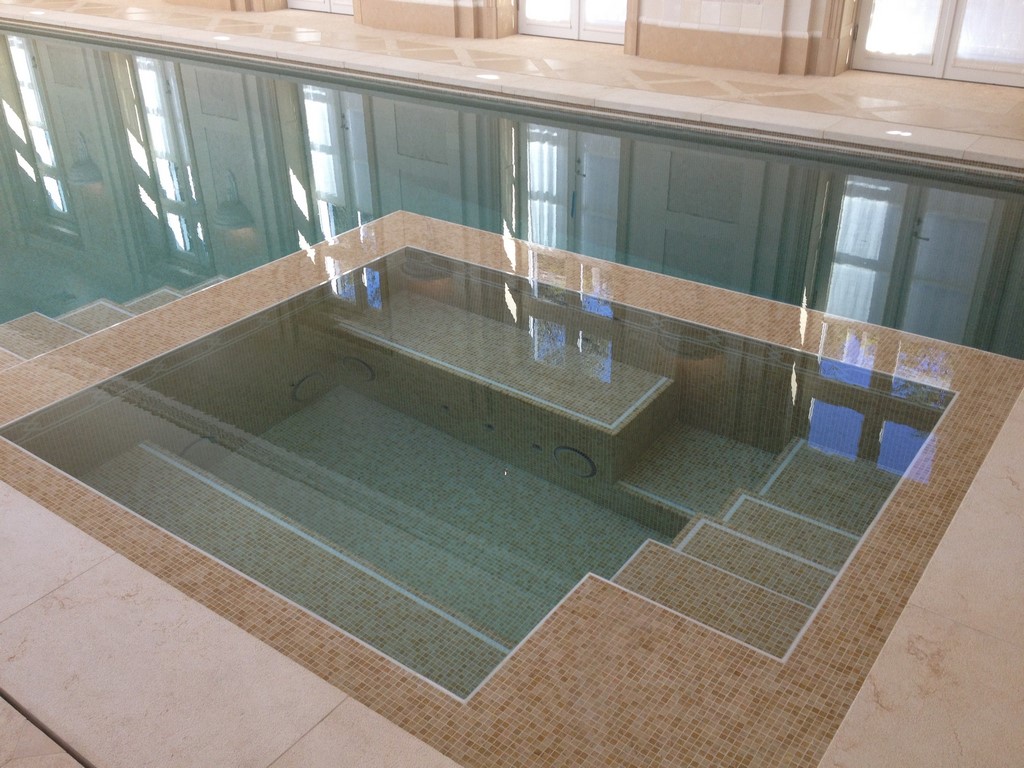
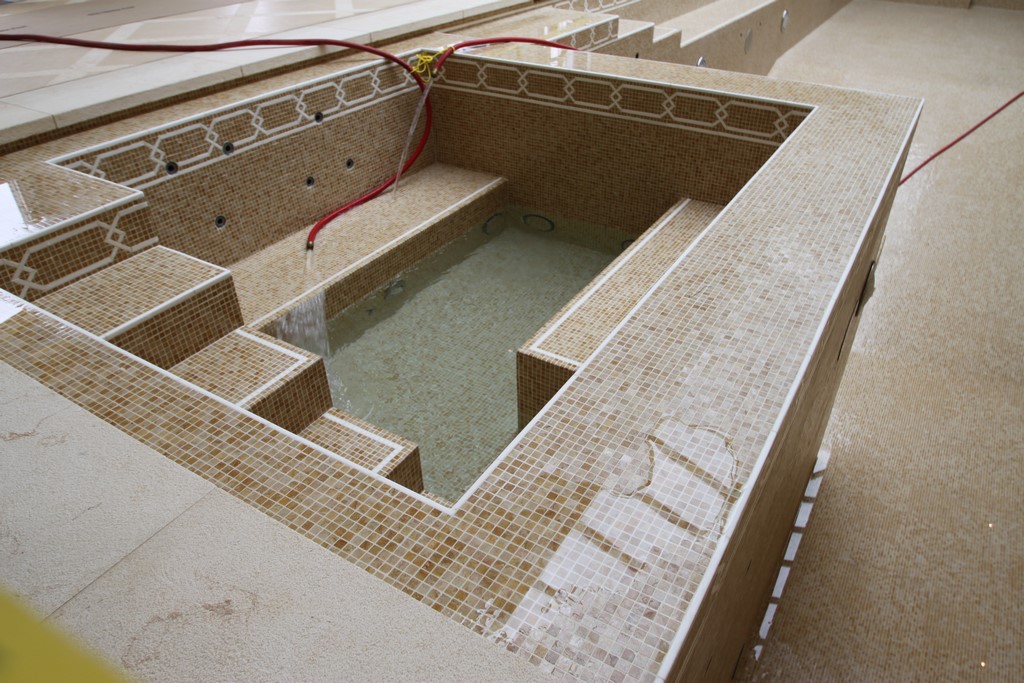
| As the pool filled to capacity, we were able to watch the outer lip of the spa sink until all it did was just barely kiss the surface – a final indication that we’d achieved the grand level of perfection we’d been pursuing for three months. That edge is so precise in elevation that it does nothing to break amazing reflections of the pool’s elegant surroundings on the water’s surface. |
The application process was complicated by the fact that the wall tile was integrated fully into the waterline pattern, which in turn flowed onto the steps and within the spa in ways that made us slow down and think through every inch of an intricate set of intersections and transitions. We also had to bring field tile up to the edges of the steps in such a way that they could be detailed and polished to make the intersecting stone pieces seem perfectly monolithic.
At 20 by 50 feet, this isn’t what I’d call a huge pool, but from beginning to end, it took a crew of eight to ten of us more than three months to complete our work.
TAKING STOCK
It’s a good thing that projects as rigorous as this one seem to find their way to us regularly: They’re uniquely exhausting, both mentally and physically, but this is what we thrive on.
To start with, there’s a lot at stake, with a requirement for absolute precision and every expectation on the part of the pool contractor, the general contractor, the project manager and the architects that every surface, every transition, every significant detail will be flawless. This kept us on our toes virtually every minute we were on site, but ours is a happy, dedicated crew that could stand up under the scrutiny.
In addition, we had a clear sense of how integrated our part of the project was within the overall design. That’s not uncommon, but again, this project was special in the degree to which absolutely every surface in the pool and spa and around the entire room was expected to synergize in creating a complete visual impression.
Finally, we at Rock Solid Tile are proud of what we do, enjoy our reputation for high-caliber work and never admit the possibility that we can leave behind anything that isn’t just right. That’s relatively easy to do in projects meant to dazzle, but where the goal is a cool, understated elegance? That’s where we really shine.
Jimmy Reed is president of Rock Solid Tile, a tile design/installation firm based in Calabasas, Calif. He founded the company in 1985 after spending his teens and early 20s learning the tile-installation trade. In between, he attended Art Center College of Design (Pasadena, Calif.) and spent several years working in the entertainment industry. For the past 30 years, Reed has focused most of his creative energy on designing and installing tile finishes for high-end custom watershapes, a process that has seen him work with some of the industry’s leading designers and builders. He may be reached through his web site: www.rocksolidtile.com.