


Integrity Below Grade

When he was brought in to replace a pool that had failed because of improper construction for the existing soil conditions, David Tisherman knew he would have to dig deep to come up with a solution – literally. The resulting structural design defines an approach to building in which at least as much thought and care goes into what’s installed beneath a pool or spa as into how the project ultimately will look to the client.
Some projects are doomed from the start, and it was pretty obvious when I first laid eyes on what was left of the existing pool that this was one of those cases: Light-duty construction coupled with a complete lack of consideration of existing soil conditions had resulted in a nightmare for the homeowner – and costly litigation for the contractor.
But with every failure comes a chance to succeed, and that’s what we’re working toward in this project, which is about 50% complete as this chapter of the story is being written.
Our goal: taking an utter catastrophe and transforming it to a world-class, elegant backyard environment, a process that so far has involved arbitration, negotiation, demolition and application of sound engineering principles to ensure that what goes on in the soil around them will no longer affect the pool, spa, fountain, barbecue and decks we’re installing.
AN INSIDE VIEW
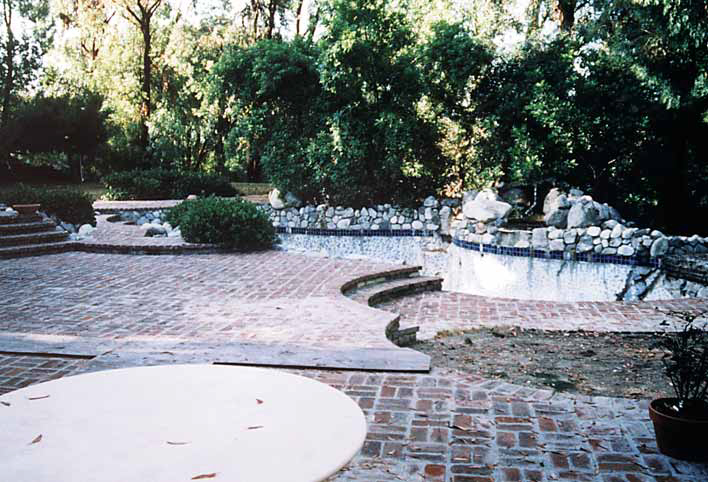
The original pool had suffered much during its wretched six-year history. The problems had started with a hinge effect at the location of a small waterfall near the transition from the shallow to deep end. Once that weakness was exposed, the subsurface shifting ultimately shattered the entire structure. As Figure 1 shows, by now the shell was shot through with cracks a quarter- to a half-inch wide.
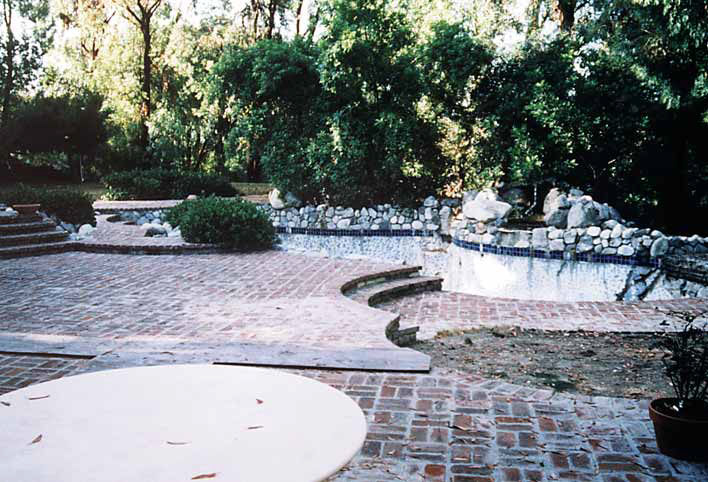
| Figure 1: The original pool had been graced with reasonable aesthetic values – but no structural integrity whatsoever. A hinging effect with the low waterfall on the far side of the pool had started the process, and before long the entire shell was shot through with cracks. |
There were two main problems with the soil: an uplift problem created by its expansiveness along with a creep factor. The whole site was set on compacted fill, which is where the lift originated, while the creep was due to the area’s dominant alluvial conditions.
The soils and geology reports clarified the extent of these unfavorable conditions, but after demolition even a quick glance at the soil surrounding the pool made the situation obvious: You could see three dramatic transitions in the type of soil, and the pathways by which the ground was moving were right there in plain sight. In brief, there was no integrity to the ground at all. There was no load-bearing capability, and it was little wonder that the original pool had failed as badly as it did.
| Dealing with Disaster
The original pool was only about six years old and had been the subject of litigation for a while by the time I saw it. Its owner had become a regular visitor to an extensive remodel we were doing in his neighborhood, curious about everything we were doing. He watched the way we graded the lot, saw the amount and type of steel we were using, observed the way we laid out the deck. From the start, it was obvious that our design involved a far different type of construction than had been used in his backyard the first time around. One day, he asked me to come over for a look at his pool, which he’d told me had cracked. What an understatement that turned out to be. As Figure 1 in the accompanying text shows, it was a horrendous mess. The problem, obviously, was improper construction for the existing soil conditions, but I told him that I’d need the soils reports and any original plans for the pool to render a more informed opinion. Except for a set of rough plans, however, neither the owner nor, presumably, the contractor had anything of the kind. At that point, I was retained as his expert in the litigation. There was no real question about liability. In fact, the only question was how much the contractor would have to pony up for the pool’s replacement. His attorneys came in with an extremely low number; our side came back with a price based on the way I’d rebuild the backyard, a much higher number. To make a long story short, the attorneys reached a settlement figure well in excess of $300,000. That’s a significant amount of money, but it’s all been going back into transforming the homeowner’s nightmare into a much more pleasant reality. – D.T. |
The new pool and waterfeatures had to be designed to accommodate these hostile conditions. We knew that, no matter what we did, the material directly beneath and around the pool would continue to move. As a result, we knew we’d have to build a foundation that reached to an acceptable load-bearing material.
As it turns out, about 20% of the new pool overlapped the old pool’s location. Using soil excavated for the new pool, we filled and compacted about 40% of the void where the old pool had been. The city requires 90% compaction and further requires that a geologist be on site to verify that the soil has been properly placed and compacted in two-foot lifts.
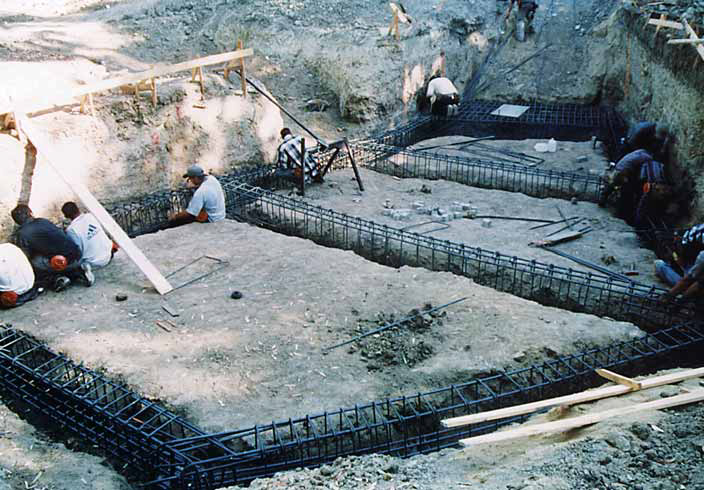
As this work progressed, we began excavating holes and trenches for a huge system of friction piles and grade beams that would serve as a support for the swimming pool and spa and the reservoir for the vanishing edge.
This is where we get into some very fundamental elements of structural design on a grander (and much more secure) scale: All piles had to be anchored to a depth of eight feet or better in competent, load-bearing material. In geologists’ terms, this doesn’t necessarily mean bedrock, but rather material that will adequately and permanently support the weight of the pool. At the surface, the piles must be tied together by grade beams that run in at least two different directions.
HIGHER STANDARDS
I don’t believe in fooling around when it comes to the structural integrity of my projects – and that’s never truer than when I know I’m dealing with bad soil conditions.
What we’re using for this project is very similar to the type of construction you see underneath elevated portions of freeways. When you look at those big pillars – the ones that look like toilet paper rolls – that’s essentially what we’ve set up beneath the pool. The horizontal members connecting the pillars and supporting the freeway deck are the grade beams; pushing the analogy along, the cars are driving in the bottom of the pool. You add walls and water and you’ve got a swimming pool – or a flooded freeway.
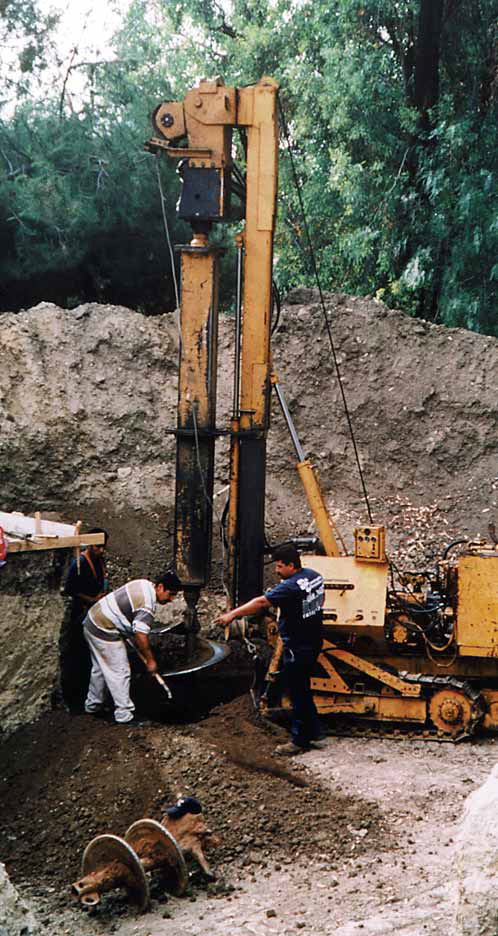
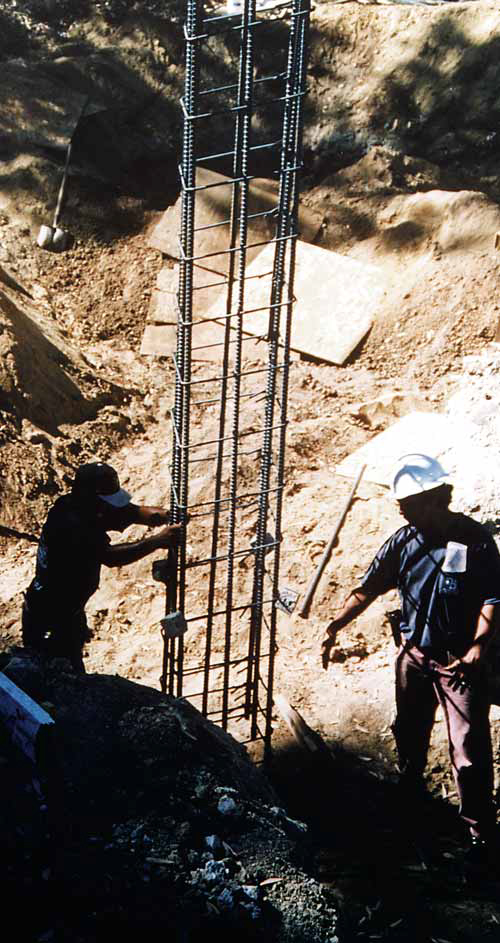
| Figure 2 (left): We were fortunate that this site offered good access for construction equipment. The drilling rig made reasonably short work of holes for the piles, which reached down more than 40 feet into suitable bearing material. Figure 3 (right): Setting up 40-foot-plus piles on site and in the holes would have been difficult, to say the least. We were relieved to be able to prefabricate the cages and simply guide them into the holes with the help of a crane we brought on site. |
So we had these big concrete toilet-paper rolls going down into the ground, all the way into the load-bearing material. On this job, we had to dig through about 35 feet of fill below grade, which meant that the piles we built were generally about 43 feet tall. We drilled the holes with an auger on a track-mounted drilling machine (Figure 2).
| Coming to Terms
Once the owner settled with the original contractor, he decided he really did want a pool – and that he really wanted me to do the job. The site problems were clearly major, we had no new design and there were dozens of variables involved. Before I’d commit, I let the homeowner know that we needed to make several key decisions together and zero in much more closely on the actual scope of the reinstallation. Most important of all, I let him know that I had to be the one to design the pool. So we talked about positioning, adjusting the grade, dealing with architectural and homeowners’ committees and the need for extensive soils-and-geology testing and subsequent structural engineering. We also needed to design the backyard, so we discussed water effects and finish materials and how we could work them into an overall program that would visually tie what we were doing into his aesthetic sense and the overall impression given by his home. We talked about the auditory factors, too, and how all of this should be worked into one integrated design. We planned and revised, finally landing on a design and a set of materials to be used. When all was said and done, the owner commissioned an elegant environment that included a raised spa, a vanishing edge with a waterfall feature, a fountain, new decks, a barbecue area and a totally redesigned landscape. Perhaps most important of all, he wanted all of the various elements to be built to last this time around. Now we needed to discuss money. I let him know that I had no way of knowing exactly what it would cost and I still don’t know, several months into the project: There are just too many variables. So what I laid out for him was an arrangement that calls for a tremendous amount of trust between contractor and client – one in which the job itself determines the price. I can do this because I’ve spent a career building a reputation for reliability and integrity. And it’s a legitimate approach, too, when you consider that nature works over thousands of miles: A matter of a few feet isn’t anything to the hillside you’re building on, but if the ground conditions require you to build a pile that runs ten feet deeper than you thought, who pays for it? Taken the other way, if we’re planning for piles that are 27 feet deep and they come up at 20, who gets the savings? The fairest way in a large job, especially when you’re dealing with difficult soil conditions, is to bill everything as time and materials. In this case, the owner accepted and we went forward. It’s important to note that this works only if both the contractor and homeowner have complete trust in each other and a great deal of personal integrity! – D.T. |
Using an auger, piles can be drilled to a diameter of 24 to 36 inches. The specific diameter of a pile is based on several factors: the type of soil, its coefficient of friction and load-bearing value, the size and grade of steel to be used, the concrete mixture, the physical location of the pool and, of course, the recommendations of the geologist and soils engineer and local code requirements. As a rule, however, it’s generally safe to assume that the shallower the pile, the thicker it should be.
For this project, our long piles had 24-inch diameters. At a depth of 43 feet, that means a lot of concrete – 14 cubic yards for each pile and a total of 112 yards of concrete in the piles alone. And that total doesn’t cover the grade beams, which typically require about as much concrete as the piles. In other words, this is literally heavy-duty construction. Most pools in the United States contain, in total, between 30 and 40 yards of concrete. By the time it’s finished, this pool easily will have 10 to 15 times that amount.
| Defining the Space
Beyond the structural distinctions between the new pool and the old one, the most important difference between the original and its replacement has to do with positioning – in my book, a decision of great significance. In fact, I consider the relationship of a pool and waterfeatures to a backyard and the site’s overall environment to be of paramount importance. This is a set of decisions that has a profound influence on the way the entire installation will be integrated with the lot, the home and, indeed, the lives of the residents. Too often, designers and builders put the pool right up against the house so that when someone walks out back, all they see is swimming pool – and that’s not necessarily the right approach, no matter what conventional thinking about convenient access might tell us. The idea with an “elegant” installation is to make it as beautiful as you can – and to make it flow as part of the environment. A pool is certainly a defining feature of that environment, but often it is only one among many and exists in a visual context. Not to get overly philosophical, but it’s my belief that when you walk out of the home, you shouldn’t feel you’re in the presence of a swimming pool so much as you should feel that you’ve entered a beautiful environment that includes a swimming pool. That was our goal here. And when we pushed the pool back and away from the house and shifted it several feet toward the far side of the property, it opened the setting to all sorts of potentials that had never before been clear. – D.T. |
After we dug all of the holes for our piles, we called in a geologist to verify the depth of each hole and to ascertain that we had indeed hit load-bearing material at each location. The geologist left us with a “sign off ” letter for the city inspector, who came by shortly thereafter. The inspector confirmed the geologist’s findings then ran through a long checklist of other factors before he signed off and we moved on to the next stage of the process.
I see this as an important point: Many builders despise inspectors as the enemy and consider their work as nothing more than red tape that drives up a project’s cost. To my way of thinking, however, they’re another set of eyes, professionals whose work will help me ensure my own success. For that reason, I want as many inspections as I can get on a job, and I want the toughest inspectors available.
And this is true for every single job I do – doubly so on hillside projects like this one where I know the soil conditions are unfavorable.
STEEL AND CONCRETE
Next, with all the holes dug, it was time to drop in the steel cages.
Sometimes we’ll tie the steel for the piles together inside the hole, but that’s no fun at all – believe me. If you have access, as we did on this site, it’s always better to bring in a crane and drop prefabricated cages into the holes (Figure 3). In this case, the cages were made of eight #8 60-grade rebars on the vertical, with #3 ties at ten inches. The ties increased to every five inches at the bottom and top of the pile. The dowels coming up into the grade beam are #6s.
| Waiting Out El Niño
We signed papers to tackle this renovation project in the Spring of 1998 and all were anxious to get started. As luck would have it, however, this was the start of a record year for pool construction as well as rain, which resulted in many contractors having to dig their pools more than once. We took a different tack: To my mind, there are enough problems in construction without having nature come and create more, so we waited for the rains to stop. And waited. And waited. But we also turned the storms to our advantage, using the opportunity to observe the way water moved across the property and correcting for the fact that the original pool and decks were six inches above grade – a fact that explained why so much of the rainwater headed right for the house. We spent nearly three weeks and $10,000 just setting the backyard up to handle the rain. We cut channels in the existing decks, set up new drains and made sure all of the water had places to go. Sure enough, the rains continued with a vengeance, just as they already had done for weeks and months. But the site was now stabilized, and all we had to do was wait out the storms, which finally let us get to work in June. – D.T |
The piles were poured using a minimum 3,000-psi concrete. After a seven-day break, we sent concrete samples to the American Standards Laboratory for compression testing. In this particular case, the readings came up to 3,800 psi. Some may question the need to go the extent (and expense) of this type of testing, but I wouldn’t have it any other way: It’s no fun at all, and really bad for business, to have to go back and rebuild a pool or pay for someone else to do the work.

| Figure 4 (left): We use lots of steel throughout our projects to ensure structural integrity, and that includes all the work of properly setting up the grade beams and securing them adequately to the piles below. Figure 5 (right): Once the cages are all established and we’ve made certain we’ll be able to tie this massive substructure into the pool,spa and decking that will top it,we set forms and get ready to pour concrete. In all,the substructure for this project cost $45,000 — more than the total cost of the original pool. |
We used a backhoe to dig the trenches between the piles to accommodate the grade beams. Large steel was placed and blocked up to the piles in two directions to prevent tortion or twisting (Figure 4). Wooden forms then were placed at the appropriate grade to hold the concrete as it was poured to make the beams (Figure 5).
After the concrete was poured and the beams had set, we removed the wooden forms and brought in dirt to backfill up to the height of the beams. This dirt didn’t need to be compacted: It was only a form for the floor of the pool and the gunite shot against it.
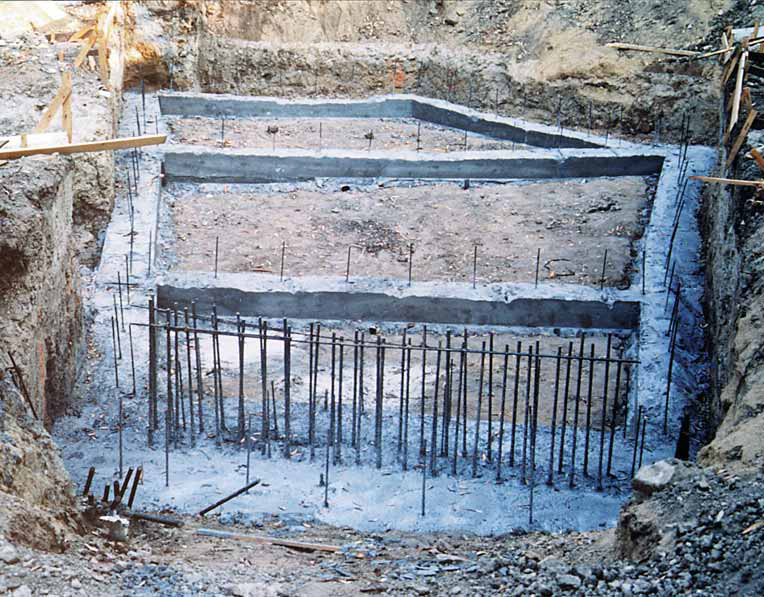


| Figure 6 (left): One of the challenges we had in implementing the substructure design involved setting up cantilevered beams to support the spa and the structural deck that is to surround it. Figure 7 (middle): This is probably the last anyone will see of the substructure we’ve set up to support the new pool,spa and decking.We built it to last – even if the entire hillside decides to wash away in the next round of El Niño storms. Figure 8 (right): Their underpinnings set and ready to support the load, the pool, spa, fountain and deck are now under construction and will be completed early in 1999. Once landscaping is completed shortly thereafter,the homeowner will be able to enjoy an elegant, fully integrated dreamscape. |
In all, this project includes 13 grade beams of various spans and diameters with varying rebar schedules, mostly #6s and #8s. As mentioned above, we built a section of cantilevered beams extending out to support a structural deck surrounding the spa (Figure 6).
WHAT IT TAKES
Obviously, the first thing you need to be sure of in any job is that the structure won’t fail, and that was certainly true for this project. No matter the job, however, the soil dictates the type of construction used: Based on my experience, I may decide to increase the amount of steel I use in any given structure – but I’ll never decrease it.
Of course, the use of all that rebar requires a lot of work in bending, laying and tying the steel. We use a hydraulic bender on site for everything up to #6s; beyond that, everything needs to be prefabricated.
With everything dug, tied and formed, we pumped 3,000 psi concrete into all of the grade beam forms (Figure 7). In all, this foundation cost $45,000 – which is more than the entire pool cost the first time around. That’s a lot of money for steel and concrete, but I sleep easy knowing that if the entire hillside washed away from beneath it, the pool it would still be there, right where I put it.
And because we focused on setting up suitable transitions from this substructure to the pool, spa, decking and fountain (Figure 8), we knew we were ready, once the inspectors had their say, to move on to the next phase of the project.
Next: Completing the hardscape, from forming the shell and pouring the decks to applying an array of finishing touches.
David Tisherman the founder and principal of David Tisherman’s Visuals in Manhattan Beach, Calif. A designer and builder of high-end custom swimming pools since 1979, he is widely known in the pool and spa industry as an advocate for the highest possible standards of design, engineering and construction – an approach fostered by his extensive studies in a variety of technical disciplines. He has degrees in industrial design and history’from CaliFornia State University at Northridge and pursued advanced degrees in design and architectural rendering at Art Center College of Design and Harvard University’s Graduate School of Design. He serves on the adjunct facultv at UCLA and chairs the university’s extension courses on drawing and presentation. He also has won several awards for his designs in the United States and internationally, and his workhas been featured in several magazines, including Architectural Digest. Tisherman serves as an industry expert for Califomia’s Contractor State License Board and has been a member of the National Spa & Pool Institute’s Builders Council since 1994, recently serving as its chairman.