Improving on the Past

Renovating pools that were built in decades past often means dealing with structures, materials and mechanical systems that were installed before the industry had fully developed its technical understanding and construction standards. Here, JC Escudero describes one such renovation project in which he brought a “lagoon pool” into the modern era – all with his distinct design flair.
By JC Escudero
This project is located in an old neighborhood in Pasadena, CA., nestled on a property with a large California ranch-style home that was built in the ’50s. The backyard was basically empty for many years until the owners decided to build a pool about 40 years ago in the early 80s.
For that era, the pool and surrounding landscape were typical of a “custom” space, featuring a free-form design with lots of faux rock, and other elements that were growing in popularity back in that era. By today’s standards, it’s unremarkable; but in those days, it was a truly luxury design.
Working in Southern California, we’ve found that existing pools of that era tend to fall into one of two general categories: well-built or very poorly so, with not much middle ground. This one would qualify as the former. Back in those days, watershapes of this type of freeform design were often referred to as lagoon pools and for its time, this one was done well.
But that was then. Today, we know much more and, over time, have learned how to design and build structures and systems that are far more reliable, and how to create settings that are equally more beautiful. Comparing the existing pool to the way we do things today; it was obvious from the start this would be a major renovation.
FIXING A FAMILY POOL
In this case, the owners have a big family. Their children are grown and they now have several grandchildren. We stayed true to their original concept of a family pool where people of different ages will use it in different ways.
It’s big for a residential pool, roughly 70 feet long, by about 22 feet wide in the shallow end, 32 feet in deep end, which is 13-feet deep and suitable for diving. There was a large attached, contributing to a hefty water volume of approximately 40,000-plus gallons.
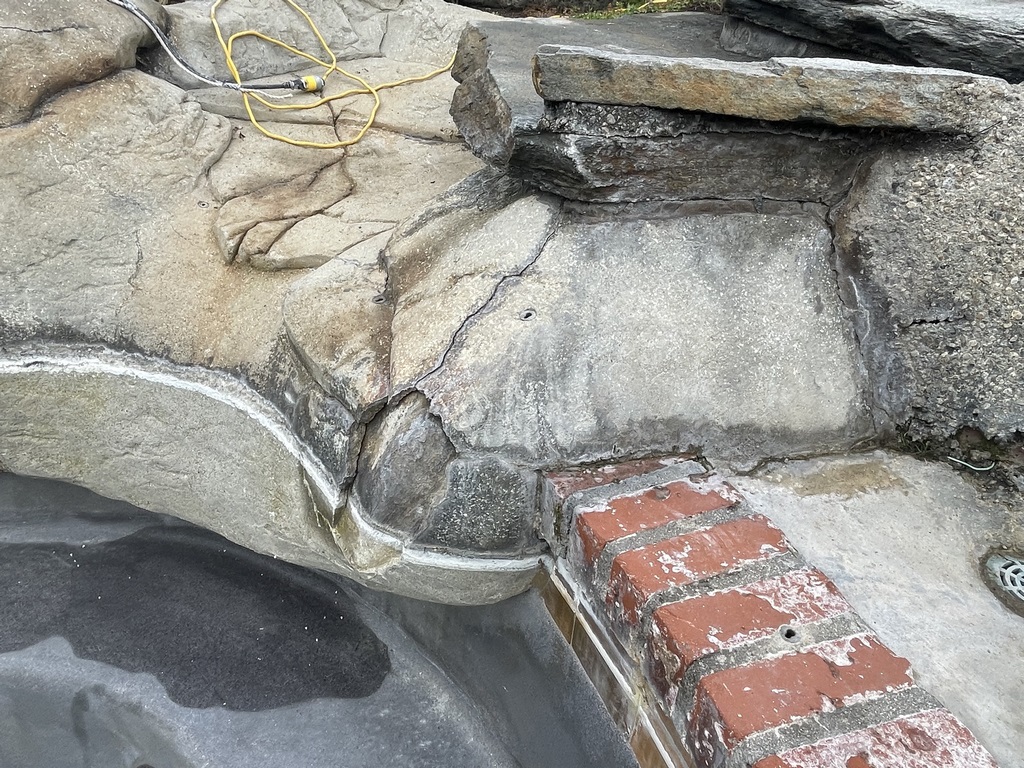
The effects of age had become evident and the pool desperately needed updating, both from an aesthetic stand point and in terms of structure and overall functionality. The first and most obvious problem was severe cracking and deterioration of the extensive artificial rocks.
We know based on experience that faux rocks of that era were made of unprotected concrete that eventually cracks. Water migrates into the rocks and they decay from the inside out, like a disease that spreads. Also, frankly, this generation of artificial rocks were aesthetically horrendous. The texture and finishing techniques did not look realistic, and certainly did not hold up over time. It is a badly outdated look.
Yet, for whatever sets of reasons, artificial rock was very trendy in the 80s and 90s. In this case, the pool had quite a bit of it, much of which extended over the copping and down into the water, which only aggravated the inevitable degradation. Over time, the structural damage in the rock spreads to the bond beam.
When you see a situation like this, you can’t be certain the extent of the damage. Accordingly, I had planned to remove the rocks, coping, tile and plaster, and then add additional shotcrete to the structure, because I was sure we’d run into areas that were compromised. Still, it’s impossible to know the extent of the damage.
MUTUAL UNDERSTANDING
I have numerous pictures of similar projects and years of experience with this type of recurrent problem. Based on mybexperience, I always tell the homeowner that we might run into damage that is relatively minor, or it can be much more extensive. And I tell them in the worst-case scenario, it’s possible we might have to take out the entire structure.
It’s like when you go the dentist or the doctor, experienced medical professionals can make assumptions, but until you have an x-ray, or an MRI, there’s no way to know for sure. You have to go through a diagnostic process.
Homeowners need to understand that. I explain that work like this is a joint venture between our company and them and there’s simply no way to know the cost until together we see with our own eyes the damage. These clients accepted that premise and already knew the pool was leaking and suspected the work could be extensive.
Fortuantely, the damage to the pool was relatively minor. The attached spa, however, was a completely different story. Because of all the rock on the spill way, the damage was extensive and the whole thing had to be removed. The water had been forcing itself through the entire spa structure.
The pool had bullnose coping around much of the perimeter. In those areas, there was little damage, but it was almost immediately obvious that much of the water in transition over the spillway was entering the shell. Cracks in the rocks on the spillway were exhibiting mineral salts, or scale, and I had a very strong suspicion the damage was probably very serious. Overall, I estimate that 80 percent of the leakage, and resulting damage was in the spa.

Beyond that, we also found some skimmer leaks where water intrusion caused a similar problem. The plumbing was badly outdated, which is very common for pools from that era because back then we knew much less about hydraulics and the piping was almost always undersized. It all had to be replaced, along with all the equipment, to bring the pool up to contemporary hydraulic standards.
BETTER BUILT
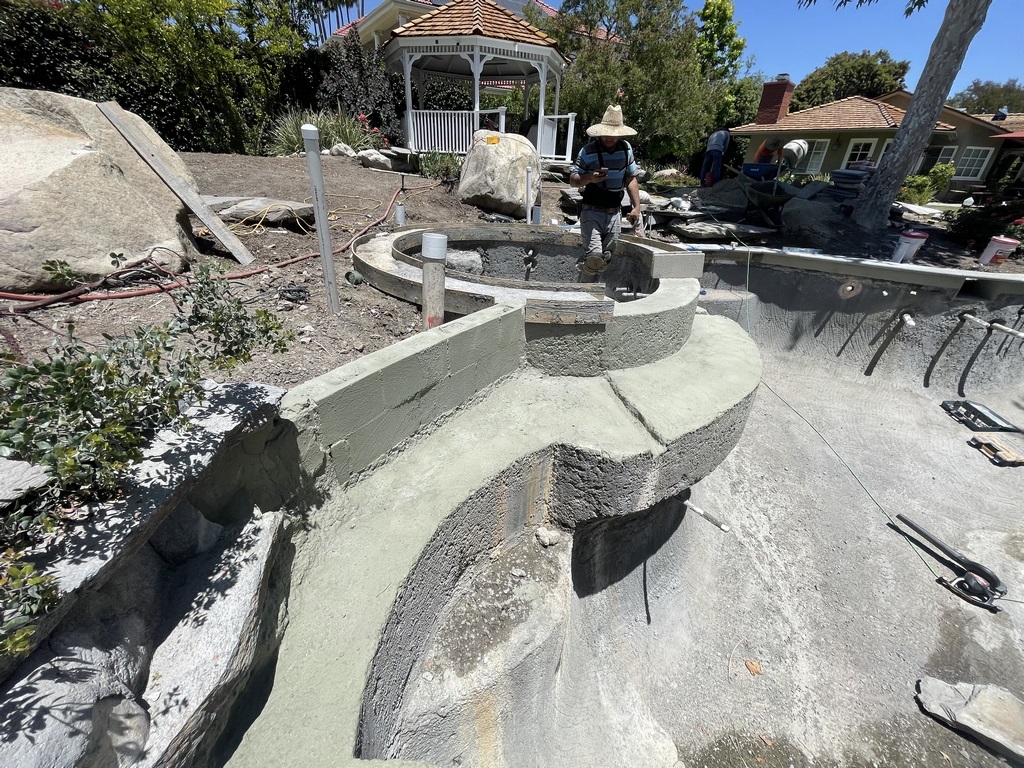
Our plan was to remove all the rockwork, the coping, tile and plaster, stripping the entire structure down to the bare bones, leaving us with just the pool’s naked shell. With everything stripped, we inspected the entire shell inch by inch, using a hammer and a rebar scanner to determine any signs of internal damage, as well as the exact location of structural steel.
We were also able to visually inspect parts of the shell when we opened up places to replace plumbing, such as the floor where we upgraded the main drain to bring it into compliance with anti-entrapment standards. (I’ve found that if the structure in the floor is in good shape, good steel coverage, no corrosion, etc. it’s a very good sign that other parts of the structure are, as well.)
We also pressure washed the naked structure to ensure that we establish a strong mechanical bond with added shotcrete and plaster. In effect, the new material becomes part of a monolithic structure, meaning it has no cold joints.
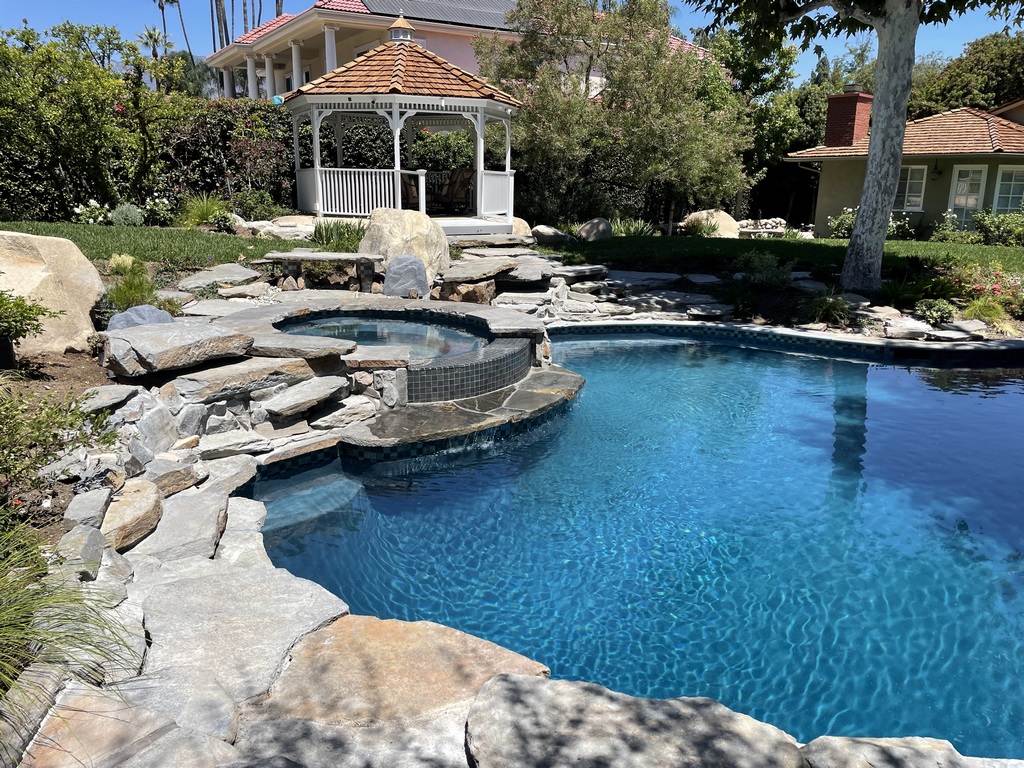
The most visibly obvious change was exchanging all of the faux rock for natural stone, which really should have been the decision when the pool was first built.
The landscape includes several large boulders that were, we believe, excavated during the pool’s original construction. This gave us an opportunity to visually harmonize the new rock structures around the pool to the landscape. It’s a very dense slate that we knew would be suitable for use around the pool. We used a variety of stone types including Oklahoma stone, moss boulders, Sydney peak stone and schist boulders.
Because we wanted to tie everything together visually, we had custom stone coping cut from matching slate material.
We knew the owners’ grandchildren would be using the rocks by the deep end for diving. We created platforms by rounding the edges to create comfortable footing with no sharp edges. We treated the approach to the diving rocks almost like stairs creating a safe approach with shallow risers. We also made sure that rocks on the deep end were slightly cantilivered for safety’s sake.
Because we replaced faux rock with natural material, it added are great deal of weight. We added shotcrete and steel to the bond beam in several places to support the heavy stones. We expanded the beam inward, adding a 20-inch-wide structural shelf that would support much of the rock.
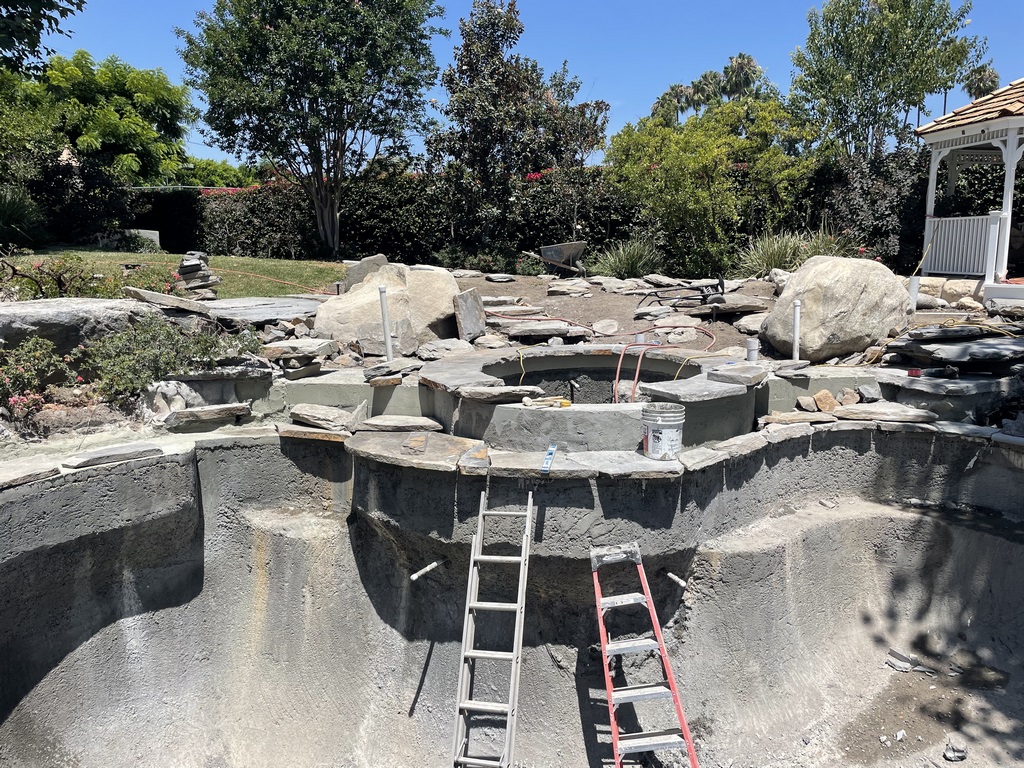
This enabled us to add a layer of rock, increasing the profile of the rockwork, making it more realistic in appearance. At the same time we avoided the vertical drop over the edge of the rockwork in the original installation. The appearance is now more complex and realistic.
The interior pool surface is a custom blend from Wet Edge, a polished aggregate finish that uses smaller-than-usual particle-size distribution, which generates a more uniform appearance than other finishes with larger stone. Both the clients and I were thrilled with the deeply inviting appearance of the water.
SPA RECONFIGURATION
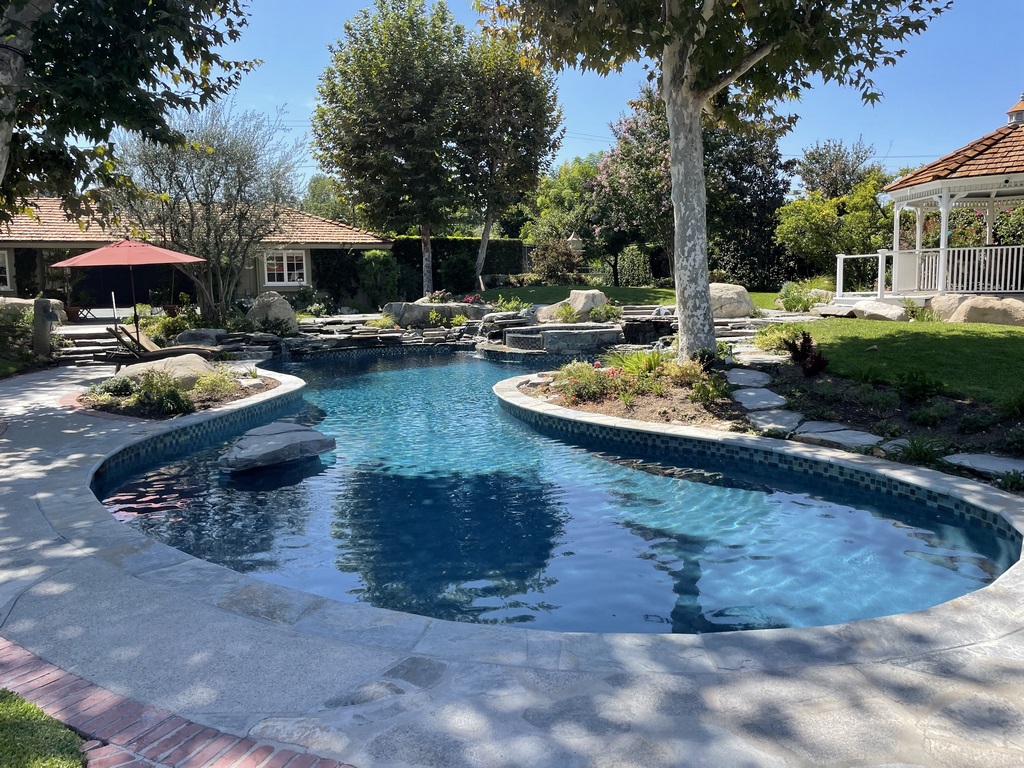
The spa dam wall and waterline are surfaced with a Lightstreams mosaic, which adds a beautiful iridescent, shimmering quality. The spa now overflows over a very clean weir, falling onto the structural shelf, creating beautiful sheeting effect. You can sit on the shelf in front of the spa and feel the warm water flowing over your back.
Because we were removing and replacing the entire spa, we had more creative decisions compared to the pool, which would remain the same shape and size. We reshaped it into a slight oval, nine-by-10. Because the spa is located off to one side, you don’t really see the shape, only its elevation.
We decided to go with the oval for a couple of reasons: first it’s a very forgiving shape in terms of seating and entry/egress. Also, the owners, who are in their 80s, have a very large family and ovular spas accommodate more people than spas of the same size but with that have more irregular shapes. In essence, we wanted to create a very “social spa” where family can easily gather.
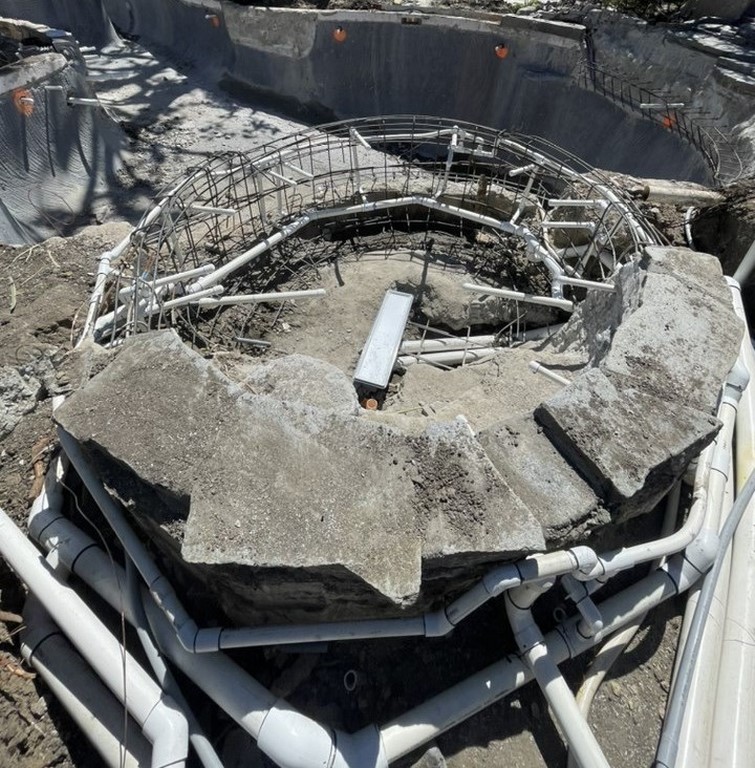
The seating is all uniform, a continuous bench. When you have different seating configurations, you lose some of the space, which we didn’t want. It has 12 jets with eight inches of combined return lines. The suction is a main drain panel with three ports and combined return of 10 inches.
We talked a lot about the spa. I made my case with the drawings and cross section and the clients decided it was the right direction, especially considering the size of their family.
We took advantage of the fact that it’s surrounded by an elevation change in the landscape by creating a waterfall spilling into the spa, blending very naturally into the landscape. It’s a very inviting destination within the yard.
FLOW TO SCALE
As is typical of older installations, the plumbing was badly undersized with mostly 1 1/2-inch plumbing. As mentioned above, we replaced all of it with properly engineered 2 ½ and 3-inch pipes. (We also replaced all of the electrical wiring and conduit, as well as the gas lines for the heaters.)
The pool has 180 feet of perimeter and with the irregular shape with different areas, we strategically located three skimmers to support water quality. The pool is located in an open area that is exposed to wind blowing from all directions dropping debris into the pool.
At the same time, we wanted the surface to appear undisturbed when the system is on, so we carefully planned the flow so that it moves, but still appears smooth. That’s also why we located the returns a minimum of three feet deep.
After sizing the surface and volume, we decided to install two 700-square-foot cartridge filters, plumbed in tandem. We have two bypasses for two heaters, which you can use together or individually, one for the spa and the other for the pool. We have three variable speed pumps, one of for the pool, another for the spa and a third for the spa booster and streams.
The pool includes five small streams that emerge from the rockwork, two by the spa and three around the pool. In those areas we extended the shotcrete back into the landscape, which was then waterproofed, like the rest of the pool, and we installed the rocks onto top of the new shotcrete. The streams are very subtle with a low flow around the large rocks.
There’s no “shooting” water. The idea was to mimic nature, creating small rivulets that flow through the rock formations. Using the variable speed pump, we are able to adjust the flow, which is now usually running at about 50%. The streams have no basins because we did not want any standing water when the streams aren’t running in order to avoid mosquitos. Water is introduced to the streams using manifolds attached to hoses that are hidden between the rocks.
For chemical treatment, we used a Clearwater Tech ozone generator and an Aquafusion hyper-dissolved oxygen system, with full chemical automation that monitors pH and ORP.
LOOKING AHEAD
When it was finished, the clients were thrilled with the results and have since used their “new” pool for large and small gatherings. They are especially thrilled that their grandchildren can now have the same experience that their kids had experienced growing up with a backyard pool.
We may return to the property for a much smaller second phase where we rework some of the landscaping and decking. There’s still quite a bit of brick detailing in the deck, which is still very much a throw back to the early 80s.
For now, we’re very satisfied that we remained true to the original design intent, while at the same time providing the clients with a platform for years of fun and enjoyment with family and friends.
JC Escudero, IWI, is co-founder and chief executive officer of J Designs Pool & Spa, a custom design/build firm located in North Hollywood, CA. Born in Mexico City, a well-traveled international citizen, JC has been working in the pool industry since 2001.


