


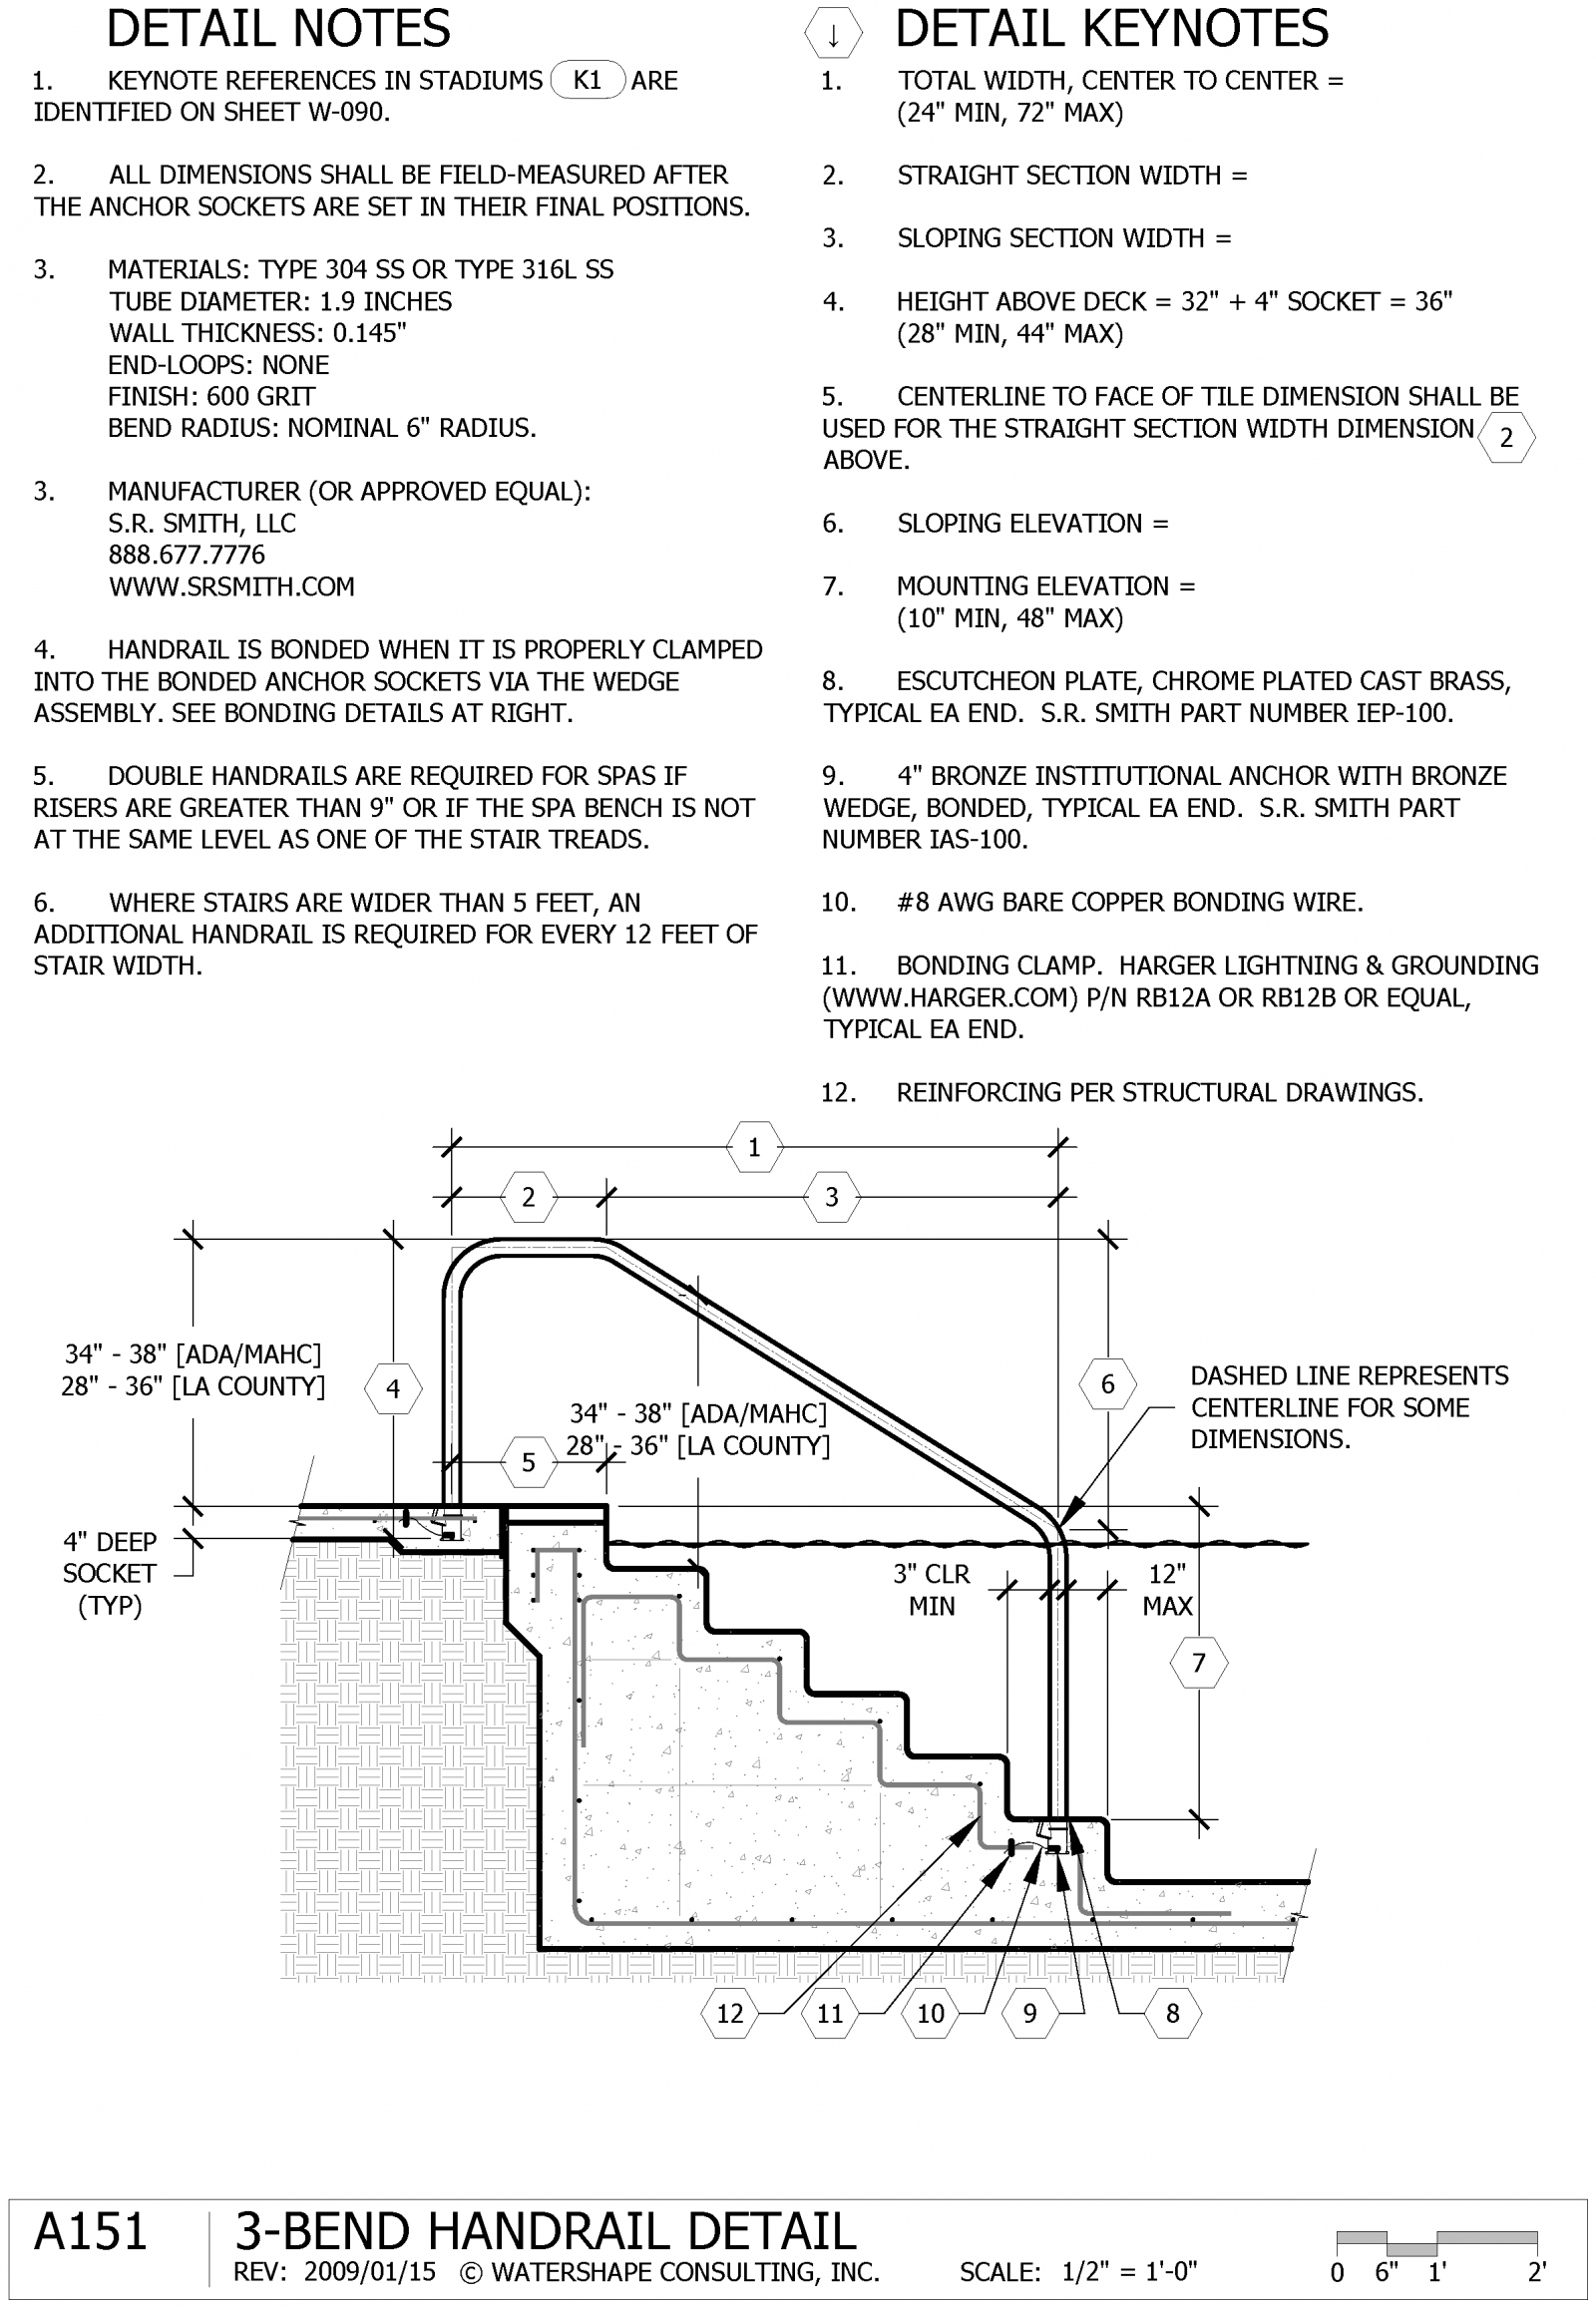
Detail A151: Mounting Handrails
Commercial pools must conform to a variety of safety and operational requirements beyond those promulgated in the residential segment of the industry. The ubiquitous 3-bend handrail is no exception. As Dave Peterson explains, even this simple design sometimes fails in implementation — but help is on the way with this nifty and useful detail.
By Dave Peterson
The challenge with handrails is that they must meet certain code-required dimensions and align into two or more anchor sockets located at different elevations. It’s one of those issues that seems easy, but can be surprisingly tricky.
Part of the challenge starts with inconsistencies that exists amongst applicable codes and standards. The dimensional requirements for commercial pools start with the Americans with Disabilities Act (ADA), the Model Aquatic Health Code (MAHC), and local codes that might vary or even conflict. LA County, for example, requires the height of the handrail to be 28-to-36 inches above the deck and tread nosings.
The ADA and MAHC require that same dimensional range to be 34-to-38 inches. Personally, I like the higher ADA/MAHC version even though the range is narrower. We are getting taller (my son was taller than me at age 12) and I often feel like I need to bend down to grab these California rails.
For commercial pools in Los Angeles County, in order to comply with the local code and Federal ADA requirements we end up with a very tight handrail height of 35 inches +/- one-inch of tolerance. Similar uncoordinated codes exist in other localities that haven’t yet adopted the MAHC, which at least does match the ADA on this issue!
ANCHORES AWAY
One installation problem I have witnessed on a few occasions is poor data acquisition for field measurements of handrails. The bronze anchors are not just located a certain horizontal distance from each other but they are also on different horizontal planes.
I’ve seen builders trying to re-bend rails in the field to get them to fit into their unforgiving sleeves, and I’ve even seen them cut-out the anchors and re-set them because they deemed that to be easier or less expensive than replacing the incorrect three-bend handrail.
One solution, of course, is to set the anchors with the handrail in place. This, of course, requires the handrail to be fairly accurate prior to arriving on site ahead of concrete decks being poured. That isn’t always possible.

Fast schedules and, oftentimes different subcontractors, demand that concrete decks are poured ahead of handrails being measured. It also isn’t practical to block-out decks because the escutcheon plates are not large enough to hide the grouted patch-job when the anchors are set at a later date.
Blocking out at the bottom tread of the stair is much easier and common as the plaster hides everything.
INSTALLATION SEQUENCE
Given the challenges described above, my preferred sequence of installation for handrails is:
[] While shooting the pool stair, block out a pocket in the bottom tread and leave a bare #8 bonding wire for the future bronze anchor. [] Prior to pouring the concrete decks, locate the bronze anchors and bond to the deck and pool reinforcing steel with bare #8 solid copper and approved bonding lugs. [] Recognize that nominal 1-1/2-inch PVC pipe has the same outside diameter as the stainless steel handrail. Install a minimum 12-inch long piece of 1-1/2-inch PVC pipe into the anchor using the clamps. Use screws or solvent-welded fittings to attach the pipe to a form board that is clamped to the coping. With four inches of the pipe in the anchor there should be eight inches (or more) of pipe above the anchor to check for plumb prior to and during the concrete pour and finishing. The PVC pipe should allow the temporary support apparatus to stay above the deck with sufficient room for a broom if the concrete is to receive a broom-finish texture. [] Pour and finish the concrete. [] Use Detail A151 as a template for measuring and recording the field measurements from the deck’s installed anchor to the expected location of the stair’s tread anchor. [] Order the handrails per the A151 sketch. [] Receive the handrails and affix the bottom anchor to the rail. [] Connect the bonding wire, position the rail into the deck’s anchor, and grout the bottom anchor into position. [] Verify that the handrail can be removed and reinstalled prior to plaster. If there is a problem, this is the time to rectify it.KEY POINTS
Detail A151 is deliberately incomplete. Missing are the specific measurements, and even calculations, that the builder needs to record using actual field measurements for each individual handrail.
Some ladder handrails do not connect in the pool and are completely supported at the deck level, which means that the dimensions are independent of pool geometry and totally generic. For those I recommend casting the concrete with the anchors clamped to the handrails – just be sure to order early enough to stay ahead of the decking subcontractor.
Three-bend handrails are the lowest cost option that meets the commercial code requirements but we can get much more creative with the shape. Look for that in the next issue of Beneath the Surface.
David J. Peterson, P.E, IWI, is co-founder of Watershape University and president of Watershape Consulting, Inc. For additional assistance with this detail he can be reached at dave@watershape.com