“My Prettiest Picture . . . Why?”

The visual grace and simplicity of this deceptively nuanced project betray the slew of design details and careful planning required to pull it off. As David Tisherman explains here, the rooftop Los Angeles pool offered a unique opportunity to apply elevated design principles and technical discipline in a dreamlike, yet challenging, setting.
By David Tisherman
I’m not sure I can do better, although I know I’ll always try. This pool with its simple and elegant design was the result of advanced design and engineering that is rare across most of today’s pool industry. While it’s arguably the prettiest pool I’ve designed, it’s what’s behind the beautiful image that makes all the difference.
Great projects always start with the people involved in them. That’s why it’s always a pleasure to work with knowledgeable professionals and clients, especially on complex projects that require a carefully coordinated team approach – not to mention a willingness to depart from the pool industry’s status quo. That was certainly the case for this beautiful rooftop pool.
I became involved with local landscape architect, Paul Lewis, who had heard about me from a few different people and decided to get in touch. He explained that the project was very interesting with a high difficulty factor, based mostly on the fact that the pool had to be integrated into the structure, with zero tolerance for leaking.
I realized right away that Lewis was knowledgeable. He knew things. I would drop a term and he would immediately understand what we were dealing with. (I later found out that Lewis was one of my former students.) As an early example of the constructive discussions, we started to get into waterproofing, a critical element for all pools.
To be clear, all pools need a separate waterproofing application. Cementitious materials such plaster or pebble finishes are not waterproof. I explained that I take a different approach than most of the pool industry, and he understood right away. (More on waterproofing below.)
The homeowners also understood construction, more so than most clients. It was a very positive situation and the design process involved intensive discussion with Lewis, the homeowners and the general contractor. They were all mostly very open-minded and good listeners. The result speaks for itself as evidenced by some of the most beautiful images of my work ever taken, but it’s the concepts behind those images that are the true beauty.
TWO VIEWS
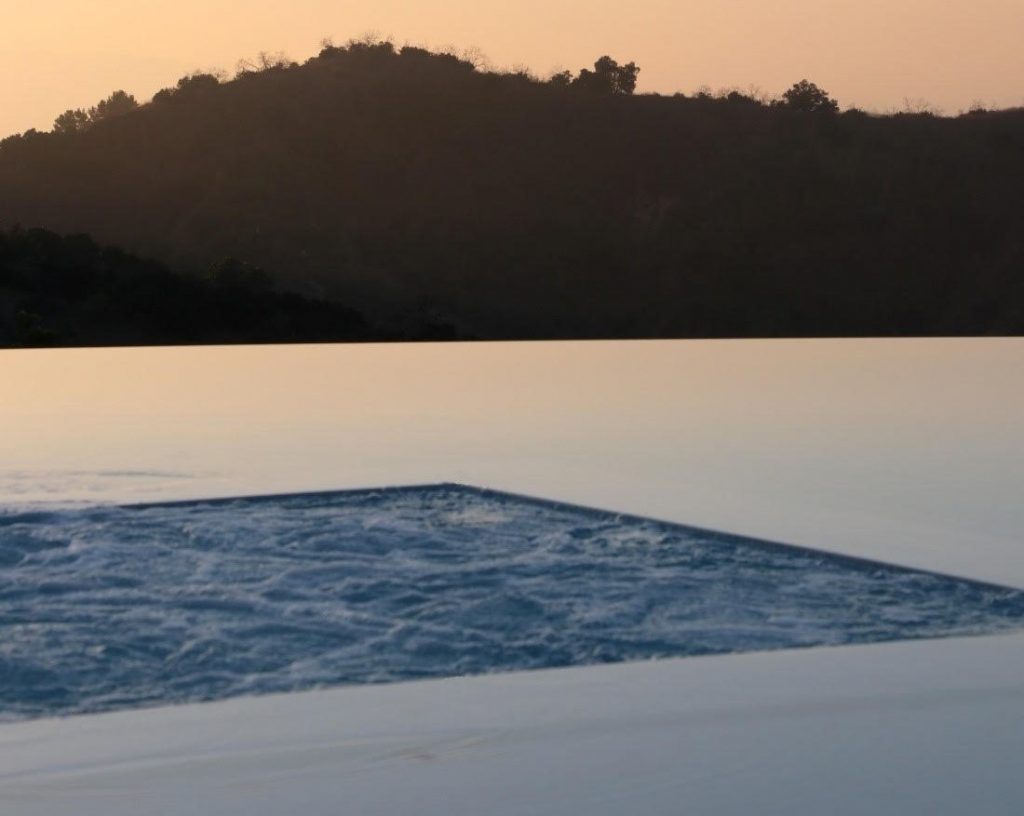
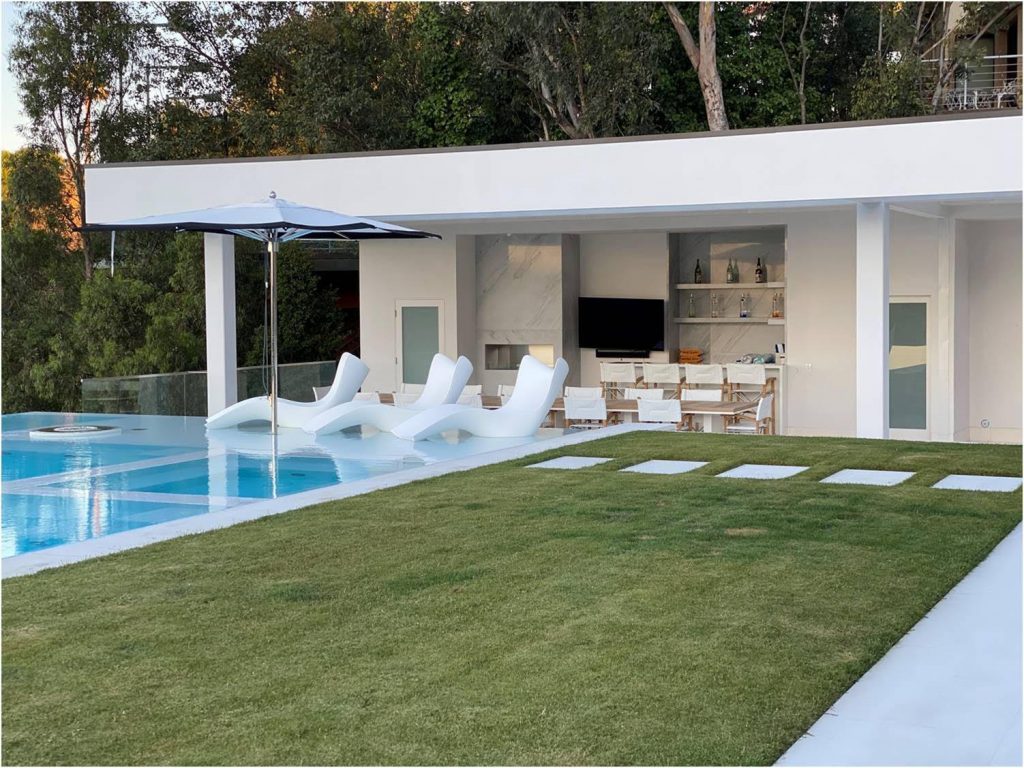
The home is on a hillside in an exclusive neighborhood overlooking Los Angeles, an area densely populated by the rich and famous. It’s a gorgeous property with beautiful vistas and tasteful contemporary architecture. The pool is located atop a new 2,500-square foot outbuilding – think an ADU (additional dwelling unit) on steroids. It features rooms and amenities for guests, games, arts and crafts, and lots of space to hang out and have fun.
The pool is a modified rectangle approximately 600 square feet, 20-by-30 feet. It has a spa flush with the pool surface, a large thermal ledge, and complex steps and benches. There’s an overhang area adjacent to the pool, which basically brings the fun concept outdoors. It has a bar, television, luxurious appointments throughout and a killer view looking out over the pool into the hazy distance.

It was a situation where design principles marry with technology. For example, the pool is also viewed from the house, so there are two primary focal points that had to be considered in the design. Among other things, that meant we had to take into consideration all the nuances with the lighting system. And there was the unusual use of fire, which turned out to be the project’s most visually distinctive feature.
More than anything, the way the pool is situated on the property, it becomes an art piece, a visual lead player rather than a supporting cast member. In a variety of ways, that influences almost every aspect of the design.
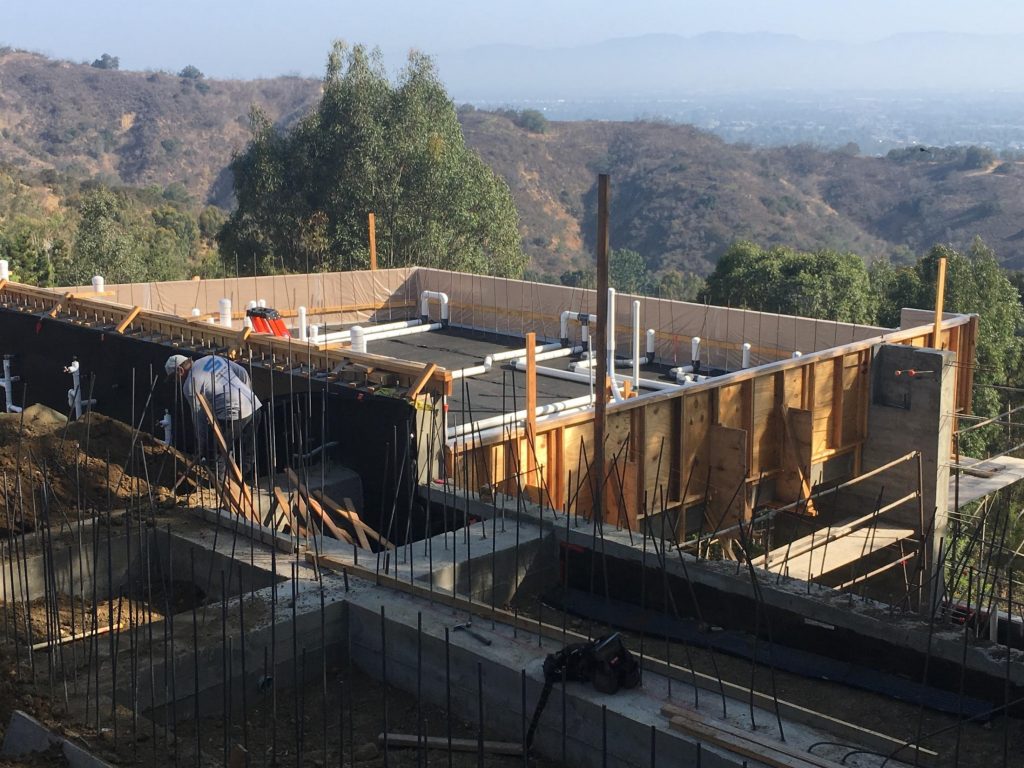
The project was definitely a technical challenge. There was the elevation issue that we had to deal with, there were finished material details, and the equipment was located 100 feet below the pool in an indoor housed area. We were dealing with challenging access, and the need to coordinate with the general contractor, and numerous trades. While it was all doable, this was certainly no place for beginners.
Yet, as is true of almost all projects, the big question was how was the pool going to be used? Finding that out requires client dialogue and the human touch.
POINT BY POINT
In this case, I knew right away that I liked these clients, a family with two teenage kids and a German Shepherd. We hit it off immediately and I quickly came to the conclusion that this pool, for all of its sophisticated design, had to be built for fun and socializing.
That led me get into ideas about extensive step and bench treatments, the thermal ledge, often referred to as a Baja Shelf (a meaningless term I detest). It was a cooling off, fun space, and not really for exercising. We needed a spa built for gatherings or intensive relaxation, with lots of jets and a welcoming interior configuration that says comfort and luxury.
The setting provided an opportunity to create a private, yet open-air paradise, defined by simplicity, elegance and enjoyment. Reaching that high ground means not thinking about the bottom line in terms of what products you’re trying to sell, but instead design features and materials that best serve the location and the clients.
Early on in the process, we started to talk about finishes, which among other things dictates the waterproofing you use. Because the pool is a major focal point — namely, a large body of water hanging off a mountain — I suggested an all-tile finish to create an artistic surface that draws your gaze into the water, and befits the lofty and luxurious setting.
All-tile is an expensive surface treatment that requires careful consideration. That’s why I often recommend that clients visit a paint store, where they get a paint chip they like. Based on their choice, I bring in a number of tile samples — custom blends of 5/8th-inch tile, based on what the art world calls pointillism, i.e. Seurat, Monet, masters in the use of dots. Any color can be achieved if you understand color.
I mix dots to create an overall look. It becomes iridescent, non-iridescent, transparent or opaque. And it’s a matter of whether or not the blend is this most beautiful look you can get. Half of Europe, their fountains, etc., they’re all done in stone or tile or something in much the same tradition. The longevity is wonderful, and the overall look is captivating. The clients agreed.
The resulting color palette is a series of grays and whites. Very clean, very light and visually very simple. We wanted something that was basically just going to mimic the sky.
WATER & WEIGHT
As we were dealing with a host of design concepts and details, I enlisted the help of Watershape University co-founder David Peterson to take on the engineering aspects of the project. There were a variety of issues, including the aforementioned vertical distance to the equipment pad, and dealing with the overall weight of the structure.
We’re basically eliminating the weight of the shallow areas such as the steps, benches and thermal ledge by replacing the additional concrete with foam, but it still has to be structural. We used two-pound structural foam, not the one-pound stuff. It’s basically Styrofoam, but it’s dense. For foam it’s heavy, but a fraction of the weight of concrete.

The biggest issue that I always find on any type of watershape construction is the waterproofing, you cannot overstate its importance to the long-term success of the project. When I became involved, they already had somebody that was going to do the waterproofing, and in that case, they did not have a solid understanding of how to do it correctly on a pool. So, I held my ground and said, I’m not taking on the project if somebody else is doing the waterproofing.
I explained why and they agreed. It’s so critical in a situation like this that I had to believe in, and stand behind, the waterproofing, for there is simply no room for error.
They key to successful waterproofing means taking a layered approach. Specifically, I told the project team I wanted a drain between the pool and the residence as an absolute stopgap should a leak occur, which the general contractor installed. Over that, I shot a minimum 4,500 PSI shotcrete, and then the entire shell was waterproofed, and tile installed under the direction of two Gregs, Bennett and Andrews.
Around every penetration, every area around pipe, we opened up two to three inches minimum, where we pack in waterproof material around each item.
LIGHT TOUCHES
As mentioned above, the focal points created a lighting challenge. Even for pools that are used for getting wet, the vast majority of the time the water is there as purely decorative element. And the joy that water brings, especially at night, is these incredible movements of the water, creating shadows and highlights; it draws your eye immediately out towards that area.
In this setting, there was a huge issue with the lighting because you have more than one viewing area. There’s a visual application from inside the house looking out, and you also have the view from the overhang area, which was 90 degrees to the right.
Depending on your viewing angle, glare would be a problem, creating too many hot spots ruining the effect of uniform luminance. The solution: we put in two separate sets of light designed for each viewing angle that can be turned on and off independently.
That way, if you’re sitting in one area, one set of lights work. If you’re sitting at the house looking at it, another set of lights work. So, the pool has one of these looks where it doesn’t matter where you’re sitting, you get the same visual, without glare.
PLAYING WITH TEXTURE
One of my favorite aspects of this pool is how we’re manipulating the texture of the water’s surface. The idea was to create turbulence in one area, juxtaposing the movement and stillness to another. I kept thinking this could be absolutely spectacular where we create a system where the turbulence in the spa appears to seamlessly touch the quiescence reflective surface of the pool.
Because we had enough area to eliminate the turbulence of the pool with all of the edges, I knew we could create a system in which the pool water remains perfectly still. Doing so, also depends on where the return lines and suction lines are located. That’s why I made sure that no drain suction or return lines were on the floor, where they could create turbulence.
Keeping the spa and the pool surfaces separate was not as tricky as it might seem. The spa is actually about a quarter of an inch higher than the pool and the dam walls are not six inches, but 15 to 18 inches, depending on where we’re looking. And, the spa flows into the perimeter overflow on two sides.
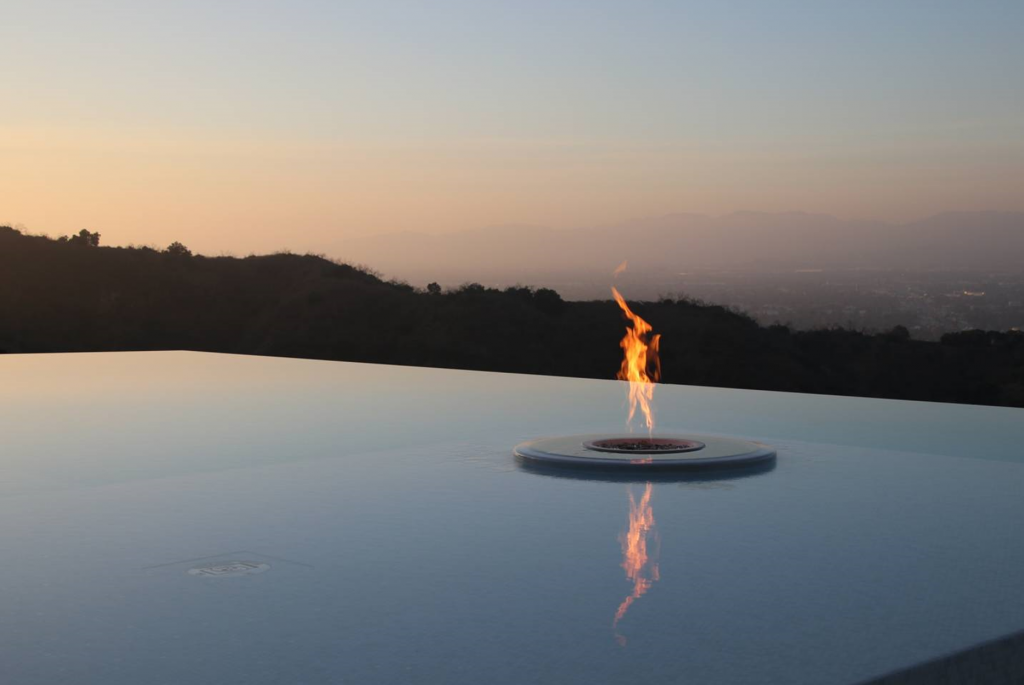
FIRE ON THE LEDGE
Arguably the most visually striking detail is the fire bowl located on the thermal ledge. I posed the question to the clients: because you’ll be looking at this from two different areas, how about we include a single fire element that would take advantage of the reflections, but without disrupting the view?
All too often we see fire elements used in a way that blocks part of the view, the familiar use of bowls on pilasters framing a vanishing edge is a common example. Or you see bowls on a raised bond beam with water spilling from fire element, which is completely nonsensical.
The idea here was to have a bowl that barely breaks the water’s surface create intimate reflections in the midst of the glassy water. I turned to a company in nearby Ontario called Outdoor Plus with whom I had worked before on another project with multiple fire features. I saw a particular item where the bowl has a very subtle perimeter overflow around the edges, that would in turn harmonize with the pool’s vanishing edges and perimeter overflow edge treatments.
The whole thing flows together. It’s an unusual and subtle feature that required quite a bit of discussion with the clients. You don’t just say oh it’s really pretty and leave it at that. You talk about why this works, why this is special, why this is different.

If you want to learn how to build these types of systems from a visual standpoint, you can’t take a pill. You have to understand the building blocks, color, design, balance, all of those terms that we need. But it’s not a question of having somebody say that’s right or wrong. It’s a question to say it’s right because or it’s wrong because.
When you approach the work from a basis of design discipline, you can create things that are pretty special.
David Tisherman is president of David Tisherman Visuals, a custom watershaping design and construction firm in Manhattan Beach, CA.
The design principles and technical detail on display in the above project will be covered in detail at the upcoming Watershape University program, DESIGN 4111: Design and Client Collaborations: From Good to Gorgeous with David Tisherman and Justin Quinn
September 27-28, 2024, Chicago,
Learn more and register here.