


Tumbling Down

Reading WaterShapes’ 100th issue brought back memories of when I first discovered the magazine and my early conversations with its editor, Eric Herman. I remember thinking at that time – or at least hoping – that there really were lots of other people out there in the design/build world who truly aim to do things right, first time, every time.
In looking over the poster included with the issue, I spotted the one from January 2000 with a photograph I’d taken of one of our projects – a retaining wall under construction. I don’t know quite why, but that image made me think of a site I visited last year where a retaining wall built by inexperienced hands was in the process of collapsing. And not only was the wall falling apart, but it was also compromising the fence atop it as well as a concrete patio, a storage shed and an inground pool it was intended to bolster.
I couldn’t help thinking that, as far as our industry has come in the past decade, there are always going to be those who
make serious mistakes. It also occurred to me that walls are so fundamental to the arts and crafts of watershaping and landscape design and construction that it was about time for me to put on my mason’s cap and dig into this topic at greater detail.
HITTING THE MARK
In that article I wrote for WaterShapes eight years ago, I described a project in which I replaced a failing retaining wall with a new one and will use it again here as a point of departure for explaining the fundamentals of proper wall design and construction and defining the distinctions between walls built to last and walls that will inevitably take a tumble.
Let me reset the scene: The clients called me in because they needed a retaining wall in their backyard – not just any retaining wall, but a big, expensive one that was going to cost them $38,000 in 1995 if I was to be the builder.
The reason for the expense was the fact that the wall was to hold up the house, which had been built many years previously on the edge of a ravine that dropped about 75 feet down a 45-degree slope. The structure’s footing was supported by a masonry wall about nine feet tall that started at one corner of the house and then moved out to wrap around its back about ten feet or so down the slope.
This masonry wall had been repaired periodically through the years and had at one point been reinforced by railroad ties that had been strategically piled in front of it. The replacement system I designed featured two terraces supported by four-foot walls penetrated by two sets of steps connecting the upper and lower levels of the property.
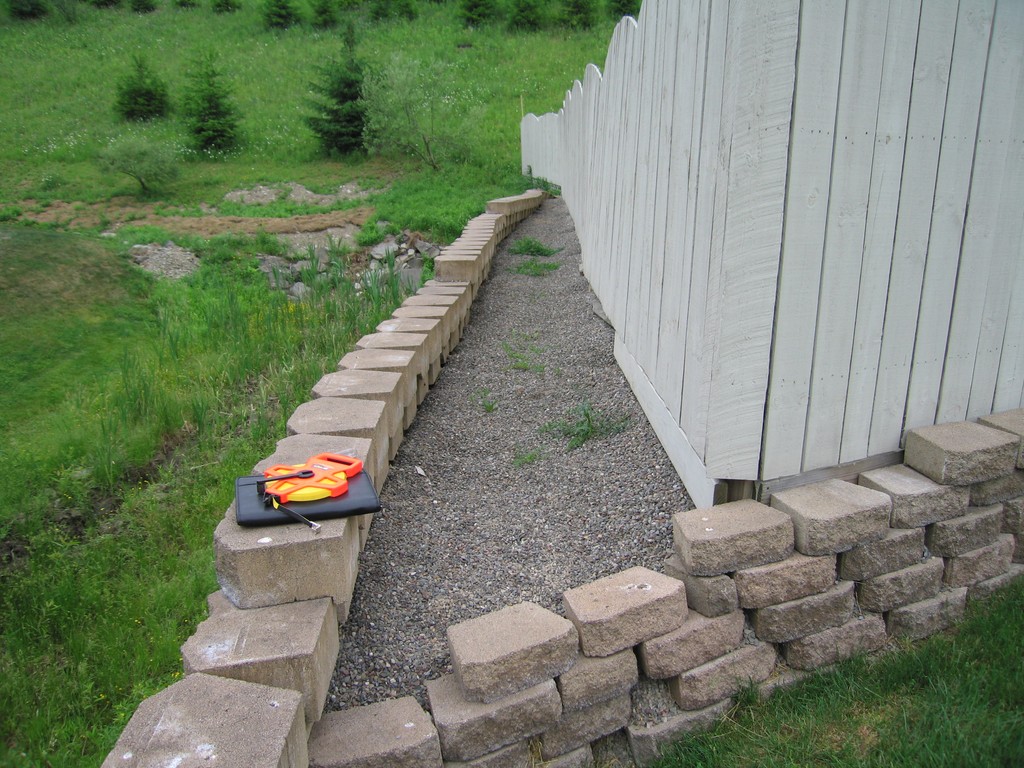
| When first completed, this wall was filled to the top with stone, but now it has settled by more than a foot and something has to give – most likely the wall, in which case the fence, storage shed, deck and pool the wall was intended to support will also be compromised, perhaps catastrophically. |
The program had a lot going for it practically and aesthetically, but instead of hiring my firm to do the installation, the homeowners opted for another contractor who came in with a lower bid – a fellow who obviously thought it would be perfectly acceptable to alter my design.
What this other contractor lacked most, it seems, was any understanding of the fundamentals of wall construction and the need for proper base preparation, tiebacks and drainage. As I knew and he should have known, those three details work in conjunction with each other: Ignore one of them and the others will not be able to hide the omission and the wall inevitably will fail. It may fail soon, or it may take a while – but fail it will.
Let’s take a quick look at those three critical factors:
[ ] Base Preparation: The base is the prepared material in which the footing of the wall will rest. For a retaining wall, that base should be prepared by excavating to a predetermined depth (as determined by an engineer in view of the height of the wall) and placing what is known as crusher run (a mix of crushed stone and stone dust) to a predetermined thickness.
This material is designed to be tamped down to form a solid mass and must be set in a layer thick and stable enough to handle the downward forces imposed by the weight of the wall without allowing any settling to occur. In the specific case outlined above, the wall called for placement of one foot of crusher run to serve as the base.
[ ] Tiebacks: This wall element, as the word itself clearly indicates, is all about tying the vertical wall horizontally into the material behind it. When a timber wall is built, for example, certain of those timbers will be set perpendicular to the back of the wall so that they reach into the supported slope. Once the area is backfilled, the weight of the soil atop these perpendicular timbers holds them rigidly in place and enables them to support the wall. (In many cases, these perpendicular tiebacks elements are alternatively known as deadmen.)
There’s another approach to providing this same sort of stability that involves using a product known as geogrid – especially common in building segmental walls using concrete masonry units. This product is a woven plastic material that reaches from four feet up to 50 or more feet into a slope, depending upon the height of the wall and its intended purpose. Geogrid also serves to separate backfill behind a wall into a series of layers, essentially making a very tall wall into a set of small walls stacked one atop the other. In the project described here, the wall design called for two levels of grid (six feet and eight feet deep) for each wall.
[ ] Drainage: It doesn’t take a lot of deep pondering to see the critical need for keeping water from accumulating behind a retaining wall. Not only does seepage through the wall make it look bad, but the simple presence of the water creates a mechanism that can eventually lead to a wall’s demise. The simple task here is to make certain any water that arrives in vicinity is moved elsewhere.
We accomplish this by backfilling to the top of the wall with crushed stone after placing perforated drainage pipe (wrapped in fabric to keep the holes from clogging) at the base of the wall. Moreover, we also (where we can) grade the surface area behind the wall to keep water from collecting. In the north, obviously, a harsh winter’s freeze/thaw cycle can be a wall-buster, but water accumulation is problematic no matter where a wall is and should not be allowed to happen.
To reiterate: If a wall is built without any one of these factors having been considered and accommodated, the wall will fail. Poor base preparation will cause the wall to settle and break apart; insufficient geogrid will allow the weight of the soil behind the wall push it over; poor drainage will cause the wall to blow out from hydrostatic pressure and, in some areas, frost heave.
There are no short cuts – never have been, never will.
SLOW OR FAST
As noted above, some failures take their time, but some walls start falling apart almost immediately – as was the case with the wall installed for the homeowners atop the 45-degree slope. Indeed, their wall was completed in November 1995 and had already deteriorated significantly by January 1996.
When a wall fails this quickly, major construction issues would seem to be the obvious problem. First, even a quick initial examination revealed improper base preparation. The size and configuration of the wall called for burying two courses of block below grade on top of a foot of crusher run. In fact, the installer used just four inches of crushed stone (not the more compactable crusher run) beneath the top wall section and didn’t sink any courses below grade. The lower wall was, incredibly, backfilled with moisture-retaining sand rather than crushed stone.
The combination of these construction errors soon compromised the wall: Not only did the upper wall settle into the sand and begin cracking almost immediately, but no geogrid had been used, so the wall also began falling forward and down.
I brought in a soils engineer to aid me in redesigning the walls, taking the current, much-degraded situation into account with respect to soil conditions, the stability of the house and the recommendations of the wall-system manufacturer. The upshot: The existing wall, which had been built using pre-cast segmental units, had to be entirely dismantled and then reassembled properly.
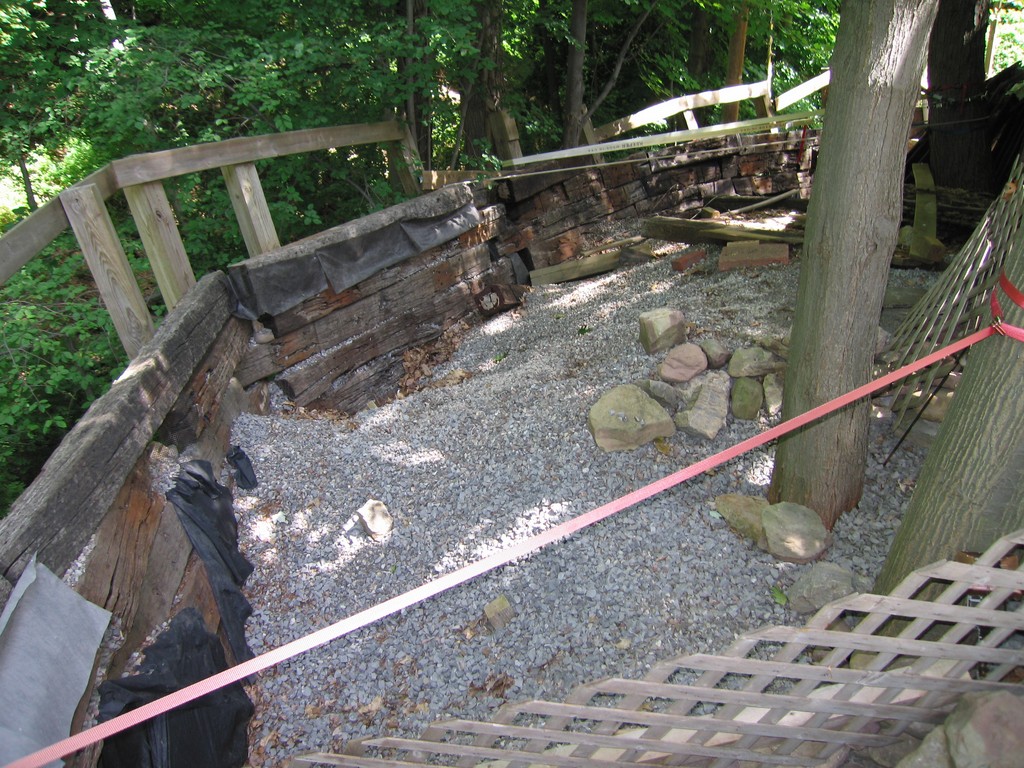
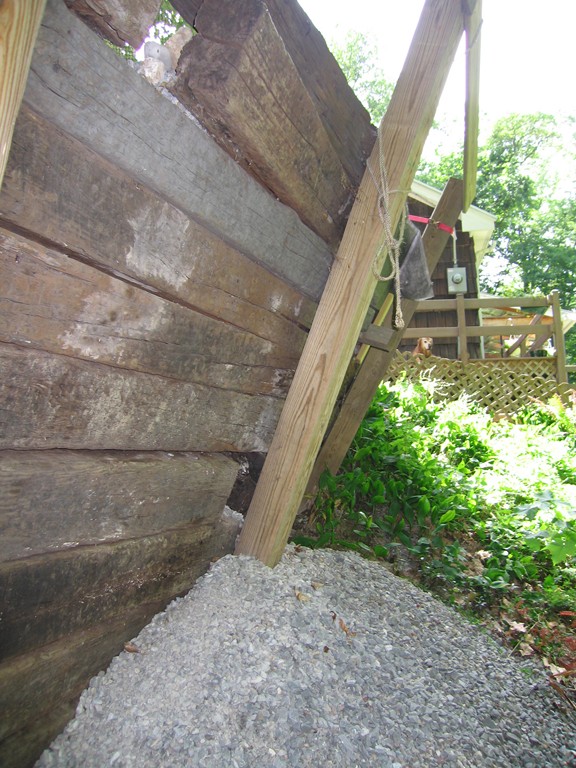
| When it comes to wall disasters, this one takes the prize. An original masonry wall had been bolstered first by railroad ties and then by vertical timbers – and then the whole thing was finally lashed to long-suffering trees. Adding insult to injury, the contractor who won the job of replacing that mess clearly didn’t know how to build a proper wall (witness the improper base) and the new one is already failing. |
We expected teardown and excavation for the replacement wall to take a week, but it actually took two because the previous contractor had, in addition to everything else, done the utterly boneheaded job of tying all four downspouts from the rear roof surfaces of the house into the drainage system behind the wall. We couldn’t believe our eyes: The whole back side of the roof was draining into the wall, and digging out the mucky mess was much more time-consuming than we’d anticipated.
As we continued to tear the wall down, we found that while geogrid had been used on one side of the wall, there was none on the other (the side that began failing almost immediately). But the contractor had failed to remove all of the railroad ties and had adjusted the geogrid around them, simply rolling the fabric up in front of the timbers so it reached only about two feet back into the slope rather than the required eight feet. Moreover, they didn’t excavate for installation of drainage stone – not even to the minimum two feet suggested by the wall manufacturer. (In my projects, I leave nothing to chance and always dig back well past the angle of repose).
We finally removed all of the block and the soggy soil and dug a trench for the lower wall to a depth of 28 inches below grade – sufficient for 12 inches of crusher run and two courses of buried blocks. We also brought an engineer on site to examine and sign off on the fact that we were proceeding properly with each phase – once when we finished excavation and again when we finished compacting each of the two layers of crusher run and yet again after we’d placed the base course of blocks.
DELIBERATE AND STEADY
Once three courses were in, we backfilled with #3 crushed stone, tamping it down in six-inch lifts. This was a critical step, because this stone was to support the upper wall. Then we laid six-foot-deep lengths of geogrid before continuing to build the wall. After three more rows of block, we laid eight-foot-deep lengths of geogrid atop a foot of crusher run that was to serve as the base for the upper wall. We continued in this methodical fashion until all 2,000 blocks were installed.
At the base of each wall, we set two layers of four-inch drainage pipe to move water away. By now, we’d also redirected the downspouts into their own, brand-new system that carried the water far down the slope and well away from the wall. By the time three weeks had passed, we were setting the last capstones and cleaning up the site.
Today, a dozen years later, the wall hasn’t moved a millimeter. Given the critical nature of the installation and its role in supporting the house, I check it every year and am pleased that it’s such a testimonial to proper construction.
Now back to the present and that project I mentioned at the beginning of this column: After evaluating the existing wall, I explained the gravity of the situation (pun intended) and let the homeowners know that everything would have to be removed to a point about 15 feet back from the wall (and to within about a foot of the pool). This was the only way we could properly rebuild the wall and correct the disastrous errors the previous contractor had made with respect to base preparation, tiebacks and drainage.
They asked me how much it was going to cost, and I gave them a quick ballpark figure of $60,000. I never heard from them again, but I must confess that I think of them often and wonder if the pool is still there.
As far as we’ve come in the watershaping and landscape trades through the past ten years, this recent incident confirms that there’s still much work to be done in leveling the playing field and arming consumers with the information they need to make the right choices among designers and contractors.
There is indeed a right way to do things, and I like to think that this magazine is helping and that there are more and more of us out there who know what needs to be done. To be sure, it’s difficult to get consumers to face reality and recognize that in saving money they may be buying trouble, but just the same, I look forward to the day when they’ll all be comparing oranges to oranges rather than my oranges to someone else’s rotten apples.
Bruce Zaretsky is president of Zaretsky and Associates, a landscape design/construction/consultation company in Rochester, N.Y. Nationally recognized for creative and inspiring residential landscapes, he also works with healthcare facilities, nursing homes and local municipalities in conceiving and installing healing and meditation gardens. You can reach him at bruce@zaretskyassociates.com.