


Stepping into Paradise

What makes for a great natural-style watershape? That’s a huge question – one which a great many people have devoted their careers to exploring and for which almost every one of us will have a slightly different answer.
As you will see here, my own response to the question starts with even more questions about the site, my clients and the surrounding structures and vegetation – questions I ask myself as I approach each individual design assignment and decide how far we’ll be pushing toward the natural. In some cases, I come up with entire designs I’d call “natural-looking.” In others, I’ll use details as small as a well-placed stone or as large as a rock waterfall to come up with something that’s been “inspired” by nature.
Through the years, I’ve designed or built dozens of projects that either mimic nature or take their lead from features found in nature. Here, I’ll be taking you through the thought processes I follow in developing these designs not so much as a prescription for what you should do, but instead to offer you starting points from which you can develop your own natural designs.
NATURAL PHILOSOPHY
From my own perspective, the designing and building of natural pools and other watershapes can only begin with an appreciation and understanding of nature. In fact, I don’t really think you have any hope of mimicking nature unless you’ve spent meaningful time examining it’s processes and studying the patterns and interrelationships that nature reveals.
In my exploration of the natural world, for instance, I’ve always found that nature offers surprises. Since then, I’ve often seen that artificial work appears the most natural when it incorporates something surprising.
I’ve also noticed that executing a natural design requires careful control over a wide range of specific aspects of the project. What nature has taken eons to produce, it seems, can’t be reproduced in a casual day’s work, and there’s a lot to be done from the design and engineering phase through to the construction and finish work – which means that careful project management is critical to success.
Above all, I’ve learned that “going natural” involves such a huge variety of interrelated technical and aesthetic issues that you have to head in that direction from the outset of the project. Trying to add naturalistic details as an afterthought is almost certainly a prescription for substandard and unnatural-looking work.
So how do you integrate the elements required for a watershape and the space around it to suggest or mimic nature? I see it as a multi-stage process in which you:
* determine how the vessel will be used
* find the shape
* select the colors
* decide what stone to use and how to use it
* make the water move
* select plant materials.
I’ve written on several occasions about how important it is to find out how your clients plan to use their watershape before you really get into a project, so I won’t repeat myself here other than to say that the information you gather in your meetings with clients needs to be integrated into all of the other decisions, selections and determinations – and that the task of weaving them all together must take place before construction begins.
FINDING THE SHAPE
Bringing a natural look to a quality watershape design begins with the shape of the vessel.
Trouble is, this is hard to discuss in precise terms. We all use the word “freeform” in discussing the shape of a natural body of water, but I don’t think that’s the best way to describe what we’re after here. Too often, freeform pool designs involve sets of sweeping curves and radiuses and are no more than variations on classic kidney-shaped templates – but nature doesn’t often work that way and instead tends to mix things up with linear patterns and jagged edges along with the occasional radius.
What I find so fascinating in examining shapes in nature is how often you’ll see a sweeping line on the crest of a bluff in a distant view that suddenly falls away into a random set of rock outcroppings or cliff faces. Whether these transitions in nature are surprising and abrupt or subtle and gentle (or both), they always seem to work.
|
The Extra Step In a great many natural designs, watershapes come with highly irregular shapes. The complex contours of such vessels can require a good bit of work on the part of the structural engineers in creating precise sets of plans – and they usually work it out by breaking irregular forms down into the radiuses with which they’re most familiar and comfortable. This is wonderful for establishing the structural elements needed to execute the project, but it can lead to alterations of the actual shape you’ve designed. That’s why I always have the engineer include a note on the plan that cites my original rendering for details in setting the ultimate shape of the pool. — B.V.B. |
Of course, it’s nearly impossible to translate grand-scale landforms and natural contours into the confines of a backyard, which is why, as a designer, you need to balance aesthetic issues with practical factors in settling on a shape and, to an extent, let intuition and your own experience of nature be your guide.
For example, you need to balance your desire to recreate the random beauty of nature with the functionality of the space. You need to be sure that all of the elements surrounding the pool are in scale for the space and, in the case of natural pools especially; that the layout and the shape provide peripheral spaces for plantings, transitional pathways and smaller waterfeatures as well as room for decks and patios.
The key is knowing what you and your clients are after from the outset. If you’ve decided to aim for a completely natural appearance and want to make onlookers guess whether or not they’re seeing a manmade body of water, the shape will head in one direction. If you’ve decided for a more stylized look – natural touches in what is obviously a built environment, the shape will tend to head in another.
There are also projects with split personalities, where a section of the pool closest to a house will reflect its architectural form while another segment away from the structure is made to look natural. In other cases still, details and finishes of the design may be natural but are set in architectural contours. I’ve seen rectangular pools that look more “natural” that some lagoon pools: It all has to do with the materials used to finish them and the landscaping around them.
Now that I’ve challenged any inclination you might have to shoot natural designs from the hip, let me make my basic point about natural shapes: They come in all sorts of configurations and contours and as everything and anything from highly irregular shapes to dead-straight geometries. To that extent, “shape” isn’t the issue; rather, settling on the footprint for a natural pool is a matter of meshing this choice into all of the other issues to be addressed in developing an integrated, natural design.
COLOR KEYS
The next feature that must be integrated into a natural design is color. Yes, the colors you choose should be drawn from nature. And yes, the vessel needs to blend with the color scheme of the landscape and hardscape around it. But decisions about color are never quite as simple as they might seem.
Because natural designs almost always include significant landscaping, the first color that comes to mind is green. This often means that stone materials and interior finishes of natural pools include greens, blue greens or gray greens. But it should also mean that you consider a whole range of complementary or harmonizing colors as well, including blacks, grays, browns, creams and various permutations and combinations thereof – all depending on the needs of the design.
So once again, it’s tough to make generalizations and recommendations in designing natural watershapes. (If you’ve been following along so far, you should know by now that there aren’t many easy choices to be made.) If you take your cue from Mother Nature, however, you can find inspiration that will help you along in the color-selecting process.
In nature, for example, you often see water surfaces that reflect the cool hues of surrounding plant and stone materials. In watershape construction, this observation will influence the selection of the interior surface and its colors as well as the colors of the surrounding stone and hardscape.
In a tropical-lagoon pool, for example, this usually calls for a dark interior color to maximize reflections of surrounding greenery. But the choice may be different if you’re working in the desert, where sand-colored interiors pick up surrounding tones and reflect bright blue skies. I do lots of work in Florida, so my naturalistic work tends toward dark interiors that play off the surrounding landscape of grays, blacks, deep greens, blue greens and other rich, intense colors.
Many interior finishes work well in naturalistic applications, including exposed-aggregate or polished-aggregate surfaces as well as tile, but I’m particularly inclined to go with pebble finishes in natural pools. Partly it’s because I like the fact that it’s a natural material, partly because I like the natural color variations they offer, and partly because the feel of the material suggests a streambed or a sandy beach. Pebbles also give me control over color, which is a key issue. I can go with a standard blend, or mix things up and develop something unique to go with the surrounding rockwork or decking.
The same utility in natural designs can’t be claimed for finishes that offer up a uniform coloration, such as white or colored plaster, fiberglass of paint. It’s hard to find uniformity of color in nature, and my choice will always be to use color that has texture and variability of some kind.
HINGING ON STONE
Just as natural designs come in lots of shapes and colors, they also invariably feature stone. Whether real or artificial, its size, shape, color, texture and durability are all important. And just as important is the placement of stone and the way it’s integrated into the structure of the watershape or the surrounding landscape or hardscape.
If you’re lucky enough to live in an area with an abundance of natural stone at your disposal, it’s likely that you’ll choose indigenous materials that will tend to blend naturally with the surroundings. (This is important in making an impression on clients and guests in these regions, because it’s very likely what they’ve seen if they’ve ventured out into their local parks or nature preserves.)
Here in Florida, we don’t have an abundance of stone varieties, so I truck in much of what I use from North Carolina and Tennessee. I select lots of river boulders that have beautiful rounded edges and lots of broken planes that reveal colorful graining. We also use a great deal of coral rock (or oolite): It’s our indigenous stone, but because of its physical characteristics, our use of it is usually limited to flat applications on patios, steps or walkways.
Whatever you have available to you, the things to keep in mind as you select stone types and specific pieces of that stone are the aesthetic qualities (colors and textures) as well as the intended function and placement.
Beyond obvious uses in waterfall structures or as decking or steps, for example, one of the most important uses of stone is for the setting up wet-to-dry transitions at the waterline. I’m a big proponent of submerging rock material to lend the work a natural look. Before you get to the aesthetics, however, you need to know the rock will hold up well under water: Some stones are far more soluble or porous than others and shouldn’t be used.
That said, when done correctly, water lapping up against rock (as opposed to a tile line) can be a true thing of beauty – and a key turning point in making a distinctive, natural impression.
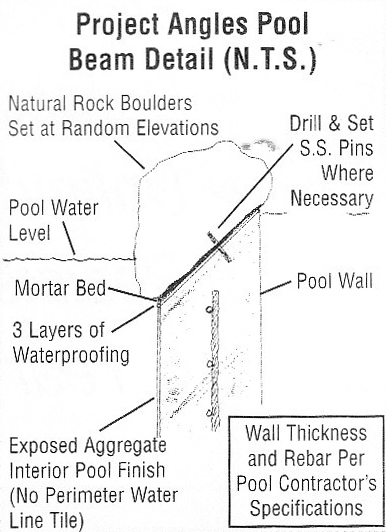
Things can (and too often do) go terribly wrong here, as with the much loathed and dreaded “necklace effect,” in which a chain-load of rocks are set atop the bond beam with no attempt made to mimic natural shorelines. This most often is the result of poor planning – or of treating this detail as an afterthought.
And the truth of the matter is that even good designers and installers fall into this trap. What it takes to avoid this unnatural look is planning to set certain stones into the beam itself – which obviously can happen only with pre-planning. What it also takes is recognition that a linear pattern at the water’s edge can be jarring to natural sensibilities. That’s why I employ a range of strategies to disrupt the edge. (See the sidebar below for details.)
AROUND THE POOL
One of the greatest challenges to making rockwork appear natural is figuring out ways to make it accommodate the functional aspects of the pool.
Areas for entry and egress must be flat, for instance, or gently sloped in the case of a beach entry. Here, selection of flat rock materials that make a transition from the flat stones in the pool to rounded or vertically oriented boulders outside the beam is crucial. To give ourselves plenty of elbow room as these decisions are made, we usually leave much of the area right around the watershape open for rockwork and plantings – that is, seldom will we bring the patio up to the water’s edge, choosing instead to use flat stones later on to allow for footpaths and access to areas around the pool.
|
Stone Works Varying the size and shape of stones along with irregular placement at the water’s edge is only part of the battle in creating natural looks.
As mentioned in the accompanying text, I also often use an angled-beam detail to accommodate placement of special stones at the waterline. In doing so, we’re able to place stones of varying sizes and at varying heights atop the bond beam with a more natural look. We also avoid the obvious presence of grout or mortar by inserting stainless steel bars into individual stones to tie them to the bond beam – labor-intensive but visually appealing. In addition, we create a variety of shelves inside shells to accommodate large, partially submerged boulders. Installing flat boulders completely submerged in shallow areas, such as beach entries can be another way to effectively conceal the edge. I also love the look of flat stonework used below the waterline for steps or thermal ledges or as transitions to dry areas. — B.V.B. |
This brings up a key point: While pre-planning is absolutely essential to success in natural designs, there are some small, localized decisions that are best left until the construction process. What’s important here usually isn’t knowing that this stone will go right there, but instead that a given space will accommodate a certain item of an approximate size and color, be it a rock, a plant, a stepping stone or a garden bench.
For my flatwork, I often use a stone known as Tennessee Crab Orchard stone, a sedimentary rock that splits well and looks beautiful as decking or in wet/dry applications along with the river boulders I like to use. Its look gives me the ability to maintain visual continuity in all of a given project’s stonework.
But I also know there are applications in which natural stone can’t be used. Whether it’s cost, the weight of the stone (and the structural strength needed to support it) or a lack of availability of the stone in the needed size or color, there are some instances in which artificial stone is the best solution.
When it’s done well, I have no quarrel with artificial stone. In fact, I’ve seen many projects in which manmade panels are truly believable and integrate beautifully into natural designs. But for every true artisan out there creating wonderfully credible structures, there seem to be several more who just don’t get it right.
Suffice it to say that when you use artificial rockwork, quality makes all the difference. To my mind, if you can create or commission artificial rock structures that fool the eye (and clients are happy with the result), then there’s no problem.
When I need to use artificial stone, however, I try to the greatest extent possible to minimize the chance for discordant visual effects by blending in as much natural stone as I can. Once again, the placement, shapes and sizes of the stones – how they’re integrated into the design – will make or break the effect.
A final point about rocks: Rarely do you see them completely exposed in nature. Mostly they are submerged in the soil or draped in plant material, and an important part of “selling” the natural look of rockwork (real or artificial) is thinking them through as landscape elements.
Setting up planting spaces among rocks and abutting rockwork with earth will help here. Another good idea is setting up visual echoes of rocks near or within a watershape at some other point in the yard to create the impression of recurring natural formations or random distribution of material in the environment.
THE ATTRACTION OF MOTION
Now we come to making the water move.
Absolutely, this is among the most important elements in a natural-style pool: The sight and sound of moving water lends key sensory elements to the design and can be used to great effect. In fact, when it comes to believability, this may well be the determining factor.
All too often, however, this is where projects reveal their artificial origins. I cringe just to think about all the projects I’ve seen where there’s a stack of rocks built up right next to a pool to create a waterfall. Much like the hideous necklace effect, this volcanic approach to waterfall design is the death of naturalism.
If you’re blessed to have elevation transitions in the lot’s natural topography, then you can and should use that to your advantage in creating a waterfall area. Here in Florida, things are generally flat as a pancake, so we often end up importing soil and building up an area of the yard to create slopes and transitions that support water effects. By gently sloping the grade, you can introduce plants and rock elements around the waterfall so that it doesn’t look as though a rock structure has popped up out of nowhere.
If that’s not possible, then you’re probably better off setting aside the waterfall in favor of a small stream that flows into the water, perhaps transitioning vertically over no more than a couple of inches.
Before doing so, however, you need to integrate your thought processes with what you clients want. If it’s about visual appeal and soothing sounds, then you can almost certainly get by with a smaller flow of water and modest changes in elevation. But if the clients want a grotto with a rush of water powerful enough to give them good massages, then you need to plan on a large rock structure and figure out ways to integrate its height and massiveness into the surroundings.
Quite often, the waterfalls I see are too big for the application. In nature, water effects are often quite small and modest, and you often find them in surprising places. With that in mind, I see nothing wrong with adding a waterfall that is little more than a small flow from a fissure in a carefully selected piece of stone. Even this simple flow can have a dramatic effect on the overall design.
Another shortcoming I often see is the result of thinking that falling water should fall into water. In nature, however, we see water cascading onto stone more often than not, so I believe in directing all or part of the flow of a waterfall onto a rock surface: Not only does it vary the sounds you hear, but it also adds visual interest to the composition.
In addition, it’s very important to conceal the origin of the water’s flow and to slow that flow down – something Bob Dews wrote about at length in WaterShapes’ April issue (see “The Hidden Source,” click here), so I’ll save a few words here. Whatever you do, please avoid the sin of having a visible pipe belching water at the top of a waterfall!
NATURAL COMPANIONS
This brings us to the final set of considerations that must be integrated to achieve good natural design: If you can’t figure out the plants, you need to find someone who can!
With waterfalls, for instance, I’ve seen situations where it looked as though the watershaper didn’t want to obstruct the view of the beautiful rockwork with any plant material. That’s a mistake, however, because adding plant material introduces areas of shadow and dappled light that add a strong natural feel to the work. The same holds true all around the yard: Naturalistic watershapes need plants, usually lots of them, to carry off the design.
Lots of pool builders, myself included, have come late to thinking about plants. That’s why I’ve developed a good rapport with an expert who works with me in developing planting plans.
If you’re lucky enough to possess that skill yourself, then I’m sure you recognize how critical plant selection around water can be, not only from an aesthetic standpoint but also with respect to maintenance. The layering and intermingling of trees and tall plants with ground covers and flowering plants is an art form that lends much-needed credibility to naturalistic settings.
The bottom line with natural designs is that there’s so much to them than meets the eye. And that’s appropriate, I’d say, because the ultimate effect of a beautiful naturalistic design is that someone entering the space won’t notice all the hard and careful work that went into creating the scene.
Brian Van Bower runs Aquatic Consultants, a design firm based in Miami, Fla., and is a co-founder of the Genesis 3 Design Group; dedicated to top-of-the-line performance in aquatic design and construction, this organization conducts schools for like-minded pool designers and builders. He can be reached at bvanbower@aol.com.