


Smoothing the Way

In renovation projects, preparation of the pool’s interior surface for a new finish is truly where the rubber meets the road – a key step in which what you’ve planned and what you actually do must come together.
With this installment of “Details,” we’re doubling back to the Los Angeles project we left behind in October as we waited for tile to arrive from Italy. If you’ll recall, the pool had been built in the 1920s and graces a property with a magnificent Gatsby-era home.
As I mentioned at the outset of this interrupted sequence of columns, the homeowners have been extremely involved, always wanting to know as much as they possibly can about what’s going on in their backyard. As I mentioned as well, the challenge with renovations – especially one as involved as this on so old a pool – is that you can never predict with any sense of certainty what you’re going to find once the work gets started.
And the unexpected is what we found, over and over again.
STRIPPED DOWN
To recap quickly, I became involved with this project sometime after the owners had installed a beautiful limestone deck. That was our first problem, as the need to work around the decking increased the difficulty (and the uncertainty) of our renovation work many times over.
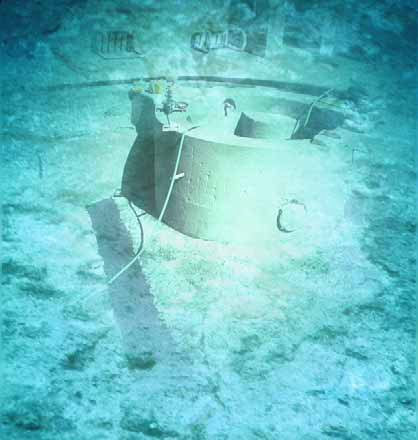
This led to the decision that all of our renovation work had to be achieved through sub-grade penetrations of the old shell as we added a round spa and accommodated new plumbing, lighting and control lines with three key additions: a large “step” that runs the length of the pool, a new set of shallow-end steps and a new, raised floor in the deep end of what was a very deep pool.
This approach emerged through careful planning, close contact with the clients and conversations with key subcontractors. Big variables remained, however, many of them having to do with the interior surface and basic structure of what was, after all, a grand septuagenarian swimming pool, and still others having to do with the soil, drainage and everything else that was going on around the pool beneath the untouchable limestone decking.
In tackling a delicate renovation project such as this one, you always inspect the site in every way you can, but there will invariably be things going on that you cannot see. For example, we knew the pool had been plastered once in its history, but we were not aware of whether or not it had been resurfaced – either how many times or in what manner, shape or form.
This is why, with every remodel I do, I explain to homeowners that without the benefit of X-ray vision, there are aspects of the work that cannot be estimated ahead of time. This is why I give a fixed price only on parts of the project of which I’m certain. For the rest – such as anything having to do with the condition of the shell beneath the plaster – everything is set up on a time-and-materials basis. Based on what I’ve seen happen time and again, a “firm estimate” on a complex remodel is the easy way to ensure lawsuits, furious clients and a costly, miserable watershaping experience.
In this case, the first step in clearing away variables involved stripping the pool. I entrusted this job to my friends at Marquez Pool Plastering, who stripped the tile from the existing gutter that surrounded the pool (taking great pains not to chip the cantilevered limestone decking) and then began stripping the plaster.
As they chipped away, we discovered that the pool had indeed been resurfaced at some point with a second layer of plaster atop the original finish. They ended up stripping it twice, working until we were satisfied that every square inch of the pool’s interior was hard, immovable material.
WHAT WE FOUND
The stripping process was no big deal and went smoothly. Once it was complete, we were ready to inspect the shell – both to assess its condition and to determine whether the renovation we’d been planning was even possible.
Soon we found what could have proved a major problem: Running perpendicular to the long walls of the pool, side to side in almost a straight line and – ominously – tracing the elevation break between the shallow and deep ends, was a visible, hairline crack.
In my experience, cracks such as these can spell big trouble having to do with expansive soil, differential settlement, inadequate engineering, poor construction practice and a range of other possible issues. Time and time again, when you see this sort of creeping structural failure, it emerges first in the area traversing from shallow to deep.
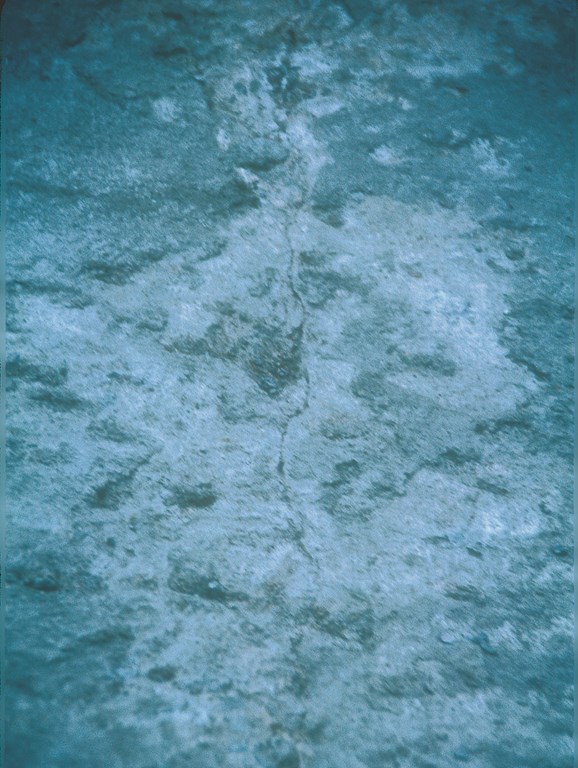
| This crack appeared once the old pool had been stripped and was enough of a concern that I brought in my structural engineer to assess the situation. With his endorsement, we widened the crack in anticipation of filling it with a non-shrinking grout. |
We opened the crack with a small V-cut for a closer inspection and, sure enough, we saw that some of the steel in the shell had oxidized – although not to what seemed a serious extent. At this point, I called in my structural engineer, Mark Smith, whose name has come up in my columns on several past occasions. When it comes to offering opinions and making recommendations, he’s quite conservative, highly conscientious – and invariably correct.
We spent a tremendous amount of time on site talking about what we saw, inspecting the shell over and over again and looking for clues both inside and outside the pool. Ultimately, however, the evolution of the crack remained a mystery, even to Mark’s trained eye.
We sat down chalked up a number of mitigating factors. For one, the crack only ran across the floor and not up the walls of the pool. (We knew that most pools failing from differential settlement will show damage on both the horizontal and vertical surfaces.) For another, steel oxidation was minimal. And in looking at the concrete itself and at what we learned in core-drilling it to accommodate the plumbing runs, we guessed that the poured concrete’s strength was between 5,000 and 6,000 psi – amazingly strong given today’s standards.
Furthermore, the pool had plenty of history. It had been poured in place, not shot; it was surrounded by reliable retaining walls; and there was the obvious fact that it had stood reliably in place for nearly eight decades, a time frame in which southern California has seen a number of major earthquakes.
After lots of discussion, we decided to move forward and cut a large V-notch into the concrete and steel and fill the void with a non-shrink grout. This was all done, start to finish, with the homeowners’ understanding and approval.
LOCKED IN PLACE
The concrete was so hard that we needed a jackhammer to open up the inch-and-a-half-deep cut along the crack, which we cleaned up with a chipping hammer. We then applied the non-shrink grout before covering the entire crack with an elastic membrane ordinarily used to waterproof roofs and walls.
We then roughed the shell in anticipation of applying three coats of Thoroseal to the entire interior surface. As is my usual practice, we alternated gray and white versions of the product, partly to make it easy to be certain we had complete coverage, but also because the two varieties have different characteristics that makes using white over gray advantageous. Finally, we floated the pool to smooth out the interior contours in anticipation of tile application.
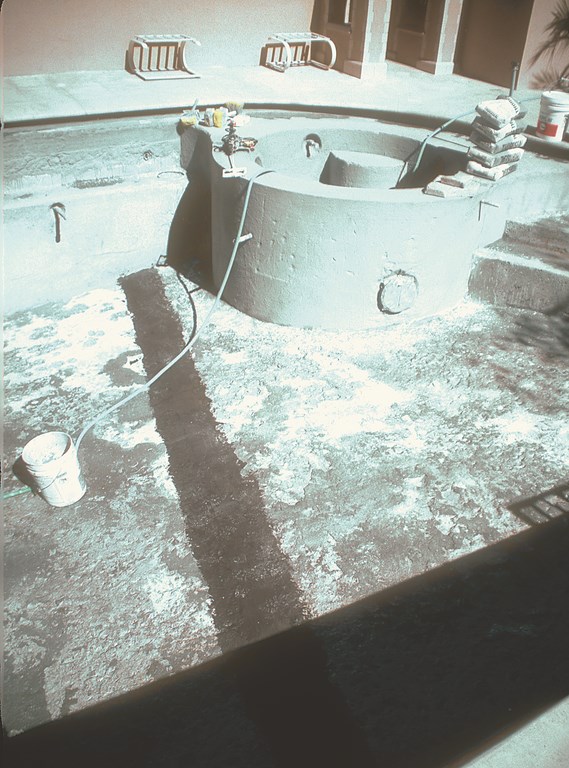
| Once the crack across the floor of the old pool was filled with non-shrinking grout, we were ready to move on to waterproof the shell in preparation for finishing the interior with a beautiful imported tile. |
Throughout these preparatory stages, we were mindful of the fact that we were working with old concrete and new gunite. Surface preparation in the form of sealing and floating is intended, of course, to create a uniform surface, but we had two different substrates and the possibility of relative expansion and contraction to consider.
The key to handling surface issues such as these, where new gunite meets existing material, is making certain the new sections are installed using proper supporting reinforcement, have been doweled securely into the existing structure and are added with quality construction techniques. Otherwise, the result is often cracking and structural failure.
In any sort of construction, in fact, whether new or remodeling, I always put steel in steps and benches and consider it complete folly to do otherwise. I do so because it’s what structural engineers call for; in renovations in particular, I do it because the steel, with its ability to handle tension, will give strength to the new parts of the shell and will resist damage from expansion and contraction of the concrete.
My strong advice: Unless you are qualified to do so, it’s never a good idea to act as your own structural engineer. Whether you’ve been a watershaper for 30 days or 30 years, your role is that of a contractor or subcontractor, and your best practice is to follow details given to you by a certified expert.
Another strong suggestion – and one that should probably go without saying by now: Refuse to use rebound anywhere in your work. In renovations in particular, this material is compromised and should be disposed of properly.
One key detail in finishing our preparations inside this shell had to do with filling up the deep end of the pool without having to “feather” the new gunite where it met the deep end’s existing slope. To avoid this potential point of failure, we set up a line and carefully chipped away the old material down two vertical inches. This means that, even at the edge, the new material will be no less than two inches thick.
Next: installation of the gorgeous tile in the pool and the new spa.
David Tisherman is the principal in two design/construction firms: David Tisherman’s Visuals of Manhattan Beach, Calif., and Liquid Design of Cherry Hill, N.J. He can be reached at tisherman@verizon.net. He is also an instructor for Artistic Resources & Training (ART); for information on ART’s classes, visit www.theartofwater.com.