


Rough Edges

Through the past 20 years or so, the vanishing-edge look has become perhaps the most recognizable hallmark of high-end, custom swimming pools.
In that time, these vessels have gone from relatively rare to remarkably common. These days, in fact, it’s a rare builder who doesn’t have at least a handful of these projects in his or her portfolio.
Unfortunately, this growth in the popularity of vanishing edges has been attended by a dramatic increase in problems with these structures, particularly on the outside surface of the freestanding wall that creates the elegant edge detail. The problems manifest themselves as cracks, surface delaminations, efflorescence and, in severe cases, as leaks. These are issues that have led to scores of dissatisfied homeowners and numerous potential
lawsuits.
The good news is, the problem is entirely solvable through implementation of a few basic measures that really should be the industry’s standard practice. The bad news is, at this point too many watershapers are just not aware of those procedures, much to the detriment of the industry’s collective public image.
BENEATH THE SURFACE
Vanishing-edge pools have been around in various forms for many years, but they really came to everyone’s attention in the late 1980s – and then caught fire as the high-end look of the ’90s.
As is true when any design type catches hold overnight, the spread of knowledge about the construction techniques needed for proper installation of these features lagged well behind the demand. As a result, many of these structures were designed and built using a seat-of-the-pants approach in which workmanship standards were not what they should have been.
All seemed well at first, because the problems didn’t become apparent immediately in most cases. Indeed, news about the increasing number of failures first reached my ears only five years ago. At that time, the vast majority of these weir walls had exposed aggregate surfaces on their outer sides, so many people assumed that the problem rested with the finishes because the failures were visually apparent on the surface.
The diagnosis was that these surfaces, because they were exposed to repeated wet/dry conditions, were breaking down over time. Given the fact that my firm provides structural plans for thousands of pools each year, we are always among the first to become aware of these sorts of problems, and I became involved early on in discussions aimed at determining exactly why this was happening.
Almost immediately, I recognized that it was likely not a problem with the surface finish alone. In fact, I could see that there were as many as four or five separate possible causes or combinations of causes that stood at the heart of the matter.
What knocked exposed-aggregate surfaces down as the primary source of the problem was my observation that most of the incidents were limited to weir-wall surfaces: There were far fewer problems with the wall of the collection trough just opposite the weir wall – a part of the vessel subject to exactly the same wet/dry conditions as its counterpart and one usually having the same surface finish.
Based on that point alone, it made no sense to lay the blame on the surface material. In addition, as time passed it was clear that exposed-aggregate surfaces weren’t the only ones manifesting problems. Now we were hearing about issues with walls finished in stone and tile – and the concern was always primarily about the weir walls.
It had to be something else, so we started digging deeper.
MATERIAL INSIGHT
For the longest time, I was at a loss to explain these failures. I knew it wasn’t the surface material, because by now we were seeing situations in which surfaces finished in combinations of tile and exposed aggregate – as in cases where the edge itself is covered in tile while the wall below is finished in some other material – were experiencing failures with both surfaces.
I began to notice that these problems were similar to those I’d seen in the dam walls of raised spas and in pools built into ascending slopes with overly irrigated landscaping above them. Moreover, we were now seeing projects were water was leaking all the way through the weir wall – clearly not a problem related to any surface finish.
All the evidence began pointing to a conclusion that the issue had to do with water behind a wall structure that had an exposed surface on the opposite side.
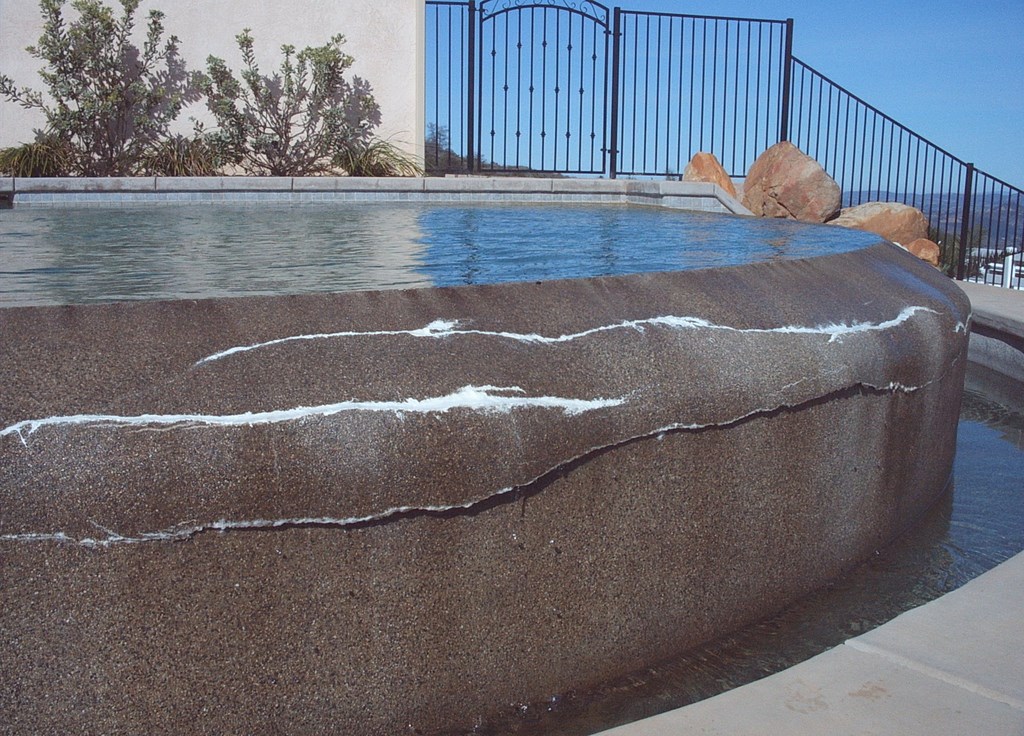
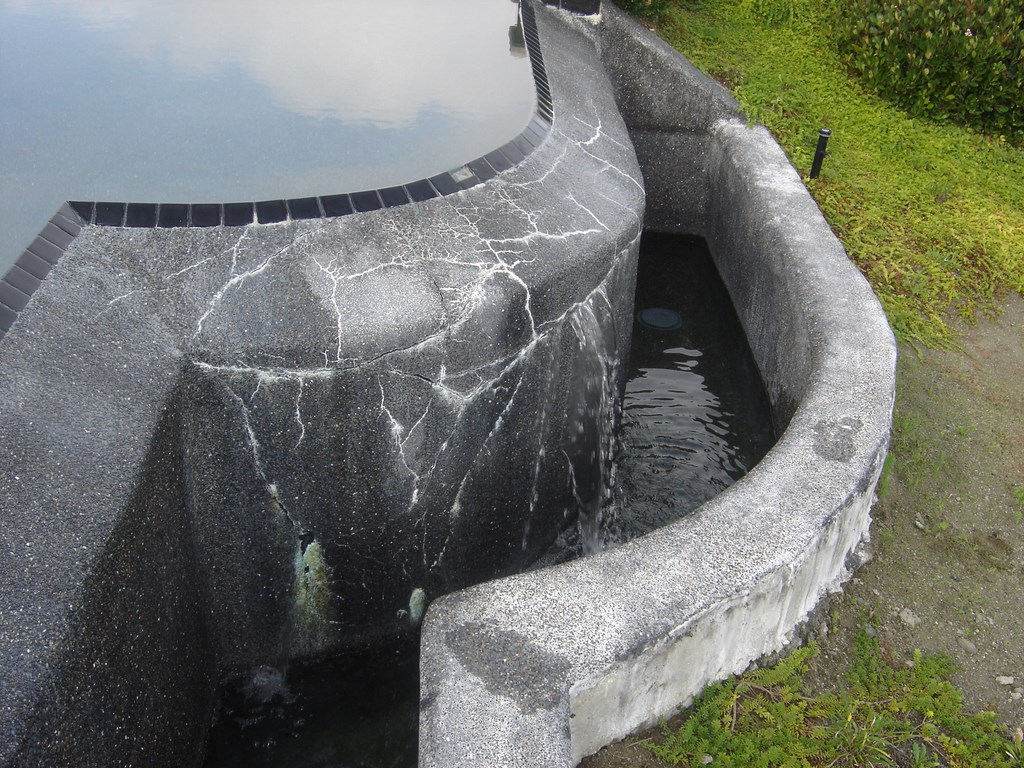
| In the years since vanishing-edge pools gained incandescent popularity in the 1990s, we’ve seen more and more failures of the sorts depicted here, with extensive, disastrous cracking and delamination of surface materials. It took a while, but eventually patterns emerged that helped us determine why these freestanding weir walls were failing – and what needed to be done to prevent it. |
This problem wasn’t happening in all vanishing-edge pools, however, so we soon recognized that the water was merely exacerbating some other problem (or perhaps a combination of problems). At its core, the challenge had to be coming from water penetrating through weir walls.
Backing up a bit, at this point it’s important to note that the cementitious surface materials used in swimming pools are not completely waterproof. The Technical Manual of the National Plasterers Council, for example, describes plaster, the most familiar of all pool and spa surfacing materials, as a “semi-permeable membrane.”
This is not new information. The simple fact is, without some other means of waterproofing or the use of admixtures, all cement-based materials will allow some water to penetrate their surfaces. They may be said to be “water-resistant,” but they certainly are not waterproof.
With swimming pools or other watershapes installed in the ground – that is, where the walls are backed by earth – this semi-permeability isn’t an issue because no harm is done when small amounts of water penetrate the structure. Usually, this volume of water is so small that it pales in significance to losses due to evaporation, so nobody ever gives it a thought.
That all changes when we consider freestanding walls such as those we set up in vanishing-edge pools. Here, the level of permeability obviously can become a problem.
GOING DEEPER
To get to the bottom of the mystery, we began examining a range of issues that might be coming into play – everything from workmanship techniques and the porosity of the materials used in weir walls to the physical nature of the walls relative to temperature differentials and the presence of moisture moving through the wall. In all cases, we were looking for ways in which these issues might be driving the failure rate.
Efflorescence is one such issue and is thought to be one of the primary factors in the cycle of weir-wall deterioration. Efflorescence is the simple formation of salt crystals through the evaporation of salt-bearing water. As water passes through a semi-permeable weir wall, salts remaining from the cement’s hydration process are dissolved and carried by water as it moves through the structure.
Upon reaching the surface, the water evaporates and leaves behind the minerals – and thereby the evidence of water’s transmission through the semi-permeable weir wall. As this process continues, salt crystals can build up in the pores and voids in the material and can eventually fracture (or spall) the surface. We stop this damaging effect of efflorescence by keeping water from passing through the weir wall in the first place. (More on this solution later on.)
Moving beyond that issue, we knew that weir walls were different from other pool structures in that they are exposed to extremes with respect to moisture changes and temperature variations – factors known to cause problems in the broader concrete-construction industry.
| Among the basic, concrete-science-type phenomena we examined for their potential roles in the problems with vanishing-edge weir walls were efflorescence (left), which can build up and fracture the surface of a shell and cause cracking and delamination of surface materials, as well as curling (middle) and warping (right), which have to do with unbalanced moisture exposure on the two sides of a concrete structure during the curing process. In all cases, the presence of these damaging factors can be traced to the passage of water from the pool through the semi-permeable membrane of a concrete shell. |
One consequence of exposing concrete surfaces to environmental conditions is the phenomenon known as “curling.” More commonly an issue with concrete flatwork, curling happens when there are differences in the moisture level between the top and bottom of a concrete slab.
We all know that concrete shrinks as it dries and expands when moist. If you have a four-inch-thick concrete slab, for example, and the top surface is exposed to the atmosphere while the bottom is exposed to a moist subgrade, the top will dry faster than the bottom and the difference in the rate of shrinkage will cause the structure’s shape to distort with its ends “curling” upward.
This same phenomenon can cause problems with the surface material on vanishing-edge weir walls when the back of the surface material is exposed to moisture penetrating the weir wall as the wall’s front surface is exposed to the air. The stresses from curling can be tremendous and will expose any weakness of the bond between the surface material and the gunite or shotcrete substrate.
Another phenomenon is known as “warping,” which is similar to curling but relates to concrete’s expansion in response to heat. Basically, when one side is exposed to heat – as in the case of the outside surface material on a weir wall – the outside part of the material expands relative to the inside of the material and bows upward in the center.
The possible result of curling or warping is delamination or cracking in the surface material. When even a single crack forms as a result, efflorescence can begin to build up and the cycle of wall deterioration accelerates. To minimize this potential for delamination, we must use the highest-quality materials and follow established procedures to ensure that bonding strengths of surface materials to their substrates far exceeds the stresses placed on them by curling or warping.
Keeping all these basic mechanisms in mind, we turned to the question of how water was managing to pass into these walls in the first place – and at such a rate that failures were occurring.
KEY CONCERNS
The areas of inquiry now broke into two basic categories: First were questions about the structural integrity of the walls themselves, then we looked to see if there was a need for some form of additional waterproofing to provide a barrier to moisture migrating though the structural material and the surface finishes.
The structural integrity factor relates to a host of fundamental workmanship issues and standards. The workmanship component can be summed up by noting that weir walls must be built with techniques and practices that should be familiar to any watershaper. While these recommendations apply to every concrete pool ever made, they are of even greater importance on weir walls, where workmanship defects are more likely to reveal themselves – often in dramatic fashion.
The discussion of standards begins with a look at the pairing of concrete and rebar. As with all reinforced structures, the rebar must be completely encased in concrete, otherwise the structure is not effectively reinforced and the voids will allow moisture to travel through the structure and cause the rebar to rust.
| Workmanship plays a definite role in these problems with weir walls. Situations in which cages are inadequately secured and are able to move during shotcrete application are trouble (left), for example, as are instances in which no spacers are used to make certain rebar can be fully and completely encapsulated in concrete (middle). The consequences in the latter case show up as soon as the forms are stripped (right) – and the situation only gets worse when water is introduced. |
Again, this is not new information, but in the case of a freestanding wall, it’s absolutely critical that proper construction procedures be followed to ensure complete rebar encasement. First, the rebar must not vibrate or move as the concrete is being shot – and that the forms should be equally stable. Any movement might create voids around the rebar that will give water a place to gather and cause rust to form. Once rust begins to form, expansion pressure builds and can lead to reflective cracking, spalling and the buildup of efflorescence.
In the case of weir walls, I’m not exaggerating to say that violations of this standard are commonplace. All too often, I see crews install forms by tying them directly to the rebar with no spacers or dobies at all between the rebar and the form. What this means is that the rebar is, in effect, going to end up at or just below the surface of the concrete and will not be fully and completely encased.
With failed surfaces, the removal of the surface material often reveals structures in which the rebar is right there, visible on the gunite or shotcrete surface and without the required coverage.
Given this practice, there’s little wonder why so many walls are failing: The rebar simply isn’t properly encased in concrete! The good news is, the fix is obvious: Build stable rebar cages, tie them together properly, construct stable forms properly braced at the top and bottom and, above all, use spacers or dobies that allow proper coverage of the reinforcing steel.
SPRAYED ON
The issue, however, isn’t all with rebar and forms: Of equal importance is a range of concerns having to do with proper gunite or shotcrete application. This is a huge topic and merits separate discussion; for our purposes here, a few key points will suffice.
The first has to do with “shadowing.” When concrete is shot into place, the nozzle operator must be certain that there’s no shadow behind the rebar – that is, the sort of void that results when correct application techniques are not being followed. Just as is the case when rebar vibrates during shotcrete application, the voids formed by shadowing lead to familiar problems with water movement, rust, cracking and efflorescence.
Another issue is over-spray and rebound. Very often, I’ve seen applicators who are “stack shooting” a wall – that is, building the wall up with successive passes – allow over-spray and rebound to build up against the form, especially if the application surface isn’t at a 45-degree angle. Maintaining the application surface at this 45-degree angle helps minimize the entrapment of over-spray and rebound. Proper workmanship dictates that after each pass, the crew needs to go back and clear away this over-spray and rebound; otherwise, the next pass simply locks loose material into the wall.
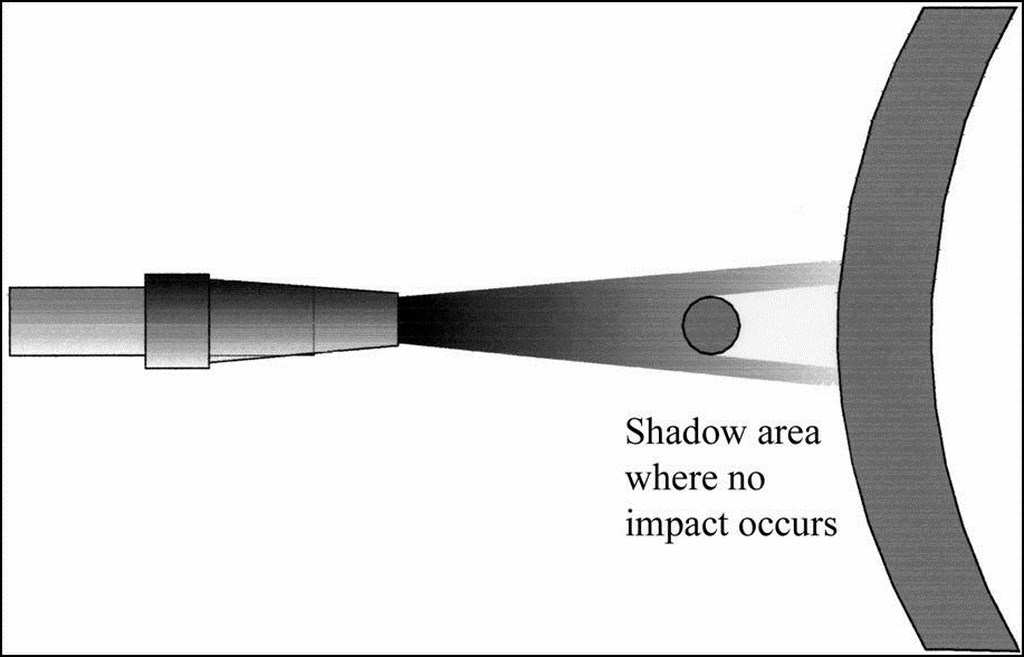
| Proper shotcrete-application techniques are important in avoiding problems with vanishing-edge weir walls. It’s vital, for starters, for the operator to know to avoid ‘shadowing’ and creating voids on the back side of the rebar (left). It’s also critical that the material be shot at the appropriate angle and in ways that minimize over-spray and the creation of rebound (middle left). Neither over-spray nor rebound are ever fully reliable material – and they are particularly troublesome in freestanding weir walls, where their presence can encourage water passage and speed a wall’s deterioration. |
This is not an uncommon occurrence, of course, because clearing away the over-spray and rebound is laborious and time-consuming. But the outcome can be problematic, as in the walls of inground pools where you see over-spray and rebound lurking at the top of the wall or in the bond beam – and coping is subsequently mounted atop poor-quality material.
As has been discussed in a previous article (“Bad Benchmarks,” August 2006, page 42), over-spray and rebound are also a huge problem in benches and steps, but they are equally problematic in weir walls, where the resulting imperfect structure is exposed to extremes of temperature and moisture differentials. Indeed, this single mistake of leaving over-spray and rebound in the weir wall structure can result in failures that might start slowly with minor cracking and efflorescence but can later develop into leaks and other serious problems.
Curing – that is, properly wetting the surface after it’s been shot – is another basic step that’s of extreme importance with weir walls. We all know that when concrete cures too quickly, it is subject to the formation of shrinkage cracks. When weir walls are exposed to direct sunlight, they can heat up quickly and, if not properly wetted after concrete application, will develop shrinkage cracks that aggravate the problems we’ve been discussing.
WATERPROOFING
In addition to basic practices that should be applied anyway, weir walls must also be given the added protection of some form of waterproofing – at least on the inside but preferably on both the inside and outside surfaces. If the above workmanship standards are observed, the added layer of protection afforded by proper waterproofing should be enough to keep these exposed walls from failing.
I recently visited a project that had a vanishing-edge pool as well as a separate vanishing-edge spa. The spa had an all-tile interior, so it had been thoroughly waterproofed, but the owner hadn’t wanted to go to the extra expense of waterproofing the weir wall as well. Here, where the same exact materials and installation techniques had been applied to both weir-wall surfaces, the wall that hadn’t been waterproofed soon showed signs of water penetration and a buildup of efflorescence, while the waterproofed weir wall of the spa is still pristine.
| Waterproofing is a good idea on both sides of a vanishing-edge weir wall, simply because, when properly applied according to manufacturer instructions, these coatings minimize the transfer of water from the pool to the outside of the wall and thereby act as welcome layers of protection. |
I’ve also seen projects where waterproofing on weir walls appears to have failed. That puzzled me at first, but closer examination revealed an obvious problem that is easily remedied. Without getting into specific products and specifications, failures of waterproofing agents almost always have to do with improper use. The range of these products is considerable, and each comes with its own specific set of application instructions that must be followed explicitly.
For example, many waterproofing products applied to surfaces once the concrete has set are designed for use only on the “positive pressure” side of a structure. With a vanishing-edge wall, this means the pool’s side of the weir wall. Others are suitable for both the positive and the negative sides, with the “negative” side being the outside of the weir wall. It all boils down to knowing which material is best used for what purpose – an exercise that requires thorough reading of the manufacturer’s literature.
It’s extremely important to note that, for all the good they can do when applied properly, waterproofing agents cannot compensate for improper workmanship. Most will only seal cracks or voids to a certain width, and they certainly won’t do anything to shore up an unsound structure. By design, they are intended to perform optimally when applied to otherwise properly constructed walls.
WHERE TO FROM HERE?
They key in all of this is to realize that weir walls, because of their freestanding nature, will expose any flaws in a builder’s fundamental construction practices. Based on the scores of projects I’ve seen both during construction and after the fact, vanishing-edge designs merely reveal inadequacies that might otherwise go unseen.
Certainly, there’s room for additional research, testing and analysis – especially of the bonding ability of the various available surface materials used on the back sides of weir walls. The long-term performance of various waterproofing products must also be scrutinized with the goal in mind of establishing application guidelines for use of waterproofing agents in weir-wall applications with particular types of surface materials.
Perhaps someday this kind of information will be broadly available, but that day has not yet come. In the meantime, if you’re one of the countless builders involved in the construction of vanishing-edge pools, you must be mindful of the basics of construction and should always take the extra step of properly applying an appropriate waterproofing agent.
If you don’t, there’s a chance the beautiful pool you turn over to your clients won’t be functional five or ten years down the line. If you do, chances are better than good that you can go back five or ten years later and find a pool that looks as good as it did the day the water first spilled over the edge.
Ron Lacher is president of Pool Engineering, an Anaheim, Calif.-based structural engineering firm focusing on pools. A speaker, educator and author on proper trade practices and structural engineering in pool construction, Lacher has written numerous articles on proper construction techniques and is a frequent seminar presenter at national and regional trade conferences. He graduated from California State Polytechnic University with a degree in civil engineering and is a licensed professional engineer and pool contractor in California. Lacher is also a member of the advisory board of the National Pool Industry Research Center at California Polytechnic State University, San Luis Obispo; of the American Shotcrete Association, where he serves on the pool/spa committee; and of the Association of Pool & spa Professionals, for which he serves on the Builders Council’s education committee. Lacher is an APSP Certified Building Professional (CBP), one of only 150 pool professionals to have attained that certification.