


Rock Steady

After a long, mostly weather-related break, it’s finally time to return to the rolling hills near Hanover, Pa., and the huge, multi-phase watershaping project I began discussing in the fall of 2003. When we last visited the project in February 2004 (page 22), the primary gunite structures were in place; we are now proceeding with the meticulous work that will give the project its visual appeal.
Even in unfinished condition, the pool complex is pretty impressive: a big, free-form vessel with a variety of features including an island spa, an enormous associated waterfeature, bridges and a range of bells and whistles I’ll discuss in upcoming columns as the project draws to a close.
As previously discussed, one of the defining design elements on this project is the extensive use of natural boulders and large expanses of stone decking. Even without the weather delays, these project phases alone have turned into quite the odyssey, starting with the basic process of acquiring thousands of tons of stone and preparing the site for placement of hundreds of boulders.
Here as in most other large projects, we were in for a few surprises.
GETTING WHAT YOU PAY FOR
Fortunately, the biggest revelation had nothing to do with the work we were doing.
By the time we suspended our work when winter began last year, the homeowners already had purchased a significant amount of blond flagstone that had been installed by the general contractor in decking areas not associated with the swimming pool. The material came from a supplier who vouched for the quality and weatherability of the stone and was proud of the fact that it was quite a bit less expensive than the stone my partner Kevin Fleming and I had recommended before our winter hiatus began.
To be sure, the material looked something like the material we’d suggested for the vast square footage of the terraces and patios, but after a brutal winter and the ensuing thaw, the installed stone was popping and delaminating all over the place. In fact, it was simply falling apart, decomposing to sand and dust right before the owner’s eyes.
To say the least, the general contractor and homeowner were upset, which meant that even before we resumed work on the pool, we collectively had to address the issue of the stone they’d been led to believe was the same as the stone we’d recommended – definitely not the way we wanted to rejoin the work on such a big project.
I carefully explained that although the stone looked superficially the same, it was a different type of material that had a different mineral composition and distinctly different physical characteristics. This was a big point, because the average person does not consider that not all natural rock materials are created equal – particularly when those materials are exposed to water and the elements.
Eventually, we solved the problem by repeating our recommendation that the stone for the decking be obtained directly from Malibu Stone & Masonry of Malibu, Calif., where I knew that they could obtain the sturdy material I favored. We put the homeowners and their contractor in contact with my friend, Joe Nolan, who ended up supplying the replacement material.
That was an unfortunate object lesson in value: The reason they’d gone with the alternative material is that it was considerably less expensive than the stone I’d chosen. As is true with so many things in life, you really do get what you pay for – even with rock.
BACK TO THE POOL
The most direct effect this incident had on the project was that it completely undermined our faith in the local stone supplier we had originally lined up to provide stone and boulders for our own work on the pool area.
Given the large amount of material we needed, we’d thought it completely impractical to use a supplier all the way across the continent and truly wanted to work with a local vendor. But the simple fact of the matter was that there were no suppliers anywhere in the Northeast who had access to the warm, cream-colored material we wanted – and so we had to look elsewhere.
The owner (in conjunction with the general contractor) suggested that I visit a facility in Rock Island, Ark., that has become a center for distribution of a huge percentage of the blond stone quarried in Texas, Arkansas, Oklahoma, Missouri and the rest of the Southeast – a source of some of the most beautiful rocks and boulders available anywhere in the United States.
I flew into Little Rock, Ark., and made my way deep into the Arkansas backwoods to a spot with the enticing name of Bald Knob. I’ve traveled a lot, but I’m not sure that I’ve ever been to a more remote location. It reminded me of a truism Joe Nolan drops from time to time: “When you reach the end of the road, that’s where you’ll find the rocks.”
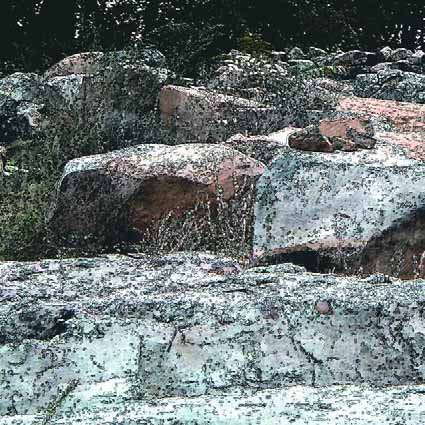
I spent a couple of days touring the facility with its proprietors, an unpretentious set of people who really know their rocks. Ultimately, we selected a blond stone touched with a range of grays and blacks with a wonderful, hard-as-nails surface – ideal for a watershape setting in a rugged climate.
It was quite the exercise in “rock-shopping,” and by the time I finished, I’d selected not only the array of boulders we needed for the pool project, but also found material for a phase of the work that will come sometime later on.
I’m not sure exactly how much material we purchased, but it measured in the thousands of tons.
SELECTIONS TO SCALE
We’ve learned through the years that it’s much more cost-effective to over-order stone than it is to come up short. On this project in particular, the overage would never be a problem given the 200-acre site: We knew that unused pieces could easily be incorporated into the vast landscape somewhere down the line.
We’ve also learned that one of the biggest mistakes you can make is relying on the supplier to choose material: In a situation like this with a discerning, demanding client, there is no escaping the need to hand-pick the material in accordance with a refined vision of how things ultimately will look.
We knew the rocks we chose would need to fit together and have character and some degree of visual consistency. As important, we knew the stones had to be of a size and scale that befitted the full extent of the project.
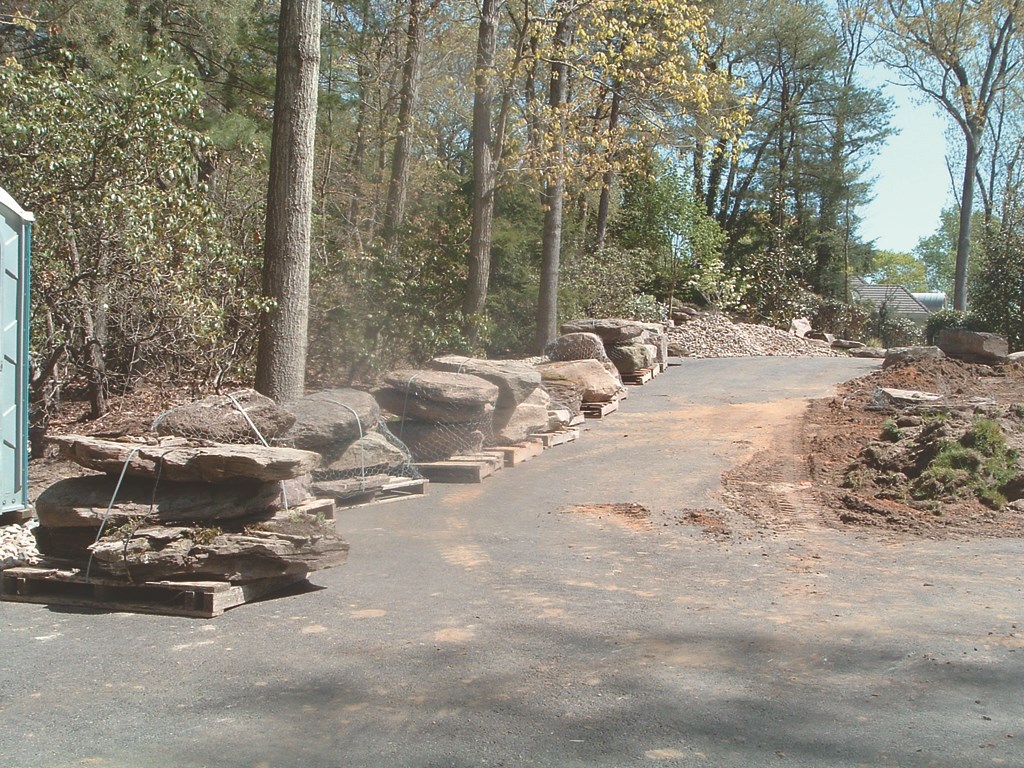
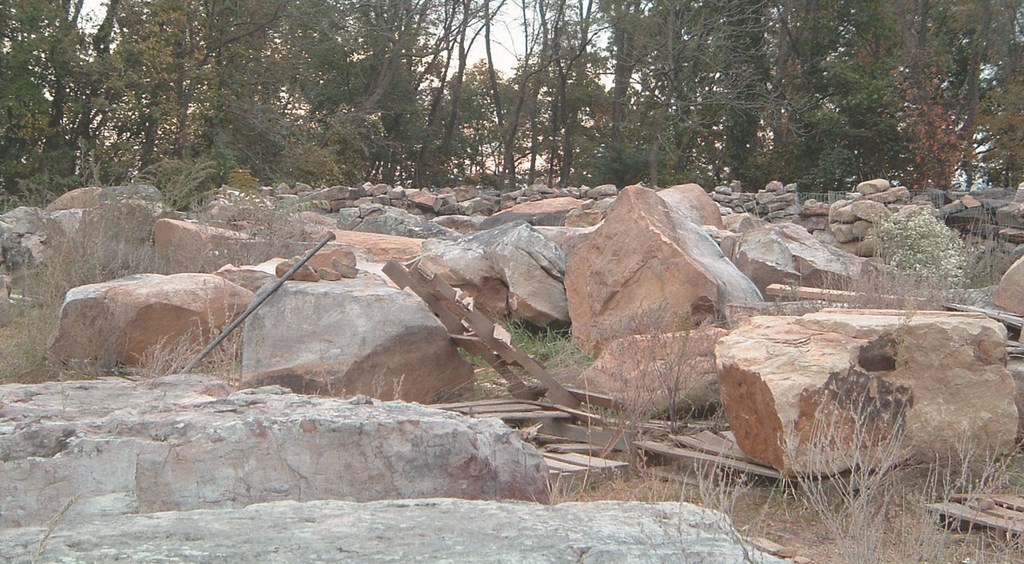
| The amount of stone brought to the jobsite was truly impressive. Much of it came in on pallets that dotted every accessible space for a while (left), then it was arrayed on a nearby field for the painstaking process of sorting and final selection (below). |
Too frequently, contractors see bigger as better and will choose pieces that are oversized relative to the scale of the design – or they’ll cut corners and use undersized boulders in places where larger specimens would be better. It’s a simple principle: Big jobs require big boulders, while smaller projects demand smaller ones. You simply can’t build a 20-foot water effect that’s a major focal point using six- to eight-inch rocks.
Based on the scale of this installation, we selected lots of two- to six-ton boulders (some as much as seven feet across) as well as a variety of bowling-ball-sized pieces to act as fillers and visual transitions. We laid everything out in a field adjacent to the pool area and now turned our attention to preparing the swimming pool and adjacent structures to support their weight.
Specifically, we were working beyond the pool with the waterfall and a structure that we’re calling the “service area,” something akin to a large grotto located just to one side of the waterfall. The waterfall is 15 feet wide and rises some 20 feet above the pool, appearing to flow from above and spanned by a cantilevered concrete bridge that, when finished, will provide wonderful views of the waterfall, planted areas and pool below.
The entire system is contained in a massive concrete structure reinforced by double curtains of #5 rebar and shot to a one-foot thickness. The structure is set atop an incline and encompasses a series of two- to three-foot walls that create a series of basins around which we’ll set the boulders. These basins will serve as small ponds and create terraces that will break up the flow of water as it makes its way down the slope to the pool. In some of these ponds, we’ll augment the flow with return lines, our goal being to mask the sources of the water while gaining the ability to control flows in just the ways we want.
HEAVY CONSTRUCTION
As suggested above, the waterfeature will flow down toward the pool through a variety of levels that will feature rockwork, small pools and planted areas. In nature, waterfalls are anything but uniform, and the water moves around and over boulders and past plants that grow up around and between the rushing water.
As watershapers, of course, we need to design and rig those rocky and planted areas, setting up sleeves for feed water, drainage, irrigation and, in this case, lots of low-voltage lighting.

| In the photo at left, the waterfall and grotto structures (left and right, respectively) are structurally separate from the pool (foreground right), rising above it to form a dramatic backdrop. As seen in the photo below, there’s plenty of big steel and concrete in the waterfall, mainly to support all of the large boulders that will eventually be placed in and around the cascade. |

The waterfeature is shaped in a sort of semi-circle with multiple tiers and all sorts of zigzags and direction changes. This free-standing, self-contained structure is set apart from the adjacent pool structure to avoid any possible problems with differential settlement.
After we shot the whole waterfeature and built small “cheek” walls out of eight- to twelve-inch concrete masonry units (CMUs), we waterproofed everything with four or five coats of ThoroSeal. At the same time, we sealed a notched detail around the perimeter of the pool in which boulders that will extend below the waterline were to be placed.
The service area mentioned above was formed with two-by-four stud construction in the shape of a quarter sphere. We set up a heavy-duty structure of reinforcing steel using #5 rebar and shot it in places with up to four and a half feet of concrete: This is what was needed to support the huge stones that will be placed up on top.
The idea is to establish a structure that exists in comfortable visual balance with the site and its watershapes. In unfinished appearance, the service area looks something like a band shell facing the pool. When finished, it will serve a variety of functions, including the provision of a shaded, wind-sheltered spot for caterers, party provisions or entertainment.
All in all, it’s good to get back to this project, whose progress we’ll track for the next several installments of “Details.”
Next time: the placement and setting of the rockwork.
David Tisherman is the principal in two design/construction firms: David Tisherman’s Visuals of Manhattan Beach, Calif., and Liquid Design of Cherry Hill, N.J. He can be reached at tisherman@verizon.net. He is also an instructor for Artistic Resources & Training (ART); for information on ART’s classes, visit www.theartofwater.com.