Sliding into Backyard Waterparks, Part 2

The feature clients like most about custom pool slides – particularly those of the modular variety – is their tremendous flexibility: The average slide is about 15 feet long, but the sky truly is the limit, with elaborate installations stretching out across 30 or 40 feet in length. Slopes are generously variable as well, but there are obvious space considerations that come into play with larger-scale projects. A good rule of thumb for a desirable 20-degree slope: Every foot built up vertically generally requires about three feet of horizontal build-out.
Obviously, this means that space availability is a major factor in slide design and construction. The great thing is, the basic procedures of slide installation do not vary much with size, so the process, once learned, is pretty straightforward and repeatable.
Here, we’ll be focusing on what this means with modular slides in particular, including design considerations, space requirements and basic construction and installation procedures.
GETTING STARTED
There are three main points that must be known before a modular slide is designed: First, you need to know the height of the slide at the seat section relative to the main deck, which is for these purposes “zero grade.” Second, you need to know the height of the exit section of the slide relative to zero grade – a position that should be no more than 20 inches above the pool’s waterline.
The third point cannot be overlooked: Before you can proceed, you need to have some idea in mind (and on paper!) of how the slide needs to look, with all twists, turns and straight runs clearly (if not precisely) defined.
Armed with this basic information, you’re ready to contact a modular slide manufacturer. Going in, you also need to be conscious of the fact that, with slides, complexity means cost, with lots of twists and turns and slope leading to higher price points. Color is also a factor, with more deluxe finishes resulting in greater cost.
This obvious progression of costs leads many designers and builders to think in terms of packages and upgrades – for example, Package A is a one-turn slide with small waterfall, while Package B is taller with a bigger waterfall and Package C is a two-turn slide with the coolest possible waterfall. This makes it easy for clients to make price-point comparisons and becomes a matter of routine for installation crews.
Of course, the use of a package approach doesn’t mean the designer can’t do something special if the client wants more and has more to spend for a truly custom project. In these cases, the designer can work at the fringes of the imagination and even safety, knowing that the modular slide manufacturer’s engineering team will review everything for performance and safe use. These engineers know, for example, that most people throw their hands up in the air while sliding, so they review drawings to make certain no rocks protrude into the space to form potential hazards. They also look at the pool’s entry envelope, making certain it is at least six-and-a-half-feet wide, 13.5 feet long and four feet deep – and will expand those dimensions as needed depending on the slide system being developed.
BY THE POOL
Once the engineering is complete and the components arrive on the job site, the installation of modular slides is generally easy – and that’s true despite the fact that different slide manufacturers follow slightly different guidelines. Generally, however, the process starts with by leveling the hill-to-be’s substrate to the approximate final grade.
 Someplace nearby, assembly of the flume begins as well. All of the parts should be laid out in the correct order (and upside-down with a protective layer so the slide’s surface won’t be scratched). An easy way to confirm that the arrangement is correct is to check the module’s underbelly near the flanges: These are typically coded in obvious ways, so “A” on one section should line up with “A” on the next, “B” with “B” and so forth through the alphabet. The anchor supports are similarly marked to carry the slide up the hill and away from the pool.
Generally, each flume section will have gaskets on the flange and the bolt holes, so it’s simply a matter at this point of inserting and hand-tightening all of the hardware. (If you are using stainless steel hardware, it’s wise to apply anti-seize lubricant to the threads.) Now’s a good time to check to see that the sections align smoothly and evenly – that is, before you start tightening down each nut with a torque wrench in an alternating fashion, working from left to right after starting with the center bolt. (This will compress the gasket evenly to prevent any leaking.) Now you attach the anchor supports as you work uphill.
 After the flume pieces and anchor supports have been assembled and rest on the anchor supports in the correct horizontal position to produce the desired pathway for the slide, you should use spray paint to mark the locations of the anchor supports. Once the marking is done, the slide assembly should be moved to one side, allowing access to the marked areas for excavation. (If the slide is long, it may need to be divided in two for easier moving.)
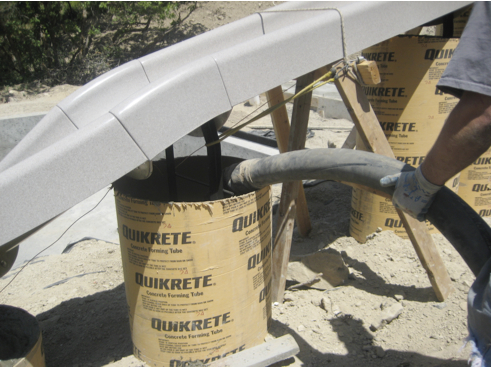
The spray paint now marks where sonotubes or footing supports should be placed to form the flume substructure. These need to be dug to specified minimum depths, but the manufacturer’s standard recommendations are always subject to adjustment depending on the site’s specific soil conditions. Often, minimums are not enough and may need to be increased to deal with a high water table, local freeze/thaw characteristics, soil conditions, local codes or a geologist’s recommendations.
Once the forms are ready for concrete delivery, the slide and its anchors should be set in place to ensure that the proper slope is being prepared – as should any support related to integrated grotto or waterfall structures. The supports should also be tied into the watershape’s grounding/bonding system to prevent electrical misadventures.
FINISHING TOUCHES
Now, just before the concrete is poured, comes a bit of fine tuning to make certain the slide is set up to perform as planned – a process that calls for a torque wrench, a two-foot level and an angle finder.
 Of the three, the angle finder is perhaps the most important because it will help you measure the slide’s slope. To do so, start at the top and take several measurements in the center of the flume. Each manufacturer has its own guidelines when it comes to tolerances, but generally if the slope is greater than intended, the rider could go too fast and will not follow the safe, correct pathway. By contrast, if the slope is less than designed, the rider might not have enough momentum to make it to the end of the slide.
For the most part, deficiencies found at this point can be remedied fairly simply using the torque wrench and checking results with the level and the angle finder. Once this process is done, it’s time to grab a garden hose and run a water check to make certain all of the nuts have been tightened properly – no leaks allowed!
Finally, before concrete locks the system in place, you should make certain the entry and exit points are level and that the slope is correct – and keep an eye on these alignments as the concrete is poured to make certain nothing gets bumped out of place. Once the installation process is complete, the slides surface should be covered to prevent damage that might occur as the landscaping and rockwork take shape.
All that’s left now is initiating the water flow and standing back to watch children at play on a mesmerizing component of their new backyard waterpark.
Kathryn Varden is western regional sales manager for Inter-Fab, a Tucson, Ariz.-based manufacturer of slides, slide systems and pool accessories. A 13-year industry veteran, she has a Masters degree in Landscape Architecture. For more information on modular slides, visit Inter-Fab’s web site: www.interfab.com/swimming-pool-slides.aspx.


