


Island Building

The project I’ve been working on in the hills outside Hanover, Pa., has just about every feature, bell and whistle one can imagine.
That inclusiveness of detail at every level has translated to an unusually intricate construction process, as I mentioned last time in discussing the excavation, forming, plumbing and steel phases. Now we get to the gunite.
Where a garden-variety backyard pool involves placement of maybe 30 to 50 yards of concrete and some larger projects may run in the 50-to-70-yard range (and where most of mine tend to fall in the 90-to-130 yard range) – this project needed two gunite rigs shooting for two solid days, 12 to 13 hours each day. The pool shell alone (excluding the waterfall, the grotto and several other features we’ll get into later) required a staggering 300 yards of concrete. That’s about 600 tons of gunite, or 1,200,000 pounds!
Those numbers may not be all that impressive for a commercial pool specialist, but in the realm of residential construction, this is one monster of a pool!
Staging the shoot was extremely complex, and once again I credit my partner Kevin Fleming for his supervision of the gunite crews and the other sub-trades that were on hand. The key to it all was setting up the island spa – which is where we get down to details.
INSIDE, OUTSIDE
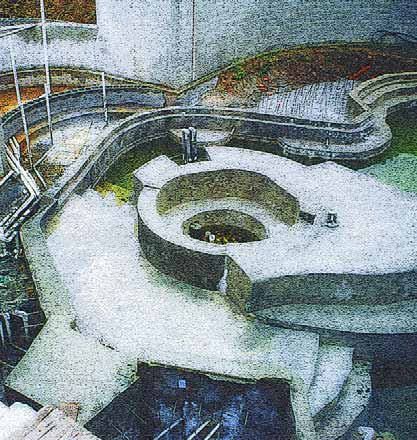
The concept of the spa island had to do with creating a special space separated from the “mainland” by a seven-foot bridge. The thought was that this would be a great vantage point for the homeowners to supervise their grandchildren at play in the adjacent pool – and a perfect spot for a thermal ledge with an umbrella holder.
On one side, the island is separated from the deck area by that just-mentioned thermal ledge. It’s just six inches deep, and as I’ve discussed in previous columns, thermal ledges provide wonderful play areas for kids of all ages. We envisioned adults sitting in the spa (or perhaps on the deck under an umbrella or awning) while watching kids play in the six inches of water. Beyond the edge are steps that lead down into the pool, which is 4-1/2- to 5-1/2-feet deep in the areas near the ledge. (See the sidebar below for more on pool depths.)
| There’s a lot of concrete in the structure of this pool shell – 600 tons of gunite in all. The framing we set up with so much care held up beautifully under the accumulated weight and pressure, giving us precisely the complex configurations we were after. |
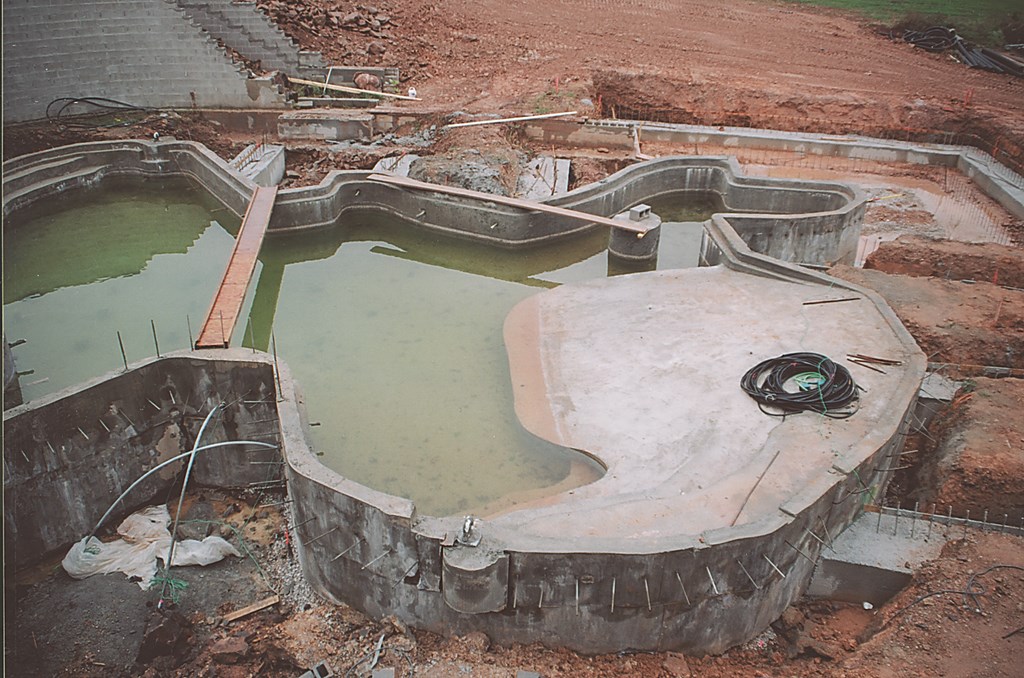
In construction terms, the complexity came by virtue of the fact that we had to form and shoot the inside of the spa, with its steps, contours and details, and then somehow also shoot the rest of the island surrounding it. How do you do both things at the same time? The answer is, you can’t – you need to sort things out and separate the challenge into two phases.
We had formed the spa just as we would most any other, with a set of forms on the outside – in this case with everything elevated between six and 12 feet above grade. The spa is approximately 8 feet in diameter on the inside and about 10 feet across on the outside of the structure.
Once the rigs started shooting the gunite, we shot the entire spa structure solid with the main pool shell. Given the elevation, this meant that the floor under the spa is about 3-1/2-feet thick, thoroughly reinforced with #3 rebars on 12-inch centers in three ways.
|
Not So Deep Some people have expressed surprise that I would design a pool of the magnitude described in the accompanying article with water depths ranging from 3-1/2 to 5-1/2 feet. First of all, the pool is meant primarily for kids and entertaining and for free and safe movement in the water. It’s also for games such as basketball or volleyball and for other activities supported by shallow water. So why not create a separate deep end somewhere? Simply stated, this was not a priority for the homeowners and we had no good reason to go any deeper. There’s also the fact that shallow water is more energy efficient (especially in a place like Pennsylvania) and that there’s value in keeping the overall water volume down relative to the surface area of the pool when heating is a necessity. To be sure, there are applications where deep water is essential, if for no other reason than it’s what the client wants. Absent some specific reason to go deep, however, I’ll opt for shallow water every time. — D.T. |
In anticipation of phase two of the spa-island shoot, we had doweled dozens of pieces of rebar that penetrated the circular outside forms for the spa. These bars stuck out in all directions. Once the inside was shot, which happened during the initial two-day gunite phase, we let things set up, then went back and stripped all the forms from the spa’s interior and exterior surfaces.
We’d used tempered Masonite to line the forms, so they literally popped off the new gunite. This detail was especially helpful in stripping the outside of the spa where the rebar extended out from the forms.
At this point, our steel subcontractor came back out and tied a new steel armature all the way around the outside of the spa to create the island, which is about 12 to 15 feet across.
We stubbed out several four-inch sleeves to accommodate the planters that will surround the spa – one sleeve for the low-voltage lighting, another for irrigation and, most important, several to allow for drainage from the planters to avoid the problem of rain over-saturating the planters and killing the plants. Some of the planters will in an area near the spa and will be surrounded by boulders; this is where we’ll be locating the spa-side controls.
HELD TIGHT
Now we brought back one of the gunite rigs and shot the rest of the island right up against the original spa structure, essentially using the spa’s exterior surface as the form.
Through the years, I’ve heard it said time and again that you shouldn’t shoot gunite up against gunite, but the fact is that you can shoot right up against it with no problems at all.
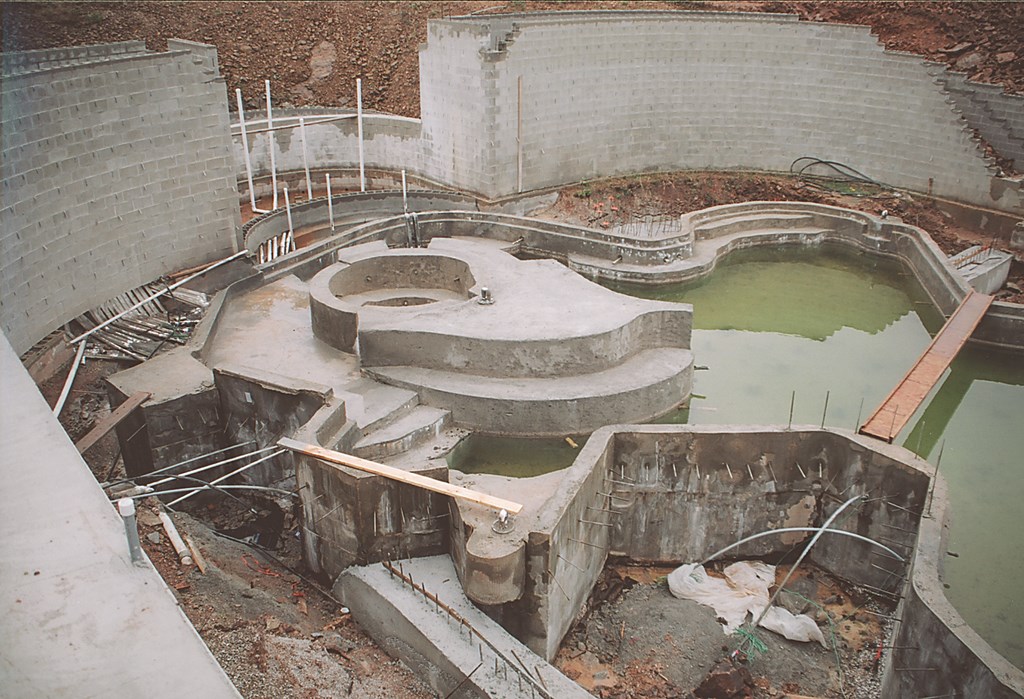
| The spa and the island that surrounds it may look monolithic, but they were actually shot in two stages. We formed, shot and stripped the elevated spa, then set up the steel for the island and thermal ledge before bringing back the gunite rig. |
In this case, the spa structure offered a beautiful form for the new gunite. We used lots of steel to reinforce and secure the added tonnage of gunite and know that, at ten tons and tied directly into the shell, the spa itself won’t be going anywhere. Now we have a massive, “monolithic” island with a finely contoured spa permanently sunk in the middle of the whole affair.
It bears mentioning again that the key to all of this heavy-duty construction was the forming work we did in preparation for the shoot. As mentioned last time, we went to great lengths to brace and stabilize the forms, all of which were above grade and set in the midst of diamond-hard shale. Despite the fact we had just a few anchoring points, the system of cross beams and kickers let us establish a rigid structure.
For all the effort that went into setting up the forms, we were obviously concerned about how it would hold up once the gunite started to flow. I’m happy to report that the forms didn’t move at all – not even a fraction of an inch – during the two-day shoot. I shudder to think what might have occurred if we’d taken a less-rigorous approach.

| There’s much more to come on this project, including a huge waterfall that will flow through the recess in the retaining walls and grottos that will require the application of many more tons of concrete to an already massive watershape. |
Lots of the work I’ve seen in the Northeast has been less than exemplary when it comes to forming – rebar stakes and pegboard forms with minimal bracing, for example. When you shoot up against that kind of “bracing” and later strip the forms, most often you’ll find that the pegboard has moved and created huge voids that expose the steel. Some contractors have told me that it’s “perfectly acceptable” to pile earth against the exposed rebar to fill the void, but all this really does is speed oxidation of the rebar and lead rapidly to structural failure.
The forms on this big Pennsylvanian project, by contrast, were set up well and didn’t budge an inch, and they were so elaborate that it took us three days to strip them away after the shoot. Yes, it costs more money to the do things this way, but a quick look at the photos shows that this was a very clean shoot.
Whenever I tackle a project of this size and complexity, I know going in – and at every step of the process from excavation to gunite – that there is no room for guesswork or the lazy attitude that says, “Close enough.” Everything that’s gone into this project has been engineered in great detail. Yes, it’s more expensive this way, but I rest easy at night knowing that nothing has been left to chance.
Next: We return to Los Angeles and the restoration project we stepped away from as we awaited delivery of tile from Italy.
David Tisherman is the principal in two design/construction firms: David Tisherman’s Visuals of Manhattan Beach, Calif., and Liquid Design of Cherry Hill, N.J. He can be reached at tisherman@verizon.net. He is also an instructor for Artistic Resources & Training (ART); for information on ART’s classes, visit www.theartofwater.com.