


Illuminating Footsteps

It’s not an uncommon goal: Nearly all of the homeowners I speak with about lighting designs want to be able to move safely and comfortably around their properties at night. Perhaps more important, they want guests and others unfamiliar with those spaces to be able to do the same without anyone being concerned about suffering an injury as a result of a misstep brought on by darkness or glare.
The interesting this is, some of my clients need convincing when it comes to path or step lighting: Even if they see
the value of illuminating main areas and passageways, they’ll often hesitate when it comes to investing in lighting of peripheral paths or step systems because, they say, “they won’t be used very often.” My response is that if those stairs or paths are ever going to be used at night, then they should be lit as a safety precaution. As I point out, all it will take is one mishap to persuade them to change their minds – and by then it’ll be too late!
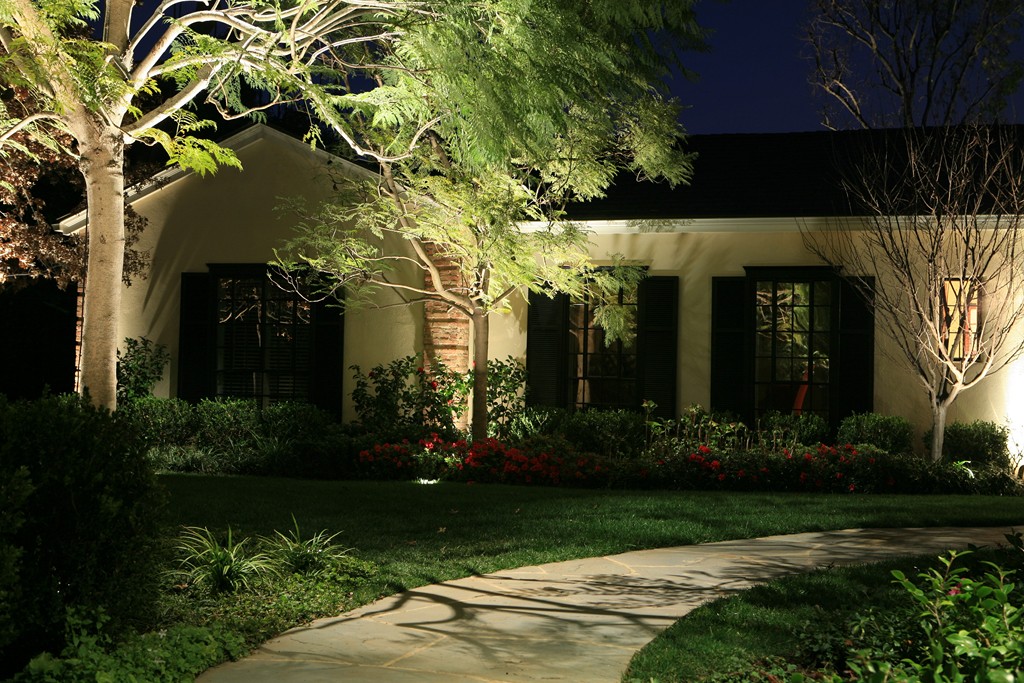
Of course, safety is only one of the issues at stake: My chief design objective in developing lighting programs for paths and steps is to make certain people can move comfortably and easily through exterior spaces at night as they transition from one destination to another – from the street to a front door, from a patio to a pool or from a deck to a spa. If I get that right, the safety of these passageways is a natural outcome.
COMFORT AND EASE
Happily, getting things right with path and step lighting is often a relatively straightforward process.
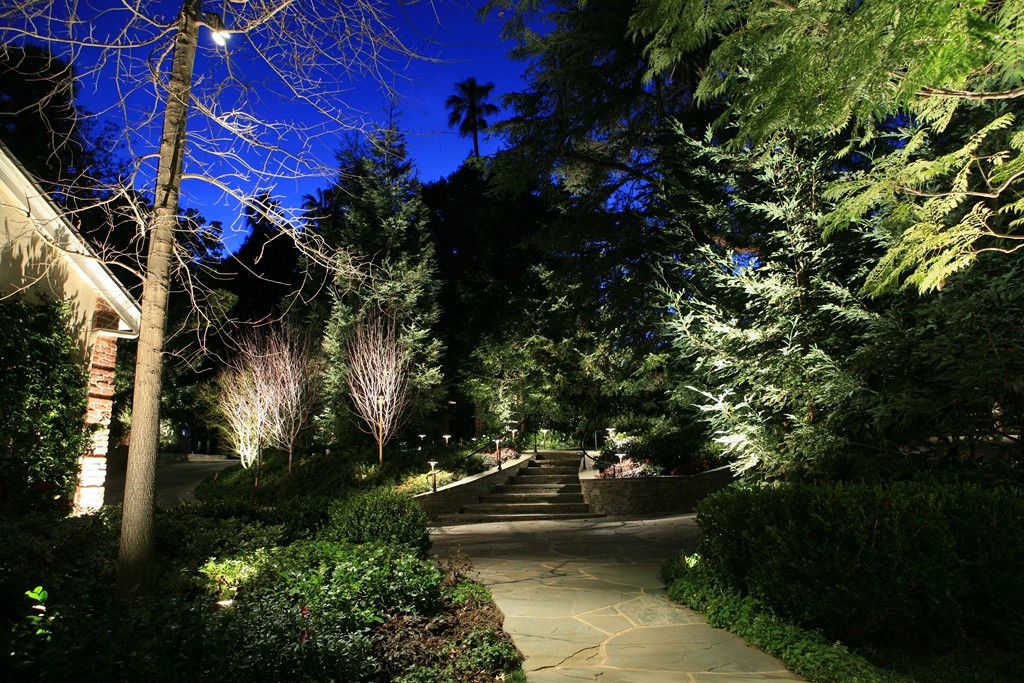
For starters, these systems typically have the lowest intensity level of any lighting in a landscaped space. There are some exceptions – maybe if the stone of a walkway is so wonderful that you want to call attention to it even at night, for example – but for the most part the job is to establish visual boundaries and elevations so people feel comfortable while on the move.
With that in mind, paths can be defined by lighting that is actually quite dim. The goal here is to provide enough illumination for trouble-free passage without having any bright lights that shine directly into the eyes: Glare causes a person’s pupils to contract rapidly, thereby rendering the surrounding area dark for five to ten seconds – a phenomenon that defeats the purpose of the lighting, creates unpleasant physical sensations and draws attention to the lighting itself rather than to the landscape it is meant to illuminate.
Steps are a different story. First, they require somewhat brighter illumination and, second, they benefit most from fixtures that bathe their treads and risers in an even glow.
| My ambition in lighting pathways is to create a situation in which anyone who comes along can move safely and easily through the space after dark. It doesn’t take much light intensity to get the job done, and I prefer alternating fixtures along the path to putting them all on one side and running the risk of creating a ‘runway’ effect. |
To be sure, some step systems are quite elaborate and might merit having attention called to them day and night. Even so, I never let that be my primary consideration in place of either safety or comfortable passage: Invariably, I’ll stick to the basics and leave the big aesthetic statements to the daylight hours while focusing my aesthetic attentions to other elements of the lighting composition.
I do so for practical reasons: Steps are inherently more hazardous than other lit elements in gardens, and I’ll willingly sacrifice some of their aesthetic potential to the causes of safety and comfort. This is why I’m particularly watchful for sources of glare around steps – a serious issue with grade changes because as one moves up the treads, poorly chosen fixtures mounted at higher levels can shine light directly into a person’s eyes and create just the sort of hazard the lighting was meant to remedy.
I’ve also seen many instances where paths and steps are moonlit from above – a technique that is typically used to cast interesting shadows on the spaces below. This can work with pathways so long as there’s enough light that the boundaries are clearly defined. Just the same, I recommend this approach for step lighting with reluctance, not only because shifting shadows will obscure a walker’s sense of the relationships of treads to risers, but also because the person’s own shadow will be projected onto the steps, further compromising clarity if the light source is placed incorrectly.
That may seem complicated, but once you make practicality the guiding principle of your approach to lighting pathways and steps, things get sorted out with relative ease – starting with fixture selection.
THE RIGHT MOVES
One of the consequences of my approach to path and step lighting is that it imposes some limits on what’s available to complete a lighting portrait.
For pathways, for example, many designers choose from various mushroom- and tulip-shaped products as well as bollards and any of a number of other decorative fixtures. With steps, they have those same options plus the possibility of mounting lights in risers or stringing them across the recesses of risers or placing them on nearby walls or step cheeks.
Personally, however, I prefer to use fixtures that blend into the landscape rather than those that make some kind of aesthetic statement or serve some greater decorative purpose. In my book, the aim of landscape lighting is to make garden elements look great after dark, so I don’t particularly focus on the aesthetics of the light sources themselves. Yes, there are clients who have other thoughts in mind and want their fixtures to make decorative statements. I’ll comply – but only if the desired fixtures do their job, which is not always the case!
This practicality issue is why, for example, I discourage clients from mounting lantern-style fixtures on pilasters or nearby walls or from using streetlight-style fixtures for step and path lighting: Simply put, they are mounted so high that they often cannot help being sources of glare and a visual distraction that will particularly compromise safe passage up sets of steps. (I especially advise against the use of common pagoda-style fixtures: They may or may not look fine by day depending on your tastes, but at night they don’t shield glare at all.)
| Lighting paths from above can yield wonderful shadow effects, but only in circumstances where the shadows don’t lead people to misread what’s coming. This is why this overhead approach shouldn’t be used on steps: You don’t want to obscure any key details in patches of darkness! |
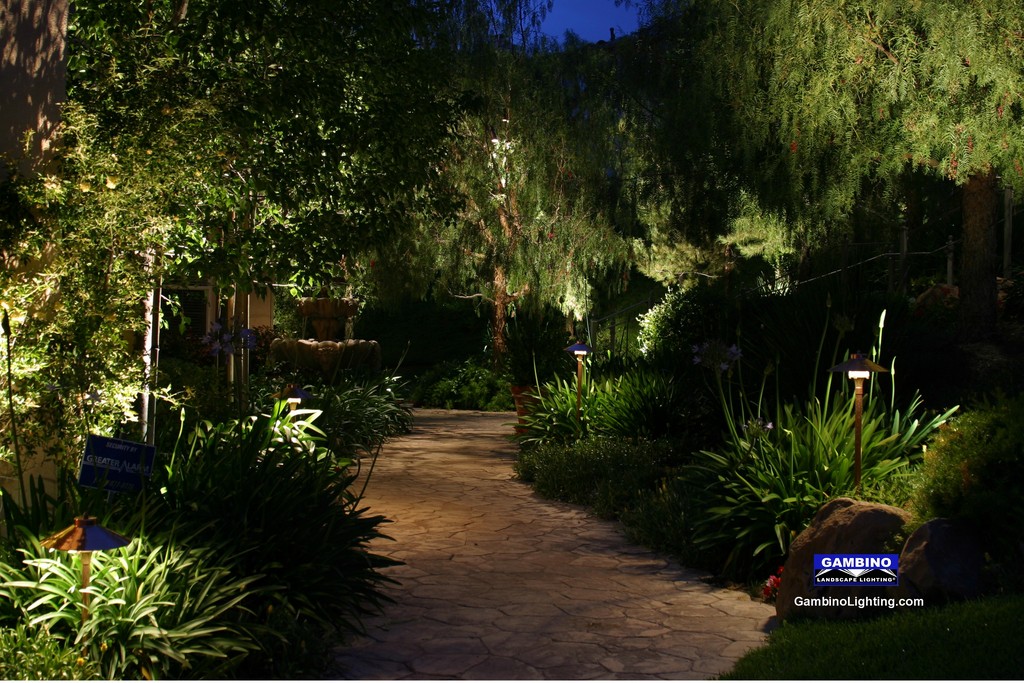
Once fixtures are selected, placing them is the key. For me, it’s always a balancing act: You want them to be close enough to a path that they provide adequate light, but you also want them to be back far enough that they’ll blend into the plant material even if they’re set just a few inches off the path. Granted, I can’t hide the light sources completely if they’re right next to a path, but I do all I can to minimize their presence while achieving acceptable illumination.
What this means is, although I’m a lighting system designer/builder I need to put on my horticultural hat and consider what’s been or will be planted along the sides of the surfaces I’m illuminating: My fixtures need to rise above, stay below or be located in front of adjacent plant material so the light will not be blocked, which means I need to know what plants are there and how they’ll look when fully grown, not just “as planted.” Believe me, I’ve seen too many situations in which fixtures were placed either too low to the ground or too close to the plants and became overwhelmed as the landscape grew in: In rapid order, the entire lighting program was rendered useless.
There are also technical issues to be considered in placement and spacing of the chosen fixtures. In addition to the color or reflectivity of the surfaces being illuminated, you also need to consider how far given fixtures spread their light and at what brightness they do it relative to the width of the space to be illuminated. Obviously, the needs of a path six feet wide are different from those of path just two feet wide, and the solutions have to do with the heights at which the fixtures are set and how far apart.
IN RANGE
What should be apparent by now is that there are enough variables involved in the design process that it’s difficult to come up with effective rules of thumb.
Even so, I know that with a path two to four feet wide, fixtures placed at ten- to 12-foot intervals and 18 to 24″ above the path will generally get the job done. In following that plan, I always stagger the lights on either side of the path in a triangular pattern to avoid the dreaded “runway” look, which is both ugly and a bit silly since it allows two fixtures to light the same space on a path for the sake of full coverage. Yes, there are exceptions where it’s only possible to work on one side of a path, but as a rule, working both sides produces the best results.
It’s also a general rule that you need to place fixtures back far enough from the path that nobody will run into one without having stepped off the path while positioning them close enough that they actually shed light where you want it to appear.
In picking these spots, you need to consider that the higher up you place the fixture, the wider will be the light spread – and the more forgiving a fixture will be with respect to placement. By contrast, the lower the fixture placement, the less the spread will be – and the closer it will need to be to the path to be effective.
In my practice, I try never to place a fixture closer than six inches back from the edge of a path or a system of steps and, when I do, I like to keep them low to the ground. I also seldom place them any further back than 18 inches, because if I do, I’ll need to raise them more than two feet above grade to get the job done – and that’s a height limit I am reluctant to exceed in my effort to avoid glare.

| When I use decorative pathway fixtures, I try to select forms and colors that will effectively blend into their surroundings. As I see it, step and path lighting serve important utilitarian functions, and it’s seldom my desire to call more attention to these fixtures than to the landscapes through which they guide people. |
In almost all situations, this approach produces lighter and darker areas along a path. I’ve never found these small areas of darkness to be an issue because the contrasts can be striking (something many of my clients like) when the patches alternate along the way. If a client wants an even wash of light, however, I just raise the fixtures or reduce the spacing to produce the desired look.
In either case, I always prefer fixtures that cast soft light in wide patterns without defined edges and avoid those that create hot circular or semi-circular patterns or even hexagonal shapes on the pathway – looks I find to be extremely unnatural. With softer lighting, I achieve better coverage without assaulting anyone’s eyes. A side effect of my approach is that the edges of the path are often brighter than the center, which is fine because one of my goals is to be sure walkers know their limits.
I also use adjustable fixtures that will cast light in just one direction – or at 360 degrees. Directional lights are great for path lighting, but 360-degree models give me the ability to illuminate the path as well as the landscaping beyond the path – a flexibility that comes in handy in some cases.
No matter the spread I select, I’m always after fixtures that do the job efficiently while shielding the lamp from view. As mentioned above, the latter becomes extremely important when fixtures follow a path or steps up a grade: I don’t want people to see up under a fixture’s hood from the bottom of a slope!
Helpfully, for these critical applications there are fixtures that conceal the light source completely in the housing, bouncing light off a reflector and spreading it without exposing the lamp. I frequently use fixtures of this type with dramatic grade changes to ease the way for those moving up the slope.
MOVING UP AND DOWN
Let me be clear: Under any circumstances, it’s trickier to light steps effectively than it is to light any pathway, sloping or not. This is so for two reasons: First, they are more hazardous and therefore require more light with more even coverage and, second, they often have structures adjacent to them – a fact that can make lighting them with the same approach you use to light a path impossible.
As a rule, your objective should always be to light both the risers and the treads because being able to see both can be critical to moving up or down safely. If, however, you have to make a choice and can only light either treads or risers, go for the treads first.
Often, homeowners and even some lighting contractors or designers will want to light steps from above with fixtures mounted in overhanging trees or on nearby structures. Depending on the specifics of the situation, that can work well so long as the lights are mounted in such a way that they don’t cast shadows through branches, for example, or through trellises or heavy railing systems.
Some also use moonlighting, which can be a good approach to path lighting in some situations and can add a wonderful dramatic touch to a design. In my view, however, it should be avoided with steps because the shadows present a safety hazard. Indeed, for any lighting from above, the source should be directly over the steps because a person moving up or down the steps will themselves cast a shadow that can pose problems of its own.
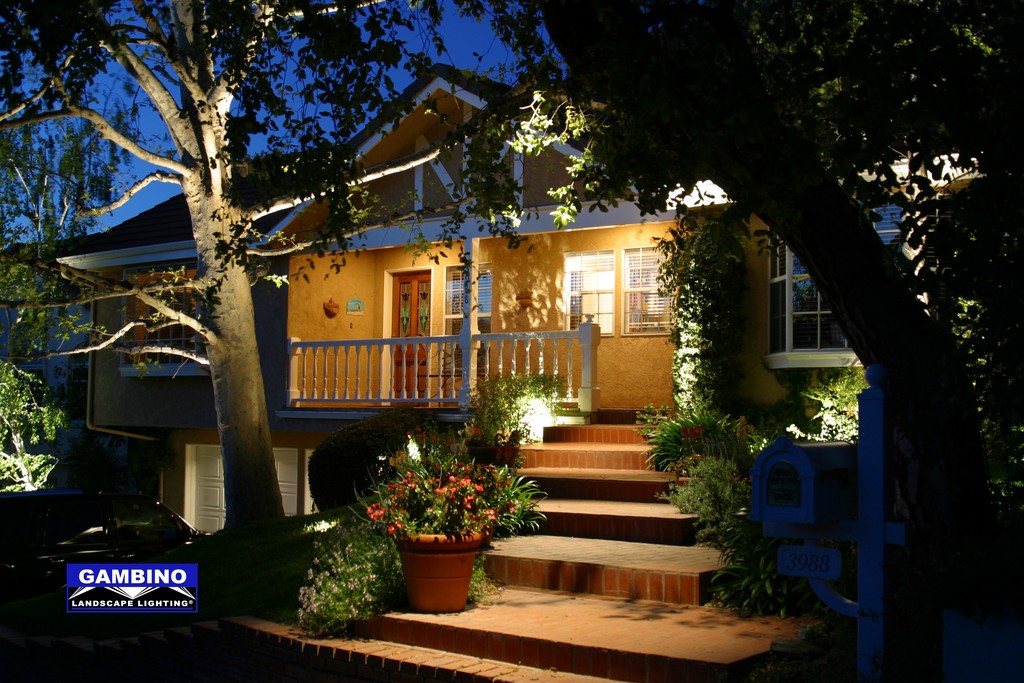
| Step lighting is something I take very seriously, and my intention is always to bathe both treads and risers in an even, unambiguous light. Where I can’t readily accomplish that feat with both, however, I’ll always focus on the treads first. |
Personally, I like lighting steps from the sides with path lights – a good solution so long as I accommodate the number of steps and their configuration and can use enough fixtures spaced closely enough that each step will be fully lit. I don’t want any dark spots here (which can be perfectly fine with paths) and want to avoid glare at all costs, but beyond that, pretty much the same set of principles apply to both paths and steps: I need to consider fixture types, placements and heights as well as issues related to plants and distances of the fixtures from the surfaces to be lit.
Often, of course, step systems are bound by cheek walls or some other adjoining hardscape structure. These can present a challenge by making the use of path lights impractical or impossible. In such situations, lights must be mounted within the cheek wall or structure – a situation that requires either working with the hardscape contractor ahead of time or core-drilling the walls after the fact.
Another option involves mounting lights in the risers, but I’ve never much liked this approach because the fixtures don’t provide an even light and often create small hotspots and dark areas. In situations where lighting the risers is the way to go, however, I prefer to mount fiberoptic cable at the top of the riser, hiding it in a slot in a cantilevered tread or in a channel at the top of the riser.
That mention of contractors and of setting things within step systems raises a key point: Step lighting is a critical safety function that can be made much more difficult by hardscape design, so it can be extremely helpful to get a lighting specialist involved at the start of design discussions or at least at a point before construction of the step system has begun. Coming in after the fact can mean a less-than-perfect design solution, not to mention the added expense of remodeling steps or adjoining hardscape after the fact.
LEADING THE WAY
For both path and step lighting, it’s important to keep in mind that the primary goal is to enable someone to move comfortably and safely toward a destination within the landscape. If you have the ability to add in a dash of aesthetic finesse while doing do, that’s nice in my opinion – but it’s strictly an added bonus.
For exterior paths and steps in particular, the best lighting designs are those that nobody notices – the ones that let other, more purely aesthetic lighting elements on the property get all the attention they deserve. My aim at ground level is to enable homeowners, their families and guests to enjoy well-designed spaces after dark without fear of traipsing into a planted area or worse, tripping and falling down.
It should all be about the pleasure, not the potential pain!
Mike Gambino owns and operates Gambino Landscape Lighting of Simi Valley, Calif. A licensed lighting contractor since 1990, he has specialized since 1995 on high-performance low-voltage systems. He may be reached via his Web site: www.gambinolighting.com.