


Good Groundings


Last time, I mentioned initial meetings and discussions having to do with a retrofit project in Pacific Palisades, Calif. I call it a “retrofit” because we’re using a portion of an existing pool shell as part of the new one, but in truth this is really a ground-up reworking of the entire environment.
This project displays the influence that architects Ricardo Legoretta and Luis Barragan have had on my thinking about shapes, colors and spatial relationships. As soon as I saw this place, in fact, the work of both came to mind because of the strong colors and materials and the expressive modern styling of the house.
Beginning with this column, we’ll trace the various steps involved in executing and detailing this great project. For now, we’ll begin at the beginning with the demolition and site preparation stages.
OUT WITH THE OLD
The new swimming pool will be substantially narrower than the existing abomination of a vessel (which had been slammed right up against the back of the house). In addition, we’ll also deal with a “retaining” wall that sits partially on the bond beam and partially on natural material with no slip joint between.
The original pool and its retaining wall seem to have had but one purpose – and they have it in common: Neither accomplished much of anything beyond cutting the yard in half.

| We jack-hammered out a set of steps to make way for the new spa that will be fully and properly integrated with the existing shell. |
We’ll be introducing a great deal of color to the setting, including a highly unusual red plaster on the interior surfaces of the pool and beautiful handmade, custom-glazed tile that will include a warm palette of (probably) purples, whites, yellows, blues and reds. The new work will incorporate several properly scaled water effects, and we’re also adding a spa to the pool and basically reconfiguring the entire yard to provide more space for landscaping and areas for meditation and entertaining.
We began construction in January of this year. At this writing, the plans have been completed and we’ve obtained permits from various agencies and the building department. We’ve also done the soils testing – and based the reconstruction plans for the pool and decks on this all-important information.
|
The Pride Factor In a drawing course I taught a while back, I spotted a line drawing on the desk of a pool builder in attendance – just a vague sketch of a pool and spa with no suggestion of materials, no detailing and no sense of how water flowed from spa to pool. It was also out of scale with extremely distorted perspective. In a word, it was amateurish. That didn’t surprise me, because that’s how lots of builders’ drawings look before they take my courses. What really struck me, however, was his statement, “My clients really liked this one, so I’m happy with it, too.” What this told me – not the words themselves but the way he said them – was that he lacked real pride in his work. His willingness to pass off an obviously inadequate drawing to a prospective buyer indicated to me that he didn’t much care what his clients thought about the project at hand or his work in general. His reaction showed me that he thought even his rudimentary drawing skills gave him credentials as a professional; the way I saw it, however, it was more like handing a 16 year old the keys to a Porsche without any driver training. As I hope I’ve demonstrated in all of my “Details” columns, it’s far better (and easier) to build client relationships on pride and mutual respect than it is to start with smoke and mirrors and a thinly veiled disdain for what your prospects think. The point behind my work as an instructor is that drawing should be seen as a place where poor performance is simply not acceptable. It’s not about slapping lines on a sheet of paper and working out the details before construction begins; instead, it should be valued as a skill that: * helps clients visualize your ideas and get fully engaged in fine-tuning designs that meet their needs * takes the guesswork out of materials selections and set clients’ legitimate expectations about the way things ultimately will look in their backyards * speeds communication with contractors and subcontractors who have nothing to go on beyond what you communicate to them in visual form. As I tell my students, there’s just too much to be gained to treat either presentations or presentation skills lightly. — D.T. |
The customers have fully signed on with the process and are excited to watch the transformation of their backyard from a poorly conceived mess into an area that is very much an extension of the style and beauty of their home and tastes.
The construction process began with an on-site meeting I set up to familiarize various trades with what would be happening. On hand were the excavator, the plumber, the electrician, the forming carpenter, the landscape installer and my mason. We talked about what needed to be accomplished in the early stages of the project, covering a variety of material-installation details and, most important, the scheduling. All of this is extremely important in a job like this where we have such extensive demolition work.
This pre-start meeting isn’t anything unusual for me. In fact, I call such a meeting on every project I do because I firmly believe that quality flows from this sort of cross-disciplinary communication: If we all start on the same page, it’s more likely we’ll stay together as the project unfolds.
This meeting is also important because it establishes my level of participation in the project. I personally supervise all phases of construction. At this level, I don’t believe you can set things up and cut subcontractors loose to do what they think is proper – and I’m not certain it’s desirable at any level, from modest to magnificent.
Let me repeat myself: I think on-site supervision is absolutely critical to success, and I need people who will be working with me to know that I’ll be around almost every single day – and will always be on hand when anything important is in the works.
As the project moves forward, I’ll have a several meetings similar to this one with key sub-trades. To my mind, it’s all part of establishing channels of communication and building in quality at every step.
GETTING TO WORK
Before a single spade was plunged into soil, we called in Dig Alert, an organization in California that helps contractors locate underground gas, water and electrical lines. These pathways were clearly marked so we could steer clear of them. The landscaper also came out early to disconnect, cap and (as necessary) reroute sprinkler lines.
The electrician made an important visit, stopping by to locate the service and kill all electrical lines leading to the backyard, including those for the old portable spa, the landscape lighting, the equipment pad and whatever else he found. This is particularly important for both safety and convenience.
| Once the plaster and decking were stripped, we knocked off the top of the portion of the shell that will no longer be used to keep it from telegraphing its presence back to the surface. Note the holes in the floor: We don’t want water to collect in the unused part of the original shell. |
Personally, I don’t like to pigtail off the electrical panel: That’s a poor way to do things. If we must, as an alternative we’ll set up a temporary conduit run and junction box for the area where we’re working. In this case, however, there were adequate electrical outlets for our needs.
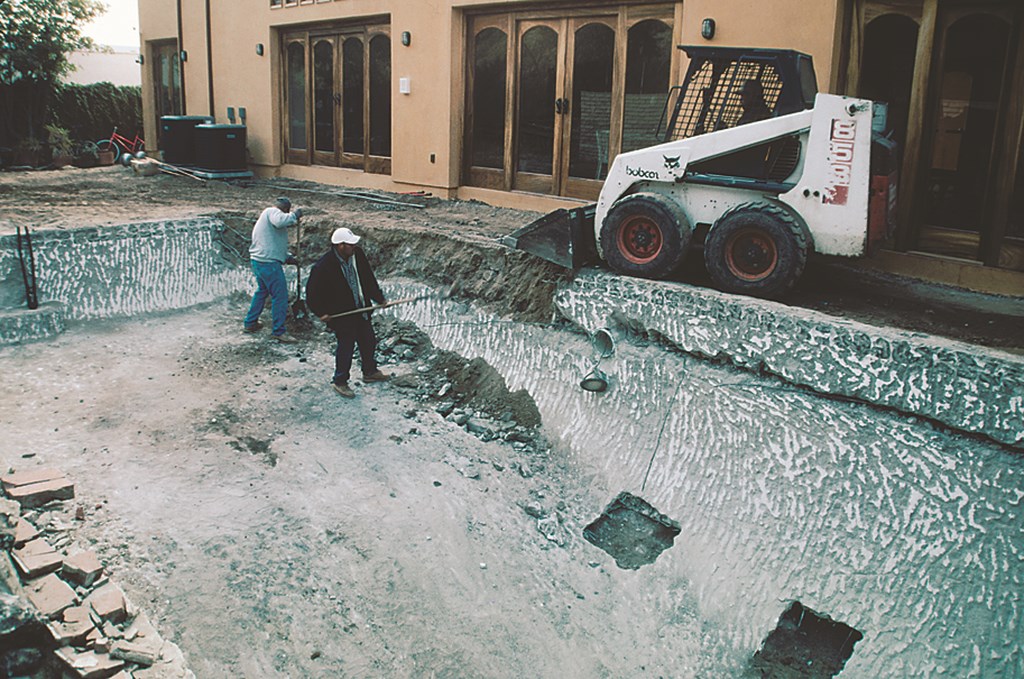
We’d also begun the work of removing all the existing concrete and hardscape along with assorted construction debris. Before long, the site was cleared of everything but the pool’s empty shell. Stripping away all the decking and old plaster was important: The plans called for using a portion of the original shell in forming a new one, and I had let the homeowners know that the entire project hinged on the shell’s passing a detailed inspection.
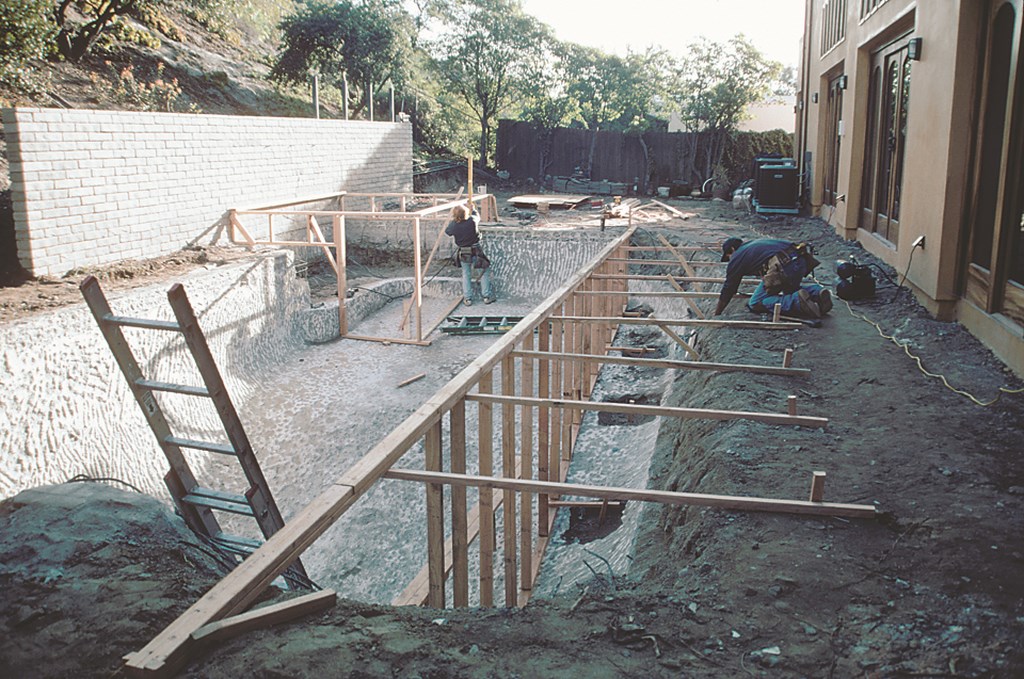
| With the framing for the new wall set, it’s already easy to see how much the new outline of the pool will change the look of the backyard and the impression it makes. |
Way back at the beginning of the process, a quick inspection of the pool revealed some superficial cracking and some spots where rust was bleeding through the plaster. I let my clients know that, because the plans called for using the old shell, we’d have to strip the plaster and get a good look at the condition of the gunite.
Once the pool had been emptied, we cut a hole in the floor of the pool at the deep end to prevent hydrostatic pressure from building up around and maybe popping the shell. Given the pool’s position at the bottom of a huge slope, this was a legitimate concern – especially because the shell would be empty heading into Southern California’s rainy season.
Once the plaster had been stripped, we determined that the cracking had no structural implications and that the rust had resulted from the steel being too close to the gunite’s surface in a few spots. Stripping the plaster early in the process gave us valuable information about the condition of the shell – which was, it turns out, in acceptable shape – and it was something we would have needed to do later on anyway to ensure a good bond for the new finish we’d be applying.
THINNED DOWN
As noted above, the pool is being reshaped and made narrower by constructing a new pool wall inside the existing structure. We’ll also be making it shallower to render it more child-friendly and energy efficient.
We started by cutting down the existing bond beam 18 inches below grade on the side where the new wall will be installed. I did this so I could come in later and backfill behind the new wall and effectively bury the old wall with landscaping and decking. If we had tried to cover the top of the existing wall without cutting it down, over time the soil would have settled and the outline of the old pool would have telegraphed itself to the surface.
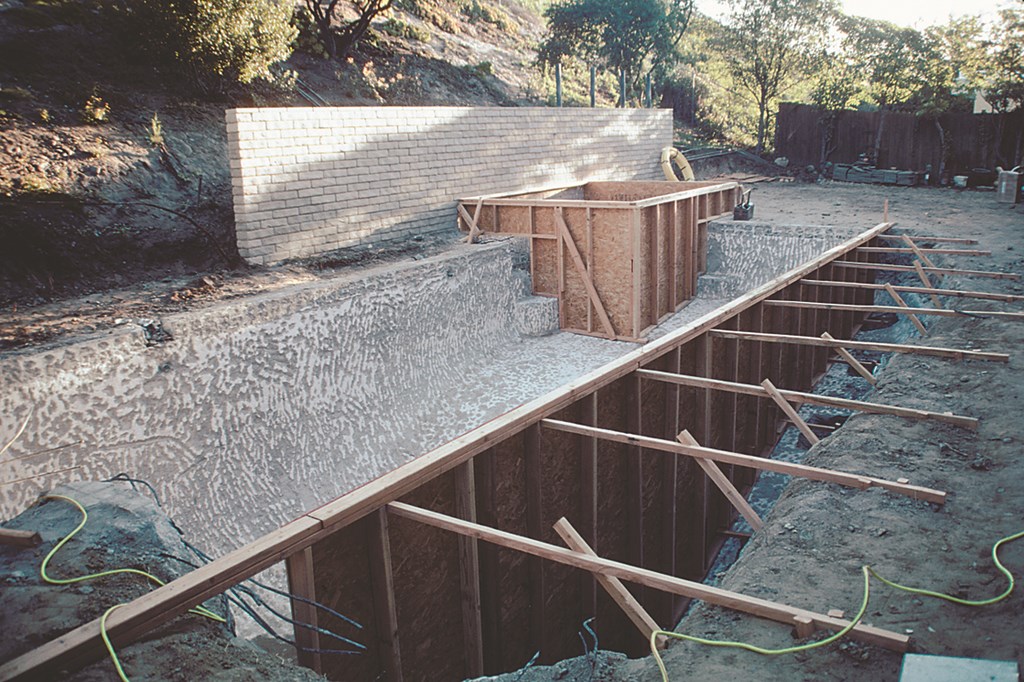
| With sturdy framing in place, we’re ready for the next steps in the process – and to tie the new wall and spa into the old structure using steel (seen clearly in the foreground) that we preserved in the demolition process. |
We also cut holes in the bottom of the shell, each two feet square at 48-inch intervals, just outside the line where the new wall will be placed. This will allow more-than-ample drainage from the portion of the old shell that will no longer be asked to hold water.
Next, we sliced out four portions of the wall in the part of the shell we’ll be keeping, the first to allow for easy penetration of the spa-related plumbing runs, the second to serve as a slot for a new skimmer that won’t be the first thing my clients and their guests see when they look at the pool. (The old one had been in the middle of the wall opposite the house.) In both these cases, we preserved the steel rebar and will tie new work into the old to maintain the integrity of the bond beam.
We also blew out two sections of the original wall for 20 inches around the points where the new wall is to intersect the old shell. Once again, we kept the rebar intact and will use it to tie the new wall securely into the original structure.
Once the new wall is shot, we’ll backfill the unused portion of the old shell with compacted gravel and cover that with a compacted fill blanket two feet thick. Of course, before we do that, we’ll need to build the new wall – a detail we’ll get into next time along with information on forming for the new spa as well as setting up the new plumbing and electrical runs.
David Tisherman is the principal in two design/construction firms: David Tisherman’s Visuals of Manhattan Beach, Calif., and Liquid Design of Cherry Hill, N.J. He can be reached at tisherman@verizon.net. He is also an instructor for Artistic Resources & Training (ART); for information on ART’s classes, visit www.theartofwater.com.