


Finished to Perfection

There are projects in which the design details define every phase of the work from excavation to the interior finish. As builder Dave Penton explains here, this dazzling watershape was one of those where precise tolerances and creative execution led to a setting worthy of the stars.
By Dave Penton
From the very start, this project was defined by the details. Located in an exclusive Los Angeles neighborhood that’s home to a host of A-list celebrities, the pool and its surrounding area were designed by Christine London, a renowned landscape architect based in Beverly Hills, Calif., with a history of these types of elite projects.
The project was put out to bid to a small list of capable Southern California builders, and we were fortunate enough be awarded the contract. Working as part of a project team that was undertaking an extensive remodel of the entire exterior, our focus was entirely on building the pool, spa and cold plunge. A skilled team of artisans tackled the other hardscape elements onsite.
It was an unusually detail-oriented process with fresh drawings and ideas generated by the site superintendent and design team on an almost daily basis. Nothing was left to interpretation, even though the design details were constantly evolving, especially early on in the process.
We knew this was no place for anything less than our A-game – truly an exercise in striving for aesthetic and technical perfection.
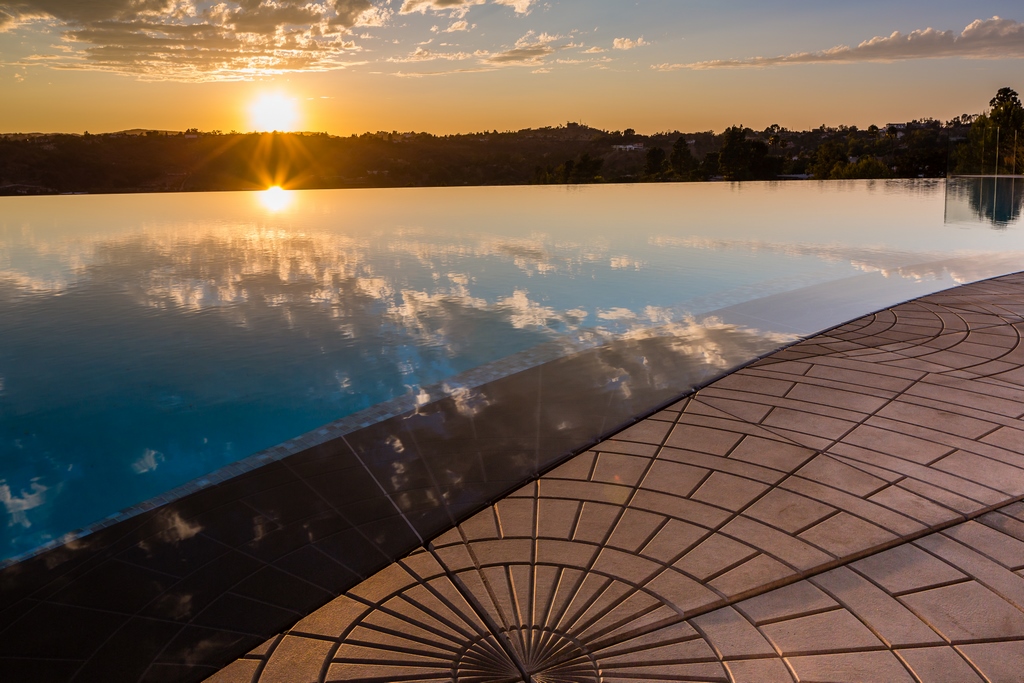
LINES AND CIRCLES
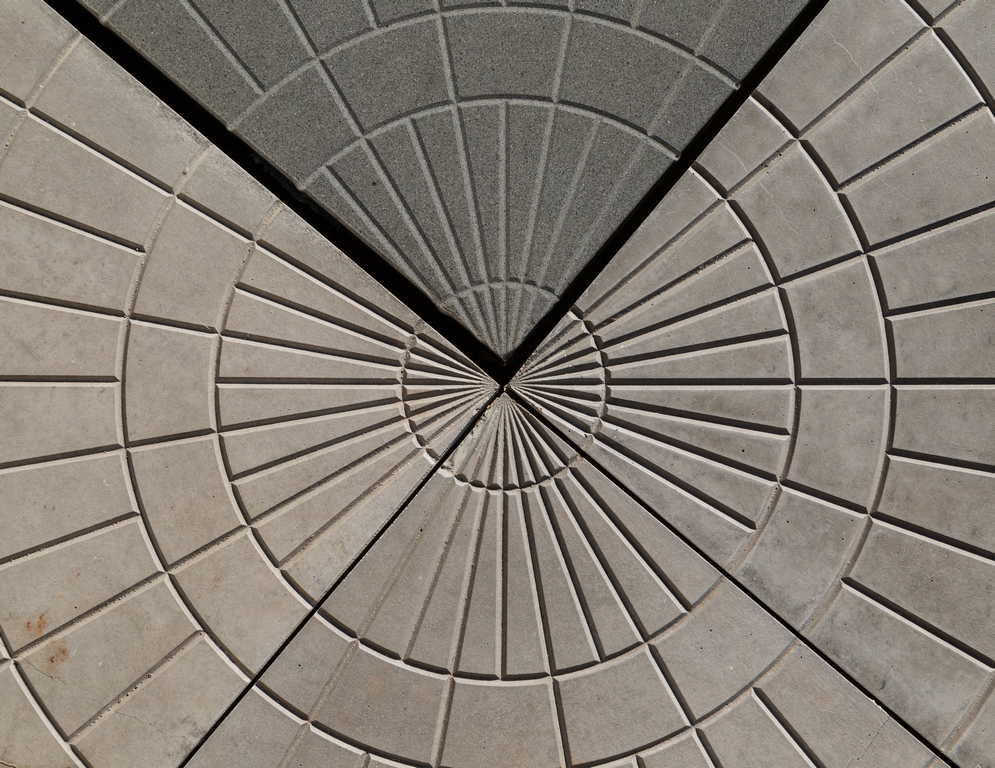
The clients were directly responsible for one of the most defining features. While traveling Europe, they commissioned beautiful custom concrete pavers for the deck areas that were scored with a striking radial pattern. While waiting months for the pavers to be delivered, all of the dimensions of the pool and deck had to be aligned with, and emanate from the pattern of circles and radiating lines.
In effect, the entire construction process was dictated down to less than an 1/8-inch tolerance by the pavers that were being made halfway around the world. Pre-planning was critical. The thickness of the tile and the float, the pavers, the plaster, as well as the raw dimensions of the pool structure, it all came into play.
Fortunately, the team had retained the services of a survey team to check and recheck the key measurements at every step of the way. They verified the excavation, they checked our forms, all of our wires for shotcrete – everything.
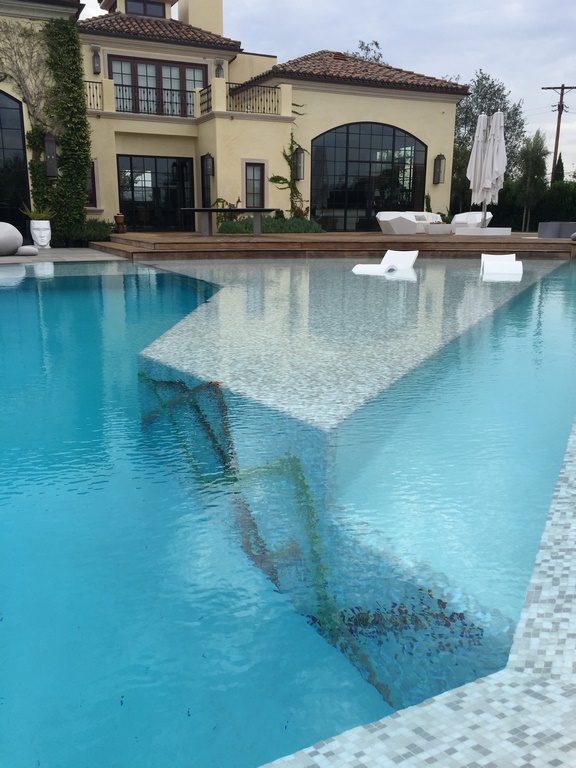
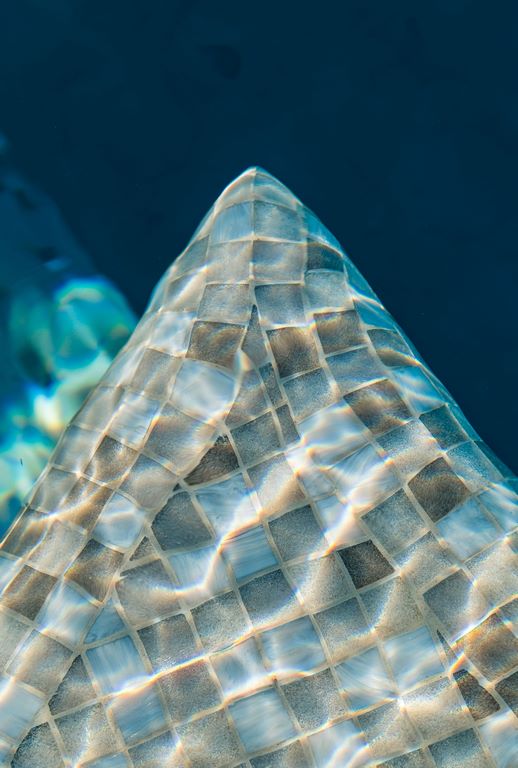
The pool has a unique shape. It has a straight edge on the house side with a perimeter overflow with an angled vanishing edge on the other, with a total of 225 linear feet of dead-level edge. Working with such tight tolerances is not all that difficult with a rectangular pool, but when you introduce elements such as the sweeping radius of the shallow lounging area (Baja shelf) on the deep-end, or the 90-foot vanishing edge and perimeter overflow details, it requires extremely close attention with literally hundreds of measurements that are verified and rechecked.
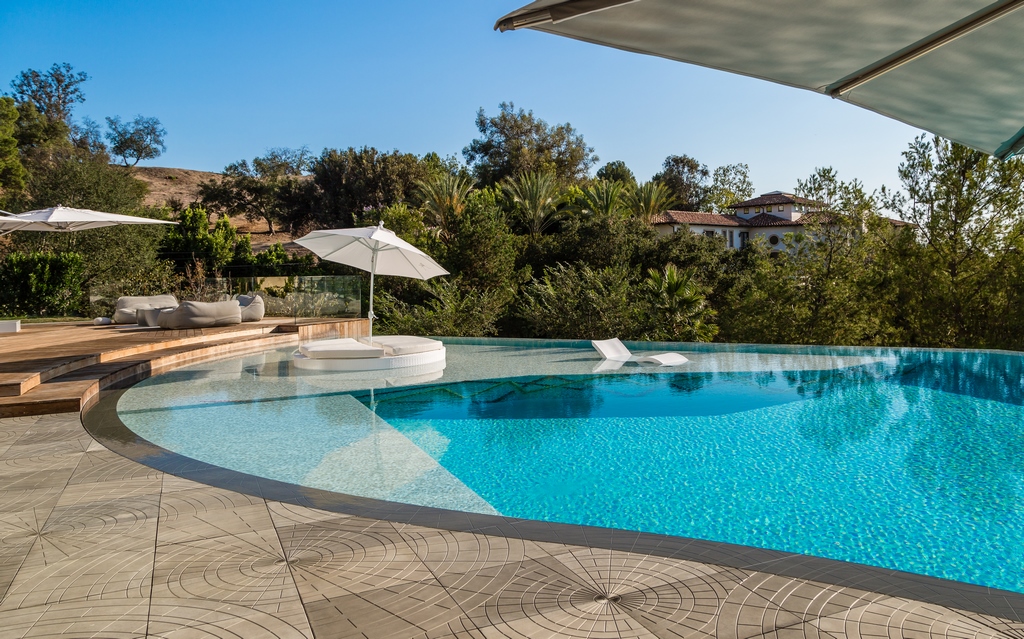
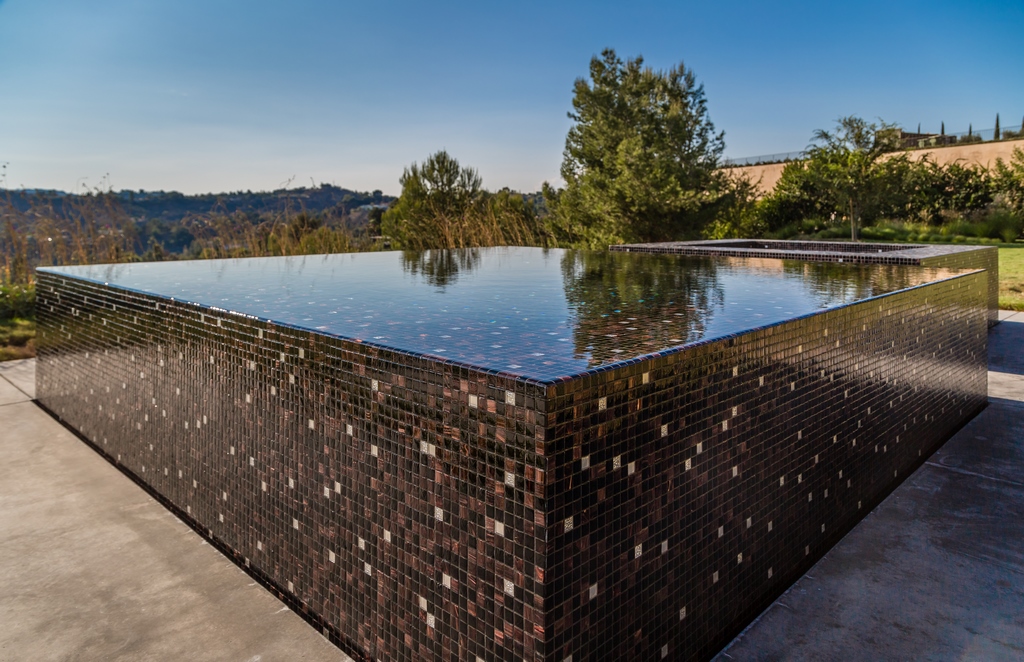
Adjacent to the Baja shelf, there are two raised, square vessels, one is an all-tile spa, the other is an almost identical looking cold-plunge vessel situated right next to each other. The pool, spa and the plunge all function independently.
Despite the relatively simple and very clean finished appearance, the pool has a surprisingly complex structure. It was built almost entirely out-of- grade with free-standing forms. We hired a framing contractor to carefully build the forms to the precise dimensions with enough support to resist any vibration during the shotcrete process.
There was a caisson contractor on the project who sunk several caissons beneath the for the watershapes as well as the equipment pad. The structural contractor stubbed up the rebar from the caissons and then we came and built the grade beams, which are integrated into the pool structure.
A STARRY NIGHT
There are a number of details that are typically only found on these types of super high-end projects. One of the most eye-catching is the starry night lighting array in the floor of the pool, a detail that literally twinkles with opulence.
We brought in Randy Stewart, a landscape lighting specialist from Fresno, Calif., who designed the system and oversaw the installation. He’s a brilliant designer who integrates different technologies and manufacturers to create the desired effects.
In this case, there are 1,100 “points of light” in the pool floor, some on the walls, illuminated by fiberoptics. We ran two 2 ½-inch conduits through the pool floor that sweep back to the equipment location downslope of the vanishing edge basin. The fibers were then pulled into the conduits and then up into the pool.
Next, the installers took a Makita saw and cut shallow ½-inch grooves directly into the shotcrete leading to each lighting point, essentially creating a system of open conduit channels. As they were doing it, the pattern looked like massive tree with branches fanning out across the floor, and up the sides in some places.
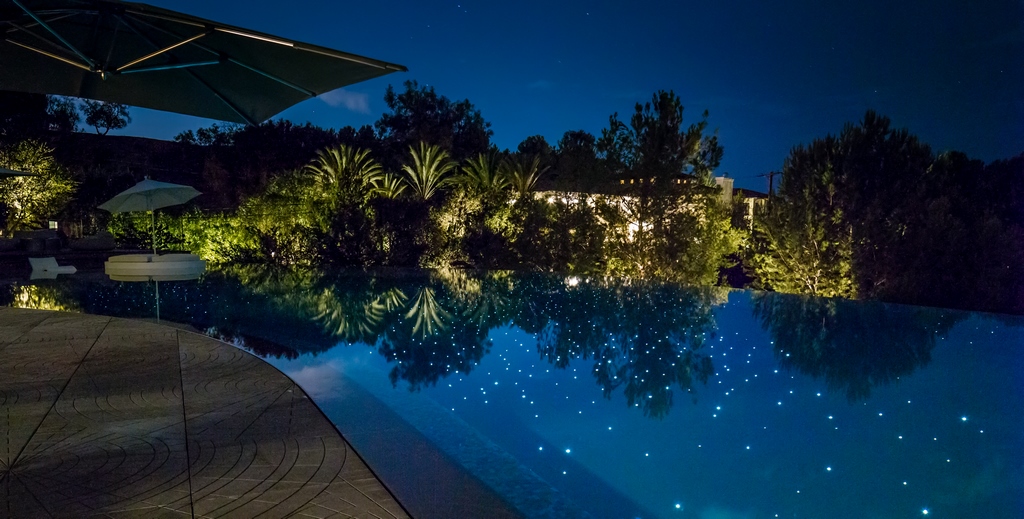
The fibers are laid directly in the grooves, some in larger bundles for main trunk lines and then branching out to individual termination points. The fibers are pulled up into special acrylic stands that resemble valves in an automotive engine cylinder head. These acrylic stands vary in circumference creating both larger and smaller “stars” and allow for multiple fibers to be installed, which creates different levels of brightness similar to the night sky.
The grooves are filled with hydraulic cement and water proofing to prevent water from later migrating down the grooves. As the plaster – in this case, Cielo Blue Pebble Fina finish by Pebble Technology – is installed, the acrylic rods are cut off flush with the surface of the pool, and now you have lights.
It was an interesting and painstaking process, to say the least. As a surprise to her husband, the wife wanted the stars’ pattern to represent the night sky on the day he was born. Even for a rarified project like this, that scheme sounded rather exotic. I was surprised when Stewart didn’t flinch and was up for the challenge.
Stewart researched the configuration of the stars the night the husband was born and then planned to make a massive paper template to locate the lights within the pool. That plan was abandoned when the wife didn’t like the way it was going to look. She decided to go with more of sweeping Milky Way pattern instead. The lights twinkle but do not change colors.
Interesting note: they installed over 1,300 lights knowing that a percentage of them would break during the plaster installation process.
It all worked perfectly, and now the cosmic results speak for themselves.
TILE CRAFT
As is true of almost all of our projects that feature tile finishes, we turned to Jimmy Reed, owner of Rock-Solid Tile. In this case, he was working two different types of tile mosaics, both blends from Bisazza. One mosaic type is in the pool and the other on the spa and cold plunge. In both cases, standard blends were adjusted with different color percentages with added colors, as well to create a one-off mosaic for this special project.
The spa and cold plunge are finished in a dark-blend root beer, ebony and red, with 24 carat white gold accents sprinkled into the mix. It’s a relatively minor adjustment, but it gives the mosaic a rich, unique look.
As previously mentioned, the primary interior finish in the pool is a polished exposed aggregate, but there’s still quite a bit of tile within the pool. In addition to the traditional waterline tile, the entire shallow lounging area and entry staircase are tiled, along with the vanishing edge walls of course. The basic blend is in pale blues and grays, with veins of brown, red and orange added to the mix.
Making all of the turns, corners and contours work cleanly with the tile and grout lines is one of the places where Reed and his company really shine like few others in the world, and Jimmy’s true artisan abilities are on full display here. In fact, there’s one corner on the Baja shelf that is at an extremely unusual angle; it took Reed and one of his top guys a full week to make this one square-foot area of tile perfect.
There was a late addition to the tile work. On the vertical wall by the Baja shelf, Reed added a crisscross pattern using the contrasting tile colors, the aforementioned warm colors that were added to the blend to create more visual interest. Again, it was the wife’s idea. Before the tile was installed, she spray-painted the wall to show the pattern she had in mind. We revised it a little bit, changed some of the colors around and sent a CAD drawing to Bisazza.
It’s a strong example of collaborating directly with the client, and it turned out fantastic.
We implemented a detail here that we’ve since picked up on other projects. When you tile entry steps, the mosaic typically goes all the way down to the shotcrete floor, then the plasterers finish right up to and partially cover the face of the bottom tile.
In my opinion this looks incredibly sloppy, even though it’s hard to notice once the pool is full of water. Reed decided to terminate the mosaic about three inches above the floor on this project. This enabled the plasterer installers to roll the plaster material up the face of the bottom tread and up to the bottom of the tile, creating a crisp clean edge detail.
We did a very similar detail on the vanishing edge dam wall, where we extended the tile from the top of the edge down the vertical wall surface a couple inches. Again, this gives the installers an easy way to terminate the plaster surface at a knife edge, to avoid having a sloppy transition between the plaster and the tile itself.
PATTERN PRECISION
Returning to the radial deck pattern, the paver design was the most influential detail driving the design and installation of the entire project. The pavers are made of concrete and I knew they would not be appropriate to use on what I call the “wet coping” of the zero edge on the perimeter overflow detail. The pavers would eventually get destroyed by the constant submersion and exposure to chemically treated water.
We decided to replicate the pavers in a natural stone material that would hold up under wet conditions, in this case a dark basalt material that is an extremely close match to the pavers color and texture. The stone was milled using a CNC machine so that each of the radial arcs lined up perfectly with the radial patter found on the pavers.
The end product of this involved design and construction process in a setting where none of the details dominate the scene, but instead everything is in visual balance and harmonizes with the entire property, the house and surrounding views.
It was a long process with countless ideas and discussion. While achieving absolute perfection is impossible, when you have this many passionate and talented people paying such close attention to details, you can come very close.
Dave Penton is the founder and president of Fluid Dynamic Pool & Spa in Fullerton, Calif. He specializes in building custom watershapes mostly in Southern California. He is a founding member of International Watershape Institute (IWI) and Ask the Masters. He is also a member of Watershape University’s Board of Advisors.