


Corner Control

With some details, seeing is believing.
That’s certainly the case with the one we’ll consider in this column, where the images will do much of the work in defining a simple but elegant way of making a statement with any raised bond beam or wall. Yet again, it’s testimonial to the good things that happen when watershapers know how to control materials and infuse their work with visual appeal.
Most of the time when pool people build small or medium-size walls, they’ll automatically be topped with some form of coping or capstone – anything from poured-in-place concrete or stone to brick or some pre-fabricated coping. Many of these walls are finished either with tile, stacked ledger stone, plaster or some other type of material that’s appropriate for vertical surfacing.
The detail I’ll cover here is about a way we can make these vertical and horizontal elements interact in subtle ways that can set our work apart.
In this case, the project involved the straightforward renovation of a 15-by-30 foot rectangular pool – the same pool, by the way, I put on display in my October 2006 column on page 24 to illustrate a favorite vertical-coping treatment. The customer wanted a clean, simple, architectural look with a sense of understated elegance – something that embodied design sophistication down to the finest points of the detailing.
BEYOND ORDINARY
The standard approach to the detail in question would have involved carrying the cap or coping – in this instance a two-inch-think Leuters limestone paving – over from the deck and across the entire top of the wall. This would have worked in most settings, but in this case, my client asked me for “something gorgeous,” so I took a different path.
What we have here are intersections of materials – points of perpendicular interface – in which a beautiful blend of glass tile (made by Boyce & Bean of Oceanside, Calif.) shows off its visual qualities on both the horizontal and vertical planes and provides varying reflective and refractive qualities in response to the sun’s angles. In addition, the tile picks up the green of the pool’s plaster finish, creating highlights that will change as each day progresses.
Making this sort of effect work is all about care in the design process – and absolute care in construction.
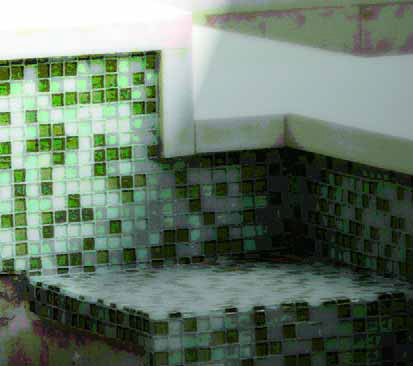
| This detail is all about the interaction of finish materials at points where everything intersects – as in this corner. The glass tile is beautiful on horizontal and vertical planes that take advantage of its reflective and refractive qualities – both under the water and on the exposed wall. In this case and knowing the material and its dimensions at the specification stage, we built the shell with a precision that made it possible to install the tile without cuts for the cleanest possible look – and lost no time whatsoever in having to make the tile fit an inexactly established space. |
In the design phase, this means knowing the materials and basing the dimensions of the step and beam structures on those materials before anything is done on site. Just as I described in last month’s column, it’s about knowing the tile’s exact measurements – in this case, just over one inch square – and accommodating the need for grout lines as well as the need to have the horizontal grout joints in perfect alignment.
To get it right, you must establish the height of the wall and steps in a way that will see the tile butt up under the coping, turn the corners and cover the top of the wall without any cuts for clean, square corner details. That same level of planning goes into planning every other plane on which the tile appears, whether it turns a corner or terminates at the margin of another material – that is, over pretty much the entire structure.
In addition to the exterior dimensions of the tile and the width of the grout lines, you also need to consider the tile’s thickness as well as the thickness of the float. I firmly believe that these dimensional calculations absolutely must be in place before construction begins. Otherwise, you will invariably find places where you’ll end up with half tiles and cuts that will blow the visual effect.
If you want things to line up, in other words, plan it that way. If you don’t, the client will spend money on materials that aren’t being used to their best effect – and in my book, that’s just not right.
JUST SO
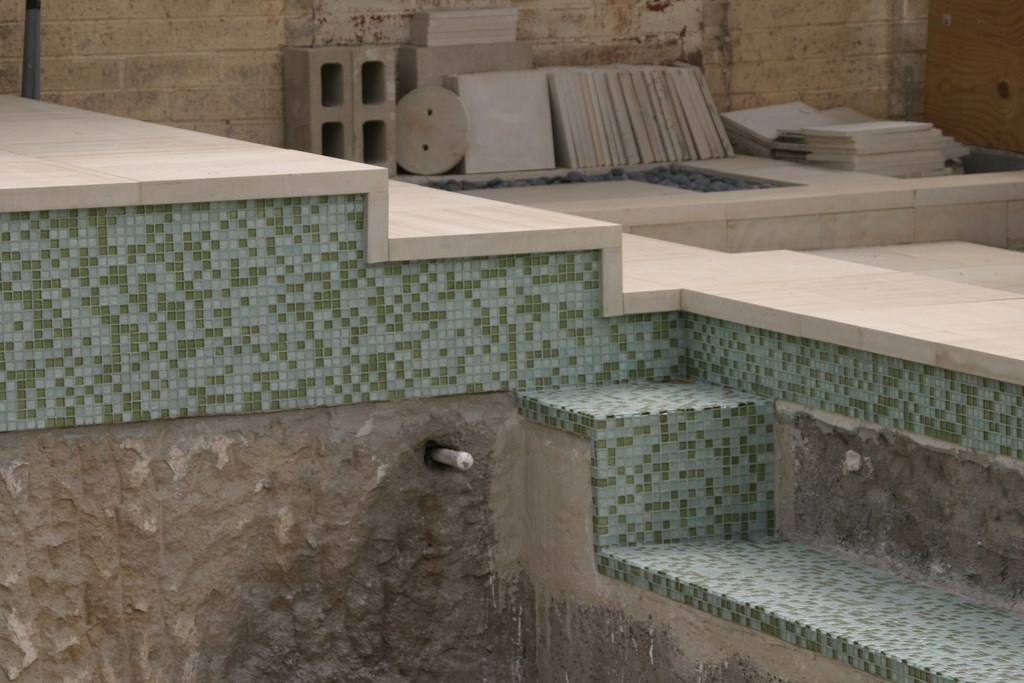
The beam pictured here wound up being just over 12 inches tall, a measurement based entirely on the size of the tile and the space dedicated to the grout between those tiles.
If you get the dimensions of the tile field right, installation is little more than a matter of setting the tiles and lining them up – a much easier job than arises in those situations where spaces aren’t established properly and the tilesetter ends up spending hours slicing partial pieces to make the material fit. In other words, it’s more labor-intensive to do things the wrong way, and the results never look as good.
|
Knowledge Gaps All too often, builders and installers who don’t fully understand what they’re doing get in over their heads, and the result is that their clients lose, suppliers associated with the project lose and, ultimately, they themselves lose. This hurts the industry, and it’s happening in an environment in which increasingly sophisticated clients know what they’re after and won’t settle for anything less than visual and functional perfection. In the case of the detail discussed in the accompanying article, knowledge of materials is absolutely crucial to success: You can’t enter the picture casually and expect to produce results that will satisfy the discriminating client. My motivation in bringing up these issues is all about changing situations in which clients, suppliers and homeowners all come out as losers into win-win-win situations: It’s all about knowledge we all should have and gaining an appreciation for the fact that decisions we make as watershape designers have significant ramifications we should be able to anticipate as projects unfold. — D.T. |
Doing it my way, the “cost” is making sure the structures are designed in accordance with the materials, and I see it as an easy investment in visual precision, overall beauty and, ultimately, client satisfaction.
Doubling back to last month’s detail, I was advocating a similar sort of approach in setting up structures both within and beyond the pool – in this case, in developing exact dimensions for the wall (to allow a clean transition from the tile to the vertical coping) and the steps (to allow for placement of full-dimension stone veneers).
Here and elsewhere, these finishes and their dimensions determine the size of the raised bond beam and/or the concrete masonry units we use to create walls: They must be set up to accept the dimensions of the tile and grout lines as well as the depth of the float. Miss on any of these elements and the corner tile detail I’m describing here simply will not work visually.
Let me hit a key point one last time: With this sort of detail, materials selection cannot be an afterthought and is instead integral to the design of the pool’s structure.
I wish I could leave it at that and move on, but it’s never been my observation that the majority of operations in the pool industry look at planning in so “detailed” a way. Tile in particular is chosen all too often as an afterthought, and don’t even get me started in a discussion of the way some builders jam materials and details into template designs.
To a great degree, using the dimensions of veneer materials in the way I’m advocating here defines a fundamental and enduring distinction between production and truly custom work.
CLIENT CONNECTIONS
In working with clients, I find that they almost all see the value of working with the fully integrated approach I follow and become immediately and passionately engaged in considering materials. They know from what I share with them that their choices will in no small way determine the appearance of the finished product.
This is the inverse of the standard pool-industry approach in which a salesperson persuades homeowners to select a pool shape from a template book, turns the project over to the drafting department for plan generation – and then, almost invariably, the pool is built without finish materials having been selected.
|
Color Play If you’re working with transparent glass tiles (including the Boyce & Bean tile I used in the project described in this column as well as some lines from Sicis, the Italian glass-tile company), there’s a possible opportunity to work with colors in unusual and, with proper execution, exceptionally beautiful ways. For this project, I used a pure-white bonding agent to highlight the tiles’ subtle textures and play up the blend I developed. In other contexts, it would be just as possible to add a pigment to the bonding agent. In this way, you substantially alter the apparent color of the tile and can devise just about any look you want. This approach, however, is not for the casual builder: If you don’t have a good grounding in color theory and they ways in which colors interact, for example, it’s easy to get yourself in trouble with pigments. And if you overshoot and add too much pigment, you can destabilize the bonding agent and run into a nightmare with tile falling off the wall. If you’re confident in your abilities – and in those of your tile installers, of course – this is yet another approach to producing “something gorgeous.” — D.T. |
Indeed, homeowners are usually called on to select tile, for instance, only after the shell is completed and usually after the decks are done. At this point, homeowners are usually pitched with upgrades – nicer ceramic tiles, for example, or maybe even glass tile – to finish raised bond beams or walls, but this comes at a point when the pool has already been built to accommodate a standard modular system. The upshot: All too often the new selection just doesn’t quite fit the layout.
The detail I’ve discussed here seems simple when you look at the outcome, but it does require a level of precision and planning that cannot be achieved if materials are selected as an afterthought. It all needs to be worked out before construction begins.
In this particular case, it all started with the glass tile, a custom blend I mixed using clear, iridescent and colored glass. Because of the way they’re made, each tile piece has a subtle concentric-circle pattern within the glass that lends an unusual, compelling, internal dimensionality to the material that is ever-changing and a constant source of beauty and interest.
There’s also a neutral-color limestone along with a rich, green plaster – and, behind the tile, a pure-white bonding agent that accentuates the tile’s colors. (For more on color and bonding agents, see the sidebar just above.) As I see it, the juxtaposition of the rigid-looking limestone against the warm, inviting and visually dynamic tile material offers a great look – especially set against the landscaping.
What appeals to my clients (and me) is that this is a look that doesn’t jump out and proclaim itself: Rather, it makes a sculptural statement that becomes more complex and beautiful the more you look at it.
Next, we’ll return to this project and look at a wall-spillway detail that finishes off the composition.
David Tisherman is the principal in two design/construction firms: David Tisherman’s Visuals of Manhattan Beach, Calif., and Liquid Design of Cherry Hill, N.J. He can be reached at tisherman@verizon.net. He is also an instructor for Artistic Resources & Training (ART); for information on ART’s classes, visit www.theartofwater.com.