


Bicarb Start-Up ABCs

WaterShapes recently published a pair of my articles on techniques for filling newly plastered swimming pools with water and starting them on the path to a long, successful service life.
In the second of those articles (click here), the focus was on the bicarb start-up method and the effect this approach has on the establishment of a durable plaster, pebble or quartz finish. But rather than being a step-by-step description of how the bicarb start-up works on site, the article was about water chemistry and its interactions with cementitious materials.
Since then, so many people have asked for the particulars of the process that this article will spell it all out – after relaying a bit of history, that is.
***
In 1974, I became the manager of a pool service company in northern California and, in the course of doing business, was asked to start up lots of newly plastered pools. Right away, I noticed that “plaster dust” immediately formed in most of the pools we initiated. This made it stand out when, in a few cases, no plaster dust would appear at all.
The dust-free outliers appeared in just one small community. Being a curious fellow – and because it was so much easier starting pools without having to worry about plaster dust – I tested the pH of the water immediately after filling pools in that town and found readings of around 8.0. Still curious, I tested pools in other areas where start-ups invariably brought on clouds of plaster dust and found readings that ranged from a low of 8.8 to as high as 10.5!
I also noticed that, on inspecting the lower-pH pools, their plaster surfaces appeared to be harder and denser in comparison to the other pools. When acid washing was performed on these pools in subsequent years, that observation was proved out when we noticed that stains and dirt could be removed faster and more easily and that these pools withstood the effects of acid application better, with less etching in comparison to other pools in which plaster dust had formed during the start-up process.
LOOKING BACK
With growing interest, I went right to the source: Assuming that the plaster itself was essentially the same from area to area, I reviewed the chemical makeup of the special town’s tap water. As it turned out, it came from four local wells and averaged about 300 parts per million (ppm) of calcium hardness, 300 ppm of alkalinity and a pH of about 7.7.
The water in the other towns was softer, with lower alkalinity (often 30 ppm) and calcium hardness content (as low as 25 ppm) and pH levels averaging around 9.3.
In an attempt to mimic the same dust-free results we saw as being advantageous to our clients, I began experimenting with new plaster pools by adding a lot of sodium bicarbonate (bicarb) and calcium chloride on my first visit to each newly filled pool in an effort to raise the alkalinity, calcium hardness and pH.
I immediately learned that adding both of those chemicals to the pool at the same time was unwise: The water clouded up dramatically and precipitated to such a level that it would actually clog the filter! Adding calcium chloride alone led to the same undesirable result. It wasn’t long before I figured out that when the pH of the water was higher than 8.3, the greater was the likelihood that the water would cloud up if I added calcium chloride alone.
By using only sodium bicarbonate in new pools to increase their alkalinity, however, I observed that the baking soda would help lower the pH from the observed high levels (above 9.0) found on the first visit while simultaneously raising the alkalinity level. Only a small amount of acid was needed at various times to lower the pH to appropriate levels.
I learned as well that raising the alkalinity to higher levels helped prevent the pH from soaring to levels above 9.0 again. But if all I did was add calcium chloride to raise the hardness, there was no benefit with respect to moderating the pH level.
After a long period filled with this sort of trial and error, we settled on a method that worked: Ultimately, all of the pools we started came on line without formation of any plaster dust, and our long-term observation was that these finishes were more durable and serviceable than were any pools in which plaster dust had made an appearance.
BICARB AT WORK
Of course, the next challenge was figuring out the best way to administer the bicarb. I started by broadcasting sodium bicarbonate into pools as they were filling. But we also had frequent need to fill our pools with water trucked in for the purpose: In these cases, we added bicarb directly to the tanks before opening the spouts. Either way, the results were the same: No plaster dust.
Through ongoing laboratory and field experiments, I eventually established more specific guidelines: The combined level of calcium hardness and alkalinity, for example, should not exceed 600 ppm and should not be below 400 ppm. In addition, a minimum of 200 ppm of alkalinity should be the rule for water used to fill new-plaster pools.
The next step was an important one, and I must credit the late John Wallace of Swim Chem with the idea of using a barrel at poolside to dissolve bicarb into tap water during the filling process. At this point, 40 years down the line, the barrel-based steps we follow in using bicarb start-ups are well established and reliable:
Step 1: Pre-Test the Water
[ ] Test the chemistry of the tap water that will be used to fill the pool for pH, alkalinity and hardness as well as for copper and iron levels. (Testing for metals isn’t a direct part of the bicarb start-up process, but it’s good information to have on hand for the early stages of treating the filled pool’s water, as is mentioned in Step 7 below.)Step 2: Calculate the Chemical Dose
[ ] Add the alkalinity and hardness numbers together, then subtract that number from 500. The result is the amount of sodium bicarbonate to be added (in ppm). For example, if the fill water has an alkalinity reading of 90 and a hardness level of 200, then 210 ppm of bicarbonate needs to be added: 500 – (90 + 200) = 210. [ ] Next, raise the alkalinity using sodium bicarbonate: (Volume ÷ 71,400) x ppm goal = pounds to add. If, for example, the pool will hold 20,000 gallons and we want to add 210 ppm of bicarbonate alkalinity, then (20,000 ÷ 71,400) x 210 = 58.8, or about 60 pounds of bicarbonate to be added(Note: If the total alkalinity and calcium hardness combined amounts to 500 ppm or higher, then no addition of sodium bicarbonate will be necessary.)
(Note as well: If trucked-in water is used, perform all of the dosing steps indicated above, adding the desired, measured amount of bicarb to the water while it is still in the tank and before it is added to the pool.)
Step 3: Set Up the Delivery System
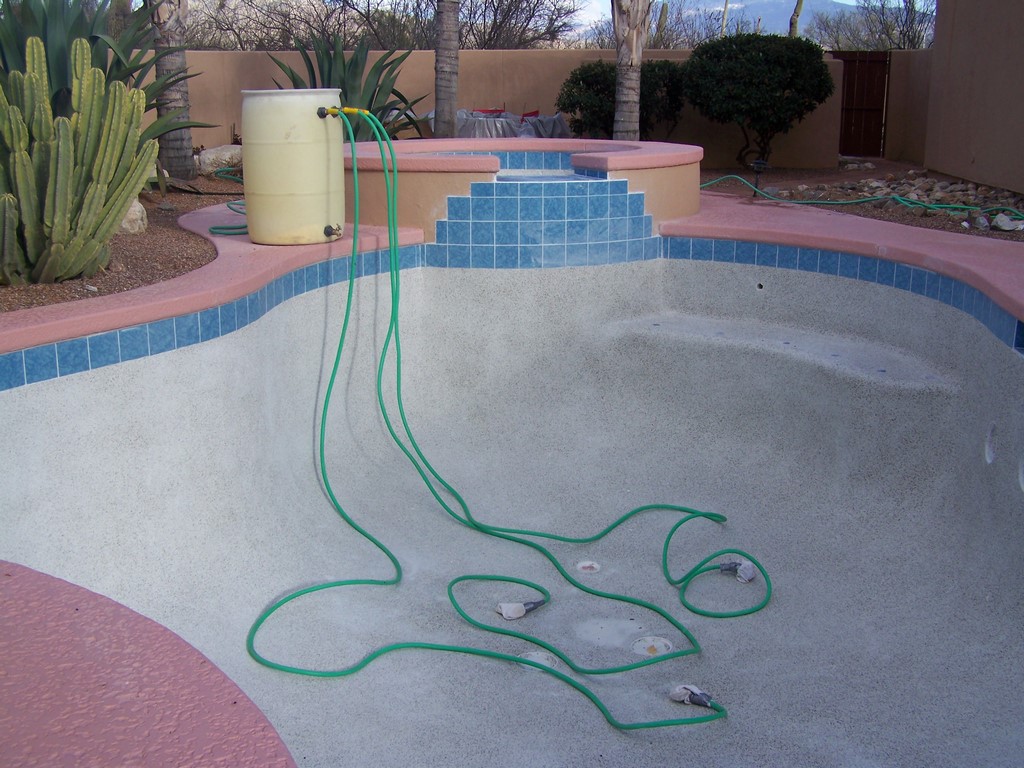
[ ] Prepare a plastic, 55-gallon drum for use by cutting an eight- to ten- inch hole in the top of the barrel for addition of the bicarb. [ ] Add a female hose bib halfway up the back or deck side of the barrel. [ ] Add three male hose bibs about four inches below the top lip on the pool side of the barrel – or enough to make sure that sufficient outputs are provided to handle the pressurized input from the tap without overflowing the drum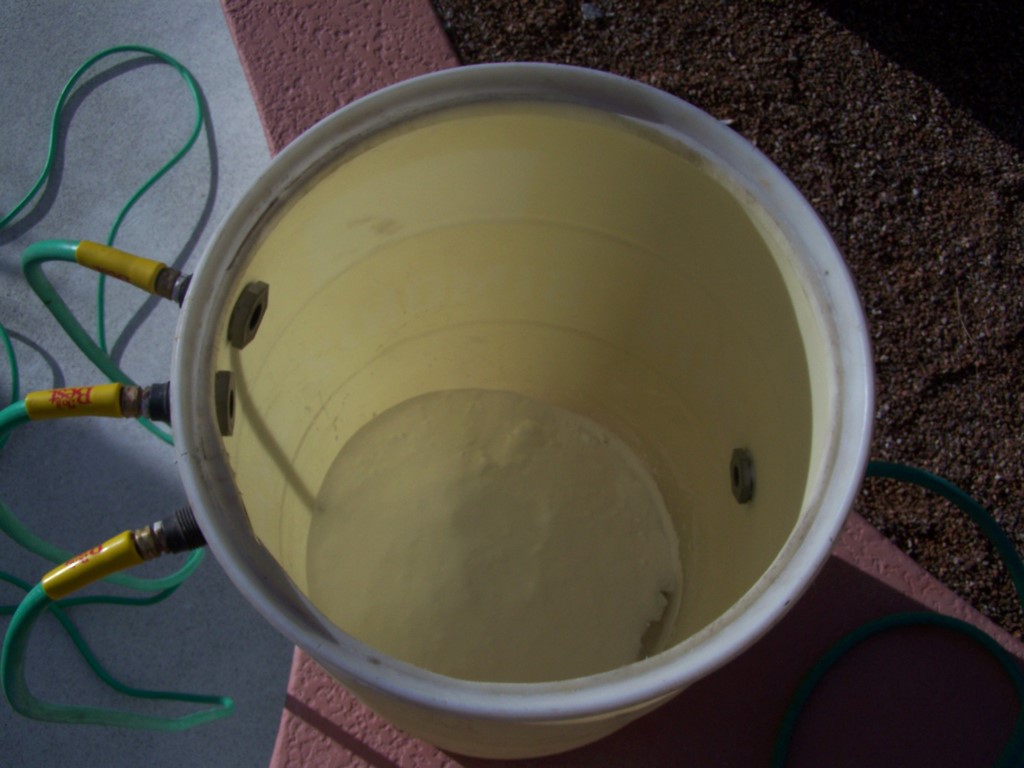

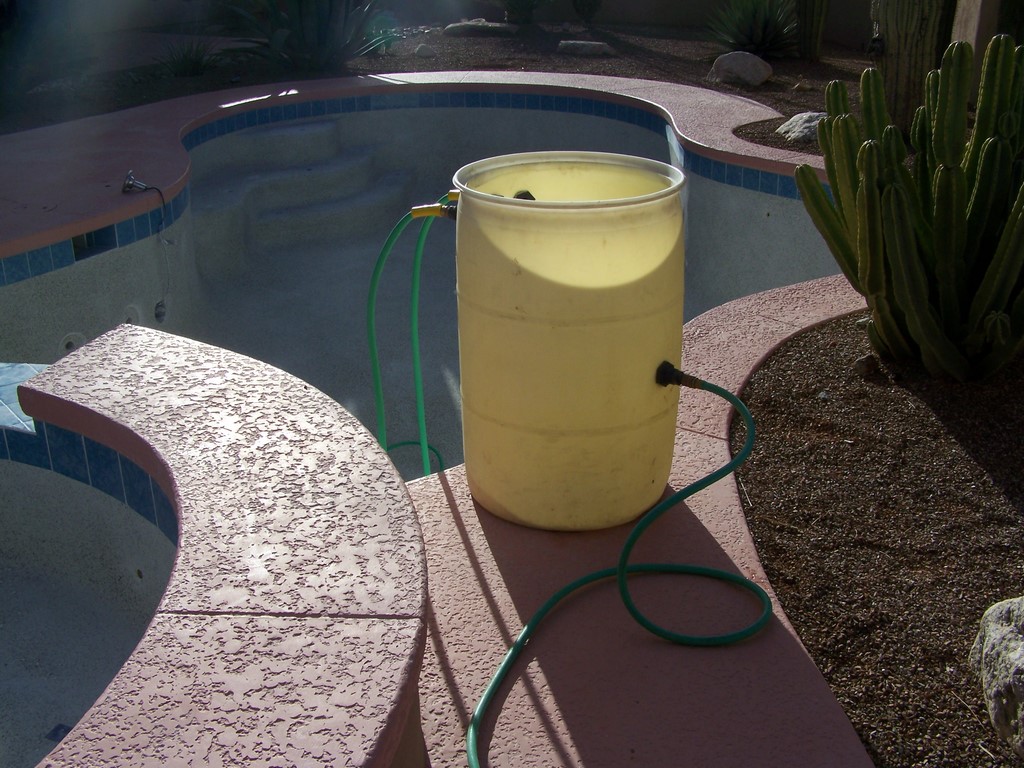
| Preparing the barrel for use in bicarb start-ups is a simple matter of drilling some holes and inserting hose fittings. Once the barrel is at poolside, you add the appropriate amount of sodium bicarbonate (left), then turn on the tap to fill the barrel. The three outlets handle the flow from a single inlet of the same size, so the barrel won’t overflow. |
Step 4: Start the Delivery Process
[ ] With the barrel in position, run a hose from the home’s water source to the deck-side fitting. [ ] Attach three hoses to the top pool-side fittings and place the other ends in the bottom of the pool, wrapping them in cloth and securing the assembly with tape. [ ] Add the desired, measured amount of bicarb (we recommend using technical grade sodium bicarbonate) to the drum before any water is turned on. [ ] After adding the bicarb, turn the water on and fill the barrel: Once the water reaches the three taps at the top of the barrel, it will flow by gravity out the three hoses and into the pool. The bicarb powder will slowly dissolve as the pool fills. [ ] Once the pool is full, drain the barrel by opening the bottom pool-side drain fitting and rinsing any remaining bicarb powder or slurry into the pool.Step 5: Adjust the pH
[ ] If the pH of the fill (tap) water is over 8.0, add one quart of acid to the drum once it is full of water.Step 6: Determine Fill Delay, Turn On the Water
[ ] In consultation with the plasterer, decide when the water will be turned on once the crew finishes its work. We recommend allowing at least six hours between final troweling and turning on the water. [ ] At the pre-determined time, ensure that the water is turned on and that the flow through the barrel to the pool is working properly, without leaks or overflows. [ ] Working with the homeowner, ensure that the filling process will proceed uninterrupted from the topping off of the bicarb barrel until the water reaches the tile line.Step 7: Make Adjustments
[ ] Once the pool is filled, double check the pH, which should be right at 8.2. (Note: This requires the use of a pH meter, because 8.3 is at the extreme high detection range of phenol red.) [ ] Double check the alkalinity, which may be anywhere from 100 to 350 ppm. [ ] If the pH is 8.0 or higher, add acid to adjust it down to the high 7s – ideally from 7.7 to 7.9. [ ] If the hardness level is below 150 ppm, add calcium chloride as needed, using the simplified dosage formula for adding hardness (see the sidebar below). Be sure the pH is below 8.0 before adding calcium chloride!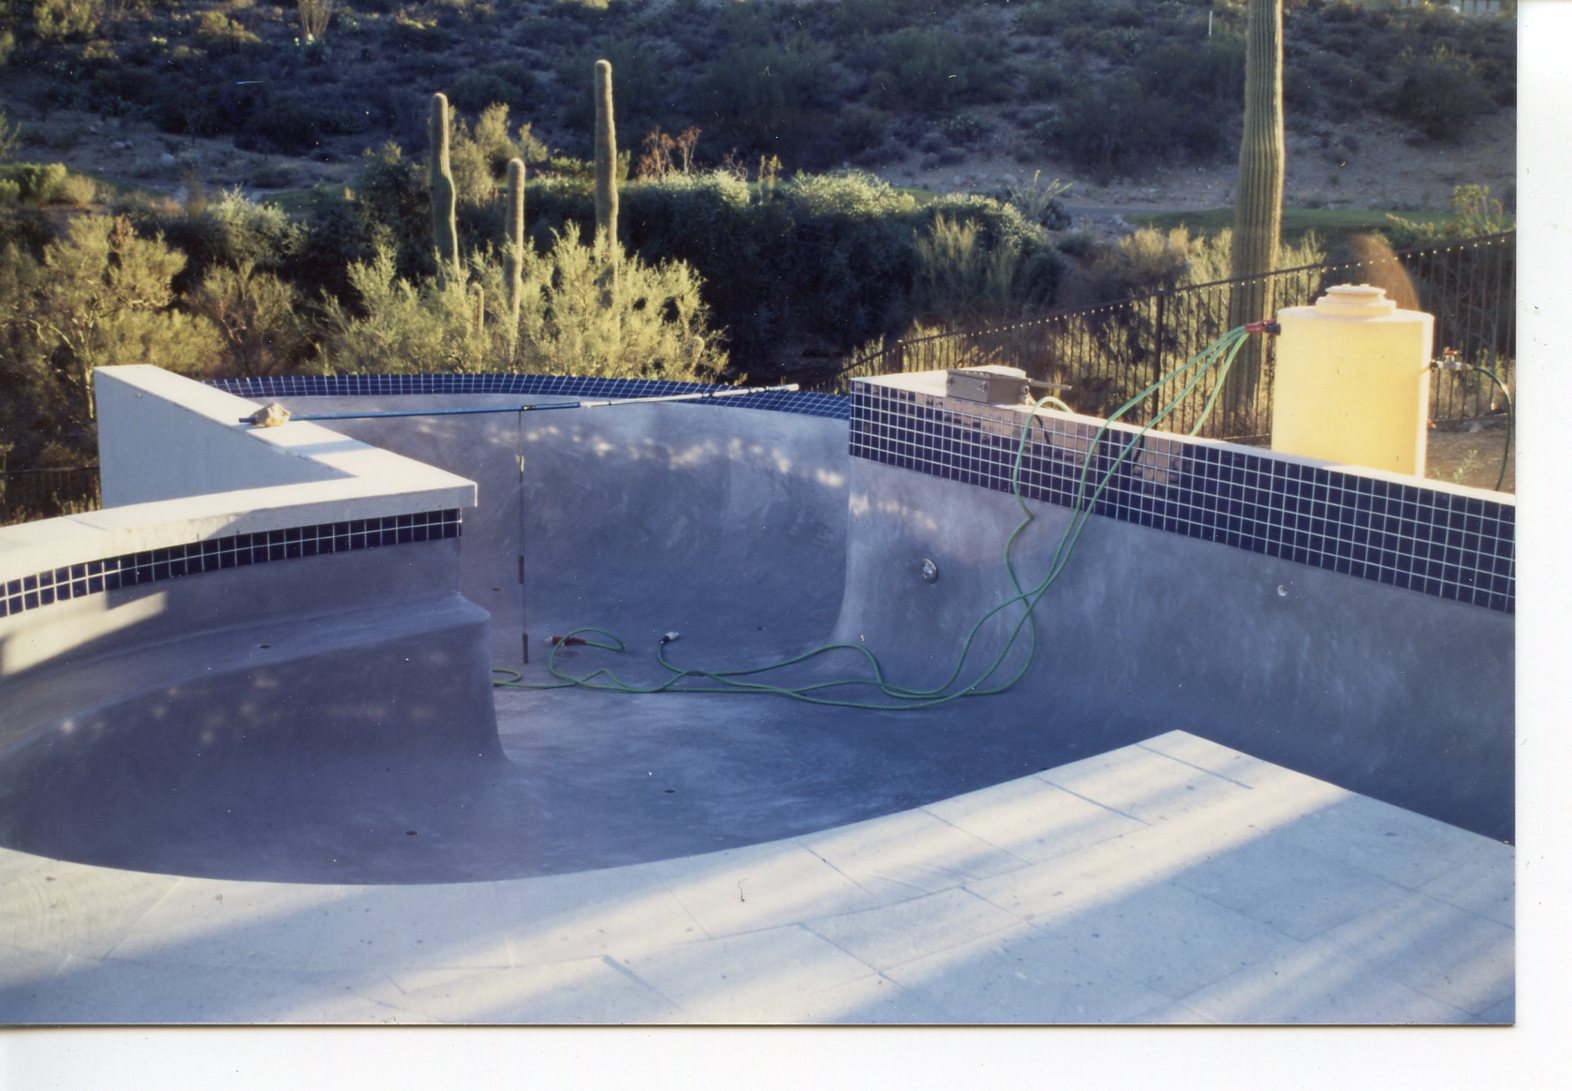

| Using the bicarb start-up method has particular value with dark-colored plaster pools such as this one, because eliminating plaster dust helps prevent discoloration of the surface after filling. In this case, the pool was set up with a pH probe to monitor the water as the pool filled (left). The barrel is different from the one depicted above (right), but it functions in exactly the same way. |
Step 8: Monitor Progress
[ ] For the next two weeks, ensure that the pool is being brushed and filtered per the plasterer’s specifications and chemically maintained per standards. [ ] For the first month after filling, allow the alkalinity to remain as high as it was from the start-up and ensure that the pH remains below 8.0.Step 9: Final Balancing
[ ] After a month, begin adding acid until the alkalinity reaches the desired target range. But don’t rush it: As long as the pH remains below 8.0, there will be no plaster dust or scale formation.COUNTING BENEFITS
The bicarb method works in all pools with cementitious finishes – plaster, quartz or pebble – but perhaps the greatest advantages of this approach are found in colored-plaster pools. By avoiding generation of plaster dust, you are also dodging many of the problems related to color consistency with these special finishes.
|
Simplified Formulas Here are two formulas that come in handy when you work with a bicarb start-up: For raising total alkalinity with sodium bicarbonate: (Volume ÷ 71,400) x ___ ppm desired change = ___ pounds. (Used in Step 2.) For raising hardness with calcium chloride: (Volume ÷ 83,000) x ___ ppm desired increase = ___ pounds. (This is the amount needed in pounds to increase calcium hardness when using 77% calcium chloride; if using 94% calcium chloride, insert 101,700 as the divisor in place of 83,000.) (Used in Step 7.) — K.S. |
And if a tough, durable finish of any color isn’t enough to make a poolowner happy, consider this: Pools started up using the acid method must be rebalanced before they are safe for swimming. By contrast, no waiting is necessary with a bicarb start-up, and your clients can get in the water and start enjoying their new watershape right away.
All told, more than 40 years of experience in developing, testing and applying the bicarb start-up has demonstrated its value in starting pools with plaster, quartz or pebble finishes. The best outcome depends, of course, on use of quality materials and suitable application techniques, as noted in my previous articles on the subject.
The goal in all of this is avoid the chemical conditions that produce plaster dust, which has been implicated in a range of problems that can arise with cementitious finishes. To be sure, this makes the process of starting a pool more than a matter of turning on a tap, but the value of getting it right is evidenced by enhanced durability, improved appearance, greater perceived smoothness – and, of course, by happier clients.
Kim Skinner began his work in the pool industry 50 years ago, starting as an employee and eventually becoming manager of Skinner Swim Pool Plastering in Sun Valley, Calif. He later became president of Pool Chlor, a chemical service firm with offices throughout the Southwest. He is also a partner in onBalance, a consulting firm that performs both laboratory and field research on pool-water chemistry and on the relationships between water chemistry and pool plaster surfaces.