


Smart Steps


In a couple of my recent “Details,” I’ve discussed the early stages of a wonderful project located on the waterfront of Long Beach Island, N.J. As is the case with many top-level jobs, this one required a great deal of work in the early going to make sure we were set up for complete success once the installation process was under way and the pool, spa and surrounding structures began to come together.
Although the pool in question is a simple rectangle designed to function mainly as a subtle and elegant reflective surface, there are certain features within the “shape” of the shell that make it something special – and particularly relevant to how the clients plan to use their new watershape.
Last time, we covered the dewatering system, setting the wooden piles and digging, forming and plumbing the pool in preparation for gunite application. There was also mention of the large, heated tent structure we built over the work area to ensure that the concrete shell would cure under controlled conditions and enable us to keep working through the winter.
UNDER THE TENT
My personal preference has always been to work with shotcrete for my pool shells, but I’ve yet to find a suitable contractor in the areas of New Jersey and eastern Pennsylvania in which the East Coast office of my business does its work, so at this point all of our projects are made using gunite.
Yes, there are arguments to be made for both products, and they both are fine when applied properly, but I find shotcrete superior because it leaves less to chance in the mixing/hydration process. There’s also the fact that the use of shotcrete results in less waste and rebound – the use of which is one of my pet peeves – and therefore leaves us with less to clean up.
There are also occasions, of course, when a job will call for the use of poured-in-place concrete – a third option that is often the best choice when there are complex architectural finishes involved in the design. In this case, however, gunite was the call.
| I always set up steps and benches with structural steel and truly don’t understand why anyone would install such key structural details without that kind of support. |
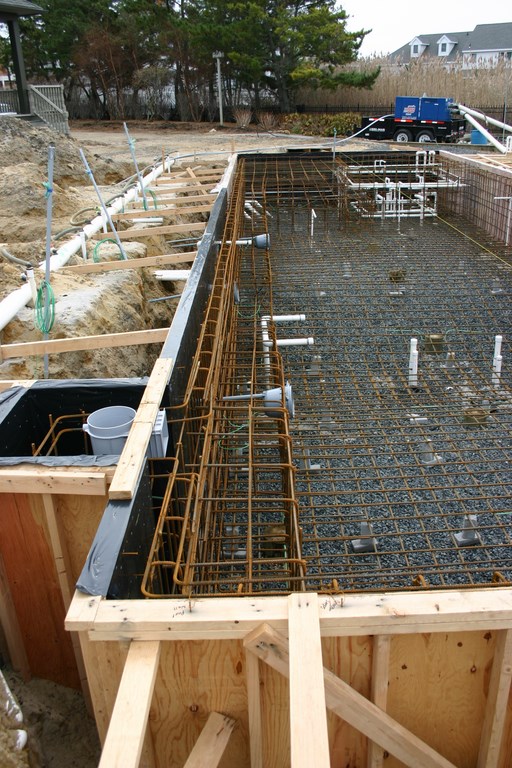
The key to using gunite successfully is making certain the nozzle operator places the material properly against the steel and achieves the level of concrete strength specified in the structural engineer’s plans. As I’ve mentioned repeatedly, a second key is clearing away and disposing of any and all rebound material and making sure that the crew never – and I do mean never – uses it to form steps, benches or any other design feature.
In this particular project, the steps and benches and a big thermal ledge are key components of the design. We formed them using structural steel, and it boggles my mind when I see details such as these – even in the most modest of pools – set up without that sort of integrated structural support.
In this case, the shape of the shell is really quite simple and reveals another of my preferences – that is, for simple geometric pools. First, I like the balance that can be achieved with simple shapes. Second, they fit with my basic philosophy that in a great many settings, the best idea is not to draw attention to the pool, but rather to have it enhance the setting as a more retiring visual element.
Often times, more complex geometric or free-form shapes will grab all the attention – more than any other single visual element on the property. Many watershapers would have seen this particular waterfront site and run with the opportunity to design and install a vanishing edge for a great water-on-water effect, but to me, that’s a modern look that would have been out of place in this environment.
If the idea is to play up the watershape in a situation where it is intended as a stand-alone art piece (as with a vanishing edge), then a more visually aggressive approach might make sense. Far more often, however, going in the opposite direction is the best call – as it certainly was for this oceanfront project.
DESIRED EFFECTS
By design, we wanted our clients to look across an elegant, refined backyard space and out toward the bay. The aim was not to compete with the ocean, but instead to complement it with an inviting space that would pull the homeowners and their guests outdoors.
To create that sense of elegance, we’re using materials that (to my knowledge) haven’t been used on the East Coast before, including a gorgeous Lompoc stone with oatmeal, gray and blue colorations. Then there’s the pool itself, which, as mentioned above, serves mainly as a reflective surface with a rectangular shape defined by a double-sided bullnose coping slightly raised (by three-quarters of an inch) on a foot.
|
An Issue of Terminology The pool described in the accompanying column is a long, skinny rectangle, and most people who see the plans or hear about its configuration want to call it a “lap pool.” I’d like to go on record here in declaring that I dislike that term intensely and think it should be discarded. To me, any pool in which laps can be swum is technically and literally a “lap pool,” which makes the term meaningless. Competition pools with lanes lines and dividers might qualify for the term, but even here the term narrows functionality down too far for use of the term to be correct. Instead, I would say this pool, with its shallow bottom, thermal ledge and bench-like step treatment, is more of a “play pool” or “socializing pool.” But it’s also a “reflecting pool” and a “sculptural watershape” that might easily be used for swimming laps, given its 54-foot length. This may seem a petty issue, but to my mind what we call our products is important and “lap pool” just doesn’t cut it. This is another reason why I, for one, love the term “watershape” and use it all the time. It’s neutral and does the job, first time, every time. — D.T. |
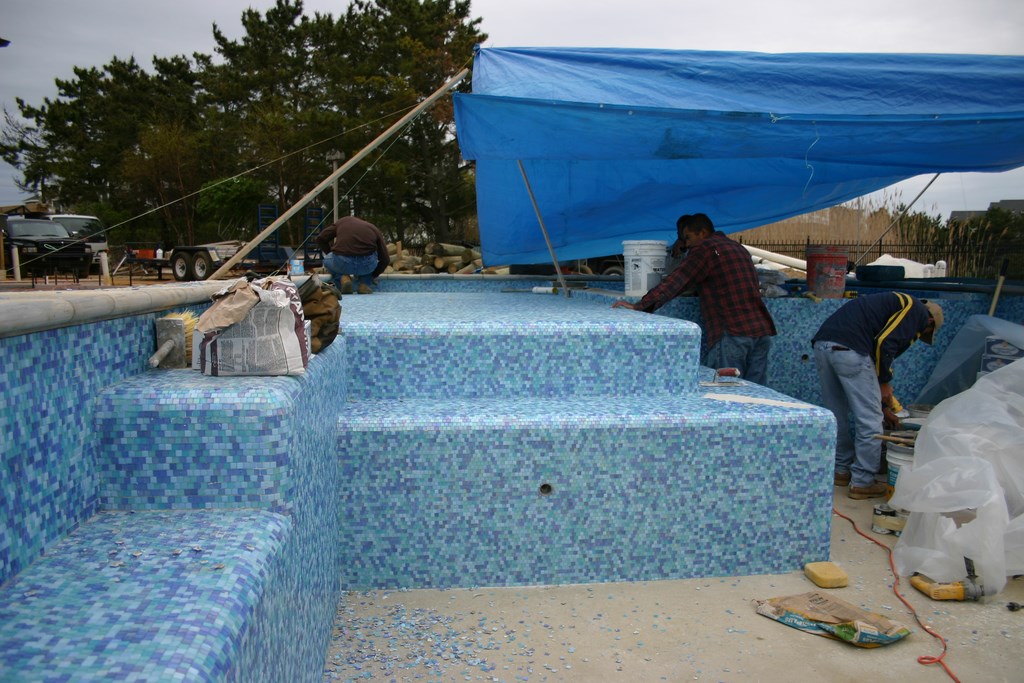
The interior surface will be a blend of blue and light-violet glass tiles that will create a beautiful, highly reflective, deep-blue surface, perfect for views from the home and across surrounding decks.
Our goal in assembling materials and making color choices had to do with setting up a classic look that will ultimately complement the house, which has a sort of Victorian, gingerbread style reminiscent of San Francisco early in the 20th Century and is also part and parcel of the look of homes in New Jersey’s classic seaside resorts.
Overall, the idea with the backyard and the pool was to make every detail look as though it had been there from the start and had been conceived as original parts of the site design. The pool itself is 12 feet wide and 54 feet long – dimensions based purely on what I thought the site needed with respect to balance, scale and visual volume.
I’ve never understood why, as an industry, we seem stuck on two-to-one proportions for dimensions (17 by 34, for example, or 20 by 40) – just a habit for some people, I guess, but a rut I avoid in thinking about dimensions. In this case, 10 by 54 is the size and aspect ratio that made the most sense given the size and shape of the yard.
Where the outer dimensions of the pool were dictated almost exclusively by the site, what goes on inside the coping with the interior contours of the watershape had everything to do with the clients and the ways they said they intended to use the pool.
INSIDE MOVES
What we learned in our many conversations is that the clients are big into having gatherings at their home and that the pool should be conducive to casual play, some lap swimming and lots and lots of socializing. People of different ages were to be considered, and what we settled on was a design concept that placed a premium on comfort and access.
One of the key features is a thermal ledge set adjacent to the spa. The idea is to provide easy foot access to the spa and the pool as well as a comfortable, cool-water lounging area equipped with an umbrella sleeve to provide some much-needed shade. With the shallow thermal ledge right next to the spa, there’s less separation between the attached spa and the pool, allowing people to interact comfortably in both spaces.
Another important feature is the step system that runs the length of the pool – a detail I’ve been using since 1979.
| A large thermal ledge occupies a key space next to the spa, the goal being to allow people to gather easily in the space and converse with bathers in the spa – and vice versa. |
In my observation, steps tend to be afterthoughts and are seldom fully considered, but I’ve always taken them seriously because I see them as prime gathering places where people sit, move in and out of the water and in general spend a great deal of time. Children also jump from the steps into the deeper water and parents are often found conversing on steps or helping small children become comfortable in getting wet. I can think of dozens of other basic, human-scale reasons why steps are important and why I treat them with respect.
Typical step treatments appear on one end or in one corner of the pool, but these generally do little more than provide internal obstructions. Think about it: In a typical configuration, the steps are either oriented so that they extend into the pool itself, thus getting in the way of those who would exercise or swim or play, or they’re in a cove that extends beyond the natural perimeter of the pool, thus disrupting the visual effect.
My preferred step treatment – one that works beautifully in rectangles such as this one – involves running a series of graduated, bench-like steps along one side of the pool in a way that works with the water’s depth. In other words, the steps are both benches for seating as well as points of entry and egress.
In this case, the pool ranges in depth from three-and-a-half-feet deep on both ends extending down to a four-and-a-half-foot depth in the center. The step/benches start out in about a foot of water on either end and descend in tiers toward a depth in the center of three feet.
LONG LOGIC
The advantages to this configuration are several. First of all, it offers no obstruction to the length-wise flow of the pool. The steps are off to the side, which makes more of the vessel usable for exercise and playing games. Children or adults can sit comfortably on the side or jump into the water from any point along the length of the pool.
Second, it transforms one entire side of the pool into a lounging/socializing area, blurring the transition between deck and water. People sitting inside the pool or those relaxing with their feet dangling in the water can easily move one way or the other without having to move to a corner or end of the pool where the steps are located. In this way, the lengthwise steps increase the functionality of the water from both socializing and recreational standpoints.

| As I’ve mentioned many times, I love this step detail, which runs the length of the pool, allows for gradual entry and egress from the water and doubles as a bench – all while leaving the main area of the pool open for swimming and playing. |
Third, this configuration eases access into and out of the water. This is where the slightly raised, double-sided bullnose coping comes into play: As mentioned above, the coping creates a lovely visual boundary, but it also acts as a handrail for people moving along the steps that obviates using prefabricated hand rails. Moreover, it makes the entire length of the pool a place where older people who might need to move carefully can descend into or rise from the water with a sense of safety and security.
By combining this step treatment with the thermal ledge by the spa, we’ve woven the interior spaces available in the pool and spa together into a composition that’s easily accessible, maximizes opportunities for social activity, relaxation and play and gives us a perfect place to put lights – which in this case point away from the house, thus reducing glare.
Next, we’ll move onto a discussion of the decks and overall site layout for the project and consider principles of visual balance.
David Tisherman is the principal in two design/construction firms: David Tisherman’s Visuals of Manhattan Beach, Calif., and Liquid Design of Cherry Hill, N.J. He can be reached at [email protected]. He is also an instructor for Artistic Resources & Training (ART); for information on ART’s classes, visit www.theartofwater.com.