


Completing the Impression


Now we come to the finishing touches – little details that make a big difference in the ultimate appearance of the renovated pool we’ve been watching develop here for the past several months.
Through those many months, we’ve taken a pool that’s more than 70 years old, rerouted all of its plumbing through cores cut in the old shell, added a circular spa in the shallow end, raised the floor in the deep end, reshaped the steps, added lights in a new, pool-long bench, installed all-new equipment and laid down gorgeous glass tile throughout – all without disturbing the beautiful limestone decking that surrounded the pool.
As the project came to a close, we turned to a final couple of details: some trick work on the drains and on the aperture for the overflow line.
POWDER POWER
The standard approach with the three main drains in the pool and the four in the spa would have involved installation of off-the-shelf anti-vortex drain covers. These plastic parts come in multiple colors in different diameters to accommodate the needs of the plumbing and capably serve their purpose with ordinary projects.
For this sort of high-end project, however, stock drain covers would inevitably have disrupted the aesthetics of the finish. Particularly set against fields of glass tile, taking the easy way out here simply wouldn’t have reflected a quality approach.

| It may be an expensive way to go, but coloring this pool’s multiple brass drain rings with a powder coating makes them virtually disappear from the visual field when installed – a welcome feature in this well-appointed, all-glass-tile pool and spa. |
In this spectacular case, I found a source for old-style, solid-brass, anti-vortex main drains and had them powder-coated by a plating company in San Francisco. We colored the drains a beautiful periwinkle color that effectively blends in with the surrounding tile.
(I found the brass covers through Reza Afshar of Afras Industries in Agoura Hills, Calif. He’s a pool-industry veteran whose company manufactures classic bronze components and had invited me some months ago to make a presentation to a group of southern California architects – a good, insightful contact.)
To my mind, it would have been a travesty to invest so much money in a tile surface only to mar the tile field with ugly plastic dots. Yes, a powder-coated brass drain cover costs a good bit, and yes, in projects where the color of the plaster or pebble is more standard, you may be able to get away with using an off-the-shelf color. But our desire here, in the midst of a grand periwinkle field, was to make the drains as unobtrusive as possible.
|
Minor Disruptions The two drain details discussed in the accompanying column are all about eliminating interruptions in beautiful tile work and give me an opportunity to stress a point that can’t be emphasized enough: Take the time to consider the colors and trims on all the lines that penetrate to the interior of your shells! I’ve seen more pools than I can count that have been visually ruined by pieces of white PVC sticking out for the fill line right in the middle of dark waterline tile or a white eyeball bulging into a field of colored plaster or pebbles. They look terrible! A better way to go is to take any piece of plumbing that’s exposed and add another colored piece of pipe or some kind of colored finish trim over it. In the project discussed here, for example, we have a bluish/grayish tile. In setting up the fill line, we didn’t want to leave behind the usual one-inch schedule 40 PVC pipe and its tell-tale white rim, so on the end of the line we attached a schedule 80 PVC coupling, which is gray and blends nicely with the surrounding finish. I’ve found that the gray color of schedule 80 pipe works well with just about anything (with the exception of white finishes) and doesn’t disrupt the visual impression made by the material that surrounds it. As with so much else of what I do, this treatment doesn’t attract attention to unimportant details while helping me build a favorable overall impression. — D.T. |
With three drains in the pool and four in the spa, so many serious disruptions in visual continuity would have been unbearable. There are those who might argue that using fewer drains would have helped in meeting this higher aesthetic goal – after all, the fewer the drains, the lower the cost and the fewer the possible visual miscues. In my view, however, cutting back in this way would be pure insanity.
Deploying multiple drains is a safety issue first and foremost – a surefire way to avoid any problems with suction entrapment. Indeed, anyone who knows about plumbing and hydraulics will tell you that one of the keys to avoiding entrapment incidents is to spread the flow out among two or more inlets and thereby reduce the risk.
These powder-coated beauties were quite expensive, especially when you consider that we needed seven of them. For less ambitious projects in which standard products are used, however, the cost is ridiculously low at $7 to $12 per added drain – a negligible cost considering the safety benefits.
This should be a no-brainer – and it is if you follow manufacturer instructions when it comes to basic hydraulics and the sizing of your pumps and plumbing. I won’t dwell on this here; suffice it to say that installing multiple drains is a matter of common sense – and not a place to cut corners in the name of saving a few dollars.
GOIN’ WITH THE OVERFLOW
The final project detail is one of which I’m particularly proud and has to do with the way we set up the overflow line for this grand old pool.
Whoever it was who did the last major work on the pool (perhaps the original contractor, although I can’t be certain of that) did nobody a favor by failing to include an overflow drain of any kind.

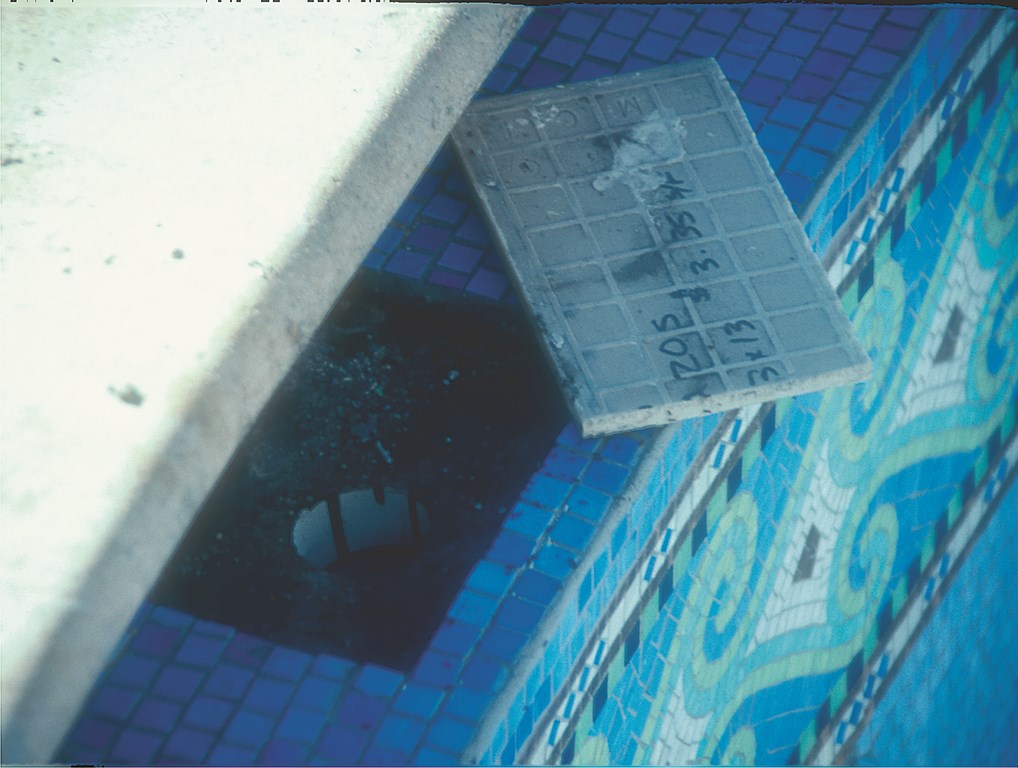
| We set up an overflow line when we re-plumbed the pool, positioning it to penetrate the base of the pool’s old gutter system (left). After the tile was installed, we began the process of making the line disappear into the finish by cutting a ceramic-tile plate to fit into the opening (below). |
Any pool without one can have a problem when it rains, but in the case of this pool everything was made much worse by the fact that all of that prized limestone decking slopes toward the pool, easily doubling or even tripling the water-collecting surface and causing havoc whenever good-sized storms rolled in.
 As I’ve mentioned in my reports on other projects, I usually install the off-the-shelf fittings made by Overflo (Tarzana, Calif.) in setting up this sort of drain detail, but in this particular case I had to develop a completely custom solution.
We saw that such a solution was needed right up front, so during the plumbing phase – when we were running lines all over the place so one more line through one of the many cores we’d cut in the shell didn’t much matter – we ran an additional two-inch line up through a notch we cut in the wall to a spot above the existing gutter and waterline.
The gutter was filled in all the way around the rest of the pool’s perimeter and now serves a strictly decorative, visual function. But in one spot in the shallow end near the new steps, we broke through the old gutter’s base and ran the overflow line down and out through a core that also carries the plumbing runs for the spa blowers.
Not wanting to disrupt the beautiful tile work – especially not at the waterline, where the pattern is particularly gorgeous and any sort of disruption would be distinctly and regrettably awful – I convinced the homeowners to allow me to do something different.
Basically, I appropriated a concept from the deck drains and skimmer lids I use on other projects: We set up a conical depression in one section of the old gutter, then waterproofed it thoroughly so it would serve to feed water into the two-inch overflow line below. I then turned to my amazing tile installer, Willie Villanueva, who did all I asked him to do in working a small bit of custom magic.
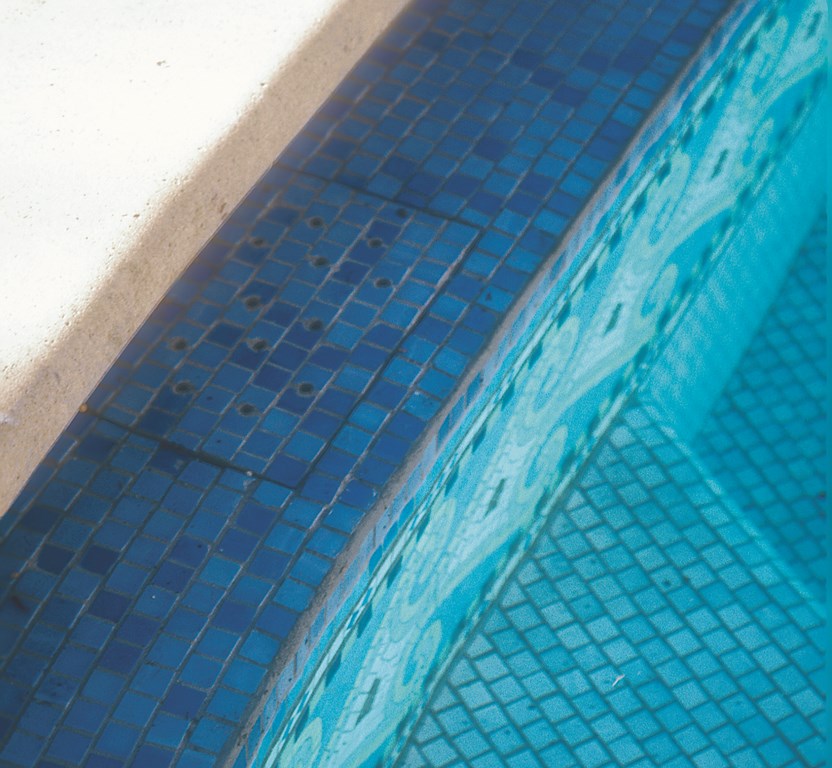
| The holes in the tiled “grate” and the slot around its perimeter ensure adequate flow to the two-inch overflow line below – all without disrupting the tile pattern in the slightest or in any way marring the aesthetics of the pool’s beautiful surface. |
We started with a large piece of ceramic tile, cutting it to fit in the space over the drain head at a level about a three-eighths-of-an-inch shy of the finished surface. Atop the large piece, we mounted the glass tile, continuing the pattern we’d used all the way around the top surface of the now-filled gutter. Next, we drilled holes through the ceramic tile between the pieces of glass tile – enough in all to provide adequate overflow service.
He did all of this working from detailed drawings I’d made. As I’ve stated before, the people who work with me are very good, but without my ability to communicate exactly what I want done, they’d be left to improvise and interpret – not something I want to leave to chance in any of my projects.
Ultimately, we had just the tile grate I wanted and set it into the recess above the drain line. The grate sits over the opening and is not grouted in (for easy removal), and the edges around the grate’s perimeter also allow for steady flow around the sides. The whole assembly is just two by six inches, and it lines up perfectly with the rest of the gutter’s grout lines so perfectly that it’s almost impossible to spot, even when you’re standing right by it.
It’s a great finishing touch for a project that stands as one of the most unusual and beautiful renovation jobs I’ve ever done.
Next: A look at some of the sources for these beautiful drain details.
David Tisherman is the principal in two design/construction firms: David Tisherman’s Visuals of Manhattan Beach, Calif., and Liquid Design of Cherry Hill, N.J. He can be reached at [email protected]. He is also an instructor for Artistic Resources & Training (ART); for information on ART’s classes, visit www.theartofwater.com.