


Designing for Depth

Although the eye is commonly drawn to structures and other architecture elements found in any given exterior environment, very often it is trees that serve as visual anchors in modern landscapes. Indeed, they tend to be the largest objects on most properties and will often become focal points even in settings in which they might have started out in supporting roles.
This dominance or even potential for dominance is why, as a lighting designer, I believe that trees should always receive careful attention when it comes to developing a landscape lighting program: I know that if I pay close attention to their sizes and shapes and the character of their structures and leaves, it’s possible to achieve absolutely wonderful effects with them once the sun goes down.
In doing so, of course, I’m aware that even trees of the same species can be quite different from one another. As a result, I’ve learned to treat them all as individuals and do what I must to avoid approaching them with any sort of off-the-shelf attitude. Just the same, I’m aware that there are several lighting strategies I can use to create a range of desirable effects.
Here, in my first column in the “Currents” slot, I’ll be discussing just two of the many techniques I find useful in working with trees after dark: backlighting (or silhouetting) and cross-lighting. In both cases, these approaches can be used to conjure senses of depth and mystery by accentuating the shapes of trunks, branch structures and foliage.
SUBTLE DISTINCTIONS
Before we begin, it’s important to note that making decisions about how to work with a given tree has much to do with the tree’s ongoing physical characteristics – how big it will be when fully grown, the character of the trunk and branch structures as they mature and the visual attributes of the foliage as the tree’s life progresses.
That can be an overwhelming bite if you approach it as a single factor, which is why I always put it in the context of being clear about what I want to achieve.
In other words, I know that trees play a variety of roles in landscapes. They can be used to define the visual and/or physical boundaries of a space, for example, or be set up to establish a measure of physical depth. They might also be grouped together and used as space dividers, privacy screens or backdrops – or they can be planted as dramatic focal points that will dominate a view.
Once I know how the space works and have determined a tree’s role in it, I know which lighting approach will most effectively complement that function and can more easily consider the effect time will have on what I need to do. Then it’s basically a matter of starting with the large elements and working my down to the small ones.
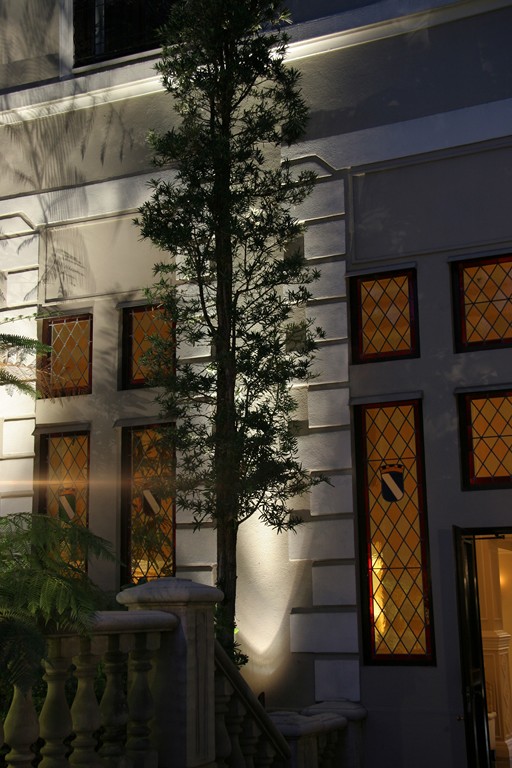
| Here, the tree is lit from behind to create a silhouette at the same time some of the light washes a nearby wall, creating a sense of depth that distinguishes the home’s front entrance. |
Now let’s get specific and see what this means with respect to backlighting.
This technique is simple in concept: Typically, you place single or multiple light sources on the far side of the tree from the primary point of view and illuminate it from behind. Another way to achieve this is by lighting a surface such as a wall (if present) directly behind the tree: This creates a dark silhouette of the tree’s shape while revealing very little detail with respect to factors that are readily apparent during the day, such as the texture of the bark, the color of the leaves or blossoms and a host of other details that would be apparent if you chose to light the tree from the front.
What I appreciate about this technique is that it draws attention to the overall shape of the tree and almost invariably draws the eye out into the full depth and measure of the landscape. In that sense, this approach lets me evoke a very different sense of the dimensionality of the space than might be drawn out during daylight hours: I like that sense of contrast – and so, apparently, do my clients.
In fact, it’s been my observation that excessive reliance of front-lighting is a common mistake among novices: Not only does this make every lit object into something of a competing focal point, but it can also make everything appear to have the same visual weight or even seem to exist on the same visual plane. By contrast, backlighting is a great way to show contrast relative to the major focal points and draw attention to the shapes of the trees without overwhelming the viewer.
Moreover, because backlighting lends a sense of depth to any setting, it’s a particularly welcome effect in smaller yards.
AT THE REAR
To be sure, there are some types of trees that lend themselves more than others to backlighting.
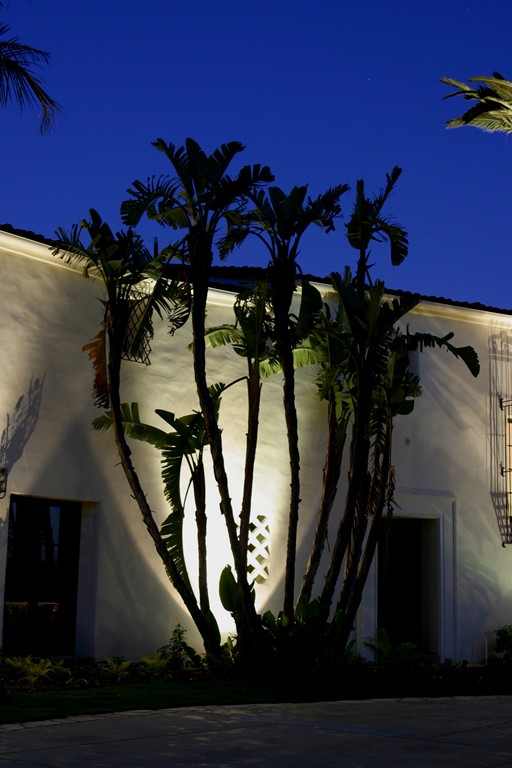
Trees with bold structures or those that are very large can be some of the best candidates, including various types of pine trees or oak trees (quite common where I work). It’s also effective with large plants that have bold leaf structures, such as Elephant Ear or philodendrons, and is a natural companion to topiaries.
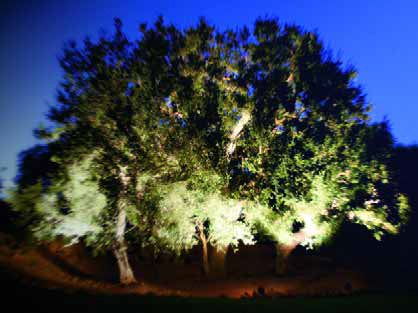
As a rule, my preference is to use this approach with trees that have open forms in which trunks and branches are not entirely obscured by dense foliage. It also works best in my view with trees where the canopy is kept high off the ground. Yes, you can backlight densely foliated trees to create a halo effect, but oftentimes these trees become so dense that almost no light penetrates the structure, which is basically a waste of energy.
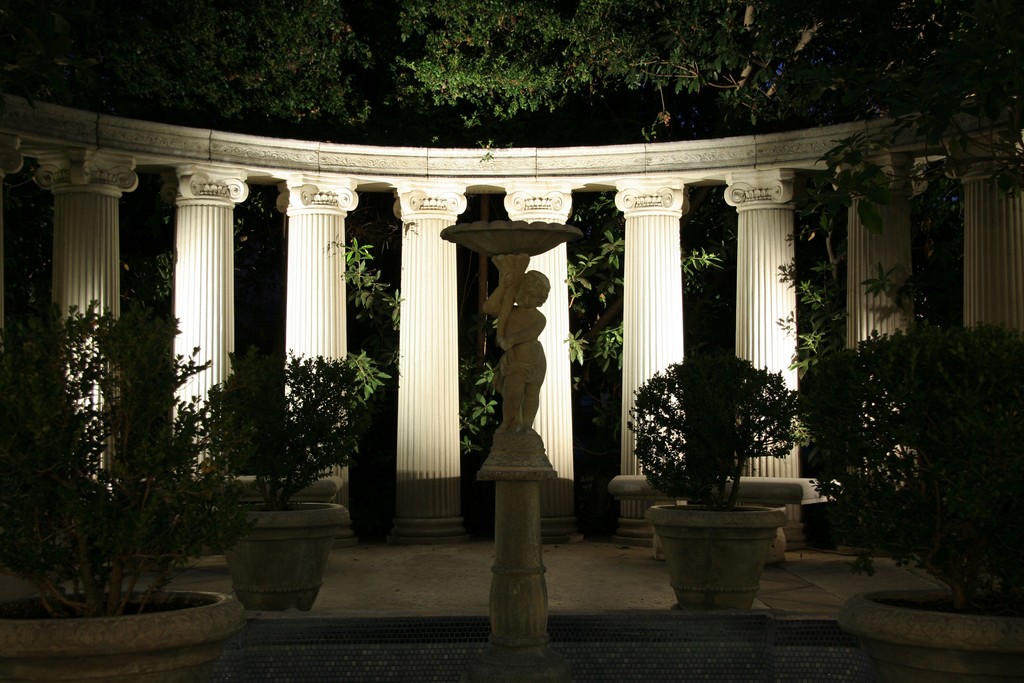
| In this case, the light is cast entirely on a backdrop colonnade to establish silhouettes of a statuary fountain and a series of potted shrubs. The objective here as with most such effects is to create a nighttime look that offers a dramatic contrast to the way these objects all appear in daylight. |
With the right trees, however, backlighting is a wonderful way to bring interest to a background or manage visual transitions between different areas of a landscape. In some cases, the technique can be used to create a distinct focal point (as with a tree with an extremely distinctive shape), but for the most part the trees and other plantings I backlight won’t warrant that kind of attention.
There are two basic ways to backlight trees: The first is simply to locate a light source on the ground just inside the boundary of the tree’s canopy. Here, the main challenge is to be sure that the light source itself is not visible from the primary and secondary viewing points, otherwise all you’ll really see is the light itself. (As is almost always true with landscape lighting, shielding the light source in some way is crucial!)
The second backlighting technique involves front-lighting a structure (a building or a perimeter wall or even a stand of screening plants) that stands behind the tree. This can be a wonderfully subtle effect that increases the sense of depth even more. In addition, because the light source is aimed away from the viewer, shielding is not so big a concern.
As far as fixtures go, you can recess well lights in the ground (a good way to obviate concerns about shielding), or you can use aboveground bullet lights with glare shields and louvers (which have the advantage of being more adjustable). It’s also possible to use a wall-wash style light, which give you the ability to diffuse the light across a broad area.
SIDE TO SIDE
Cross-lighting is another effect I like to use with trees, basically because it lets me generate areas of light and shadow within a tree’s structure.
As with backlighting, cross-lighting is basically a means of lending a sense of depth, which makes it similarly effective as a background effect. But with cross-lighting, there’s real value to its ability to reveal more of a tree’s visual characteristics – glimpses of the texture of the trunk or main branches, for example – and create wonderful “inner glow” effects in trees with foliage that lends itself to that look.
In other words, where backlighting is basically a two-dimensional approach, cross-lighting introduces a subtle third dimension to the program – which makes it important to select subjects worthy of a higher degree of viewer attention (such as open-form trees that allow light to penetrate the branches and filter through the foliage).
Cross-lighting can be achieved either by uplighting from the ground or by downlighting from fixtures mounted on a tree’s branches. Either way, you need to set up at least two fixtures on opposite sides and have the streams of light cross one another. (I say two as a minimum because, depending on the size of the tree and access to it from various focal points, you can set up multiple pairs of lights to work on the same tree as seen from different angles – even four or more lights if a centrally located tree is to be appreciated from all possible angles.)

| Cross-lighting can be used (as it is here) to highlight interesting trunk and branch structures in a way that brings drama to a setting at a level of intensity that simply can’t be perceived in daylight hours. |
When cross-lighting from fixtures mounted on the ground, the light sources should always be aimed up through the tree to create the cross effect – in most cases at angles between 45 and 60 degrees. This creates areas of light and shadow that can lend a setting an air of mystery as well as depth.
By contrast, if the fixtures point straight up, what you’re doing is basically washing the tree’s surfaces with light in a way that will appear more two-dimensional. That can be a useful effect in and of itself, but it’s not technically cross-lighting and won’t conjure the same level of visual interest.
What I like most about cross-lighting is the ability it gives me to generate interesting shadows within the tree’s branches and foliage. When lighting from below, I usually place the fixtures within the perimeter of the tree’s canopy – which I’ve found to be the best placement for making the leaves glow in a particularly dramatic way (especially when I’m working with the elegant leaf forms of a tree such as a Japanese maple). It’s also particularly dramatic when I’m lighting trees with multiple trunks or broad, open-form, lateral branch structures.
Cross-lighting at downward angles from inside the tree can also create extremely interesting patterns of light and shadow; moreover, I like the way dappled patterns are cast on the ground and/or adjacent structures.
In cases where it’s not possible to get the fixtures far enough up in the tree to illuminate the whole tree, I will often cross-light the same tree from below as well. For me, it looks peculiar if you cross-light a tree from within but only a portion of the tree is illuminated. In addition, if you combine cross-lighting from the ground up with fixtures that are in the tree itself, you eliminate the problem of hot spots – almost impossible to avoid when you have fixtures that are up in the tree right next to branches and foliage.
HIDING SOURCES
With cross-lighting even more so than with backlighting, shielding the light sources is critical simply by virtue of the fact that you’re using multiple fixtures that might be seen from more viewpoints within a given space. As mentioned above, well lights are useful, but they are limited when it comes to making angular adjustments. This is why hooded aboveground fixtures are often used to achieve these effects, but they have their limitations as well.
There’s no easy answer to this particular challenge, and experience tells me that the solutions tend to be project-specific. In many cases, for example, we use low-profile plants around the bases of the trees to provide cover for our fixtures, but we’ll only do so if we’re confident property owners will stick to a maintenance program and keep these plants from growing to a size that will interfere with the effect.
A more predictable solution to the shielding issue is using rock or other hardscape structures to conceal light sources, but again, that’s something that can only be determined on a case-by-case basis.
As I work with these techniques, I’m always thinking about the potential for creating visual hot spots and am aware that the closer a light source is to the subject, the “hotter” things will get. This is where it is helpful to know such details as how fast the tree will grow and to what size it will grow upwards and laterally: There’s nothing much worse than being called back to a site every year to relocate fixtures, but that’s the only option in a universe in which the entire effect your clients have paid for can be destroyed by growth that extends out to a distance beyond your light sources.
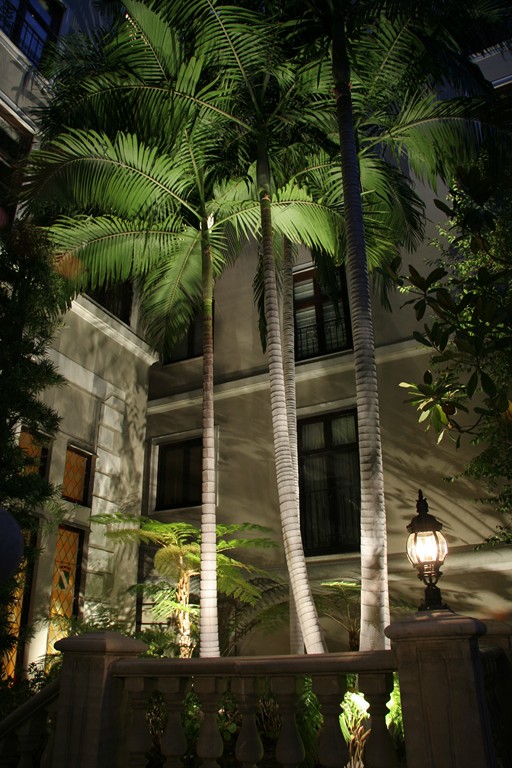
| The distinctions between back- and cross-lighting are seen clearly in these images of mature palms after dark. At left, backlighting creates silhouettes that lend senses of depth and even mystery to the space, while at right cross-lighting highlights the features and volumes of the palms and their fronds by bathing them fully in light. |
This is why, although I am a lighting specialist, I spend a lot of time learning all I can about given types of trees. And if I’m ever unsure about what I know, I never hesitate to talk to the experts at nurseries or tree farms to find out what I need to know. There’s never any shortcut to doing your homework!
Along somewhat similar lines, there’s one area suggested just above over which we have relatively little control that can have a tremendous influence on how our backlighting or cross-lighting schemes will work in the long run: maintenance. In fact, the all-important physical characteristics of trees mentioned above – factors that have everything to do with how you decide to light them – can be dictated as much by maintenance as by the species of the trees.
When I’m working on a design, I always discuss with the clients how the tree is going to be maintained, how often it will pruned and to what extent. If I’m confident they’ll follow through in a way that will keep the tree open most of the time, I’ll be far more comfortable using an effect such as backlighting or cross-lighting for which penetration of the structure is crucial to the effect. If I get the impression the tree I’m working with will be allow to leaf out fully, I might decide on a simpler uplighting or front-lighting scheme – or perhaps no lighting at all.
KEEPING UP APPEARANCES
This concept of maintenance is a crucial point and will the one with which I close this discussion. For my part, I don’t believe you can overemphasize the subjects of either landscape or lighting-system system maintenance when working with clients. If plants and trees are allowed to grow unchecked, the investment the client has made both in those plants and in a lighting system is undermined, either partially or completely.
What I’m after in designing a system is to use effects such as backlighting and cross-lighting to enhance the outdoor environment after dark and draw observers’ eyes into the space while making subtle visual statements. From the start, I want the property owner to know what’s at stake and take upkeep issues seriously. If they don’t, they might as well not have called on me in the first place.
In particular, backlighting and cross-lighting are sensitive to this concern about maintenance and do require a certain level of diligence on the part of the client. When set up properly in well-maintained spaces, lighting designers can use these two simple techniques in ways that create some truly wonderful effects at what usually proves to be a relatively modest cost.
In an upcoming installment, we’ll cover other effects that are useful in lighting trees, such as grazing and moonlighting.
Mike Gambino owns and operates Gambino Landscape Lighting of Simi Valley, Calif. A licensed lighting contractor since 1990, he has specialized since 1995 on high-performance low-voltage systems. He may be reached via his Web site: www.gambinolighting.com.