


Containing Glare

In the landscape lighting business, we often hear complaints about glare and get lots of questions about how to bring it under control. In some cases, it’s a minor annoyance, but in others, some clients are so sensitive to the discomfort it can produce that it ruins entire lighting designs for them.
So what exactly is “glare”? I define it as light transmitted directly from a source into an onlooker’s eyes (either directly or indirectly) in such a way that it’s a nuisance. Beyond the squinting that can result, the problem is that, where this glare occurs, it’s likely an observer’s attention will become fixed on the source of the glare rather than on anything else the light makes visible in the landscape. In other words, how you handle these situations can spell the difference between a successful lighting design and one that is a complete failure.
That’s no small dilemma, because it’s almost impossible to eliminate glare completely. This is why, when I start working with new clients, I always let them know that glare can’t be entirely avoided because, in lighting any object within a landscape, it’s almost always possible for someone to reach a point in the space where they will be directly exposed to a light’s beam spread.
What I then describe is a delicate balancing act: We will reduce glare to the greatest extent possible, but we also know that if we go too far down that path, we might as well not try to light the landscape at all. Indeed, I’ll go so far to say that a landscape lighting program without glare is likely to be lacking when it comes to character or interest.
A certain amount of glare simply comes with the territory: The art comes in managing it in the specific context of a given landscape while weighing it against the sensitivity of the client.
BRIGHT STRATEGIES
Some landscapes help by establishing an observation point on just one spot or one side of a space – through a window, for example, or from a patio or deck that stretches along the back of a house. In such cases, it’s relatively easy to control glare by aiming all of the fixtures away from the prime viewing angle.
That simplicity is rare these days, however, because modern landscapes are about exterior rooms and destinations – elements that invite people to move out into the space to enjoy the fullness of a setting. Here, because of the multiple vantage points involved, it’s basically impossible to eliminate all sources of glare and still do a landscape justice after dark.

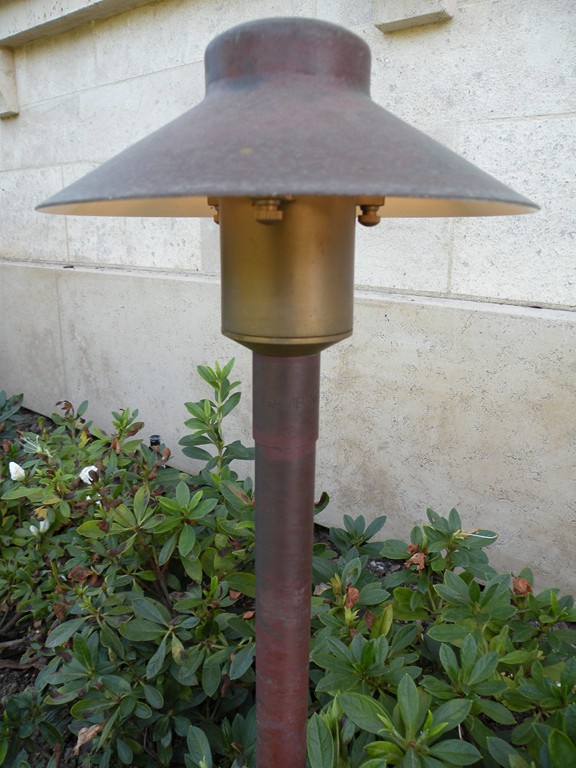
| If you happen to put your eyes between this fixture and the object it’s meant to illuminate, you will experience glare of the most painful variety. Avoiding such situations is sometimes simple to do, of course, but in many cases it can be a surprisingly difficult challenge. |
Sensitive clients will want that glare to be minimized, even if it means sacrificing some aesthetic effects, but others won’t mind so much and will accept the fact that there are places where they’ll be exposed to glare. As a designer, I lean to the sensitive side: When I look at a space and see a point of light shining directly back at me, I immediately start thinking about ways to soften the effect, mainly because I want to avoid the visual distraction.
Even if I’m successful in that effort, however, I let my client know that if someone moves through the landscape into an area we might call a secondary or tertiary viewing position, then it’s very likely he or she will be exposed to glare.
With that in mind, I spend a good portion of my design time understanding where the primary viewing areas are going to be and how to optimize effects from those vantage points. That sounds simple enough, but it still requires some care if you want to avoid basic mistakes.
If, for example, you’re lighting a planting area in the front of the house, you wouldn’t be mistaken in assuming that the primary viewing angles are out on the street or from the driveway or along a front walkway. But there can be trouble if, additionally, the homeowner has an easy chair inside the house and likes to look out the window above that planter. If you lack information on this second primary viewpoint, you might well place a fixture that shines right up into the client’s eyes every night.
Clearly, this is a communication issue, and I spend lots of time talking with a client about personal habits and preferences at the same time I’m trying to figure out how much glare he or she might be willing to tolerate. Armed with all that information, I can begin planning a lighting scheme that achieves the desired aesthetic effects while eliminating (sometimes painful) visual distractions.
This information drives lots of decisions. If, for example, the client is interested in a moonlight effect or wants to light a statue or piece of sculpture, there’s really only one spot in which to place a fixture and glare is likely to be a factor from several angles. Some clients will want the effect and won’t care about the glare in this specific case; others, however, will prefer to live without the effect, however desirable, simply to avoid any visual pain.
MECHANICAL SOLUTIONS
The information gathered so far gives me what I need to decide which methods I’ll be using to control glare. There are basically two, the first having to do with shields, baffles and lenses installed on fixtures, the second about objects in the landscape (rocks, dense plantings or architectural features) that can be used to mask light sources.
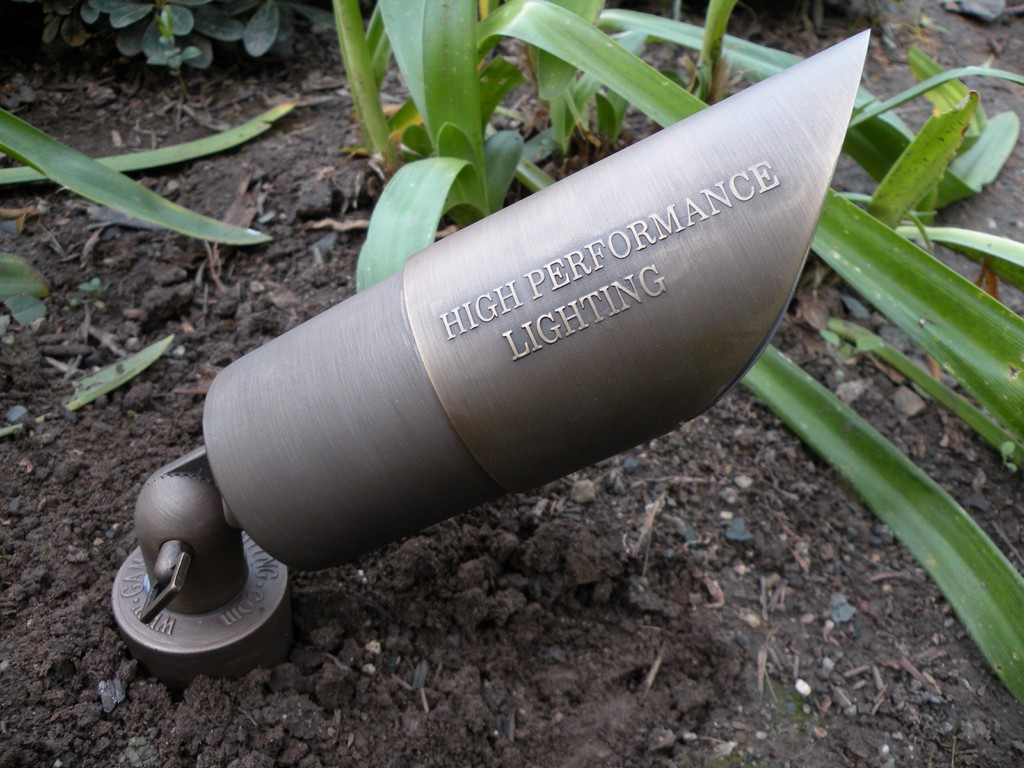
| The long, adjustable shield on this bullet-style fixture can be positioned to favor the primary viewing area and block a source of unwanted glare. |
With fixture components designed to mitigate glare, it’s important to recognize that they significantly limit the spread of the light and its characteristics. If you take a raw lamp (lamp being the term lighting people apply to what most of us call bulbs) and shine it at a wall, it will have a tremendous spread; if you take that same lamp and put it in a fixture, the spread is reduced to an extent determined by how the fixture surrounds the lamp.
When you take another step and place a shield of some type on that fixture, you completely alter the lamp’s photometric qualities: It simply won’t cast light on objects other than those captured within a very narrow spread – and the longer the shield, the narrower the spread. So if you’re starting with a fixture that already has a small aperture, by shielding the lamp you can wind up with a light source that has a narrower beam spread. (You can counter that narrowing to some extent by moving the fixture farther away from the object that’s being lit, but then you open up a greater possibility that someone will be exposed to glare.)
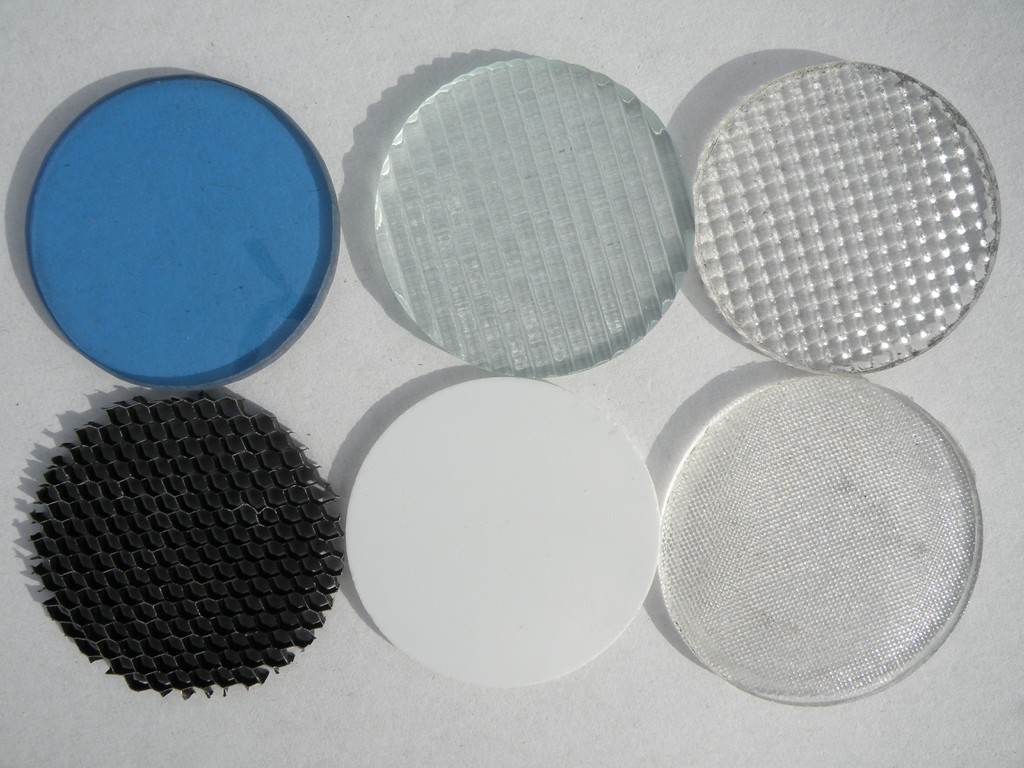
| A baffle (such as the honeycomb louver seen at lower left) or various lenses can be used in many situations to diffuse a light source or alter its photometric properties in such a way that fixtures become lesser sources of glare. |
My point here is that there’s a reciprocal relationship between controlling glare and achieving effective, desirable lighting effects – and it all folds back to the balancing act mentioned at the outset. There are situations in which shields and baffles have saved entire projects, but there’s no guarantee that you can solve every problem with them. And it’s also true that you might learn that glare is a problem only after the client has had a chance to live with the system.
With all of those variables in mind, let’s look at the three most common types of fixture-altering components you can use:
[ ] Shields: These devices include any additional part or extension of a light fixture that serves to conceal a lamp and lens. As suggested above, shields come in different lengths: The longer the shield, the narrower the beam spread becomes. Some shields will entirely surround the fixture and block glare from all angles except one, while others provide directional protection by shielding just a portion of a fixture.
As a rule, I avoid using shields that prevent water or debris from escaping the fixture. This is indeed a challenge, as many will be pointed at upward angles and can trap water or debris (a potential hazard). This is why I opt for shields that have spaces that allow water and debris to fall to the ground; generally, these are about 80 percent enclosed and 20 percent open.
[ ] Baffles: These are anything you add to a fixture that mitigates the light’s output or conceals the source from a given angle. In some cases, these might be structures that attach atop a lens – honeycomb louvers among them – and are effective in cutting down glare viewable from peripheral angles. These baffles don’t eliminate glare by directly blocking the light (as is the case with shields); instead, they work by reducing the glare’s intensity.
[ ] Lenses: There are many types of lenses you can place on fixtures to alter a lamp’s photometric qualities. They can be used, for example, to soften or diffuse the light, change its color or widen (or narrow) the beam spread. In landscape lighting applications, they should always be made of some type of tempered glass that will stand up to the heat generated by the lamp.
Most manufacturers do a good job of providing various forms of shields, baffles and lenses for most of their fixtures. While I occasionally will need to modify a component or even make one from scratch to suit a particular need, for the most part I can always find equipment that meets my needs. The key to selection, of course, is knowing what you need and understanding the effect it will have on a lamp’s characteristics.
IN THE LANDSCAPE
Oftentimes, of course, I find non-mechanical solutions when it comes to reducing or eliminating glare. As mentioned above, these include the use of rocks, plants and walls or other architectural features.
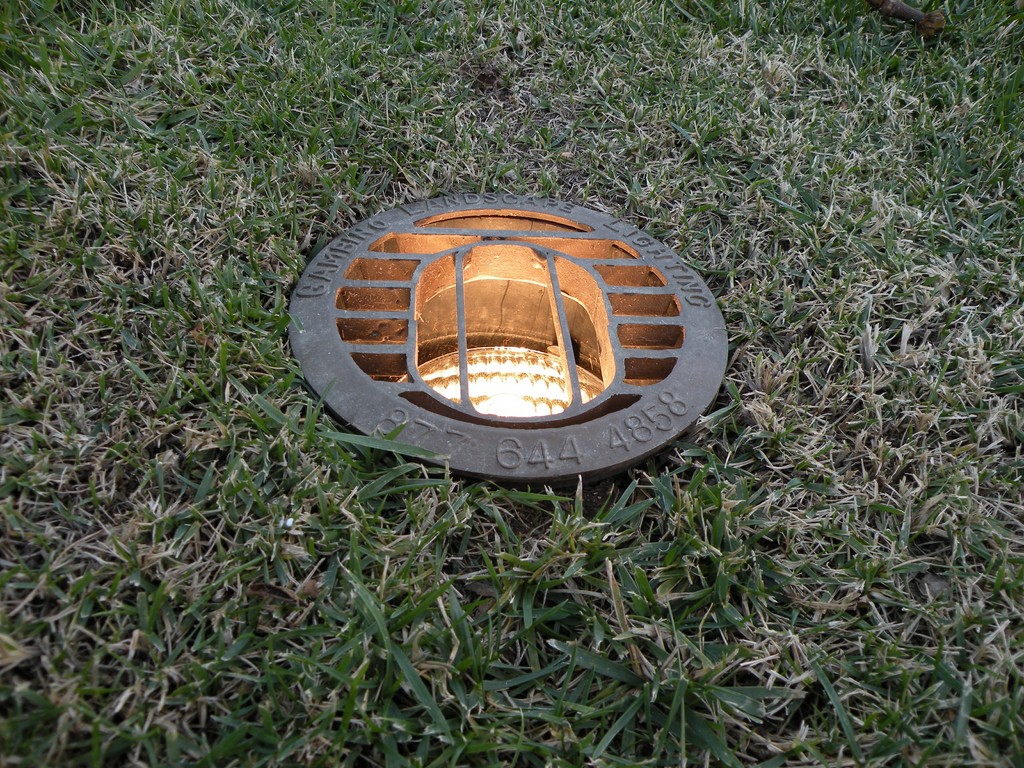
| Excellent glare control can be achieved with in-grade fixtures featuring deeply recessed lamps and brass grate covers (above). For path lighting, properly installed mushroom-type fixtures (right) are virtually glare-free because the light source is hidden within these fixtures’ bodies. |
Indeed, I’m always on the lookout for placements I can use to mask light sources, both because it saves on the expense involved in acquiring shields, baffles or lenses and because interesting effects can often be created by the way these “found” objects can block, reflect or even transmit light. Some foliage glows when lit, for example, and you can create interesting silhouettes in placing fixtures behind rocks or walls.
In fact, I’ve always liked to exploit these easy solutions to controlling glare whenever possible, and there have been many cases where I’ve worked with landscape designers or contractors to locate their rocks and plants to conceal my fixtures. Not only does this knock down glare, but it also conceals the fixture itself so that the source is always hidden.
Such simple solutions aren’t always available, of course, particularly when I’m working with architectural features such as walls, pilasters or sides of buildings – but I’m always considering ways those elements can worked into the overall lighting program. It all depends on the situation and the constraints of the space as well as the client’s priorities in terms of effects and areas to be lit.
As I noted at the outset, there’s no way to eliminate glare completely, but there are lots of available options that enable you to reduce it to the point where it ceases to be a distraction. It can be tricky at time (and can even lead to design compromises in some cases), but it’s always worth the effort: With landscape lighting, after all, the idea is not to be blinded by the light, but instead to be delighted and intrigued by it.
Mike Gambino owns and operates Gambino Landscape Lighting of Simi Valley, Calif. A licensed lighting contractor since 1990, he has specialized since 1995 on high-performance low-voltage systems. He may be reached via his Web site: www.gambinolighting.com.