


Up on the Roof

The fact that the vast majority of our landscapes exist on the ground floor has posed a challenge as city dwelling has become more popular: Relatively few urbanites are lucky enough to have ground-floor garden spaces to work with, but that in no way diminishes their desire to include garden spaces as components of their upper-floor environments.
Even without land for plants, people still want to come home to attractive gardens at day’s end. Although the first roof gardens date back to the Hanging Gardens of Babylon, city dwellers with only rooftop and balcony spaces at their disposal have been forced to get innovative, developing creative and sometimes highly unusual solutions.
Hence the emergence of “roof gardens,” which often combine spectacular distant views and dramatic cityscapes with creative hardscape and planting treatments – works of art that expand livable space as well as the value of these properties.
BASIC PRINCIPLES
It may seem otherwise at first thought, but designing roof gardens is not unlike other design projects once you accommodate a few constraints.
Those constraints can be serious as these are built environments. Mother Nature brings little to the table, so you need to deal in unusual ways with issues such as exaggerated temperature variations and wind effects as well as access, code and structural requirements. Moreover and quite important from the client’s perspective, these issues can inflate both sides of the time/expense equation.
With all these caveats, why would anyone willingly tackle roof-garden design? For me, it’s all about the clients: These people tend to have an infectious passion, looking at their tiny slices of the great outdoors as an amenity they can’t wait to use – even more so than many clients with ground-level yards.
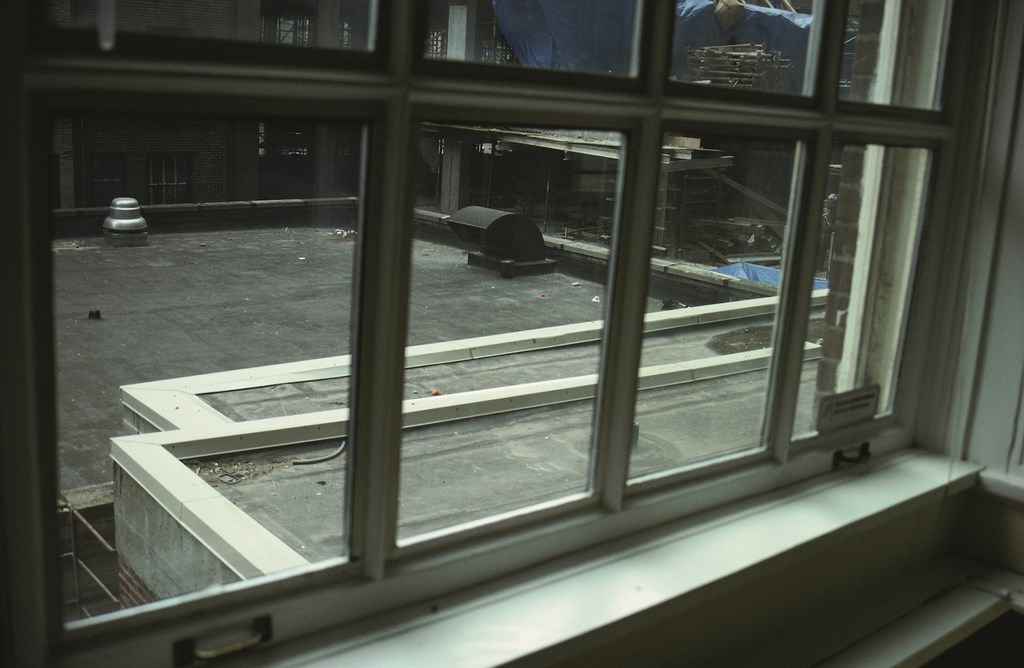
| Oftentimes, the initial view of the rooftop space is daunting and dreary, but the potential is almost always there to do something special for a willing client. In this case, the available space above a parking garage (defined by the white walls) doesn’t seem to offer much privacy, but a comfortable sense of enclosure still can be achieved. |
In considering a roof-garden design, I always start with a thorough site assessment, evaluating drainage, irrigation potential, accessibility and other building and safety issues. Before I start any design work, in fact, I am particularly motivated to assess drainage: After all, without somewhere for the water to go safely, a rooftop garden has the potential to inflict severe damage on the structure above which it resides.
It’s truly amazing to me how many roofs I encounter that are not properly pitched to accommodate drainage even though all it takes to get things right is use of a simple laser-leveling system or string line at time of installation. You wouldn’t think anyone would set up a roof without accommodating its need to drain properly, but in my experience, far too many rooftop gardens have had to be replanted at least once too often because architects and builders have failed to take this simple issue into account.
Moreover, too few architects or contractors seem to think about the potential functional uses of a rooftop space and therefore forget to provide hose bibs and irrigation connections. It’s easy enough to remedy the lack of water if you have enough money to throw at a project; condominiums in particular seem to present more than their share of structural issues that need addressing.
In checking out these issues, it’s also important to review local building and safety codes, with one obvious concern being whether the substructure can handle the extra weight. But that’s by no means the only thing you need to think about: There are also regulations that limit what you can place on a rooftop and how – as in historical districts, where you need to concern yourself with what might be visible from the street.
WEIGHING POSSIBILITIES
Consider a few of the practicalities: How, for example, are plant and construction materials going to get to the roof?
Whether by stairs, elevators or cranes, there’s a lot of porting of construction materials, equipment, soils and plants to be accommodated. While the crane option may seem cost-efficient in terms of time, remember that you need to get a permit (which can be a hassle in some high-traffic or narrow-street locations) and that cranes will not lift over high-voltage lines. Also important: Staging considerations may make it impossible for all materials to be delivered at once.
And let’s not forget that Murphy’s Law applies to the transporting of soils and plants: If dirt can leak out of a bag, for instance, you can be sure it will. And if petals from flowers will fall on the floor, they will – and it’s only the staining varieties that will get ground into the carpet by foot traffic.
Once you’ve determined everything that can go wrong and have planned accordingly to work these factors into your installation, you can begin designing within the constraints of the site as you have carefully defined and observed them. In my experience, it’s best to start by determining what type of environment your clients want to create.
In her book The Inward Garden, Julie Moir Messervy describes landform archetypes in light of the ways in which they mimic natural environments. In that context, roof gardens tend to fall into three categories: They can be cave-like, especially in high-rise buildings where balconies are stacked one atop another; they can be promontories or overlooks that provide dramatic views of the cityscape; or they can be islands in which the roof deck exists in a virtual sea of surrounding buildings.
| Looking at rooftops in archetypal terms, they can come across either as islands amid a sea of buildings (left), caves that envelop the exterior space (middle), or promontories overlooking a multi-level landscape (right, designed by Bernice Pink). The way these spaces are perceived depends on their surroundings,but in all cases you need to balance exposure and privacy in ways that make it easy, comfortable and desirable for people to move from inside to out. |
Recognizing the various feelings these roof-deck landforms generate makes it easier, as with their natural equivalents, to develop compensating strategies that will appeal to your clients’ emotions while meeting their basic needs.
Along with the emotional component of the space, the next most important site-assessment consideration has to do with the orientation of the deck to the sun and the prevailing winds. A southerly exposure guides plant selection to species that thrive in full sun, for example, while an eastern exposure is gentle to plants and opens you to a wider variety of choices through the absence of hot afternoon sun.
Similarly, where prevailing winds blow in from the west, a westerly orientation can be quite harsh, rapidly drying out both plants and their growing medium. On the north side, by contrast, the primary challenge is establishing excellent drainage, as it’s harder for shaded, damp soils to dry out.
A FEEL FOR THE SPACE
Then there’s the basic design necessity of controlling the flow, indoors and out.
In designing at grade level, we often create rooms or separate spaces in a garden and know that managing transitions from one area to the next is a key to the overall success of a design. The task is simplified with rooftop gardens – clients usually open a door and voila, they’re outside – but the concept of room creation is just as important here as it is at grade level because you have the opportunity to create a transitional space that promotes a positive emotional response.
After considering elements that constitute the “feel” of the environment, the next major design challenge with roof decks is integrating materials used outdoors with those inside, particularly when it comes to decking. One cost-effective solution involves staining wood surfaces as a complement to exterior walls.
The maintenance issue here is that stain will need to be reapplied periodically depending on the local climate and exposure to the sun. Fortunately, there are many options besides the usual cedar, which in my area turns a particularly depressing gray – just like dreary skies on rainy days. I particularly like Brazilian ironwood (known as Ipé). Synthetic woods are also available – but although these are maintenance free, they all too often look, well, synthetic, and availability in limited sizes also reduces their utility. There are various pavers as well: These can be set up with pedestal systems that keep the deck level no matter the pitch of the underlying roof. Ultimately, such choices relate somehow to budget, in which case I’ll take all the options I can get.
After determining which decking and container/planter material you’ll use, it’s time to select an appropriate plant palette and decide how your choices will be contained.

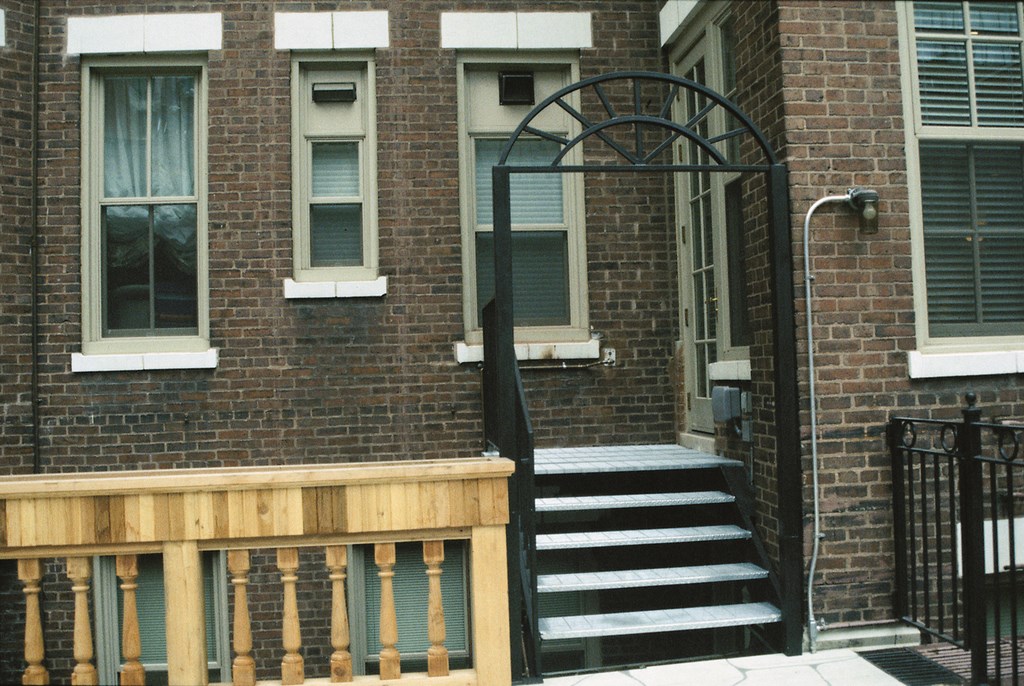
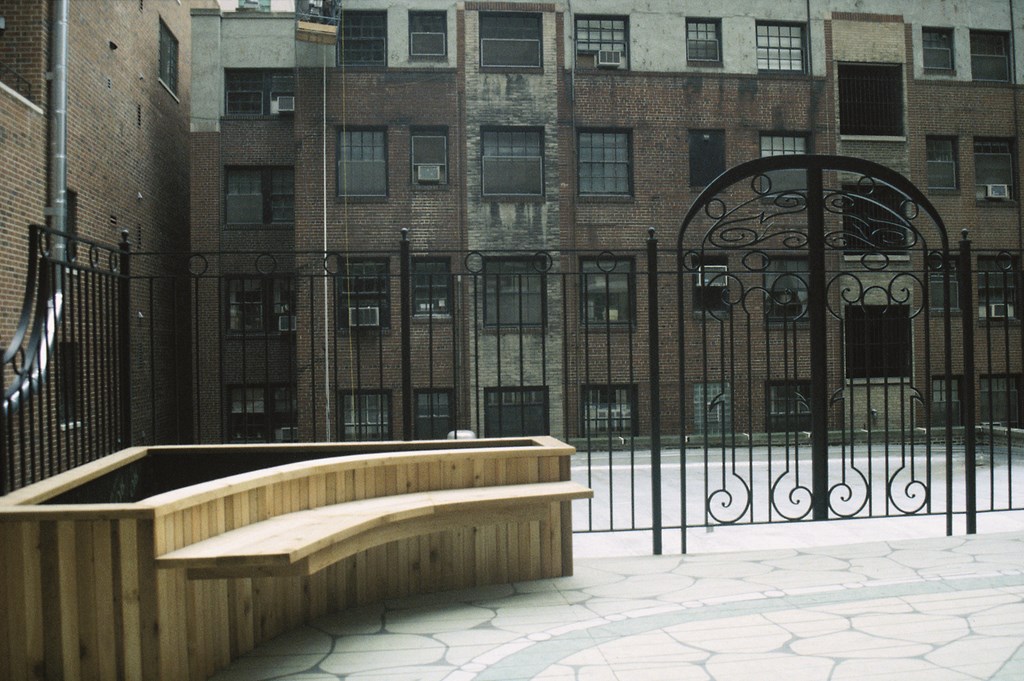
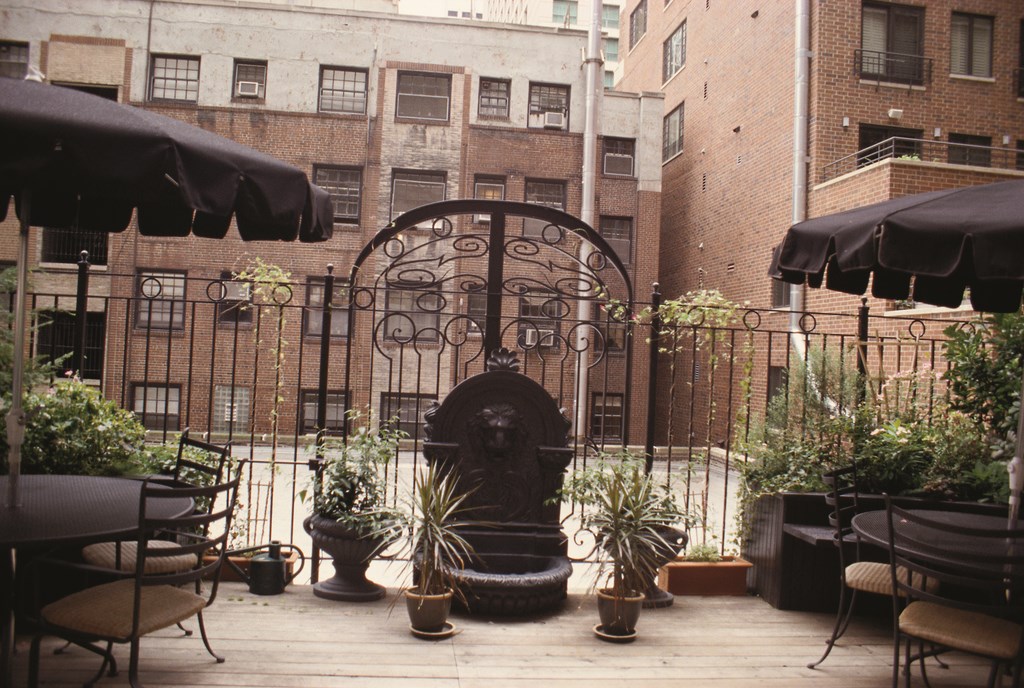
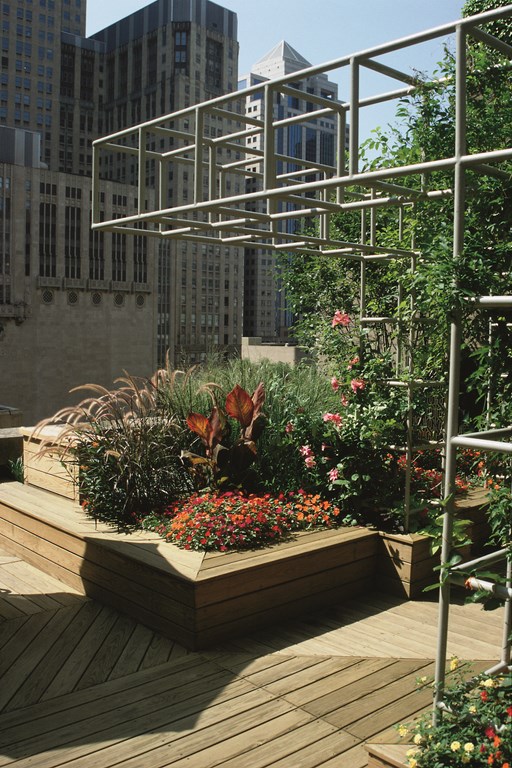
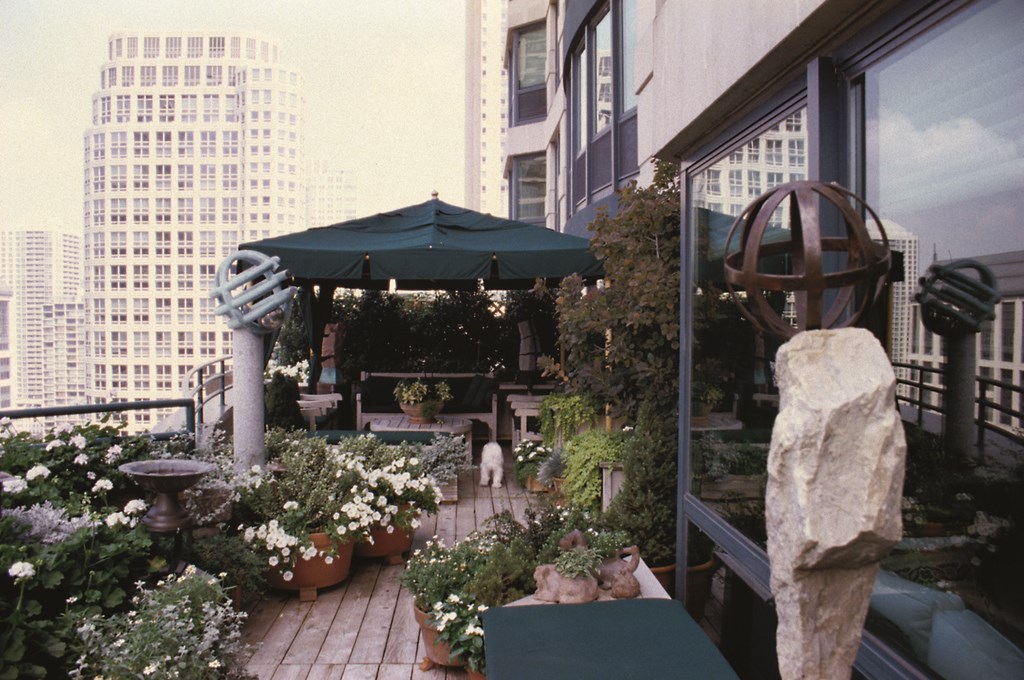
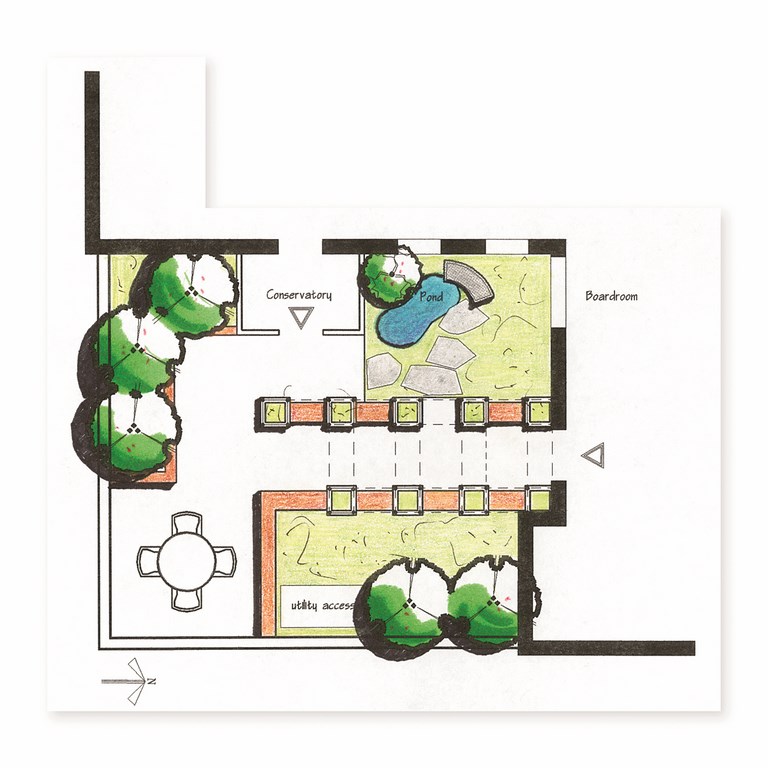
| For this island-type roof deck (left), the first phase involved the installation of new, wider, more gracious steps to provide access to the deck. Steel arches over both the entrance and the fire escape from upper floors were added to humanize the scale (they’re about 10 feet tall), while the planter box to the left of the stairs provides security for the open-air well below (middle left). Next, a six-foot-tall iron fence was installed around the perimeter of the deck, fronted by semicircular planters with built-in seating at two corners (middle right). The ornamental gate – a classic French look – provides a focal point for the center of the deck. In the final phase, we added a small fountain and an umbrella (right) – elements that continue the program of bringing things down to human scale. |
Unfortunately, there are few resources that will tell you how various trees and shrubs will do on roof decks. Most information to be had is in books on container gardening, but I generally rely on my own sense and experience of the microclimates in each part of a roof on which I’ll be planting with the biggest challenge having to do with giving roots enough room to spread out.
The hardiness challenges related to a tree such as a Japanese maple, for instance, are minimized in a sheltered east-side location, but I’d never recommend one for a windy west-side orientation. Another guide can be to look at what does well in surrounding urban streetscapes, as these plants have their own sets of stresses that often mimic those found on decks up above.
In addition, with perennials and groundcovers I change zones and look for plants that are hardy at least one zone colder than my site, thus maximizing their potential for success.
MAKING CHOICES
To enhance the appeal of upper-story spaces, I like to create distinct social areas within my roof gardens. Often, these are barbecue/cooking areas that include (at a minimum) countertop serving, a place to pull up a stool and talk to the cook and storage for frequently used items, cushions or firewood. These areas often do double duty as transitional or entrance/foyer spaces.
As for seating, it’s important to have enough comfortable chairs for the primary family. For urbanites who like to entertain, I’m also a big proponent of built-in bench seating: This gives my clients lots of flexibility and eliminates the need to buy (and store) cheap white-plastic chairs.
Clearly, I’d like to be as confident in recommending plants as I am in arranging for adequate seating, but my basic observation with roof gardens is that I’d love to have access to a really good crystal ball. There’s just no foolproof way to anticipate the weather patterns that will prevail as plants enter and leave dormancy, which is why I place a premium on good insulation and drainage and see them as the best means I have at my disposal to ease plants’ passages through periods of harsh weather. (And I’m not above helping out by applying anti-desiccant sprays to evergreens as a late-fall treatment.)
But make choices I must, so there always comes a time when I must consider how I’ll install the design and create the planting beds.
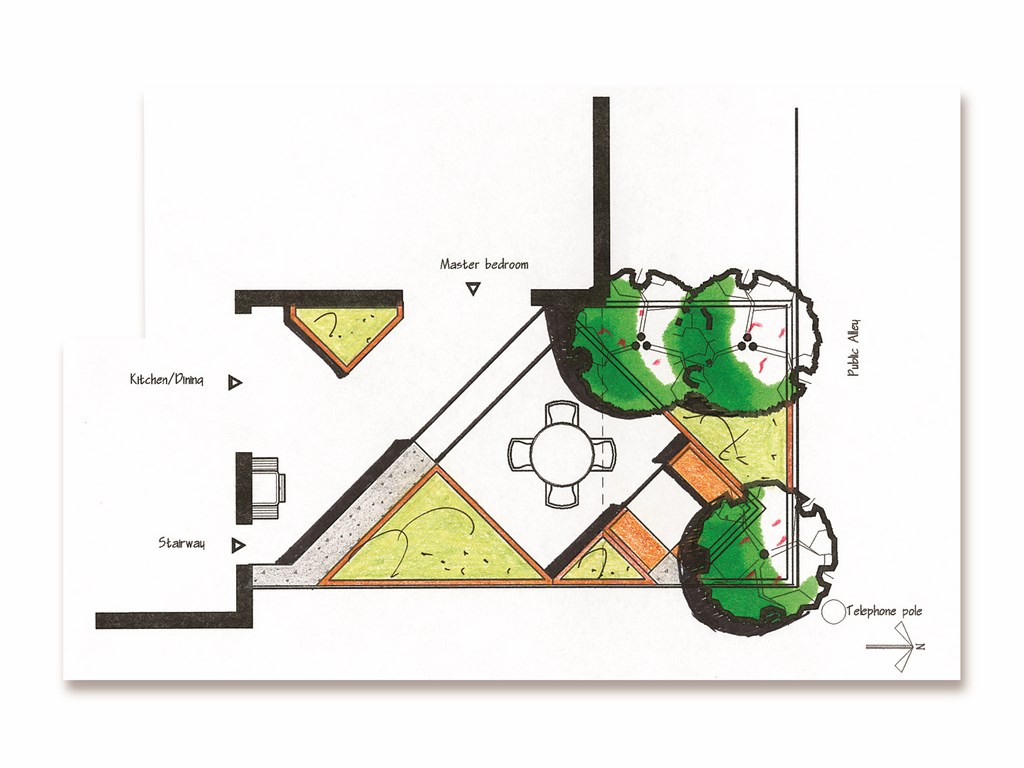
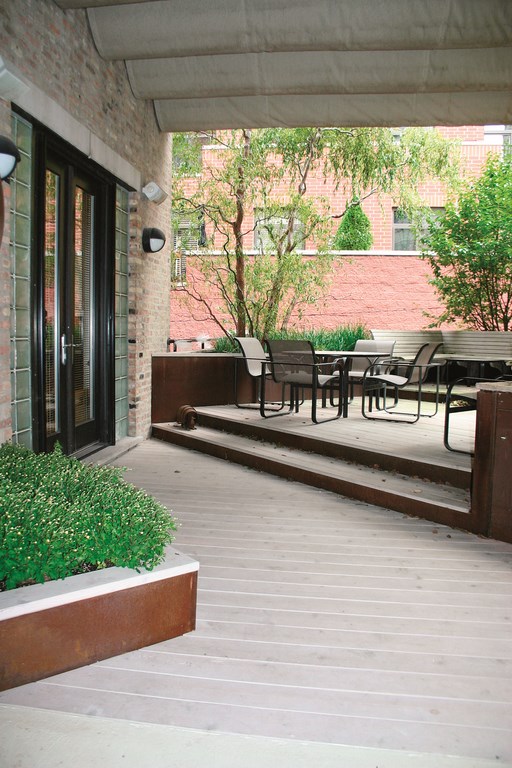
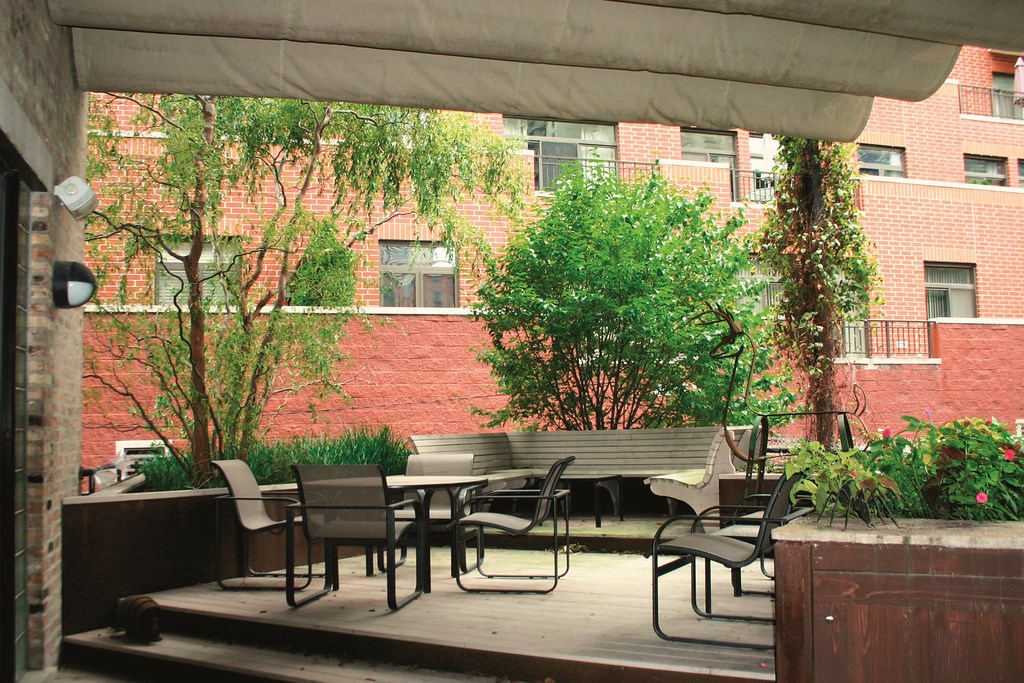
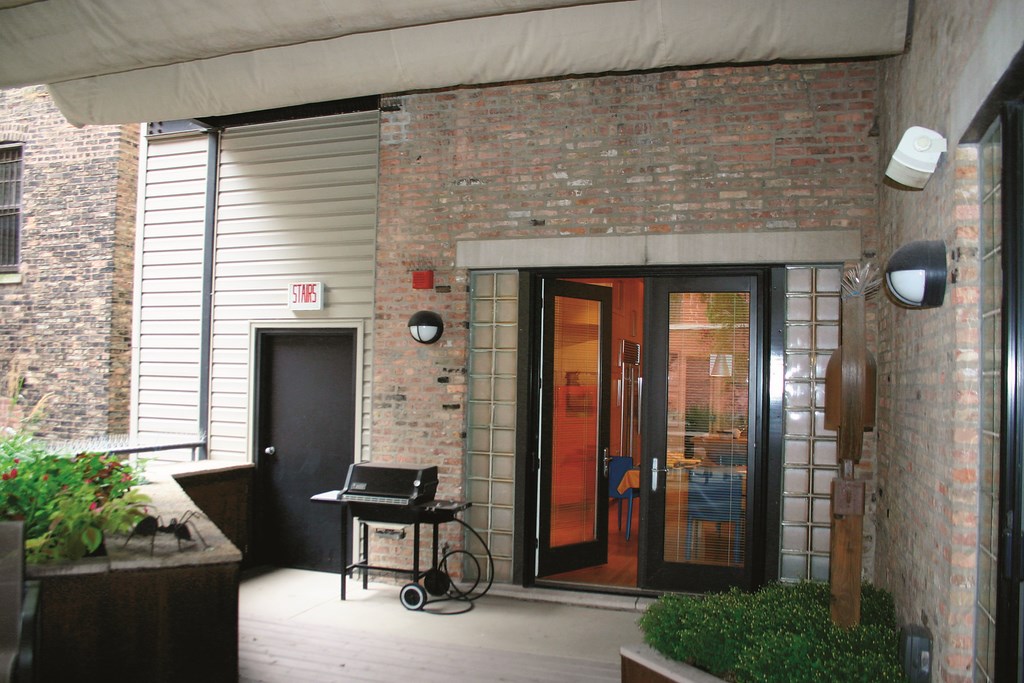
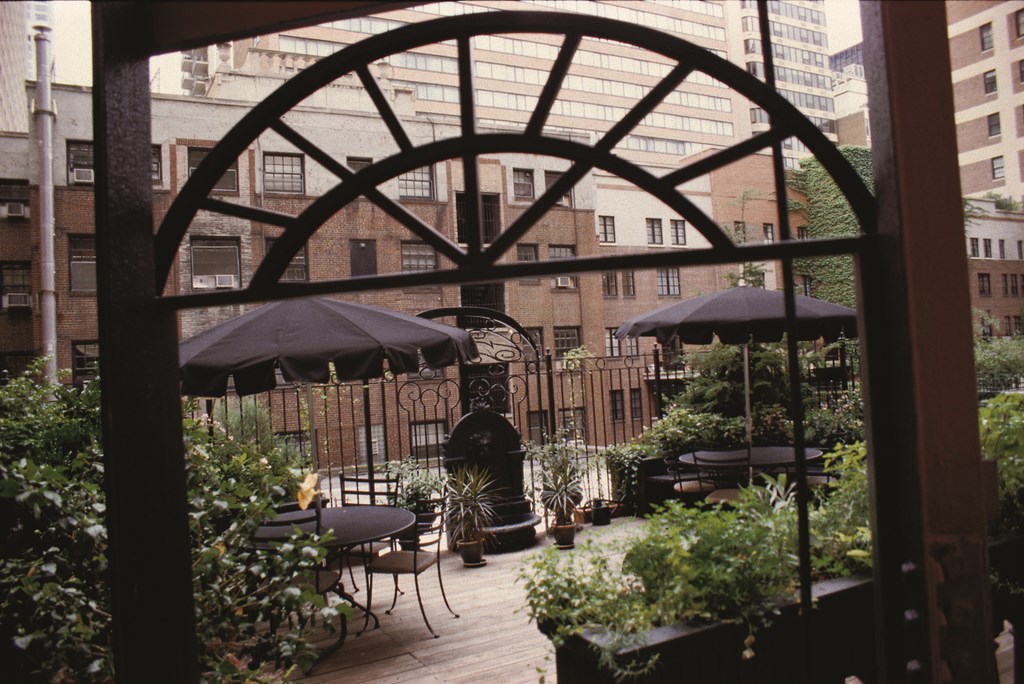
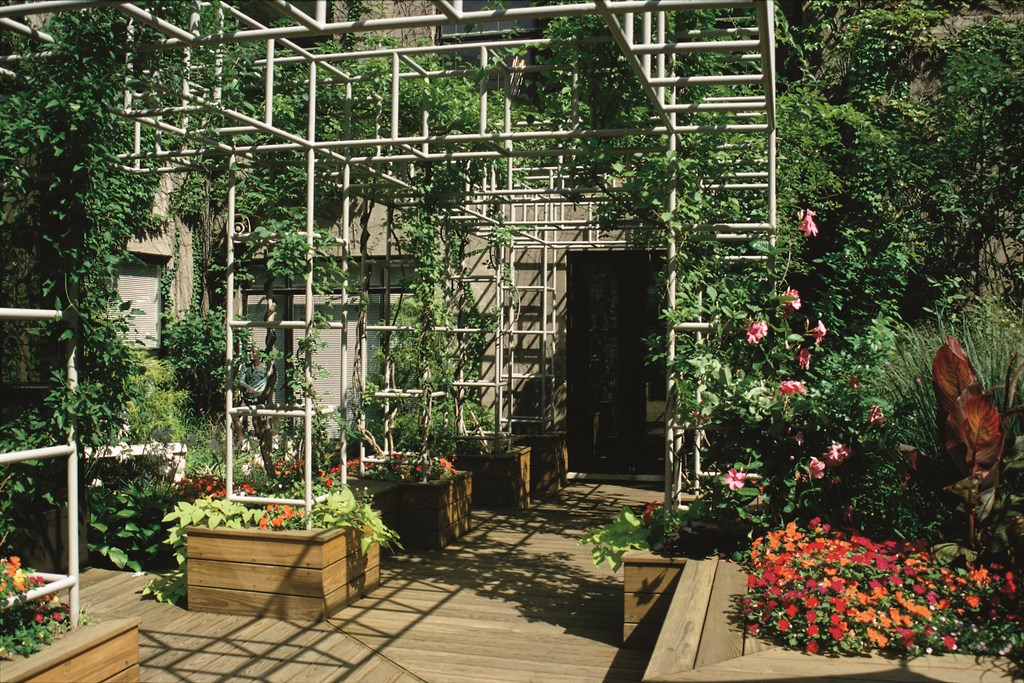
| In this cave-like space (left), the approach involved breaking a small outdoor space into even small rooms: an entrance/cooking/wood-storage area, a middle dining area and a sunning area beyond the overhanging deck – a structure emphasized by putting the deck on three levels. A canvas awning over the atrium area minimizes the filtering of debris from the deck above (middle left), while a Cornus mas (Cornelian Cherry Dogwood) serves a similar masking purpose by hiding a large utility pole (middle right). All the wood surfaces were stained a neutral color to complement the awning and interiors, while the vertical surfaces were clad with steel (right). (We didn’t want rust to run onto the deck, so we left a reveal between the flooring and the steel for drainage.) |
In my region, green roofs are promoted as a means of improving air quality, reducing roof and ambient temperatures and minimizing stormwater runoff while conserving energy through their insulating capabilities. That’s a great and noble set of goals, but the practicalities involved in making them happen require uncommon care on the part of both the designer and installer.
On typical green roofs where I work (Zones 4 and 5), perennials and groundcovers are placed in very shallow soil – typically no more than four inches of soil on top of the drainage medium – while trees and shrubs go into about 12 inches of soil.
Plantings in soil that shallow are made possible by the fact that rooftop gardens have gained so much popularity and acceptance that many innovations have evolved to address the unique needs of plants in these upper-floor environments. One such innovation is “engineered soil,” which offers superior support and plant performance regardless of the depth of the container.
SPECIAL SOILS
Known as “green roof media,” these soils are composed of roughly 50 percent expanded aggregates such as shale, slate or clay (fired at high temperatures), while the other half is made up of equal amounts of sand and organic matter. The exact proportions and compositions depend on local availability of aggregates and the specific plants to be grown.
These engineered soils are superior to typical planter mixes because they are lightweight, don’t compact, provide long-term nutrients to plants and have excellent drainage properties. (It varies, but these soils weigh just 20 to 25 percent as much as similar volumes of common soil.) In deeper planter boxes, I install these soils in compacted three-to-four-inch lifts.
As for containers, although I size them in direct proportion to the size of the deck, I know that bigger is better in the case of rooftop gardens because the greater volume of soil gives the plants more room for root growth. In addition, soil temperature and moisture stay more uniform in larger containers than in smaller ones – all the more reason to maximize container sizes within the bounds of good design.
One trick I use, particularly when space is at a premium, involves building planter walls 18 inches high: This allows me to include some bench seating as part of a widened planter-box cap.
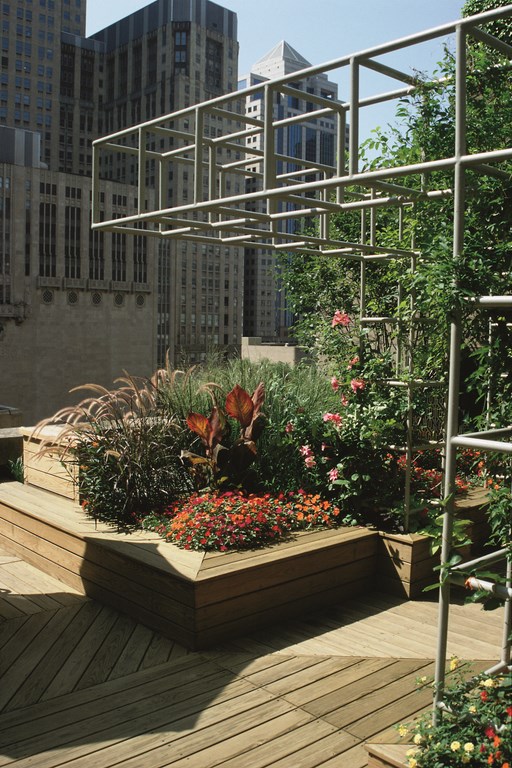

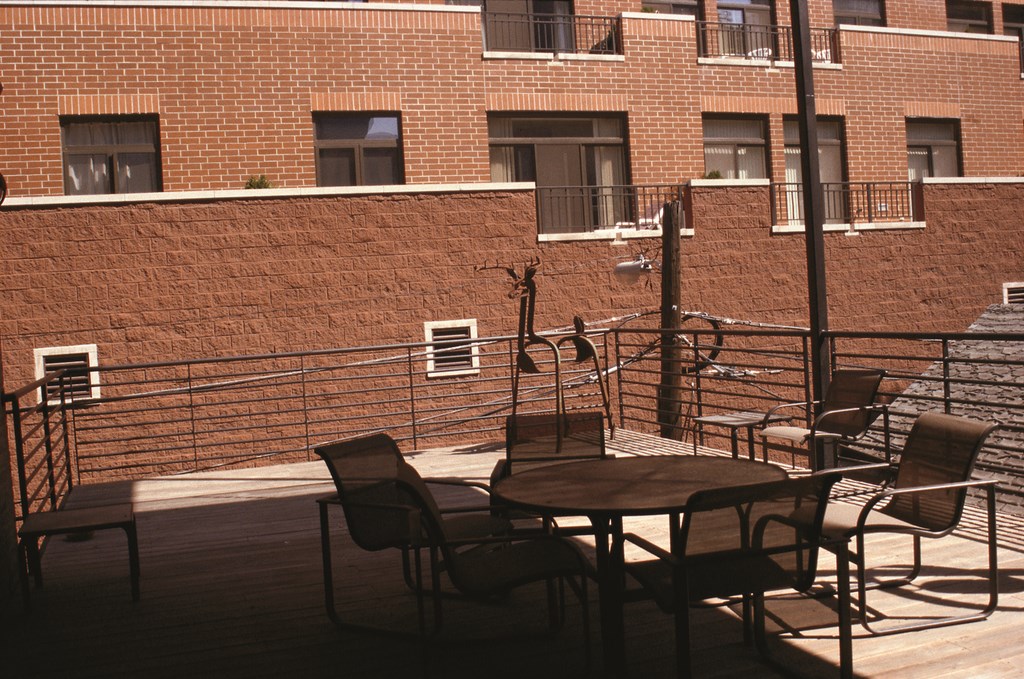
| On this promontory rooftop (left), spring begins with the flowering of Amelanchier x grandiflora (Apple serviceberry) and bulbs planted with complementary shades (middle left). This abundance is made possible by engineered soil mixes and excellent drainage that allow the plants to thrive rather than rot. The powder-coated steel trellis provides a comfortable sense of scale while defining access to the space from the office area (middle right). The caps of the planter boxes throughout are designed for casual seating (right) – a nice, welcoming setting for a break from the day’s routines. |
With the boxes themselves, the options are many and various. I’ve made wooden boxes and clad them externally with metal – copper, tin or steel, for example – or made them entirely from metal. I usually line the vertical sides of planters on the inside with an inch-thick piece of Styrofoam: This insulation protects roots from overheating in the summer and from freezing in the winter. (The bottom is generally insulated by the building – although you never want to place planters directly on the roof membrane.)
Wherever you have freeze/thaw cycles, it’s also a good idea to use cross bracing inside the planter so the boxes don’t expand or become distorted while enduring freeze/thaw cycles. This is another case where my familiarity with these microenvironments and the extremes of winter weather proves helpful.
My experiences in these respects definitely come into play in setting up “window boxes” mounted on the top of railings. Specifically where I work, I set them up with internal dimensions of at least 10-by-10-by-10 inches, and I also use a galvanized tin lining inside so I can completely control the runoff of irrigation water: The last thing I want to do is “endear” my clients to downstairs neighbors by splashing or dripping water onto lower decks.
WATER WORKS
Based simply on my observation that not even the most dedicated of my clients will commit to twice-daily watering schedules, my roof-garden designs almost invariably come with recommendations to install automatic irrigation. Where I work, a week or more of hot, dry, windy days can be a recipe for disaster without an automatic system.
|
Damage Control I mentioned Murphy’s Law briefly in the accompanying text for good reason: Experience (sometimes painful) has taught me to leave little or nothing to chance when it comes to protecting my clients from the sort of damage rooftop construction often invites. Since the potential for damage to interiors is quite high when roof access is limited, for example, I always have my workers wear disposable hospital booties whenever they need to walk through an interior space – especially when carrying materials up the stairs or over the clients’ new cream-colored carpeting. Self-adhesive carpet-protection film can be a real help, too: Thanks to this material, we once wheeled 60 tons of soil through a set of corporate offices without doing any damage at all to the beautiful (and expensive) carpeting. — R.R. |
In setting up such a system, it’s critical for both the designer and the irrigation installer to monitor the situation through the first few weeks: Too much or too little water can lead to an early demise—even with xeriscapes: It’s important with drought-tolerant plants to provide supplemental irrigation to help them get established.
For projects with engineered soils, I shy away from basic drip-irrigation systems. Although they might work wonders in containerized gardens, their performance with this medium leads me to great caution: These soils have only limited horizontal-wicking properties, so with a drip system, water typically runs straight through to the drainage medium. Instead, I see overhead irrigation that mimics rainfall as a more reliable solution.
The goal through all of this is establishing rooftop gardens in ways that turn unused or neglected spaces into beautiful, functional areas. This is where designing these spaces most resembles work on ground level: It gives me the opportunity to expand interior spaces visually while increasing the usable square footage of a property. In that light, not building rooftop gardens is almost a crime!
It takes some planning and a bit of insight into the challenges that come with these sites, but armed with good information, any designer or contractor can use rooftop gardens as a unique environment for showcasing valuable skills and capabilities.
Rosalind Reed, APLD, has been a landscape designer for 16 years and, as principal of Rosalind Reed Associates, specializes in residential and roof gardens. Through the years, her work has been published in Fine Gardening, WaterShapes, Chicago Tribune and many regional newspapers. Her former garden in Oak Park, Ill., was featured in Julie Moir Messervy’s and Susan Susanka’s book Outside the Not So Big House: Creating the Landscape of Home, and has won gold merit awards from the Illinois Landscape Contractor’s Association and recognition by APLD. For the past four years, she has been named as one of Chicago’s top landscape designers by Chicago Magazine and has earned excellent reviews on professional-development lectures she has given at the Chicago Botanic Garden, the Olbrich Botanic Garden in Madison, Wis., the Colorado Landscape Contractors Association the Perennial Plant Association’s national conference. She also teaches for the School of the Chicago Botanic Garden Certificate Program, is a certified member of APLD and has served on its Board of Directors in addition to holding leadership positions in many local green-industry organizations. Her work can be seen at www.rosalindreed.com.