


Flowing in Light

Today’s swimming pools, spas and waterfeatures have moved several steps beyond their traditional, classic forms in shape, complexity, visual interest and beauty – and so have the techniques and technologies involved in giving them a warm, inviting glow when evening comes.
Happily, we’re far past the bad old days when the common solution to most watershape lighting tasks was placement of a blinding, 500-watt incandescent bulb in a huge, visually intrusive niche: Through years of innovation, experimentation and refinement with light-emitting diodes (LEDs), lighting is now adding splendor and wonder to the pool/spa experience in compact, unobtrusive packages – a design asset that couldn’t even have been imagined 20 years ago.
But still, finding just the right way to achieve desired and desirable lighting effects can be a challenge, particularly when the water is moving. To explore this task and, I hope, shorten your learning curve, the fourth and final part of this series on the lighting of pools, spas and other waterfeatures will step beyond the static systems discussed in previous installments and travel to new frontiers where water goes vertical and passes from one level to another.
TASKS AT HAND
In some cases, of course, the lighting of water in motion is handled in the manufacturer’s shop and is simply a matter of selecting and installing a light-emitting bubbler or jet fixture per instruction. The results are no less wonderful than if the designer or builder had worked out the specifications, but in the context of this series, let’s move on to situations in which the watershaper on site has everything to do with achieving ambitious after-dark effects.
In doing so, let’s begin with the narrow troughs found with many spillover spas, then move on to waterfalls (including spillways and scuppers) and grottoes – and then, finally, to vanishing edges.
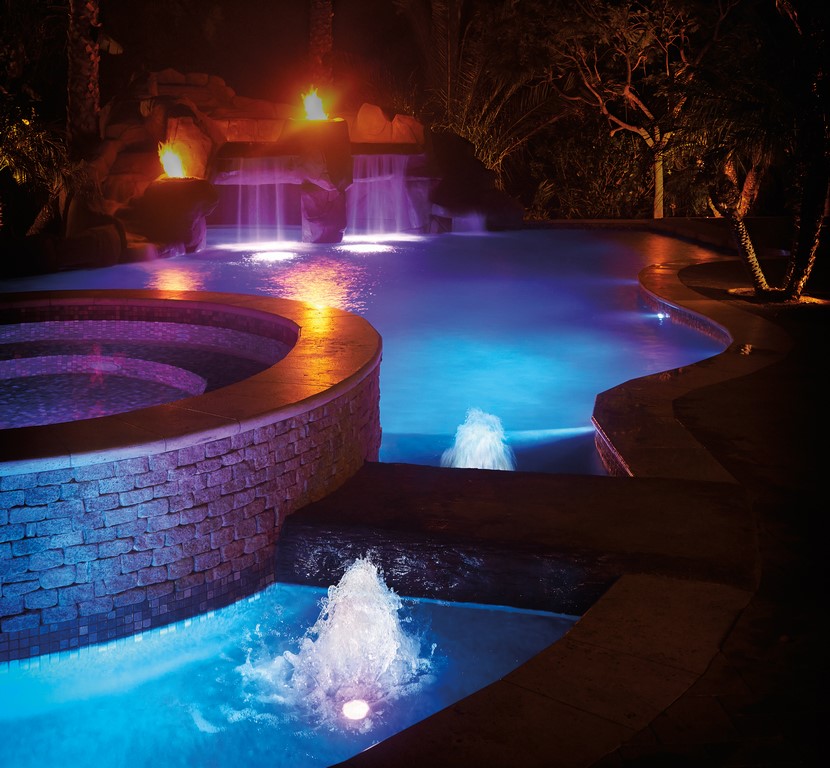
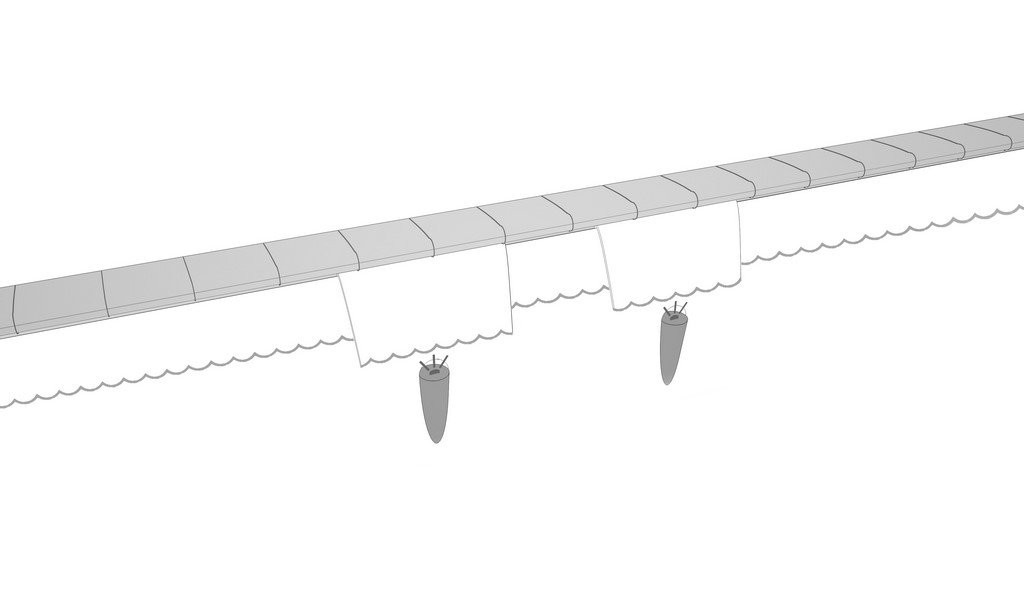
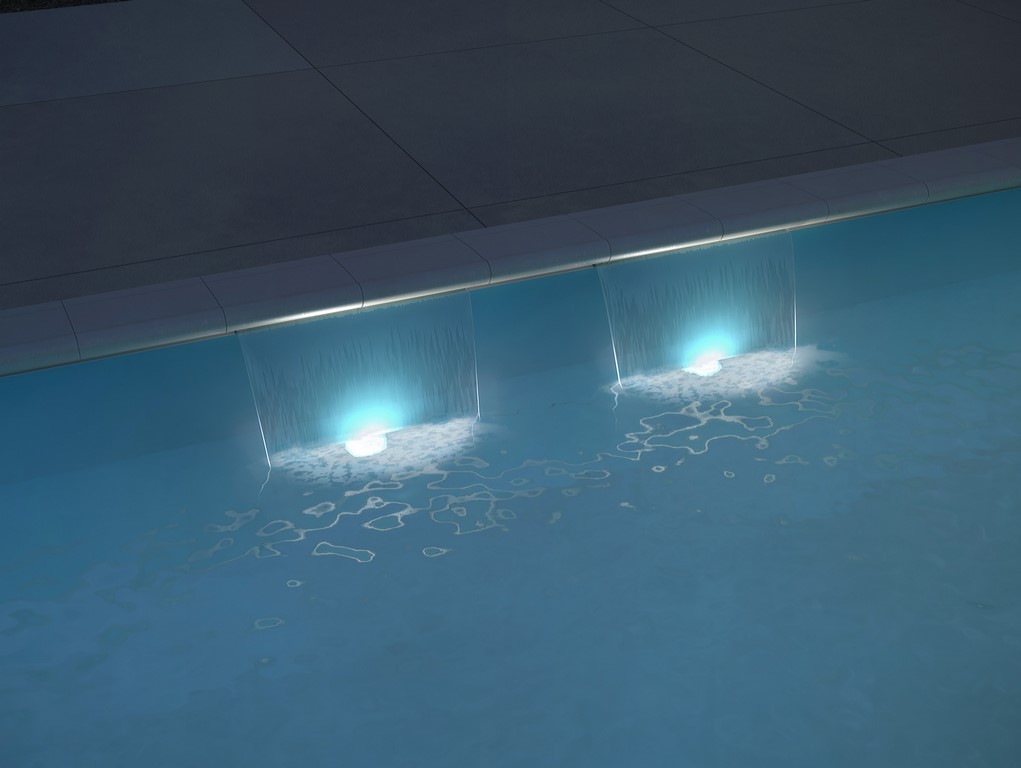
Raised-Spa Gaps
An increasingly popular feature with today’s raised spas is a narrow-gap trough – a cool detail on its own but one that gets even better with a thoughtful lighting approach that sets off a bubbling spa like a diamond in a jewel box once the sun sets.
| Raised spa surrounded by a lightable trough |
Many of these spas operate with perimeter-overflow effects on multiple sides, raising the stakes of the visual statement. And lighting these troughs is easy so long as there’s a five- or six-inch gap in which low-wattage light fixtures can be placed to point down the length of each section of trough and shed light on water that flickers as it flows over the spa’s edge and down into the gap.
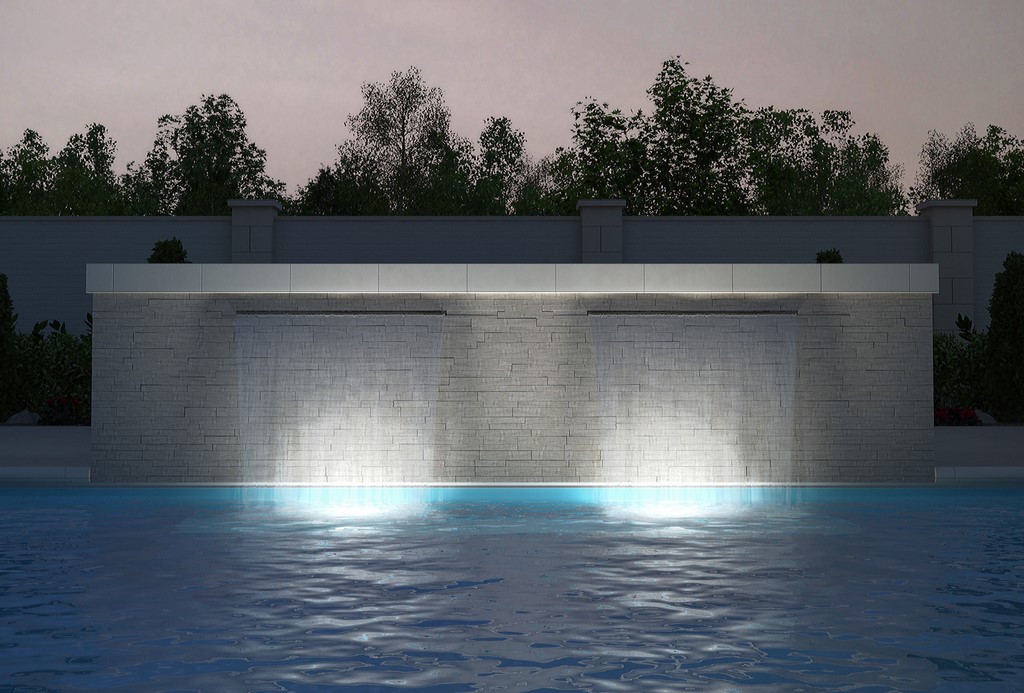
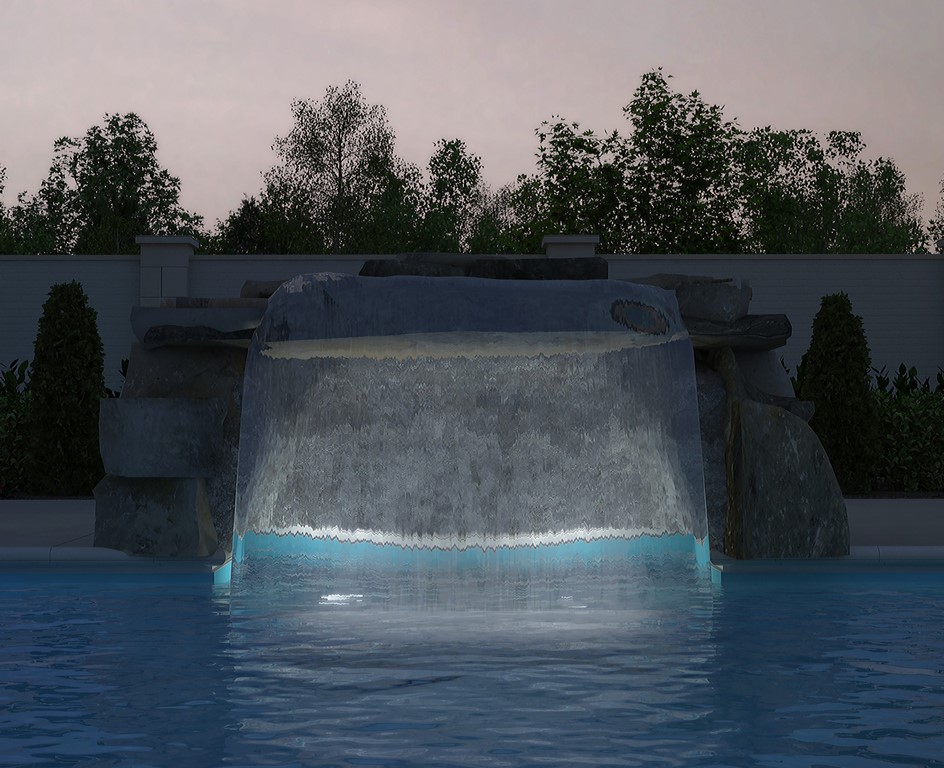
Waterfalls
Lighting waterfalls has been a watershaping challenge for a long time – but it’s also become an increasingly important task given the more frequent inclusion of these features with today’s pools and other watershapes.
|
Need Help? If you get to a point where you need help in devising a lighting scheme, you should know that most suppliers of submersible lighting products are more than willing to lend a hand – usually free of charge. The reasoning behind all of that support is clear: Their success depends on yours! — G.O. |
It’s no secret that illuminated waterfalls (including scuppers and spillways as well less formal weirs) tend not to look as good in person as they do in the manipulated images found in brochures, catalogs and web-site galleries. That deficit can’t be completely eliminated using today’s technology and techniques, but with some careful planning, it’s possible to come very close to meeting the design objective of providing a good glow from top to bottom of the effect.
If you try working from the water’s source, as many suppliers of top-lit systems suggest, physics is your opponent: Light does not “bend” to follow the flow as the water pushes out of a scupper or spillway or breaks over a waterfall’s weir and drops into a pool or basin. Some portion of the light shows up because of reflections within the water stream (this is how laminar jets work, with the light being reflected within the coherent, arcing tube of flowing water), but with the rougher flow out of typical spillways, scuppers or waterfalls, much of the intensity is lost in a matter of inches.

|
This is why the best approach to lighting waterfalls, scuppers and spillways involves working from below – down in the splash zone – so the light works its way straight up through the flowing water to a point near its source. This light transmission isn’t flawless, and there’s something to be said for combining a top-down with a bottom-up approach, but working solely from below, the water catches the light well enough that it can travel all the way upstream if there’s a good, somewhat coherent vertical drop.
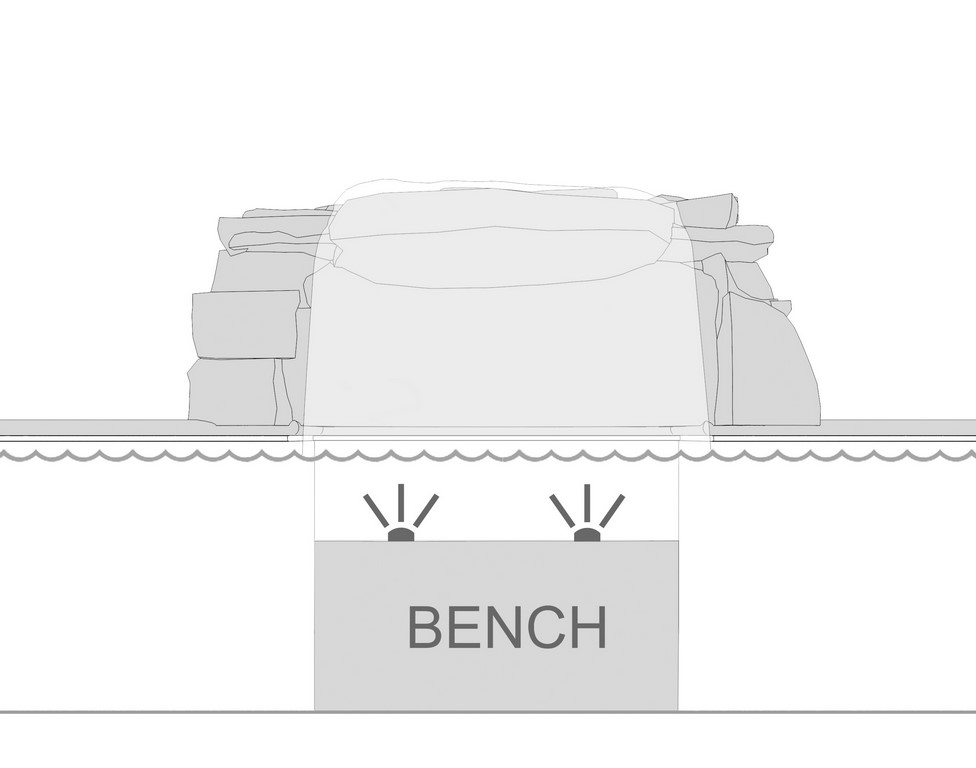
These up-lit effects work best if the waterfall drops into a shallow area or onto a bench: The shorter the distance between the light source and the water’s source, the stronger the illuminating glow will be from top to bottom. But if you do include a bench or ledge, please note that, for safety, the light fixtures need to be recessed into the horizontal surface and/or covered with appropriate guards to protect the lenses from curious fingers or wayward feet.
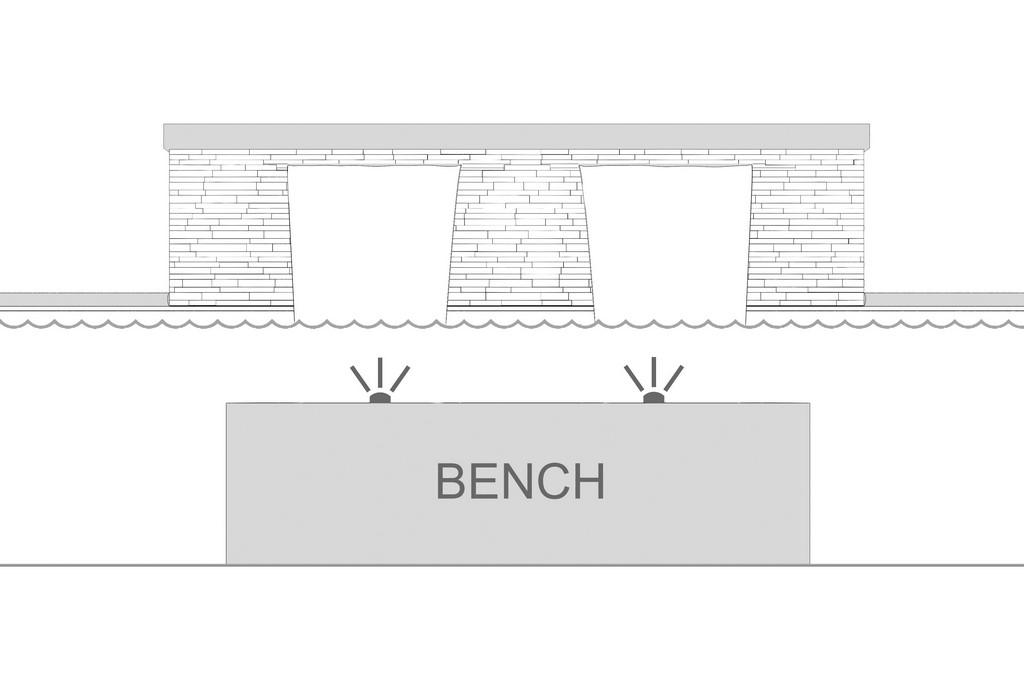
| Raised waterfall installed over a bench |
If, by contrast, the water beneath the waterfall’s point of entry is deep – say, at a level more than four feet under water – the light will likely be so dispersed as it rises through the water that it won’t have the desired intensity by the time it reaches the source of the fall. So you either need to think in terms of a top-and-bottom approach or of inserting a bench or shelf that offers a shallow lighting source.
Another possibility: Insert the LED fixtures in sconces that protrude from the wall’s vertical surface. This sconce approach isn’t usually a perfect solution – it’s difficult to get the angle of the light to correspond closely enough with the flow of the waterfall to optimize transmission – but it’s a step in the right direction.
| Coping waterfall over angled wall sconces |
And actually, sconce-type lights work well if you’re lighting the flow at the end of a waterslide. While the light source may not be directly beneath the splash zone, the turbulence of the water in these spots will make things glow fairly well – a desirable safety factor – and there’s even the possibility that a fair portion of the downward flow will be lit up as well.
Making these details work can take some experimentation with wattages – not to mention careful planning for fixture placements at appropriate intervals along the waterfall’s point of entry – but there’s no doubt that when these lighting schemes work, the effect dramatically enhances the nighttime appearance and appeal of a waterfall, spillway or scupper.
Grottoes
What child’s imagination doesn’t run wild when he or she thinks about the mysteries within a water-filled cave? It’s wonderful enough by day, but the effect can be even more mesmerizing by night if the space is properly lit.
| Large grotto and waterfall placed over a bench |
The most substantial goal here is to make certain reflections of shimmering water play on the grotto’s walls and ceiling – a move that requires use of the same shallow-water/bench/step approach used to make the most of waterfalls. The safety rules hold here, too: Any lights set on horizontal surfaces must either be recessed or protected by some form of guard.
When this effect works, it’s even more appreciated when the kids go to bed and their parents have the chance to head for the grotto for a bit of relaxation and quiet conversation amid the dancing light!
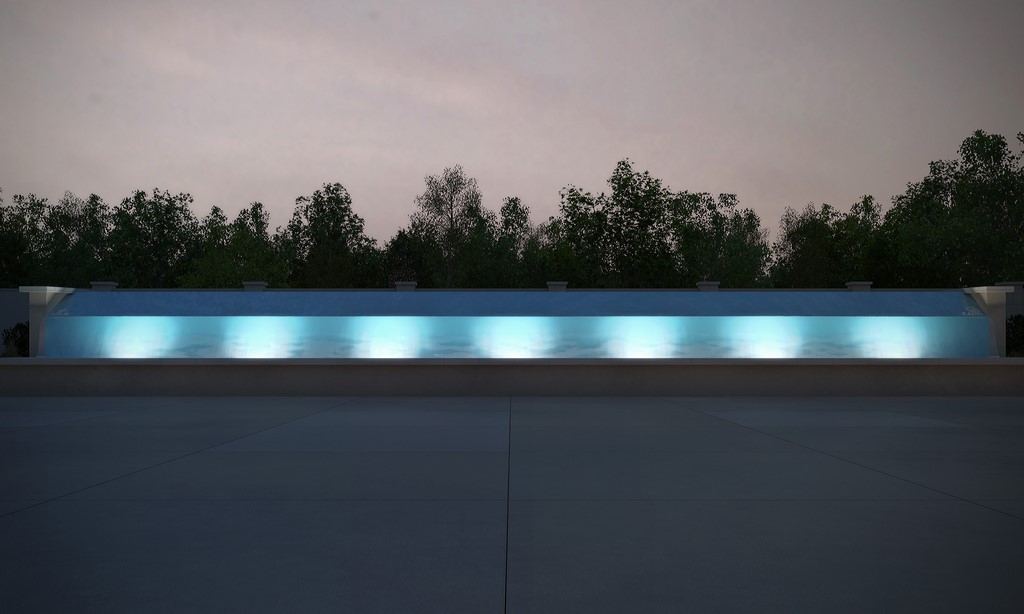
Vanishing Edges
These features, also referred to as negative or infinity edges, have been popular for decades and are desired because they create an illusion that a pool is without a solid boundary – a particularly effective illusion in water-on-water situations where a pool is set over a lake, pond, river or ocean.
The lighting task here mostly has to do with the catch basin or trough beneath the outside wall of the vanishing-edge effect: There’s a substantial “wow” factor in this view no matter whether the edge flows toward the house or is something passersby will see as they float by on the adjacent body of water or walk by in an open setting along, for example, a golf course.
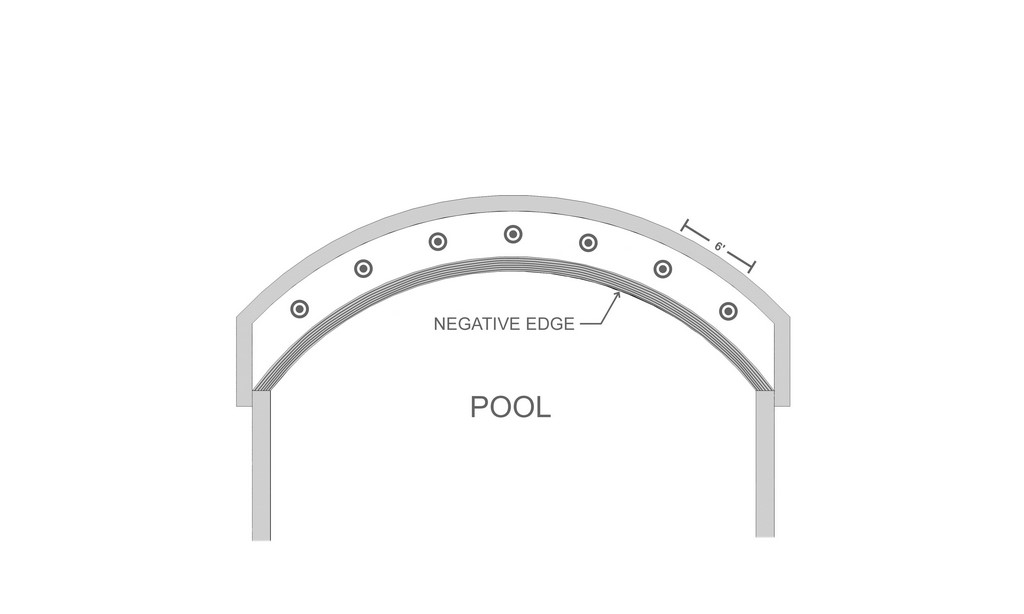
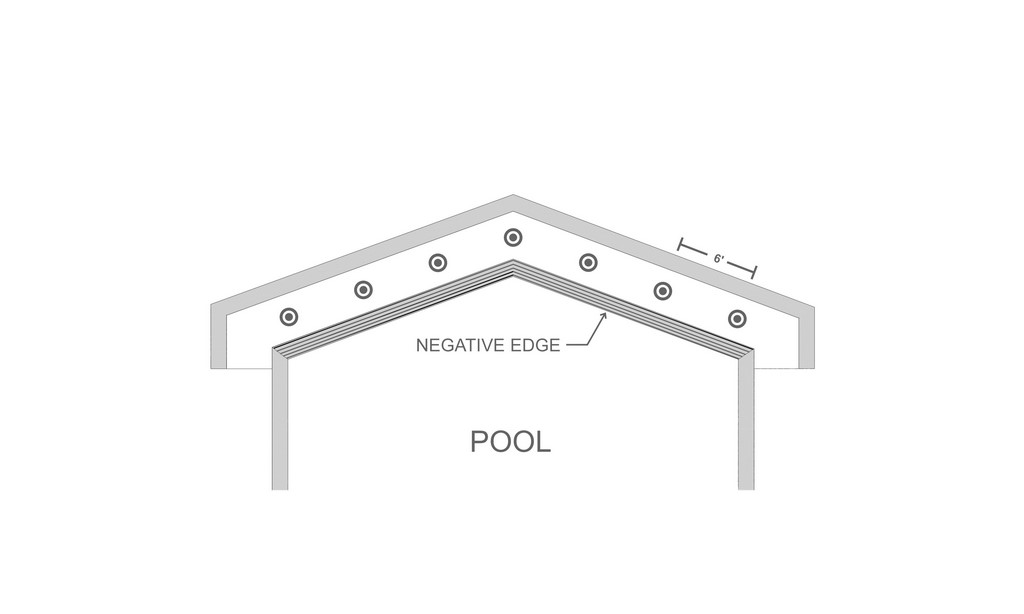

| Vanishing-edge wall configurations and a straight-wall application |
The key here is placing the lights to wash the vertical wall at intervals of six feet, being mindful that the water becomes quite agitated as it flows into the basin, no matter whether it’s a sheet dropping away from the lip or a trickle clinging to the surface as it falls.
Medium-wattage lights are typically recommended to overcome the unusually intense agitation and/or the depth of water in the trough. If the wall is tall or the trough is deep, however, a high-wattage fixture may be required. As always, the look is more important than anyone’s presumption of how a certain wattage will perform: If the light is overpowering, step it back; if it’s insufficient, step it up!
***
As we’ve seen in this series of articles, modern swimming pools come in all sorts of shapes and sizes complete with vanishing edges, grottoes, waterfalls, spillways, shallow lounging areas, bubblers, deck jets, scuppers and more. As discussed, these configurations and features make the lighting of watershapes a much more complicated task than was in the past – one that requires designers and builders to pay attention to new possibilities if their clients are to be enthusiastic about the results.
|
Resources: This is the fourth in a set of articles recently published through WaterShapes. To see Part 1, on lighting philosophy and practicalities, click here. To see Part 2, on lighting conventional configurations, click here. To see Part 3, on working with advanced shapes and details, click here. — G.O. |
So many homeowners lead busy lives these days, and we know that in many cases the only opportunity for them to enjoy their pools comes at the close of the day. Their safety is important in this context, but the ability to use light to alter and manage mood and ambiance to suit the homeowners’ needs is paramount.
As was mentioned in the first part of the series, success in lighting design task has a practical component to go along with the artistry: You need to think things through, keep all the lights on one circuit and at the same voltage and make certain the transformer and the control system are a good match for system requirements.
Beyond that, you have to accept the fact that lighting a watershape is nothing like it was even ten years ago. There’s a definite and sometimes sharp learning curve here (not to mention a need to keep up with fast-changing lighting and control technologies), but there’s also an incredible opportunity to make watershapes and their environments more beautiful, more responsive to their owners’ needs and a fuller expression of your skills – all at the touch of a button.
Graham Orme is product and custom design manager – lighting and water features for Zodiac Pool Systems in Vista, Calif. He may be reached at [email protected].