


Edge-Wall Essentials

Vanishing-edge walls have been a common design detail for the past 25-odd years and have been the subject of seminars and workshops almost as long as I can remember. Still, it’s clear that there are several key points about how they should be designed and installed that elude watershapers who persist in treating these key structural components as little more than glorified in-pool spa dam walls or some other internal detail.
You can probably guess that I’m about to declare, that’s a big mistake – and that if you’ve been thinking that way, it’s time to get educated.
For starters, where the typical spa wall is pressed on both sides by water, a vanishing-edge wall is most often, in effect, a free-standing dam. This is why it is important to incorporate waterproofing within the cement matrix of the vanishing-edge wall as an incorruptible layer of protection against the sort of one-way fluid penetration that can make an utter mess of the outside portion of the vanishing-edge wall.
And there’s more to consider, as we’ll see below.
ON THE MOVE
I know all the arguments for seeing concrete, properly applied at the proper density, as a watertight matrix. But even the American Concrete Institute agrees that, given infinite time and pressure, water will nonetheless penetrate concrete.
This is why, when it comes to a vanishing-edge wall, I’m unwilling to take the chance that any pathways through the wall might develop. It can lead to efflorescence, tile or stone delamination or other signs of water transit that might develop on the wall’s dry side. And in the worst cases, it can lead to corrosion of the reinforcing steel and eventually to rust stains, cracked walls and even catastrophic structural failures.
Of course, the lowest-level signs of water passage are unsightly – and just the sort of issue that will get a homeowner up in arms about how bad things look. Very often, this is the first step on the road to time-consuming remedial work or costly litigation.
But please note: It’s not about slathering just the area on the inside of the wall with waterproofing material: It has to be the entire wall and basin, because there’s no way of knowing what path the water might take in finding its way to the edge wall’s outside surface. In fact, in our projects at Aquatic Technology (Morgan Hill, Calif.), we specify not only an additive waterproofing agent in the shotcrete, but also an additional layer of external protection on both surfaces of the wall, extending out onto the pool floor and the interior walls beyond – and across the entire interior of the catch basin’s surface.
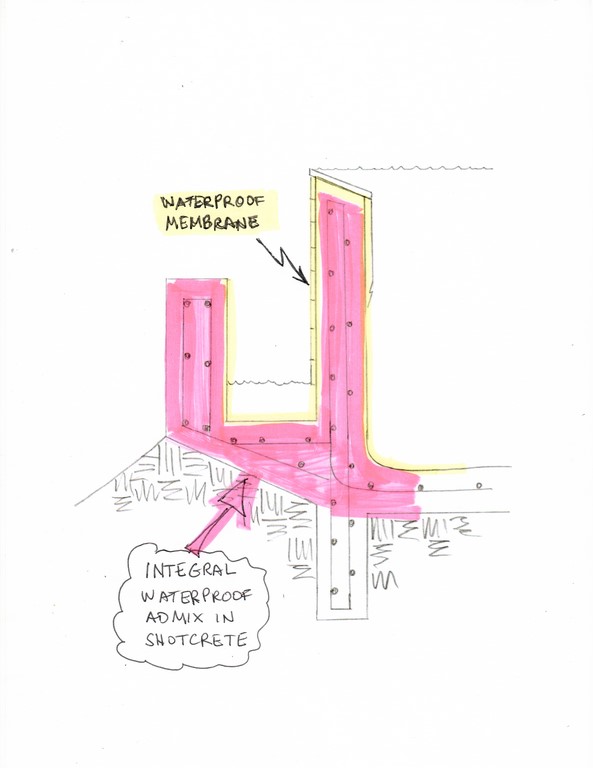
| This isn’t an accurate section of a vanishing-edge wall, but it capably indicates the waterproofing strategy we use: First, we add an waterproofing admixture to the shotcrete to cut off paths of flow through the matrix of the entire pool (indicated in pink), then we slather a topical waterproofing system to the back and front sides of the wall (indicated in pale yellow), running it down to the floor on the inside of the pool and covering the complete interior surface of the trough. |
In addition, we extend any tile or stonework on the dry side of the vanishing-edge wall (or lining the catch basin) down to and beyond the minimum operating level of water that always remains in the basin. We do this because the water level in the basin is constantly changing, which means that the walls above the minimum operating level are subject to constant wetting and drying. Any plaster-based finish in that zone will therefore be subject to shrinkage cracking and, ultimately, failure.
With reference to the illustration at right just above, the yellow-highlighted area illustrates the minimum areas that should receive a topical waterproofing in addition to any additive waterproofing included in the concrete matrix. Depending upon the finish materials, we will specify a cementitious or elastomeric membrane. Elastomeric membranes must be topped with a compatible skim coat of thinset. And to ensure compatibility – a key factor! – we always use products from only one manufacturer (whichever one it might be) for this purpose.
This approach ensures that the plaster finish will bond on the inside of the pool while also preventing any moisture from penetrating into the wall – a necessity given the fact that plaster is not a waterproofing matrix. (Yes, that is correct: Plaster is not waterproof! According to the National Plasters Council, it’s just cement and sand, and water will wick right through it, just as it will through any other cement-based system.)
WATER PHYSICS
There’s another, less expected decision in vanishing-edge design that comes into play here – that is, the choice of which way to tilt the weir. Some say it’s a matter of personal preference, but there are also aesthetic and practical issues involved that lead me to recommend tilting the weir down and into the pool.
First, this approach creates the illusion that the watershape is somewhat larger than it actually is by increasing its internal surface area. Second, and more important from a design standpoint, it offers a sharp visual break that increases the impact of the vanishing-edge effect from a greater number of angles.
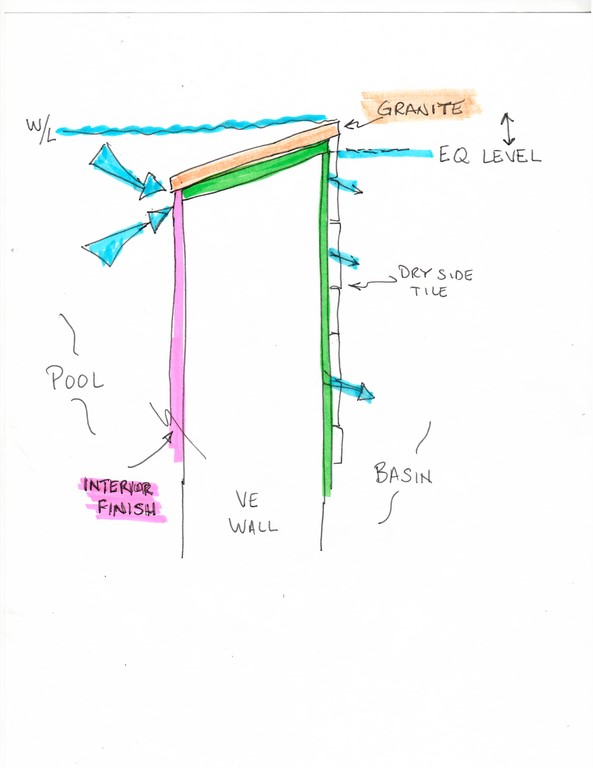
| This illustration shows the pathways water will take as the pool’s contents seek to find a path through even a competently waterproofed a vanishing-edge wall. This assumes a granite top and dry-side tile applied over a mortar leveling bed – and an equalization level that ensures the fact that the water will be doing all it can to reach the far side of the wall. |
Beyond that, it is a practical fact of physics that water will always seek its level. It’s also true that water will migrate, via capillary action, right through cement. If no waterproofing is employed on the vanishing edge wall, then water (as indicated by the two large arrows on the left side of the illustration at left) will quickly begin to seep through the mortar bed (highlighted in green).
And this seeping will occur no matter which way the weir tilts, because the water level in the pool will always be higher than potential exit points on the dry side: Hydraulic pressure (weight) and gravity do the job here, effectively forcing the water to pass through the mortar. In fact, if left to its own over time, the water in the pool will eventually equalize with the exit point on the dry side of the wall (as indicated by the blue line and the double-headed arrow at top right in the illustration).

| Efflorescence is never something that makes a homeowner happy, especially when the problem is as bad is as the one shown in this photograph and can’t be “cured” without extreme and costly measures. A far better alternative involves doing a thorough job of waterproofing the shell inside and out to minimize transit of the water other than by the desired means of the weir. |
The water migrates through the mortar bed and ends up behind the dry-side tiles. As the water discovers cracks in the grout, some will exit to the surface and carry with it the dissolved salts that make up efflorescence.
The water will continue to flow through this mortar or in hollow areas behind the tiles until it either encounters a dense area of mortar or a sound area of tile. The remaining water will exit at this lower elevation, carrying with it a majority of the dissolved salts and therefore a greater build-up of efflorescence.
It’s impossible to completely prevent some incidence of efflorescence, but by incorporating waterproofing additives into the mortar bed and waterproofing wall surfaces, you can effectively seal the capillaries in the mortar, thereby at least retarding water migration.
The addition of a membrane atop the mortar bed only leaves a layer of thinset (under the granite and/or tiles) as a possible migration route for the water – a path, but a relatively minor one.
MASTERING THE DETAILS
There are some other factors in the construction of vanishing-edge walls that bear consideration – especially with reference to the first sketch shown at left above. First, the reinforcing shown in the drawings is not intended to represent the actual steel schedule one might encounter in a quality vanishing-edge wall. Instead, it’s been simplified to show how everything comes together.
| Avian Antics
While I’m happy to make the aesthetic case for tipping the top of a vanishing-edge wall toward the inside of the pool, I am also aware of the fact that this configuration can create a favorite hangout for an area’s feathered population. In fact, tilting the weir into the pool creates a shallow, conveniently inclined birdbath that can attract hundreds of birds in the course of an afternoon. You can imagine the mess made by hundreds of blackbirds, pigeons and seagulls frolicking in the water along with doves, sparrows and mockingbirds every single afternoon. It’s a fact of which weary service technicians are commonly aware, but one few watershapers consider – and even those of us who do will still make the correct aesthetic choice. — P.B. |
In actuality, a vanishing-edge wall should never be less than 12 inches thick, with double curtains of steel. In these cases, the structural engineer mandates the exact wall thickness, steel size, spacing and placement – a scheme that must be followed on site.
Also, the catch basin elevations in that same illustration were drawn arbitrarily. Again, please follow the specifications provided by your engineers, whether the catch basin is above, below or even with the pool floor – or cantilevered in mid-air.
The same illustration shows a deepened keyway footing, but be aware that not all vanishing-edge pools require them. Some call for foundations that are much more elaborate; others requires no specialized foundation at all. The important point is that you should work with (and follow!) the soil engineer’s recommendations – here and in all other structural matters related to the task at hand.
The most important of all points made here is that there’s value in getting educated about what’s involved with vanishing-edge pools, about working with plans generated under the seals of competent engineers and about the dynamics of water as it interacts with cementitious materials. What you don’t know can hurt you and your business – and it’s a plain fact that there are plenty of ways to get all of the educating you need.
Seek it out: It’s well worth the investment of time, cost and effort.
Paolo Benedetti is principal at Aquatic Technology Pool & Spa, a design/build firm based in Morgan Hill, Calif. He may be reached at [email protected].