


Delicate Dynamics
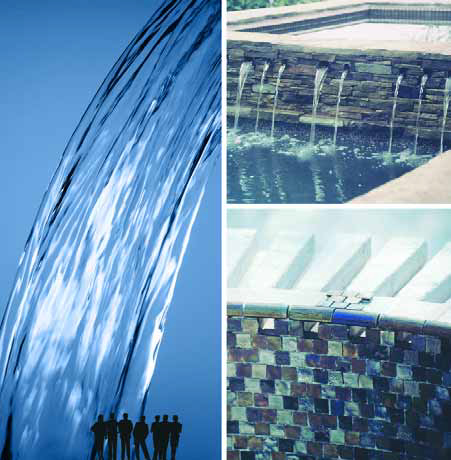

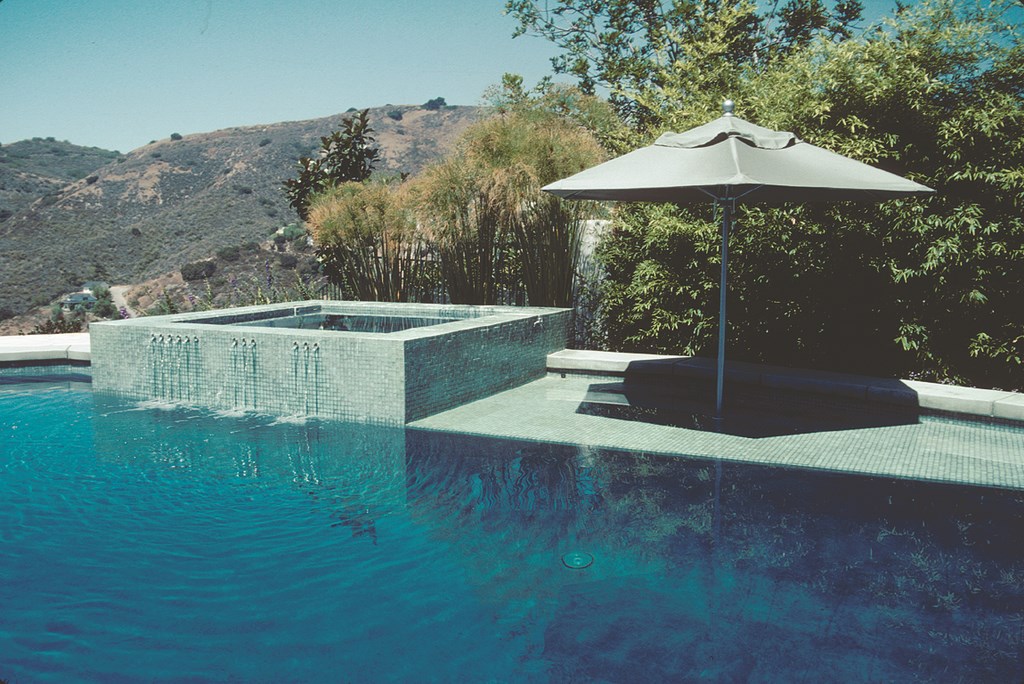
One of the skills of a good designer is the ability to recognize those situations in which less is more. The detail pictured in these pages, for example, shows how the choice to go with a small volume of moving water (as opposed to a torrent) can add immeasurably to a composition’s visual strength.
Using this understated approach helps the designer or builder avoid what has become one of the biggest clichés of modern pool design – that is, the outsized waterfall spilling over a single weir from a raised spa into an adjacent swimming pool. My desire to get away from that monotonous look has led me in some cases to install the multiple, small spillways you see in these dam walls as a means of generating delicate, variegated streams of water.
When built correctly and integrated properly from a design standpoint, it’s an effect that can be applied to create a flow of water that looks spectacular. As is the case with so many of these advanced details, however, you have to know what you’re doing with your designs or the effect just won’t work.
SIMPLICITY OF CONCEPT
I’ve been using spillways similar to those pictured here for several years now, but it was an idea that had been percolating in my mind for far longer than that.
In fact, the idea goes all the way back to an interest I had in the acrylic tubes I’d encountered in my years as a student and practitioner of industrial design. The sense of line and flow these forms embodied always intrigued me, and I found a direct translation of their beautiful contours in the laminar flows and streams that have become so popular in contemporary fountain designs.
But I wanted to jump beyond the laminar sheet falls that have emerged in recent years to find a look that had greater long-term visual interest. Eventually, I landed on this idea of multiple, small spillways that could be use just as easily on radius or linear dam walls.
| If you’re looking for ways to step beyond the conventional when it comes to transitions from spas to pools, these elegant spillways are a sure bet. But novelty isn’t enough: For this look to work, it must be integrated into an overall design program or the effect just won’t work. |
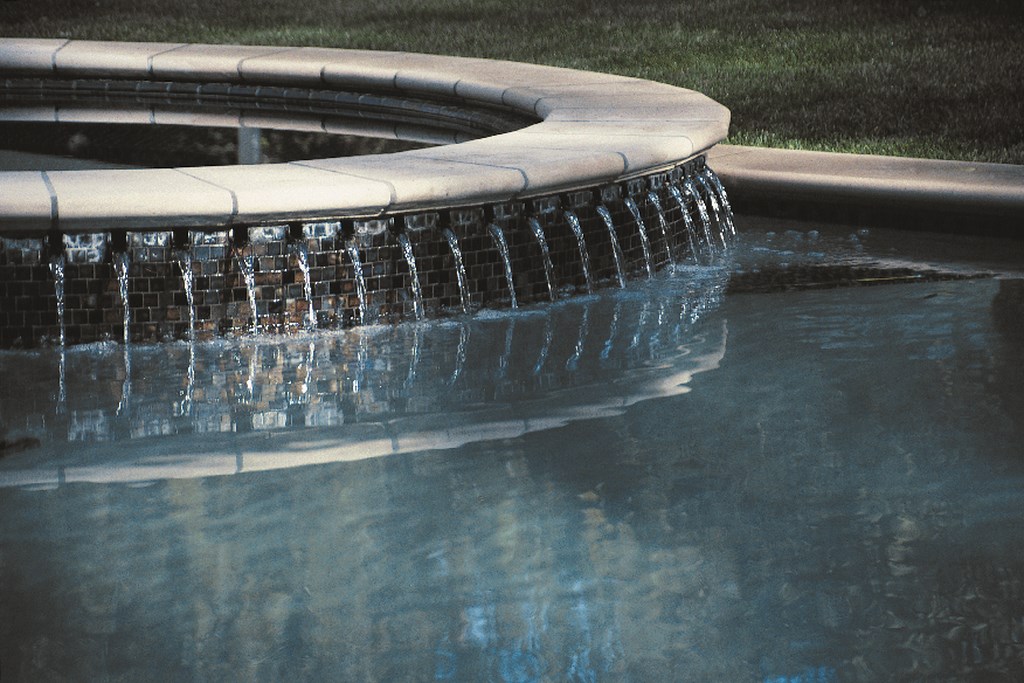
As I’ve worked with these effects, I’ve found them to be tremendously and surprisingly flexible. Depending entirely on the needs of the design, for example, I’ll use spillways that are all the same size and placed at regular intervals, or I’ll mix things up and install spillways of different dimensions at irregular intervals. It’s also possible to play with height: I’ll allow the water to fall anywhere from six or seven inches above the pool’s water level all the way to two feet up.
In all cases, the effect gives me a flexible way to manipulate and control the visual dynamics of the project and offers a genuine element of novelty and surprise that delights my clients.
DELIVERING THE GOODS
The spillways are simple in concept and relatively straightforward in terms of construction, but as with so many fine details, looks can be deceiving and it’s critical to know what you’re doing in an overall design sense to make the effect work.
 In setting up spillways of this sort, for example, you need to consider a range of factors that will influence how the effect can and should be used – factors as elemental as whether the water will be falling in front of dark- or light-colored material and how the background influences the look and visual appeal of the flowing water. Likewise, a factor as grand as the way the sun moves across the pool and how it either enhances or washes out the effect can be critical to success.
These and many other factors have a great deal of influence over the ultimate appearance of the streams and will having everything to do with whether or not the design comes together.
| Getting this detail to function properly and look just right takes a lot of planning and forethought. We saw-cut the channels in a precisely dimensioned wall, seal the concrete and then line the channels with tile. The trick in this case is working all the dimensions in such a way that all of the spillway tiles line up without interrupting the overall tile pattern on either side of the wall. |
The point that needs stressing here is that this isn’t an appropriate detail for every project: Success isn’t only a matter of figuring out how to make the spillways work hydraulically and physically, but also has to do with a genuine understanding of visual dynamics, balance, texture, materials and the fundamentals of good design.
You also need to figure out the auditory factors: No matter how far the water falls (up to the two-foot height mentioned above), these small spillways tend to create an extremely delicate sound far removed from the crashing rush of a typical spa spillway. This would tend to rule out the use of this approach, for example, when the flow of water over the dam is intended to create sounds that mask out traffic noise.
Instead, these spillways provide an extremely soothing sound that adds a sense of tranquility to the space. In projects that call for it, I use this auditory quality to provide contrast to the more ragged sounds of a babbling brook set up in other portions of the design. As always, decisions about how far all of this can go – and it can go pretty far if the client is willing – are determined by the site and its surroundings and how various effects work together.
CARE IN CONSTRUCTION
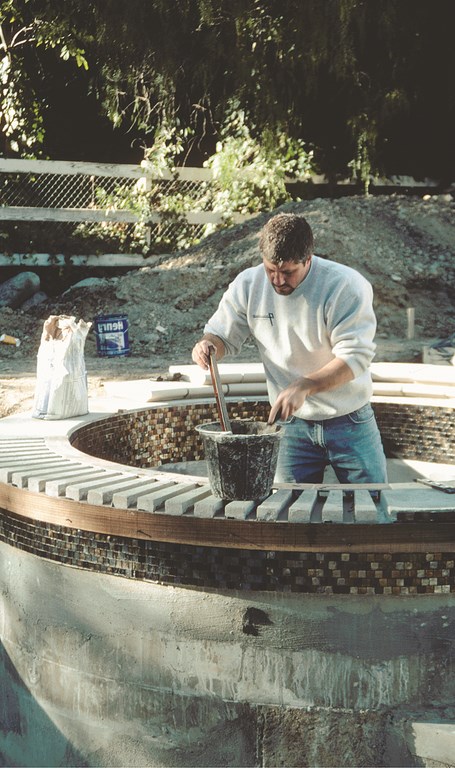
As far as actually building these spillways is concerned, it’s really pretty simple: Just build a dam wall and decide where you want to put the spillways in relation to the water level in the spa – keeping in mind that wherever the spillways are set will determine the water level of the spa.
Now you take a diamond-blade saw and cut precise notches directly into the gunite. Yes, you could also make a wide cut, as you would with a typical spillover detail, and build up the notches with mortar, but I prefer cutting the channels into the gunite itself because it gives me much greater control over the dimension of the channels.
Once the cutting is done, I apply several coats of Thoroseal and tile the insides of the channels before setting a piece of slate or stainless steel on top of the completed spillways. Atop this plate, I place whatever finish material has been selected – coping stones, tile, poured-in-place concrete or whatever else the plans specify.That all sounds simple – and it really can be – but there are a couple of things you need to consider. For one thing, I place tile inside the spillways, so my dimensions in cutting the channels need to be planned with the specific tile size in mind.
|
Balance and Symmetry When I talk about “visual balance,” too many people jump to the conclusion that I’m talking about symmetry when in fact I am not. Balance and symmetry are two different things – and understanding the distinction is very important when it comes to designing elements such as the spillways seen and discussed in the accompanying text.
The fact is that, depending on the situation, symmetrical shapes can be completely out of visual balance in their environment, while in many cases it is the asymmetrical shape or pattern that creates balance. But explaining this in words can be nearly impossible because the effect always depends on a range of factors, including placement of a specific detail in relation to other shapes and structures, the use of light, weight of line and the appearance of materials. This is yet another case where being able to draw comes in handy as part of a sales presentation. All it takes is a simple elevation or two to show clients how spillways – whether symmetrical or asymmetrical – work in the space you’re discussing and how true visual balance is achieved within the overall design and setting. — D.T. |
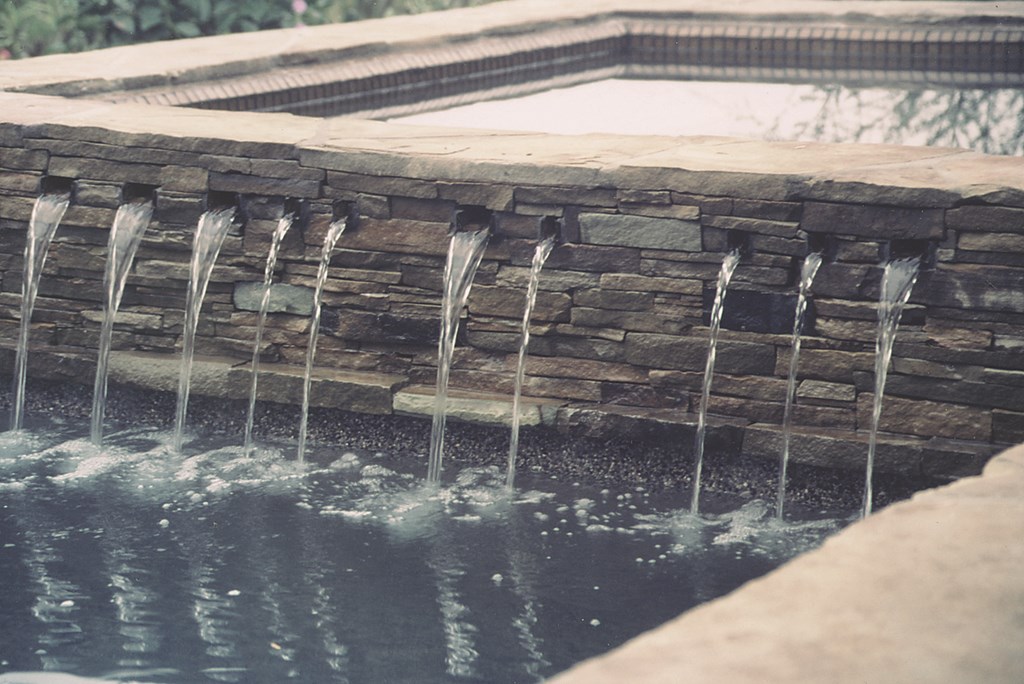

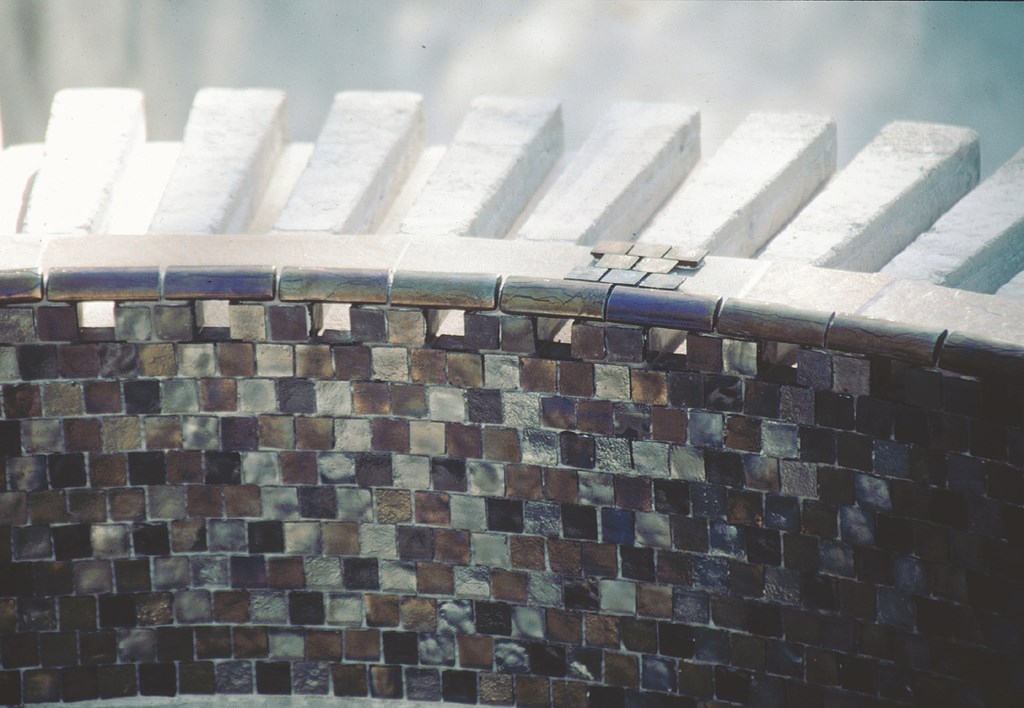
When the face of the dam wall is tiled in a stacked pattern, I also arrange the spillways so that they align with the grout lines of the rest of the tile. Some would say that this is too detailed, but I see it as part of the discipline required not only to do the job the right way, but also to make the effect visually seamless within the overall design.
Because the idea is to accentuate the appearance rather than disrupt it, I strongly believe that it’s critical to pay close attention to details at this level. And when you’re talking about creating physical dimensions of the watershape based on tile size, that means you’ve got to be planning for the effect from the first stages of the design process. This is not an effect that should be added as an afterthought!
There’s one more key to making this effect work: At the point where the water spills out into the pool, you need to extend the three pieces of tile – vertical and horizontal – a fraction of an inch out from the wall and angle them back ever so slightly so that the water spills away from the dam wall. Without that tiny bit of clearance, the water will cling to the wall and dribble down the face of the tile. And because a small portion of the tile is essentially cantilevered out of the face of the wall, you have to pay attention to the way the tile is finished on the sides.
If you try to do this in a haphazard way with the wrong materials, it will stick out like a sore thumb and ruin the visual effect.
THE BIG PICTURE
If you grasp the design concept behind these spillways and use them in the right kinds of projects, their performance finally boils down to zero-tolerance construction and proper hydraulics. In other words, if you don’t have control of these technical skills, I’d set this concept aside until you do because the effect won’t work as advertised and your client will be disappointed rather than thrilled.
And believe me, this is a look that bowls my clients over, even more than some of the touches that are much more difficult to achieve. Remember: We work in what is primarily a visual medium (that’s one of the reasons I call my company David Tisherman’s Visuals), and these kinds of details make a real difference.
To be sure, the reasons for excitement vary a little from client to client and from site to site, but I think it’s fair to generalize a bit and say that these small streams of water offer the viewer an attractive alternative to the gush of water that’s found on way too many spa-to-pool transitions.
In a literal sense, this is an example of how you can shape water to achieve a desired effect. The bottom line is that these streams are delicate, beautiful and, when properly proportioned to their surroundings, can make all the difference.
David Tisherman is the principal in two design/construction firms: David Tisherman’s Visuals of Manhattan Beach, Calif., and Liquid Design of Cherry Hill, N.J. He can be reached at [email protected]. He is also an instructor for Artistic Resources & Training (ART); for information on ART’s classes, visit www.theartofwater.com.