


Up from the Depths

Last time, I described a series of unfortunate revelations that complicated the early stages of an elaborate pool renovation project in Malibu, Calif. By the time all of those enormous structural issues had been addressed, the pool project had been on hold for about six months.
When we finally returned to the site to resume our work, we were greeted by a “courtyard” that was basically a neat, seven-foot-deep hole surrounded by a beautiful home in one of the most exclusive neighborhoods in the country. Although the most significant of the troubles were now behind us, the tasks that followed were far from simple.
In the intervening six months, my clients had rethought much of what they’d formerly wanted by way of materials selections and an array of other details. The basic shape of the pool remained a constant – and would itself be difficult to achieve – but now we had to revisit a number of stone and tile details; the elaborate lighting plan and numerous other tricky electrical aspects of the project; a complicated skimmer detail; an unusually intricate array of plumbing lines; tighter-than-anticipated quarters for the equipment; and a whole set of issues related to installing a string of advanced laminar jets.
Some of the changes – especially ones related to the decking material, the width of the coping and the approach to landscaping – were destined to turn this project a high-wire act from the day we returned until completion.
FORMS AND SUBSTANCE
We returned to find a cavernous void where the cozy courtyard had once been, and faced once again the collapsed, narrow breezeway that provided our only access to the space.

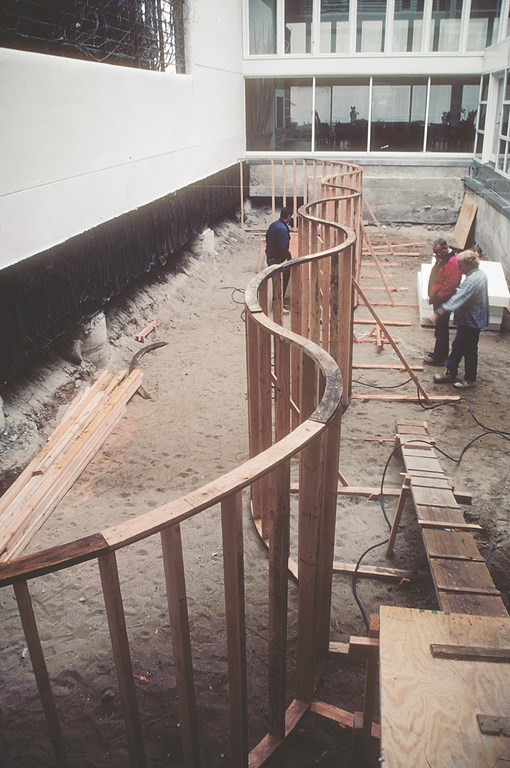
| The need for precision in laying out the wave-form edge was so great that we used a computer to generate a full-scale, 55-foot-long paper template to guide us in setting up the plates for the top and bottom of the forms. |
First of all, we set up a platform and ramp through the breezeway to allow access. Next, we stepped into the chasm, set a sub-drain system up under the pool (a perforated pipe encased in a foot of 3/4-inch crushed rock wrapped in fabric to handle any hydrostatic pressure that might develop), built the forms for the shell, installed the steel and plumbed the pool and spa
This is a case in which I shudder to think about any attempt to approach the tasks at hand with anything less that the highest standards of design, engineering, craftsmanship and construction technique. Consider what was involved in forming the shell as an example.
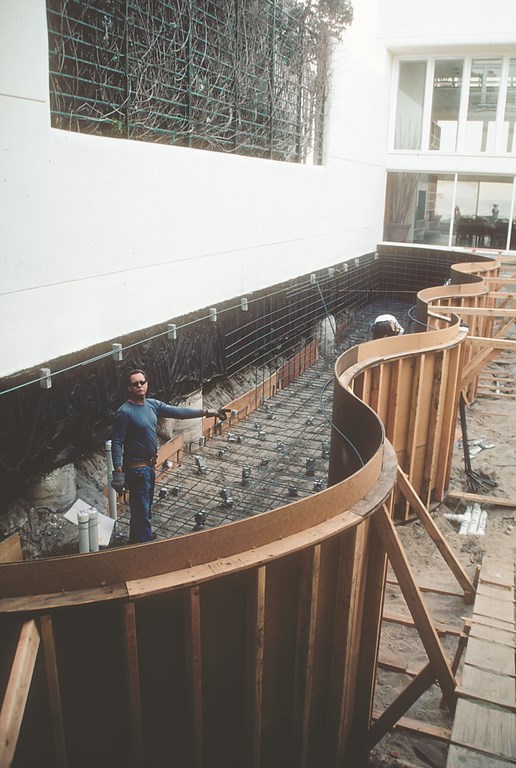
The design called for a perfect set of matched, undulating curves along the full, 55-foot length of the pool and spa – and there was no room for error. Our target in setting up the forms was a tolerance of no more than 1/16 of an inch across the entirety of the shell and a deceptively tricky shape that involved fairly tight radiuses, complex step details in the spa and squared corners within the pool to accommodate the tile that we would later install.
| Our aim in forming was to hold everything to within 1/16th-inch tolerance along the entire length of the pool. Given the prime viewing angles from slight elevations inside the home, any flaws would have stood out like sore thumbs. |
The need for extreme precision was required as well to accommodate the bluestone material selected for the coping atop the wave pattern. One-foot square bluestone – gauged at precisely 3/4-inch thickness – had to fit perfectly along the arcing contours to maintain the visual integrity of the edge.
That need for perfection was driven in part because the main vantage point for the pool from inside the house is the family room, which looks down the length of the vessel from a slight elevation. Any flaw at all in the appearance would be painfully obvious, meaning the bond beam had to be dead on and every stone had to be cut in a perfect wedge shape to accommodate the radiuses – or the whole exercise would be a waste.
At this point, let me tell you that, given the prominence of the clients and fact they’d entrusted me with creating something truly spectacular for their home – not to mention the tortured beginnings of the project – I had a stronger-than-usual sense that my own reputation was on the line.
IN THE TRENCHES
To help us achieve the required precision in setting up the forms for the shell, the client suggested I work with a computer company he knew that did large-scale, precision work for the aeronautics industry. Soon thereafter, we had a detailed, full-scale, 55-foot paper template of the form to use as a guide.
| The forms were made with two-by-four construction and lined with Masonite for easy stripping. Even here, it’s possible to see the long, undulating line we were after – and how important precision was to achieving the desired visual effect. |
We laid the whole thing out on a driveway offsite, where the forms were built by Rick Shevit, a builder and expert carpenter who does all of my forming.
Back on site, we used the printout once again to confirm that all of the radiuses required for the design were perfectly cut and assembled and that everything was within that 1/16-inch tolerance. The forms were, as on all of my jobs, made with two-by-four construction and lined with Masonite to facilitate stripping of the forms after gunite application.
The steel for this project was typical of what I usually do, including multiple curtains of steel with a six-bar bond beam and dam wall – massive amounts of rebar everywhere. I’ve often been accused of overkill in my steel specifications, but I’ve always seen it as relatively cheap insurance against structural failure.
I’m not a structural engineer, but I do understand what those professionals do and work very closely with mine, a gentleman named Mark Smith. He’s a bit on the conservative side, but he has the best understanding of concrete and steel and its relationship to soil and water of anyone I’ve ever known.
This is an important point: As much experience as I have, I’d never in a thousand years dream of setting up my own steel or concrete schedule for any pool. I’ll talk with my engineer and offer input based on my experience, but I think any builder who operates without the services and without following specifications laid down by a competent structural engineer is just asking for trouble.
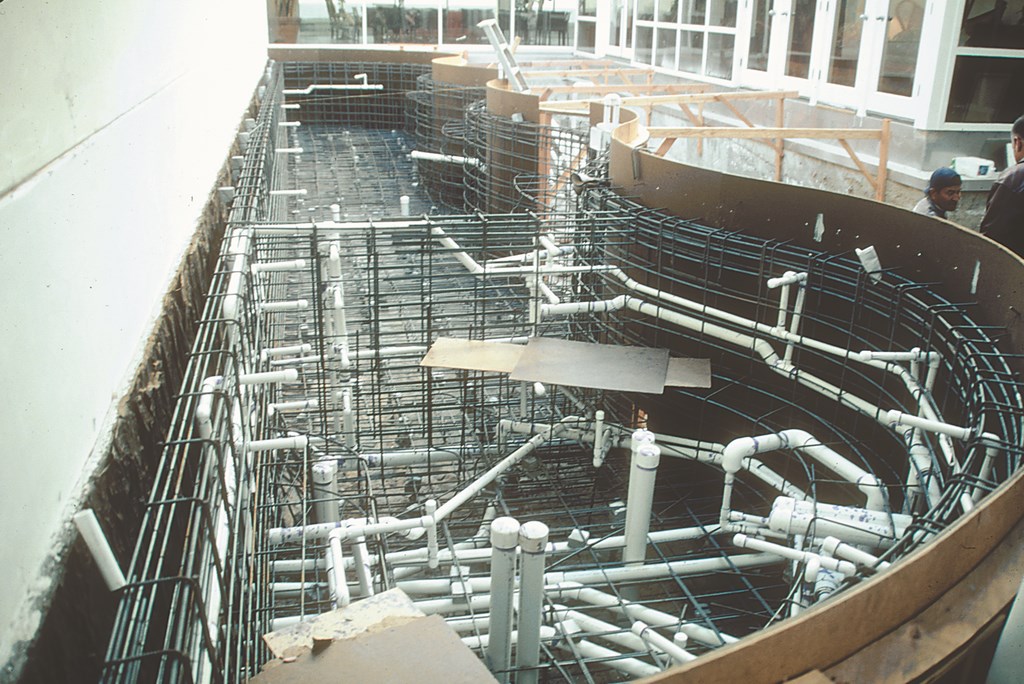
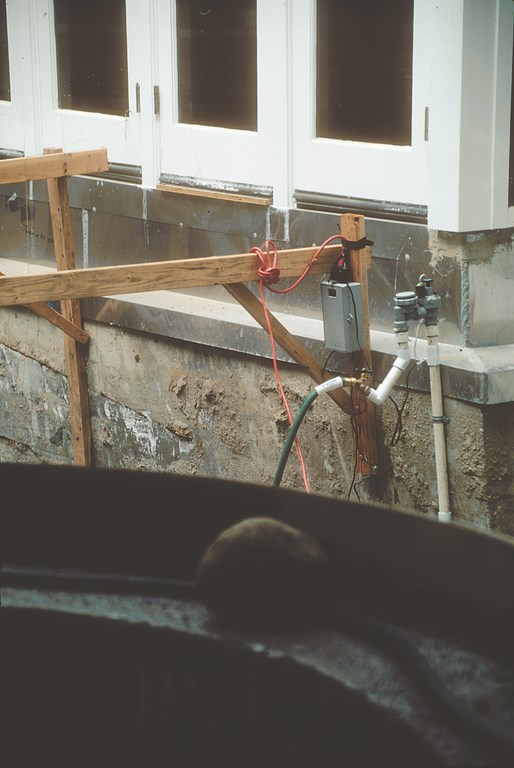
| The plumbing that makes the pool/spa system work is unusually intricate, with more than two dozen lines running from the pool to the equipment vault, and was complicated by the need to pass all those three-inch lines beneath the house. |
So on this project as on all my others, the steel and concrete schedules were specified and endorsed by a structural engineer in accordance with prevailing soil conditions – no guesswork involved.
With the courtyard wide open, we set up a complicated plumbing network that included some convoluted runs underneath the house to a new equipment location near the front of the property. Most of it was stubbed up into a vault we built where a shed for trashcans had once stood. All told, 25 plumbing lines – mostly three-inch PVC lines including the manifold serving the spa’s 24 therapy jets – ran from the pool to the vault.
We also set up a series of electrical and fiberoptic lines running to illuminators set up on a wall adjacent to the equipment pad. A series of communications cables were set up to run between the laminar jets and an amazingly elaborate computer-control system mounted in the garage.
COMING TOGETHER
The work on the foundation assisted us by opening up accessways beneath the house that gave us a clear shot at the equipment pad via a trench we dug beneath the walkway on the home’s north side. All this was necessary because the equipment for the original pool had been located illegally in a space on the home’s south wall intended for fire department access. That placement was conveniently adjacent to the pool – but ill-advised just the same.
| Proper hydration of the curing shell was so important that we left nothing to chance: a timer and drip-irrigation system made certain the gunite was exposed to all the water it needed for several days after we’d shot the shell. |
None of this below-grade work came cheap or was achieved without enormous effort, but by carefully following a precise, detailed set of plans, we successfully relocated all of the equipment to the new shed – tight, but set up and carefully arranged for proper service access.
Once this phase of the work was done, the shell was shot at 3,000 psi and the forms were stripped. As with all my jobs, I asked a deputy inspector to observe the gunite stage. It’s not required in all jurisdictions, but I make it a practice to have this important extra set of eyes on site during the process – an extra measure of assurance to my clients that everything is being done in accordance with the highest possible standards for quality.
We then began to refill a hole that had now stood open for the best part of a year, raising it back up to within 30 inches of the finished level of the pool. Now it was time for the hard stuff.
Next: a look at the coping, skimmer and bond beam details.
David Tisherman is the principal in two design/construction firms: David Tisherman’s Visuals of Manhattan Beach, Calif., and Liquid Design of Cherry Hill, N.J. He can be reached at [email protected]. He is also an instructor for Artistic Resources & Training (ART); for information on ART’s classes, visit www.theartofwater.com.