


Bars and Pipes Forever


Our discussions in the last two issues have been about excavation, which leaves us this time with a big, literal void that serves as a relatively exact dimensional representation of the vessel we’re building. After we’ve installed the forms – a subject I’ve covered in great detail in a number of past columns – it’s time for the installation of the plumbing and steel.
Before we jump into that process, however, let me make a key point: Although I am a knowledgeable builder who has paid attention through the years and can work his way through lots of watershaping projects without assistance, I am not a hydraulic engineer nor have I ever pretended to be one. When something unusual comes up – such as the need for 12-inch pipes and 25-horsepower pumps – I know my limits and seek competent, professional help.
When it comes to hydraulics of the more common sort, I owe much of what I know to my good friend and Genesis 3 co-founder Skip Phillips, who knows plumbing like the back of his hand and has taught me a great deal through the years. (Because it has been mentioned so many times in WaterShapes by people who are more versed in the subject than I am, I won’t repeat Skip’s mantra about small pumps and big pipes here.) But even Skip isn’t a hydraulic engineer, and he knows his limits as well.
The same holds true for steel: I’ve been around the block, but I always listen to my structural engineers and rely on the fact that their work reflects not only years of experience in dealing with structures of the kind I build, but also incorporates the very specific information provided to them by my soils engineers with respect to prevailing geological conditions.
IN THE HOLE
Assuming that the hole has been properly dug, that the forms are all dead on and that we have a “go” from the soils engineers, geologists and inspectors, we’re ready to install appropriate plumbing and steel.
Actually, this step links all the way back to the start of our work on site and the initial meeting I hold with all of my key subcontractors – a team that includes my plumber, my steel installer and my electrician. We review every phase of the construction process and cover any specific challenges that can be foreseen, reinforcing the fact that every job unfolds in its own way and that our scheduling and sequencing of steps will always be subject to modifications required by a given design.
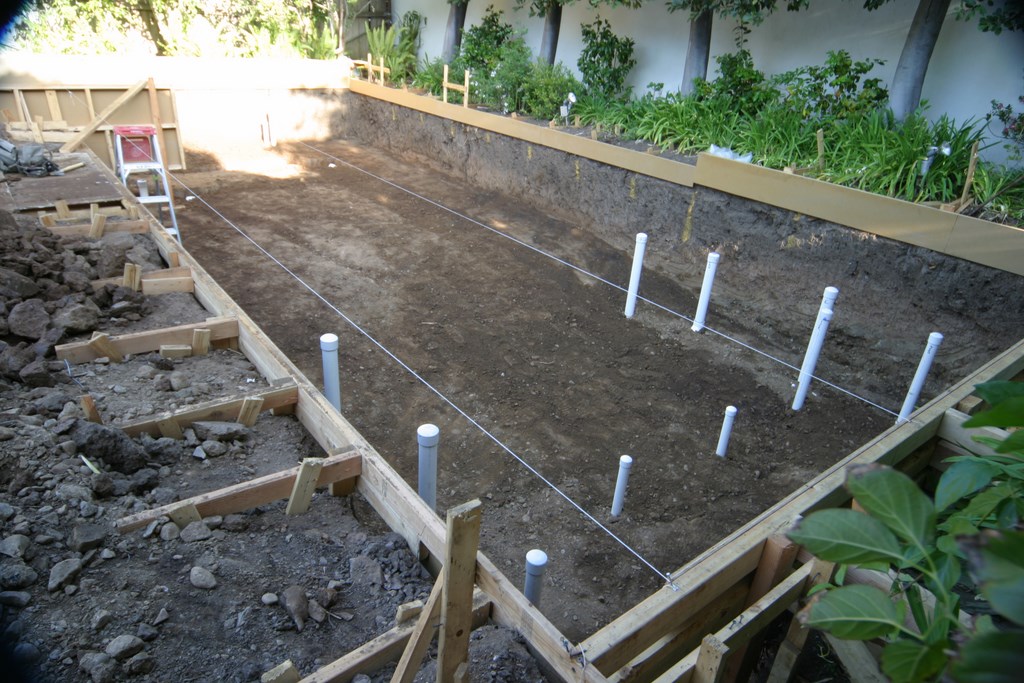
| After the wood forming was in place, we followed the usual sequence of installation by placing plumbing in the floor per plan and running pipes to appropriate locations along the walls. Next, we completed steel installation — even at this early stage making certain spacers are included to ensure adequate gunite coverage of all surfaces of the bars. |
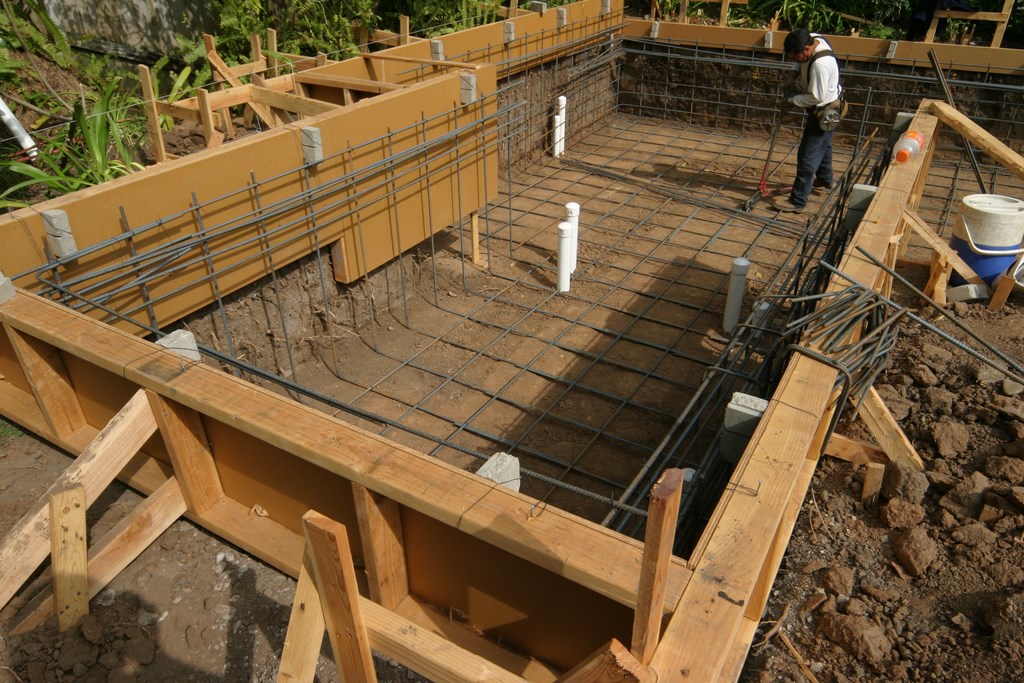
For all that flexibility, however, the plumbing/steel phase usually breaks into three typical parts: Installation of the plumbing in the bottom of the vessel with runs to basic wall locations; installation of the steel cage; and a return to work on the plumbing in which we bring the lines to their exact locations on the inside of the cage-defined walls, steps, benches and wherever else they are specified.
Within that basic sequence, things can vary quite a bit. The plumbing that runs through a gravel pack at the bottom of a pool, for example, might be installed before we add the gravel or afterwards – or we might add some of the gravel first, then set up the plumbing, then apply the rest of the gravel. It all depends on the site and the detailing of specific water effects.
With that qualification, the plumbing in the floor always goes in first, including split main drains in the floors of both the pool and spa. None of the plumbing that reaches to any elevation above the floor is installed at this point, but runs to those perimeter locations are “sleeved out” as required and will be worked with after the steel is installed.
This is an important point, because the finish plumbing will be based entirely on this detailing. In spas, for example, system complexities and variations are so numerous that there’s no way to set up the lines for the jets without having the precise shape of the vessel articulated by the steel. The same applies to the rest of the system as well, including bond beams (which can range from six to 24 inches wide depending on the design) or dam walls (which can range from ten to 16 inches thick or even greater). These dimensions influence every plumbing fitting installed above the floor.
To be sure, finish-plumbing locations can be established at any time after excavation is complete, but in my approach I advocate installing the steel before doing so. I look at it as a bottom-up operation in which I don’t want to lock in plumbing access until I know exactly where everything is going to be. In addition, this gives me maximum flexibility in making adjustments or adding features up to the last minute: As I see it, that’s what truly custom construction is all about.
STEEL AWAY
Backing up just a bit, once the plumbing has been installed in the floor and the lines to the walls have been run to their locations outside the shell, it’s time to install the steel.
This is a topic that raises real fervor in me because of the kind of projects I pursue and my oft-stated belief that a structural engineer armed with accurate soils and geology data is an indispensable part of my project team. Yes, I use “standard plans” when appropriate (although even when they are suitable for use in the site conditions I might encounter, they are usually modified to reflect the specifics of the project), but I don’t commonly work in locations where they get the job done.
For the most part, I get the sense that standard plans are, for many builders, an easy way out, a means of avoiding the expense of retaining a structural engineer. That’s short-sighted, and these builders run the very real risk that a given site has features that will undermine the accuracy and value of standard plans in ways that might eventually lead to structural failure.
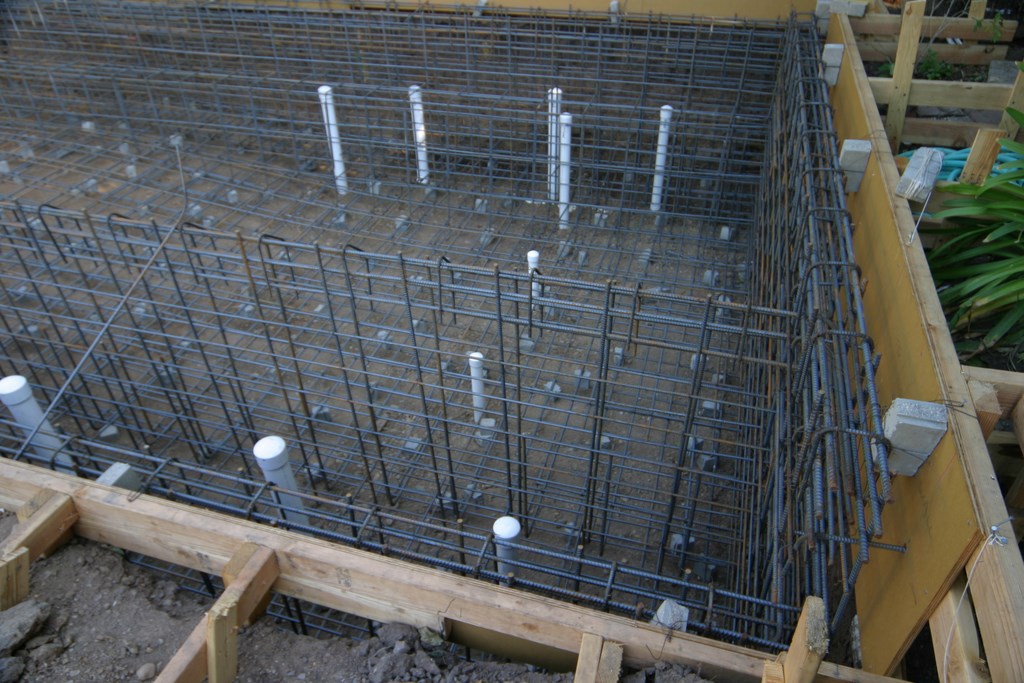
| Once a steel cage is in place, it’s possible to see how the final gunite structure will come together – offering a very clear sense of how and where the plumbing needs to be placed to make the pool’s and spa’s various systems work efficiently and effectively. This is the last point at which adjustments can easily be made, so we now perform a rigorous review of fitting and jet placements and fine tune all plumbing systems as needed. |
 Armed with an appropriate set of plans, a steel installer will follow what’s on the page, but it’s the job of the project manager to make sure that the crew observes every last detail. It’s like a baker making bread (two cups of this, one cup of that), but in this case the recipe calls for four #5 bars here or six #4s there. As with baking, there’s no room for approximation or cutting corners: Either the steel is installed per the plans or it’s not, and I see it as my personal responsibility as project manager to make certain everything is correct.
If you know how to read plans (a skill too many builders lack) and you carefully oversee the steel installation (another gap in many operations), you will end up with what amounts to an accurate silhouette of the finished structure.
This is the point at which clients are finally able to visualize the full design in place, and it’s been my experience that they often get pretty excited: Indeed, there’s something impressive about steel structures, and I encourage them whenever possible (and safe) to have a good look around.
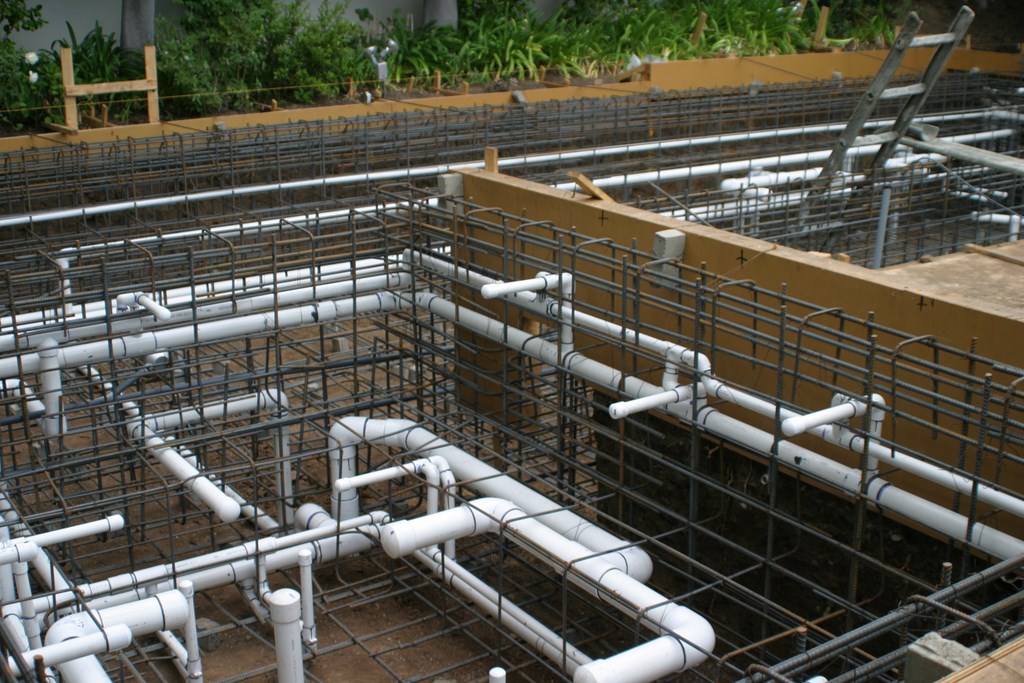
Now it’s time to go back and finish the plumbing, bring all the lines to their precise locations and stub penetrations well out past the steel to accommodate the thickness of the concrete and finish material and leave us something substantial to trim away. At this point, we have one last shot at assessing precise locations for things such as spa jets. It’s precision work, and we use both the plan and the steel to position each pipe precisely.
(This is not, by the way, the sort of process you’ll observe in a production-oriented, high-volume operation. There’s no time for fine tuning, and this is why so many of these projects feature odd placements of return lines, for example, and why the spas typically don’t work as well as they might.)
At the same time as we’re wrapping up the plumbing, all the lights and electrical conduits are inserted and every steel structure within ten feet of the pool is bonded together, including lights, conduits, column flanges, umbrella mounts, handrails or metal spillways, all per provisions of the Universal Building Code.
MAKING THINGS WORK
As mentioned above, I never hesitate when it comes to calling on experts to make certain my pool systems are up to snuff. Once I’ve accessed that expertise, I never take it for granted: I work, for example, with experienced, detail-oriented, professional plumbers who know I want everything to be just right – and who also know that I will be watching as the work progresses to make certain we’re always on the same page.
This element of supervision is very important, because there’s always danger in allowing anyone whose focus is on the practicalities of an installation task to have the sense that there’s any room for improvisation. Those on-the-fly decisions can have distinct aesthetic consequences related to, for instance, the placement of a skimmer. And how many times in production-type jobs have you seen a return line that’s been set awkwardly high or low on a step riser? I won’t let that happen, and the way I avoid these issues is by trusting my plumber to get the technical details right while assuming final responsibility for the aesthetic ones myself.
And believe me, when it comes to plumbing, I range far and wide in the sorts of decisions I make relative to aesthetics because all those places in pools and spas where plumbing intrudes represent discontinuities in the finish that I want to minimize in visual terms.
In fact, I’m thinking of mounting a personal crusade against all of the plumbing-related penetrations that aren’t absolutely necessary – for starters, those we make for automatic pool cleaners and in-floor cleaning systems. I know that’s an outrageous thing to say, but when you step back and look at it from a broader perspective, even the existence of these technologies is some indication that our circulation systems are rather far from perfection.
Let’s take pool sweeps to illustrate: They do the job of removing debris from the bottom of the pool, I suppose, but they’re incredibly intrusive (aesthetically speaking) and have other bad habits besides, such as spitting streams of water where they shouldn’t go and/or getting stuck at various points around a pool. Yes, manufacturers have addressed some of these functional issues, but I just can’t get around the fact that, as contraptions go, these are truly monstrous.
The same holds for in-floor cleaning systems: All those bold-faced intrusions on a floor make pools look as though they have chicken pox. The fittings don’t have the right texture for use with glass tile, they don’t have the right colors for plaster or pebble finishes – and they’re basically just too ugly to be tolerated.
I have a fundamental objection to these components and systems and just can’t help thinking they’re used to overcome the fact that we do so poorly in designing our systems that we need to introduce other systems to compensate. The consequence is, we accept the basic unattractiveness of these things and agree that parts of the circulation system can be ugly because they always have been and always will be.
IN HOT WATER
In my design ethos, I reject the notion that certain forms of ugliness are practical necessities and do all I can to achieve visual continuity in my watershape finishes. Don’t even get me started on spa jets, for instance, which seem to place a premium on being seen – with a vengeance.
|
Another Thought In June, my Genesis 3 partner Brian Van Bower offered his thoughts on what it takes to work your way through dips in the market – including the general one we currently face. (To see “Turning Down, Tuning Up,” click here.) While I agree with some of his observations, I want offer a caution about taking on additional exterior-design functions as a means of broadening our bases and seizing more of the opportunities offered by our clients’ backyards. I would, in fact, do all I could to discourage any sort of dilettantish “exploration” of functions best left to specialists. What I would encourage instead is informed curiosity about those areas of design and a willingness to get involved in the bigger picture. Take landscape lighting as an example: Yes, it’s becoming more popular, but that doesn’t mean you should declare yourself to be a “lighting designer” overnight and leave your clients to deal with the consequences of your learning curve. I would, in other words, happily leave money on the table and then do the best I can by performing admirably in areas in which I excel. When times are slow, it’s not the time for a capable watershaper to go out and find expertise in exterior lighting, landscape installation, irrigation systems, patio furnishings or lawn care. Instead, it’s time to focus on getting better at what you already do well by focusing on bettering your watershaping skills – your drawing, your ease in working with color, your awareness of art and art history, your knowledge of design fundamentals and your ease with the latest technologies available to support your design work. All those other fields require you to pay your dues and gather appropriate experience in whichever different specialty you might choose, and you’ll be doing your clients (and ultimately yourself) a disservice until you are completely up to speed. It may not seem that much of a leap to declare expertise in another field, but if you don’t know what you’re doing, you’ll only dig yourself in deeper! — D.T. |
Some designers and builders knuckle under and “celebrate” the presence of these fittings by making them look as elaborate as possible. For my part, I can’t stand to see jets fitted with escutcheons that don’t match the finish. And appropriate escutcheons can be damnably hard to find unless, of course, you want to join fitting designers in announcing the presence of their jets.
I’ve made my stand by using flush-mounted eyeball fittings in spas – the kind that can practically disappear into the surface if handled properly. Likewise, I do all I can to conceal main-drain covers and return and suction fittings (not to mention deck drain covers and skimmer lids – details I’ve covered at length in past columns and no doubt will bring up again in the future).
My point is, sometimes you can’t rely on what’s commonly available to get the job done. I’ve had escutcheons powder-coated to exact colors to blend into tile surfaces, and I’ve made square escutcheons from limestone to match a surrounding veneer. You won’t find these things in catalogs, but they can be obtained and work visual wonders for a design’s continuity.
While avoiding visual disruptions is my passion, there are also performance-related issues I consider in working with my plumber. Sticking with spas, for instance, I’m a strong believer in installing cool-water feeds into spa systems.
As we all know, spas have a tendency to become warmer as they operate, almost invariably causing bathers to remove themselves from the water at some point to sit on a ledge and cool down. This can be overcome by the simple step of introducing small amounts of cool swimming-pool water to the spa: It’s a user-friendly way to maximize bather comfort.
I’m also an advocate for installing blowers with spa systems instead of relying completely on air channels and the Venturi effect. Blowers don’t cost much either to install or operate – and they do a great job of kicking up the hydrotherapeutic action in even the simplest of spas.
DUE CONSIDERATION
For the reasons touched upon above, I’ve never taken a casual approach to the plumbing/steel phase of my projects. I know my way around basic pipe diameters, valves, fittings and the like, and I know the functional distinctions between schedule 80 and schedule 40 PVC – but I also know the limits of my knowledge and call in the cavalry when I need the help.
Once everything is specified, I work in close collaboration with my plumber, steel installer and electrician to make sure the plans are followed, that penetrations are set up at the proper places and at the appropriate levels and that aesthetic deficiencies are either avoided or kept to an absolute minimum.
This extends to a system element as simple as return lines: Most pools have too few of them to be efficient, but I make certain – despite the fact I object to their intrusions on my finishes – that there are enough of them to ensure adequate circulation throughout the entire vessel. The basic need is for the pool to work; my job then becomes making certain it’s the best it can be visually.
At all stages, our projects should serve just one key fact: Water is and has always been the most important element in our work, and it seems to me we all could stand being a bit more insightful and deliberate about how we set it up to move through our watershapes!
David Tisherman is the principal in two design/construction firms: David Tisherman’s Visuals of Manhattan Beach, Calif., and Liquid Design of Cherry Hill, N.J. He can be reached at [email protected]. He is also an instructor for Artistic Resources & Training (ART); for information on ART’s classes, visit www.theartofwater.com.