Despite everyone’s best intentions, concrete structures sometimes crack. If those cracks occur in the shell of a pool, spa or other watershape and are big enough, they’ll eventually leak – which often leads to development of even bigger cracks and far larger headaches for everyone involved.
In many cases, nobody is to blame. You might have worked under the guidance of a geologist or engineer and used good construction practices in building a structure meant to withstand the tests of soils that expand, contract, shift, settle and occasionally quake, but structural cracks are a fact of life. You can reduce the odds of cracking, but the earth is a powerful and unpredictable host, and so long as we build concrete shells in the ground, some of them will fail.
Sometimes the problems emerge quickly, but most of the time structural cracks develop over a period of years. When this happens, owners have two choices: They can pay to have the whole structure ripped out and replaced, or they can hire someone to try to fix it. As has been described in previous articles in WaterShapes, extreme structural failures are best remedied by demolition and reconstruction. So long as the contractor doesn’t repeat the mistakes of their predecessor, rebuilding is effective – but it’s always an expensive proposition.
As an alternative, I contend that you can effectively and permanently repair many of the structural cracks that occur. Doing so is far less expensive than rebuilding from the dirt up, and it can be done in conjunction with cosmetic refurbishments, such as resurfacing or retiling, that are part of the regular lifecycle of a watershape.
EPOXY MOXIE
The method I use in repairing shells is a specially designed epoxy-injection process. In concept, it’s simple: Once I’ve done as much as I can to stabilize the structure, I inject super-strong epoxy resins into the structural cracks under pressure; the material fills the gap and hardens to create an extremely durable bond.
For years now, I (and other proponents of this technique) have made the case that the bond created by these epoxy resins is stronger than the concrete itself. Recent studies have shown this to be true to an extent far beyond our most optimistic appraisals of epoxy’s strength (see the sidebar just below for further discussion of epoxy’s strength).
| Heavy Pressure
I have long stood by the claim that epoxy injection makes for a bond that exceeds the strength of the concrete itself. That’s a big statement, and I don’t blame anyone unfamiliar with the process for being skeptical.
I’d like to offer proof in two forms – one anecdotal, the other scientific.
A couple of years ago, I was brought in to help NASA determine how to deal with cracks on its launch pads at Cape Canaveral. After dozens of years and countless launches, these massive, reinforced-concrete slabs had begun to crack. After seeing data on the strength of epoxy injection, officials at NASA gave my company a call – and a contract to repair the launch pads.
It’s been a challenge. We’ve had to develop techniques for injecting epoxy resins deep into the slabs to fill miniscule cracks and fissures. We’ve spent months at the Cape shoring up the launch pads in advance of Space Shuttle and satellite lift-offs. So far, our patches have withstood the tremendous heat, pressure and vibration delivered by what are among the most powerful machines ever built.
Of course, NASA wouldn’t have agreed to use epoxy injection if we couldn’t prove that it provides a strong bond. Studies conducted over the past three years by independent laboratories have made that case for us.
Using the same techniques for testing the compression strength of gunite, core samples that cut across large epoxy-filled cracks have been taken and placed under a hydraulic press in the laboratory. (This is the same procedure used to test whether or not concrete meets the psi standard defined by engineers.)
In every test, the core sample containing the epoxy patch resisted more than 5,500 psi before breaking. And on those samples, researchers noted that the patched portion of the sample held fast while the adjoining concrete broke away. Suffice to say, epoxy properly injected in a structural crack is tough stuff!
– M.G. |
There are several keys to creating this bond. First, you must determine which among the many available types of epoxy to use – a decision made during the initial damage assessment.
We use a wide range of two-part epoxy products that require the on-site, last-minute mixing of a resin and a catalyst (typically known as parts A and B). These products are formulated to provide a wide range of viscosities and bond strengths. The trick to achieving a maximal bond in a crack in concrete is to select an epoxy product with a viscosity that enables you to completely fill the void.
Wide cracks, especially those on vertical surfaces, require higher viscosity epoxies than do smaller cracks. In other words, you need a thicker material that will adequately fill gaps and stay in place as it hardens. By contrast, smaller cracks can be bridged by thinner materials that are able to penetrate into hairline crevices without the use of tremendous pressure.
Epoxy manufacturers offer products that meet these needs. We use products ranging in viscosity from 25 to 600 centipoises (cps). (Centipoise is the unit of measure for adhesive viscosity.) The lower-viscosity epoxies – that is, those we’d use for hairline cracks – have about the same viscosity as water: That’s a really thin resin. For big vertical cracks, we use the 600 cps epoxies, which is about as thick as molasses on a cool day.
Perhaps the biggest advance in epoxy injection in recent years has come with the advent of ultra-thin, very-low-viscosity materials that enable you to fill cracks you can barely see. This has enabled companies like ours to repair “cosmetic” cracks before they become structural problems.
Whether you’re dealing with large gaps or small ones, deciding which epoxy to use for what size crack is a real trick, one that requires both experience and a feel for each job.
SQUEEZING IN
Once you’ve sized up the situation and chosen an epoxy in this selection phase, the project is ready to enter its second phase: preparation.
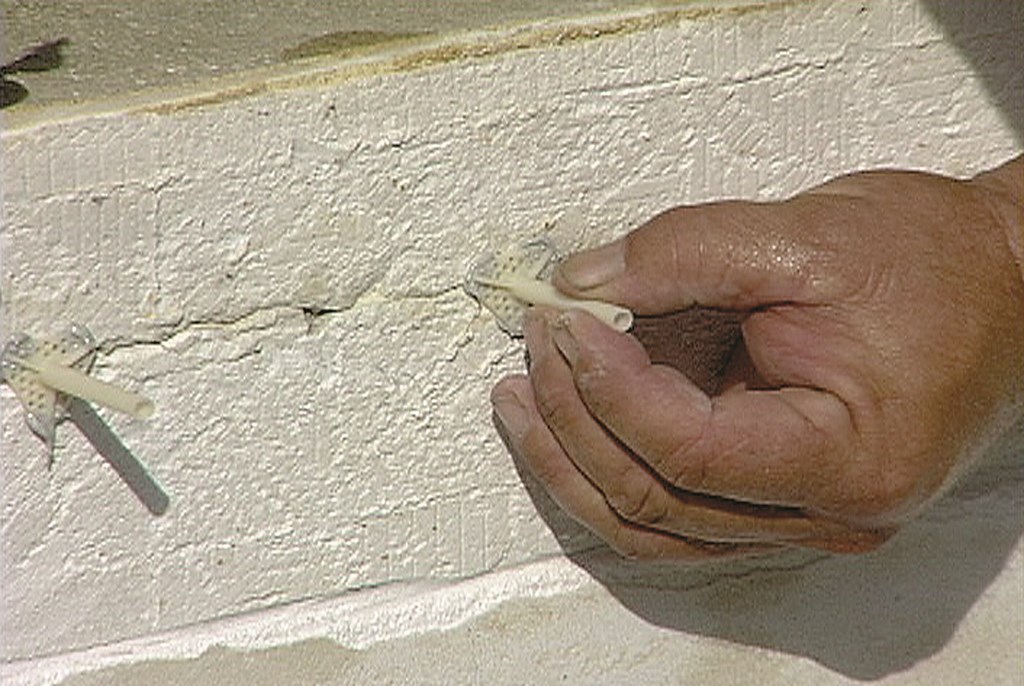
The first step here involves creating a special patch over the crack. This patch holds special “injection ports” – small plastic tubes inserted into the cracks and through which the epoxy eventually will be squeezed into the voids (Figure 1). As important, the patch keeps the epoxy from settling out of the crack after it’s been applied.
| Figure 1: If the crack is large enough, placing the injection ports at six-inch intervals along the crack is easy. In many cases, however, you need to drill out a hole for the port. |
Remember that epoxy injection uses some pressure to get the job done. If you use too much pressure to inject epoxy that’s too thick for the crack you’re trying to fill, you’ll blow out your patch and injection ports and have to start all over.
Depending upon the size of the cracks (width, depth and length), we choose between two different pumping systems: one for small jobs with small cracks that will be filled with low-viscosity epoxy; another for larger jobs with big cracks that will be filled with high-viscosity epoxy. For small jobs, we use a hand-held, piston-pump system. For larger jobs, we bring in an electric-powered, pressurized pumping system.
The small pump draws epoxy, premixed and placed in a reservoir, through a hose and into a cylinder contained in the hand-held applicator gun. The operator pulls a lever, a drop-valve opens and the epoxy is injected into the void via the injection ports. The large, powered pump has two reservoirs, one for the resin, the other for the catalyst, and automatically mixes them in a spiral tube before the material is pumped into the injection ports through a hose.
| Ground Work
As mentioned in the accompanying text, it’s important in repairing a cracked concrete shell to understand what caused it to fail in the first place.
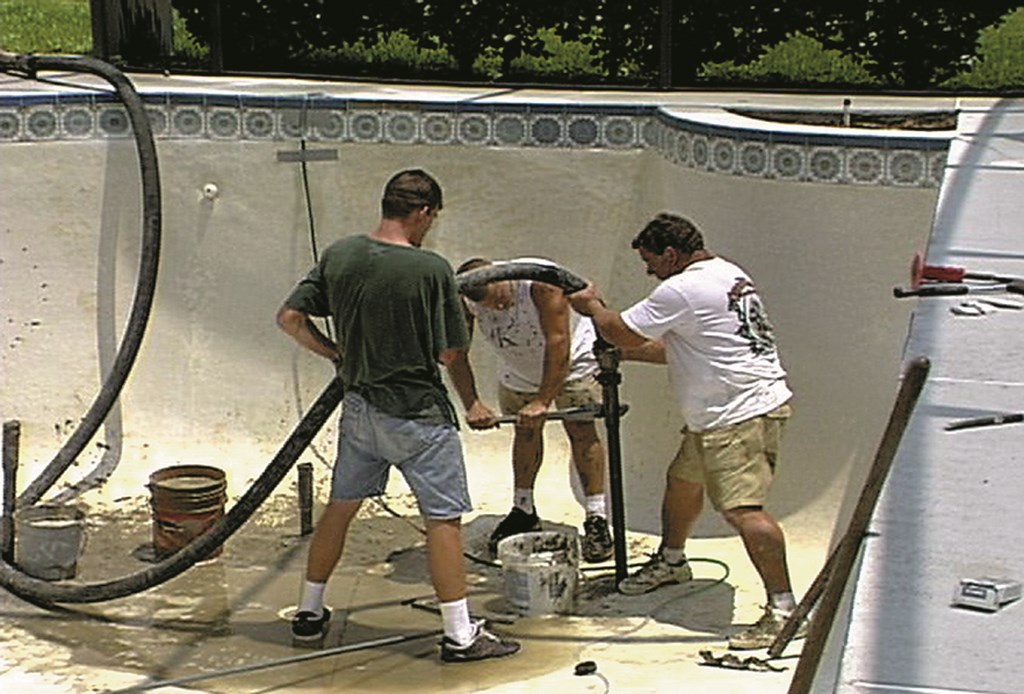
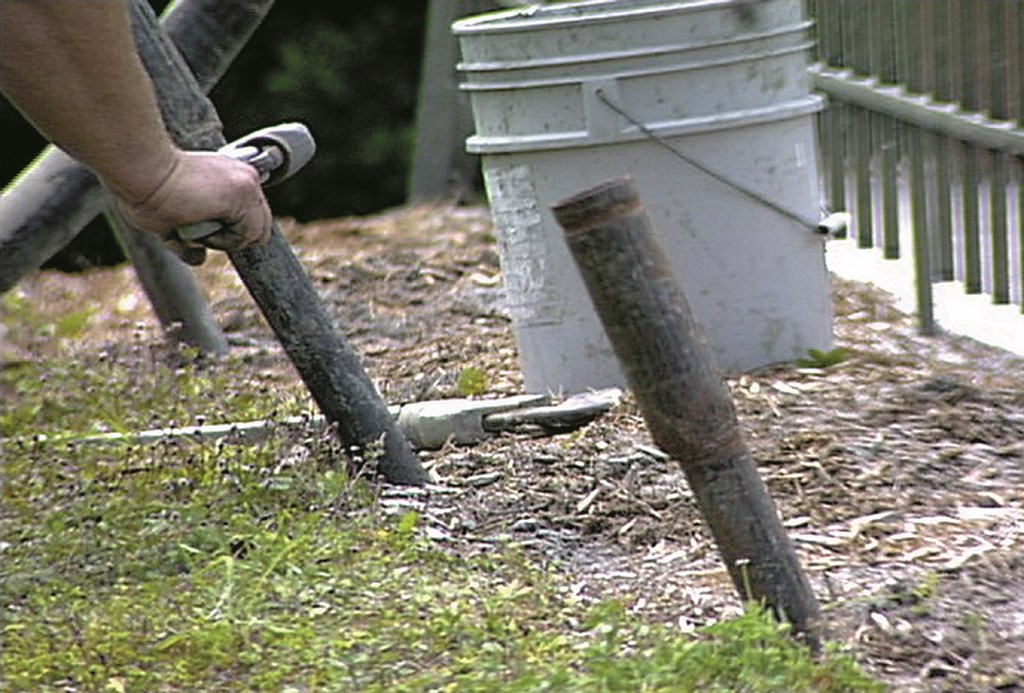
On many jobs, I bring in a geologist or engineer to examine the site and make recommendations about soil remediation procedures. Oftentimes in my area, which is plagued by settlement of sandy soils, the experts will recommend a procedure known as pressure grouting or compaction grouting. This is used where settlement has created voids next to or beneath the concrete structure; in turn, the voids allow for movement and cracking.
In pressure grouting, we will install pipes at various locations and depths and then inject concrete into the voids in order to stabilize the soil immediately around the shell. In effect, this increases the load-bearing capacity of the soil by creating a sub-base that is better able to support the weight of the concrete shell. It’s like backfilling an unstable shell with concrete to make it sound.
Compared to the epoxy-injection technique, pressure grouting is more specialized and requires considerably more training and experience, basically because so many variables and such a wide range of soil conditions can be involved.
In our area, for example, we run into a lot of gravely and sandy soil that simplifies pressure grouting. More often than not, we’re able to inject pressurized concrete and stabilize the structure. In areas with expansive clay soils, by contrast, grouting is much harder. In either case, I would only recommend taking this serious remediation step with the advice and approval of a geologist or soils engineer.
– M.G. |
My powered unit has an adjustable psi setting. I typically pump the epoxy into the cracks at about 30 to 50 psi, while some hairline cracks require pressures up to 200 to 300 psi.
But I’m getting ahead of myself here: As I mentioned at the outset, in addition to deciding which epoxy to use and what system to inject it with, our initial inspections include an examination of the cause or causes of failure. In the flatlands of the Southeast, which is where I work, I see lots of unanticipated settlement of sandy soils.
Needless to say, I don’t want to be called back to visit another set of cracks and a disillusioned client, so I do what I need to do at this point to stabilize the situation and set the shell up for years of trouble-free performance. (There’s a lot to say about this aspect of the overall repair job; see the sidebar just abovbe for some of these details.)
READYING THE VOIDS
Now work begins on the crack itself.
The first step is to rid the crack of any loose material or debris. This is really important, because you don’t want your epoxy bonding to anything other than a clean concrete surface. To get this job done, I use a combination of pressure washing and vacuuming to be sure that we’re good to go. If necessary, I’ll remove tile and even coping to clean out voids wherever I find them.
One thing to look out for here is water leaking back into the vessel through cracks. If the flow is obvious from staining or some other clue, you know right away that you’ll have to take steps to evacuate the surrounding soil of ground water. But be on the lookout for small trickles or seepage: These will be much less obvious and perhaps even more troublesome.
Keeping water out of the cracks is very important because it keeps the epoxy from fully penetrating the crack. The water doesn’t affect the epoxy chemically, but it keeps it away form the voids where it’s needed the most. As a result, when I do observe water, I’ll often insert a well line into the ground to pump ground water out of the area while we’re working.
The next step is to insert the injection ports into the cracks. These will vary in length a bit, but usually ports I’ve cut to three inches will do the trick. Obviously, you can vary the diameter of the ports as well. And in some special applications, you may even need to drill out a crack so you can insert ports to a greater depth. On a typical swimming pool job, I’ll insert ports at approximately six-inch intervals over the full length of the crack.
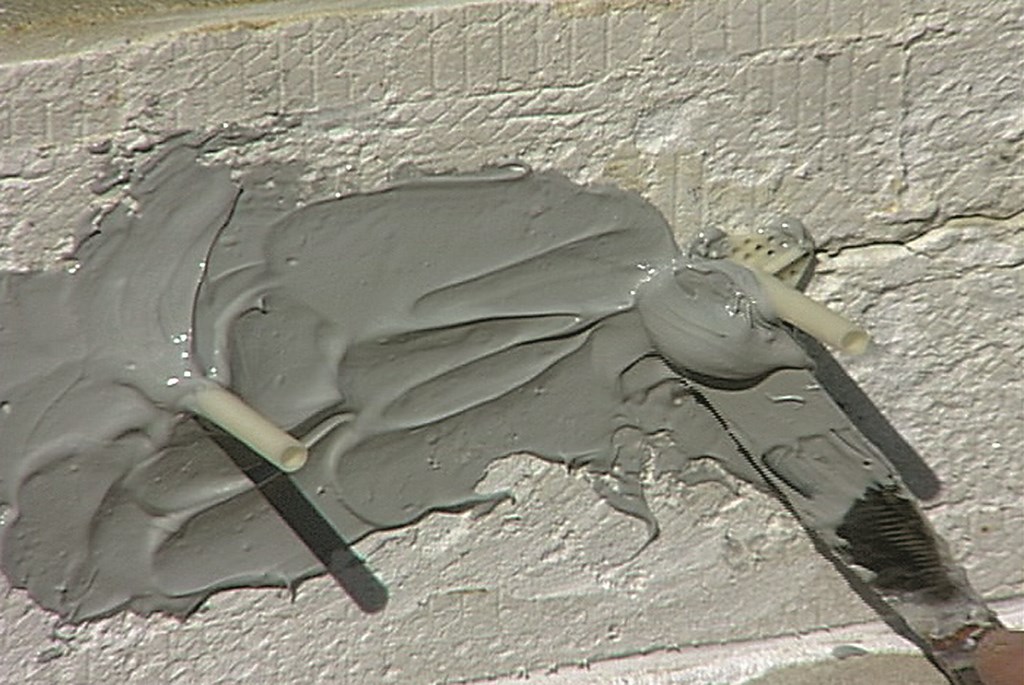
With the injection ports in place, it’s time to create the all-important patch, which I do by spreading a quick-setting epoxy over the top of the crack (Figure 2). This is really thick stuff, far too viscous to penetrate and actually fill any gaps. Instead, this patch forms a bridge across the top of the crack that seals it and, as mentioned above, holds the ports in place for the epoxy-injection process. This patch material usually takes 20 minutes or so to set up, depending upon the air temperature.
| Figure 2: Once the ports are in place, a patch made with a very-high-viscosity epoxy is buttered over the crack both to seal the ports in place and to keep the injected epoxy from flowing out of the crack. |
When it’s had time to set, I inspect the patch and the injection ports to make sure that everything is sealed and tightly in place. Now it’s time to get out the epoxy and the injection equipment and go to work pumping the material into the void.
FILLING THE GAP
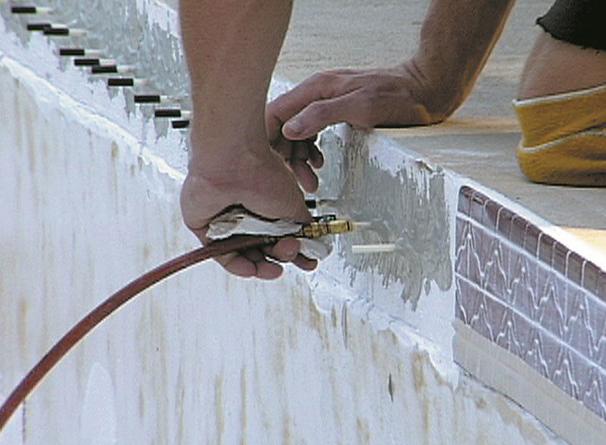
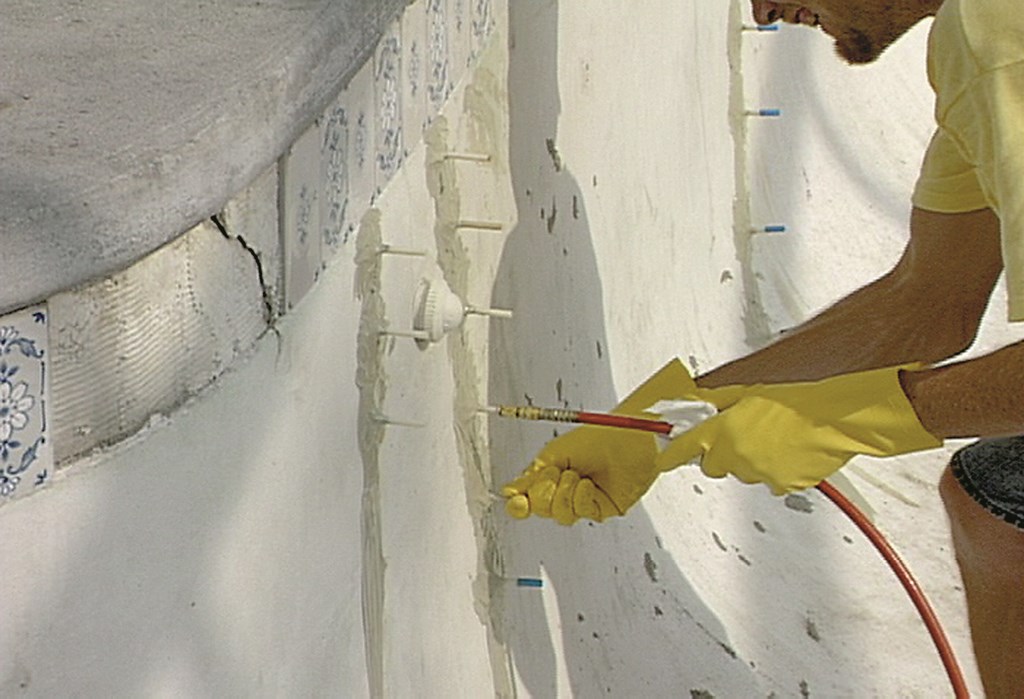
No matter whether I’m using the hand-held pump or the electric pumping unit, it’s finally time to inject the epoxy into the crack. I start at the injection port on one end of the crack, filling until epoxy begins to flow out of the next port in line (Figure 3). Now I back off, cap the injection port I’ve been using, and move on to the next port, repeating this process until I’m done.
| Figure 3: Starting at the bottom of vertically oriented cracks, we inject epoxy until it starts coming out of the hole above, then cap the current hole and move up the row. With a powered injector, this process goes smoothly and quickly. |
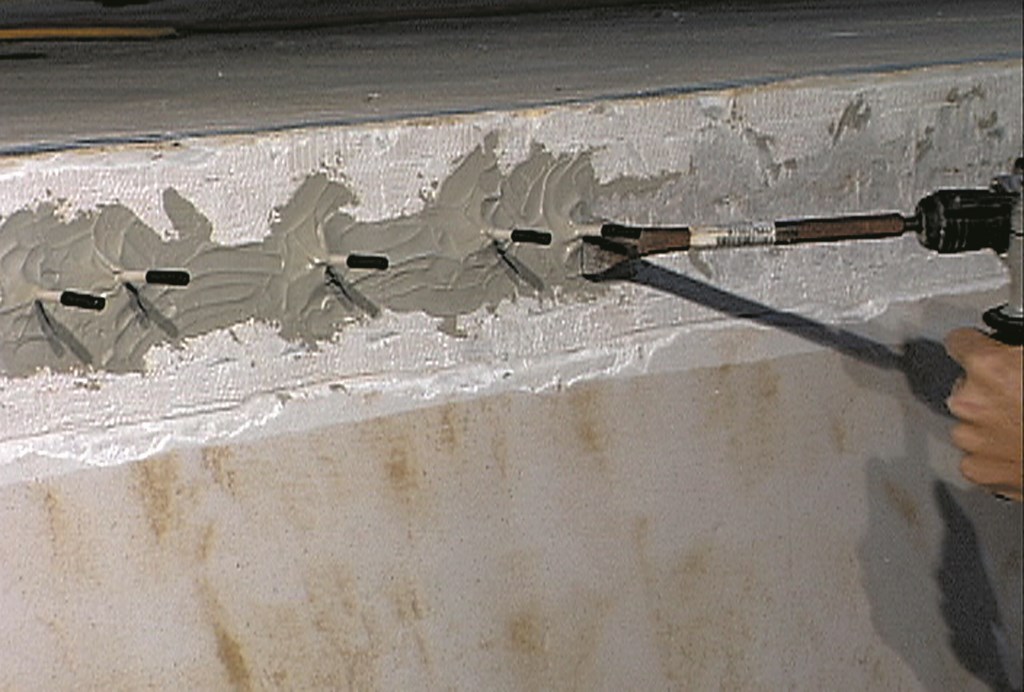
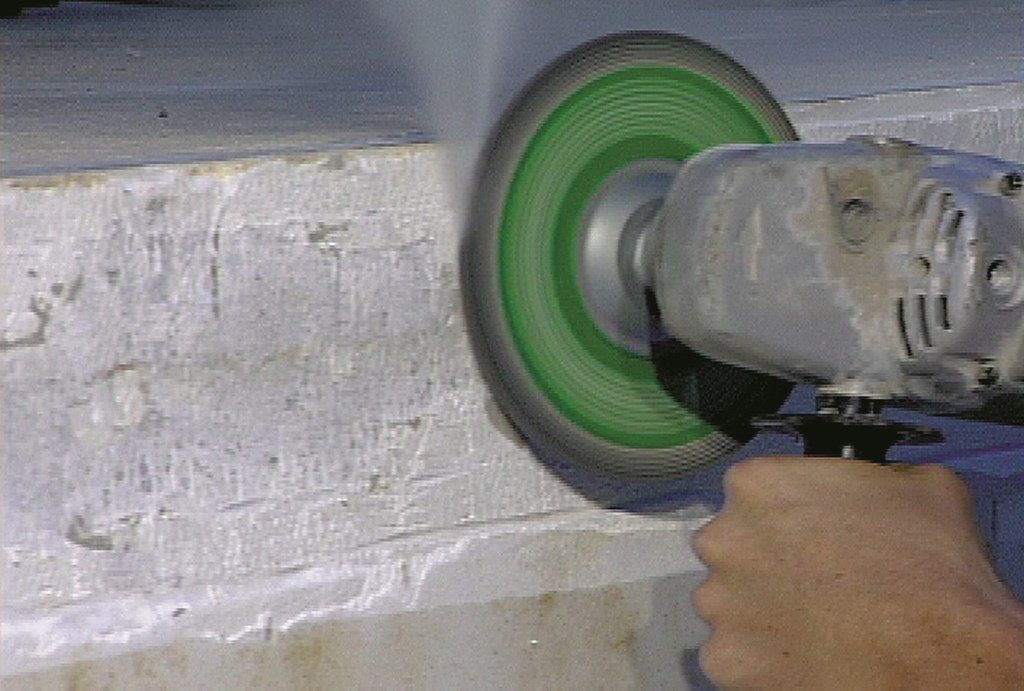
It’s important to begin at one end of the crack and proceed continuously to the other. (If the crack has a vertical orientation, I’ll always begin at the lowest point and work my way up.) Once the cracks are filled, I let the epoxy cure overnight. The next morning, I roughly cut off the injection ports with a chisel mounted in a hammer drill (Figure 4), then use a power grinder to level the patch and injection ports flush with the surface of the concrete (Figure 5). (The injection ports are filled with hardened epoxy and so become part of the repair.)
| Figure 4 (left): Once the epoxy has cured, we go back and clean up the surface of the repair. The first step is cutting off the epoxy-filled injection ports. If there’s any doubt about the toughness of the repair materials, this operation is best performed with a heavy-duty chisel mounted on a hammer drill. Figure 5 (right): The last step in the repair process before the vessel is replastered or the tile is reapplied involves grinding away the patch and leveling the repaired area with the surrounding concrete. |
I’ve been using this technique for more than 20 years now and have invested a lot of time and energy in teaching the method to others. Through the years, I’ve found that epoxy injection offers support to builders faced with cracked shells – and to homeowners who simply want things to be right with their watershapes. Nobody wants shells to fail: This is a way to fix them.
Once I’ve ground away the patch, the watershape is ready to hold water. And experience tells me that these cracks will not reopen.
Mike Gravenmier is founder and owner of Advanced Grouting & Epoxy Techniques, an Orlando, Fla.-based contractor specializing in the pressure grouting of unstable soils and the repair of structural cracks in watershape shells and concrete slabs. He began his work in these specialized fields 17 years ago, when he went to work for a Florida pressure-grouting firm. He founded his own firm in 1984 and quickly moved into the complementary field of epoxy injection. Gravenmier has produced an instructional video detailing both of these repair techniques and routinely makes himself available for consulting and for training of other contractors interested in moving into epoxy-injection and pressure-grouting work.
Normal
0
false
false
false
EN-US
X-NONE
X-NONE
MicrosoftInternetExplorer4
When concrete shells crack, trouble is near at hand: The emerging cracks are sure to grow, and water will eventually leak out of the watershape to create a cascade of additional problems. Unfortunately for the homeowner, the options here are few and can be very costly. In this feature, an expert in crack remediation and shell repair explores those options and discusses the techniques he uses to shore up severe structural cracks in a reliable and permanent way.
Despite everyone’s best intentions, concrete structures sometimes crack. If those cracks occur in the shell of a pool, spa or other watershape and are big enough, they’ll eventually leak – which often leads to development of even bigger cracks and far larger headaches for everyone involved.
In many cases, nobody is to blame. You might have worked under the guidance of a geologist or engineer and used good construction practices in building a structure meant to withstand the tests of soils that expand, contract, shift, settle and occasionally quake, but structural cracks are a fact of life. You can reduce the odds of cracking, but the earth is a powerful and unpredictable host, and so long as we build concrete shells in the ground, some of them will fail.
Sometimes the problems emerge quickly, but most of the time structural cracks develop over a period of years. When this happens, owners have two choices: They can pay to have the whole structure ripped out and replaced, or they can hire someone to try to fix it. As has been described in previous articles in WaterShapes, extreme structural failures are best remedied by demolition and reconstruction. So long as the contractor doesn’t repeat the mistakes of their predecessor, rebuilding is effective – but it’s always an expensive proposition.
As an alternative, I contend that you can effectively and permanently repair many of the structural cracks that occur. Doing so is far less expensive than rebuilding from the dirt up, and it can be done in conjunction with cosmetic refurbishments, such as resurfacing or retiling, that are part of the regular lifecycle of a watershape.
EPOXY MOXIE
The method I use in repairing shells is a specially designed epoxy-injection process. In concept, it’s simple: Once I’ve done as much as I can to stabilize the structure, I inject super-strong epoxy resins into the structural cracks under pressure; the material fills the gap and hardens to create an extremely durable bond.
For years now, I (and other proponents of this technique) have made the case that the bond created by these epoxy resins is stronger than the concrete itself. Recent studies have shown this to be true to an extent far beyond our most optimistic appraisals of epoxy’s strength (see the sidebar on page 45 for further discussion of epoxy’s strength).
There are several keys to creating this bond. First, you must determine which among the many available types of epoxy to use – a decision made during the initial damage assessment.
We use a wide range of two-part epoxy products that require the on-site, last-minute mixing of a resin and a catalyst (typically known as parts A and B). These products are formulated to provide a wide range of viscosities and bond strengths. The trick to achieving a maximal bond in a crack in concrete is to select an epoxy product with a viscosity that enables you to completely fill the void.
Wide cracks, especially those on vertical surfaces, require higher viscosity epoxies than do smaller cracks. In other words, you need a thicker material that will adequately fill gaps and stay in place as it hardens. By contrast, smaller cracks can be bridged by thinner materials that are able to penetrate into hairline crevices without the use of tremendous pressure.
Epoxy manufacturers offer products that meet these needs. We use products ranging in viscosity from 25 to 600 centipoises (cps). (Centipoise is the unit of measure for adhesive viscosity.) The lower-viscosity epoxies – that is, those we’d use for hairline cracks – have about the same viscosity as water: That’s a really thin resin. For big vertical cracks, we use the 600 cps epoxies, which is about as thick as molasses on a cool day.
Perhaps the biggest advance in epoxy injection in recent years has come with the advent of ultra-thin, very-low-viscosity materials that enable you to fill cracks you can barely see. This has enabled companies like ours to repair “cosmetic” cracks before they become structural problems.
Whether you’re dealing with large gaps or small ones, deciding which epoxy to use for what size crack is a real trick, one that requires both experience and a feel for each job.
SQUEEZING IN
Once you’ve sized up the situation and chosen an epoxy in this selection phase, the project is ready to enter its second phase: preparation.
The first step here involves creating a special patch over the crack. This patch holds special “injection ports” – small plastic tubes inserted into the cracks and through which the epoxy eventually will be squeezed into the voids (Figure 1). As important, the patch keeps the epoxy from settling out of the crack after it’s been applied.
Remember that epoxy injection uses some pressure to get the job done. If you use too much pressure to inject epoxy that’s too thick for the crack you’re trying to fill, you’ll blow out your patch and injection ports and have to start all over.
Depending upon the size of the cracks (width, depth and length), we choose between two different pumping systems: one for small jobs with small cracks that will be filled with low-viscosity epoxy; another for larger jobs with big cracks that will be filled with high-viscosity epoxy. For small jobs, we use a hand-held, piston-pump system. For larger jobs, we bring in an electric-powered, pressurized pumping system.
The small pump draws epoxy, premixed and placed in a reservoir, through a hose and into a cylinder contained in the hand-held applicator gun. The operator pulls a lever, a drop-valve opens and the epoxy is injected into the void via the injection ports. The large, powered pump has two reservoirs, one for the resin, the other for the catalyst, and automatically mixes them in a spiral tube before the material is pumped into the injection ports through a hose.
My powered unit has an adjustable psi setting. I typically pump the epoxy into the cracks at about 30 to 50 psi, while some hairline cracks require pressures up to 200 to 300 psi.
But I’m getting ahead of myself here: As I mentioned at the outset, in addition to deciding which epoxy to use and what system to inject it with, our initial inspections include an examination of the cause or causes of failure. In the flatlands of the Southeast, which is where I work, I see lots of unanticipated settlement of sandy soils.
Needless to say, I don’t want to be called back to visit another set of cracks and a disillusioned client, so I do what I need to do at this point to stabilize the situation and set the shell up for years of trouble-free performance. (There’s a lot to say about this aspect of the overall repair job; see the sidebar below for some of these details.)
READYING THE VOIDS
Now work begins on the crack itself.
The first step is to rid the crack of any loose material or debris. This is really important, because you don’t want your epoxy bonding to anything other than a clean concrete surface. To get this job done, I use a combination of pressure washing and vacuuming to be sure that we’re good to go. If necessary, I’ll remove tile and even coping to clean out voids wherever I find them.
One thing to look out for here is water leaking back into the vessel through cracks. If the flow is obvious from staining or some other clue, you know right away that you’ll have to take steps to evacuate the surrounding soil of ground water. But be on the lookout for small trickles or seepage: These will be much less obvious and perhaps even more troublesome.
Keeping water out of the cracks is very important because it keeps the epoxy from fully penetrating the crack. The water doesn’t affect the epoxy chemically, but it keeps it away form the voids where it’s needed the most. As a result, when I do observe water, I’ll often insert a well line into the ground to pump ground water out of the area while we’re working.
The next step is to insert the injection ports into the cracks. These will vary in length a bit, but usually ports I’ve cut to three inches will do the trick. Obviously, you can vary the diameter of the ports as well. And in some special applications, you may even need to drill out a crack so you can insert ports to a greater depth. On a typical swimming pool job, I’ll insert ports at approximately six-inch intervals over the full length of the crack.
With the injection ports in place, it’s time to create the all-important patch, which I do by spreading a quick-setting epoxy over the top of the crack (Figure 2 on page 42). This is really thick stuff, far too viscous to penetrate and actually fill any gaps. Instead, this patch forms a bridge across the top of the crack that seals it and, as mentioned above, holds the ports in place for the epoxy-injection process. This patch material usually takes 20 minutes or so to set up, depending upon the air temperature.
When it’s had time to set, I inspect the patch and the injection ports to make sure that everything is sealed and tightly in place. Now it’s time to get out the epoxy and the injection equipment and go to work pumping the material into the void.
FILLING THE GAP
No matter whether I’m using the hand-held pump or the electric pumping unit, it’s finally time to inject the epoxy into the crack. I start at the injection port on one end of the crack, filling until epoxy begins to flow out of the next port in line (Figure 3). Now I back off, cap the injection port I’ve been using, and move on to the next port, repeating this process until I’m done.
It’s important to begin at one end of the crack and proceed continuously to the other. (If the crack has a vertical orientation, I’ll always begin at the lowest point and work my way up.) Once the cracks are filled, I let the epoxy cure overnight. The next morning, I roughly cut off the injection ports with a chisel mounted in a hammer drill (Figure 4), then use a power grinder to level the patch and injection ports flush with the surface of the concrete (Figure 5). (The injection ports are filled with hardened epoxy and so become part of the repair.)
I’ve been using this technique for more than 20 years now and have invested a lot of time and energy in teaching the method to others. Through the years, I’ve found that epoxy injection offers support to builders faced with cracked shells – and to homeowners who simply want things to be right with their watershapes. Nobody wants shells to fail: This is a way to fix them.
Once I’ve ground away the patch, the watershape is ready to hold water. And experience tells me that these cracks will not reopen.
Sidebar 1
Ground Work
As mentioned in the accompanying text, it’s important in repairing a cracked concrete shell to understand what caused it to fail in the first place.
On many jobs, I bring in a geologist or engineer to examine the site and make recommendations about soil remediation procedures. Oftentimes in my area, which is plagued by settlement of sandy soils, the experts will recommend a procedure known as pressure grouting or compaction grouting. This is used where settlement has created voids next to or beneath the concrete structure; in turn, the voids allow for movement and cracking.
In pressure grouting, we will install pipes at various locations and depths and then inject concrete into the voids in order to stabilize the soil immediately around the shell. In effect, this increases the load-bearing capacity of the soil by creating a sub-base that is better able to support the weight of the concrete shell. It’s like backfilling an unstable shell with concrete to make it sound.
Compared to the epoxy-injection technique, pressure grouting is more specialized and requires considerably more training and experience, basically because so many variables and such a wide range of soil conditions can be involved.
In our area, for example, we run into a lot of gravely and sandy soil that simplifies pressure grouting. More often than not, we’re able to inject pressurized concrete and stabilize the structure. In areas with expansive clay soils, by contrast, grouting is much harder. In either case, I would only recommend taking this serious remediation step with the advice and approval of a geologist or soils engineer.
– M.G.
Sidebar 2
Heavy Pressure
I have long stood by the claim that epoxy injection makes for a bond that exceeds the strength of the concrete itself. That’s a big statement, and I don’t blame anyone unfamiliar with the process for being skeptical.
I’d like to offer proof in two forms – one anecdotal, the other scientific.
A couple of years ago, I was brought in to help NASA determine how to deal with cracks on its launch pads at Cape Canaveral. After dozens of years and countless launches, these massive, reinforced-concrete slabs had begun to crack. After seeing data on the strength of epoxy injection, officials at NASA gave my company a call – and a contract to repair the launch pads.
It’s been a challenge. We’ve had to develop techniques for injecting epoxy resins deep into the slabs to fill miniscule cracks and fissures. We’ve spent months at the Cape shoring up the launch pads in advance of Space Shuttle and satellite lift-offs. So far, our patches have withstood the tremendous heat, pressure and vibration delivered by what are among the most powerful machines ever built.
Of course, NASA wouldn’t have agreed to use epoxy injection if we couldn’t prove that it provides a strong bond. Studies conducted over the past three years by independent laboratories have made that case for us.
Using the same techniques for testing the compression strength of gunite, core samples that cut across large epoxy-filled cracks have been taken and placed under a hydraulic press in the laboratory. (This is the same procedure used to test whether or not concrete meets the psi standard defined by engineers.)
In every test, the core sample containing the epoxy patch resisted more than 5,500 psi before breaking. And on those samples, researchers noted that the patched portion of the sample held fast while the adjoining concrete broke away. Suffice to say, epoxy properly injected in a structural crack is tough stuff!
– M.G.
Figure 1: If the crack is large enough, placing the injection ports at six-inch intervals along the crack is easy. In many cases, however, you need to drill out a hole for the port.
Figure 2: Once the ports are in place, a patch made with a very-high-viscosity epoxy is buttered over the crack both to seal the ports in place and to keep the injected epoxy from flowing out of the crack.
Figure 3: Starting at the bottom of vertically oriented cracks, we inject epoxy until it starts coming out of the hole above, then cap the current hole and move up the row. With a powered injector, this process goes smoothly and quickly.
Figure 4: Once the epoxy has cured, we go back and clean up the surface of the repair. The first step is cutting off the epoxy-filled injection ports. If there’s any doubt about the toughness of the repair materials, this operation is best performed with a heavy-duty chisel mounted on a hammer drill.
Figure 5: The last step in the repair process before the vessel is replastered or the tile is reapplied involves grinding away the patch and leveling the repaired area with the surrounding concrete.
Mike Gravenmier is founder and owner of Advanced Grouting & Epoxy Techniques, an Orlando, Fla.-based contractor specializing in the pressure grouting of unstable soils and the repair of structural cracks in watershape shells and concrete slabs. He began his work in these specialized fields 17 years ago, when he went to work for a Florida pressure-grouting firm. He founded his own firm in 1984 and quickly moved into the complementary field of epoxy injection. Gravenmier has produced an instructional video detailing both of these repair techniques and routinely makes himself available for consulting and for training of other contractors interested in moving into epoxy-injection and pressure-grouting work.