


Made to Order

When you design and build custom swimming pools for a living, I’d guess you’re always thinking somewhere in the back of your mind about what your own pool would be like if you ever got the chance to build it.
In my case, when I finally did have the opportunity to design and build one for my home, I knew it had to be a complete extension of my own design philosophy, standards of construction and product choices. That was a no-brainer. What surprised me was just how much excitement and pleasure I derived from the process of seeing my own backyard take shape.
I had a pretty good idea of what I wanted going in. I’ve developed strong likes and dislikes through the years, and I knew with good degree of certainty that our pool would have a vanishing edge, an attached spa, interesting lighting and an array of beautiful finish materials.
Even with all that in mind, however, landing on the perfect design that expressed all of those elements wasn’t automatic by any means. As with any custom watershape, each facet of the project required consideration and a weighing of the options.
This forced me to step back and decide what I thought was most important in terms of design features, aesthetics and functions. The process was challenging at times, but extremely rewarding – mostly because it helped me get in touch with why I’m in this business in the first place: Swimming pools are fun!
THE RIGHT PLACE AND TIME
The fact is, whether you own one for purely aesthetic reasons, for exercise or for splashing around with the kids, pools are about enjoying the finer things in life – or at least they should be. Whenever I’m working with clients these days, I try to make them aware that what they’re really doing is investing in a portion of their lifestyle and that the decisions they make about their pool today will reflect their own tastes and attitudes for years to come.
This was certainly true in our case.
In many ways, in fact, our pool represented a major step in establishing our “dream home.” My wife and I had moved into the Mediterranean-style house in the hills above Escondido in 1996. It’s on a big lot and gave us plenty of room to spread out and put down our roots. My offices for Questar Pools are located in a wing of the home with a separate entrance. All in all, it’s fair to say that this is where we plan to stay, maybe for the rest of our lives.
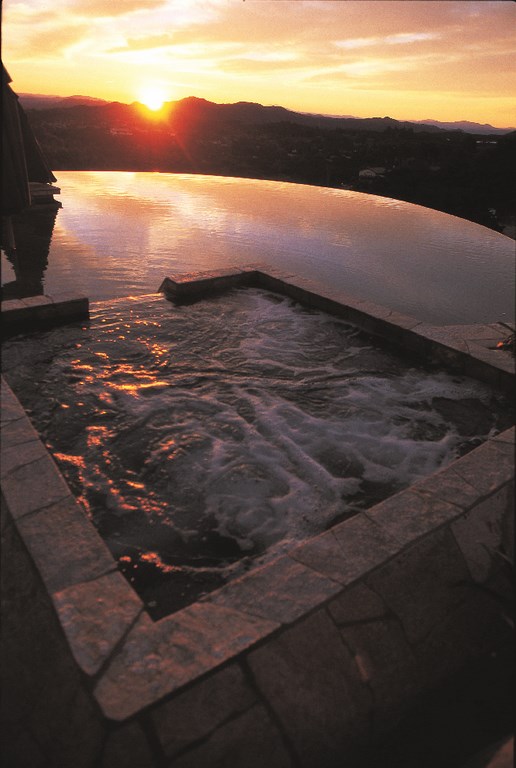
Our first decision, of course, was about where to put the pool. This was pretty easy: We’d lived in the place for a while and knew where it made the most sense to place it. The spot we choose was on a downslope adjacent to a southwest-facing patio. Doors from our family room open onto that space, giving us great access and a beautiful view of the surrounding area. And the sunsets are really something to behold.
| Picking a spot for the pool was easy. With its slope and long view toward the horizon, this slice of the yard was ideal for a vanishing-edge pool of the type I often build for my clients. |
As a bonus, the view of the vanishing edge from the downhill side rises dramatically above the street that wraps around the front of the property. The backside of the pool is the first thing you see as you come onto the road, and it’s already become a useful landmark in giving people directions to the house.
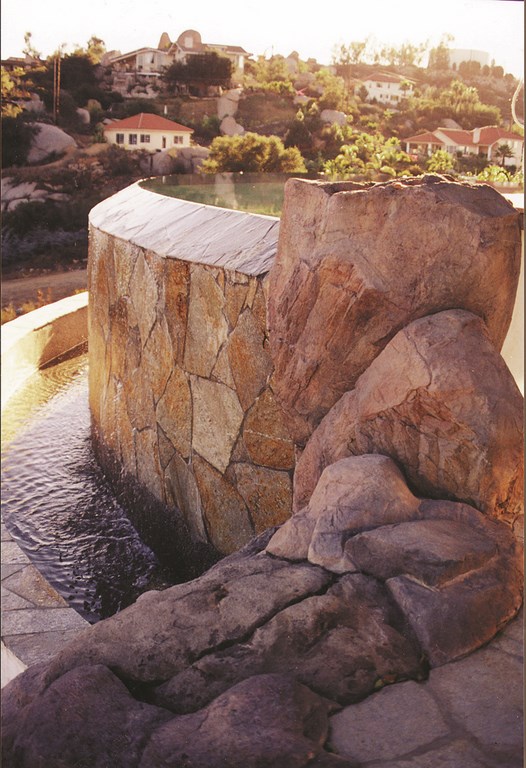
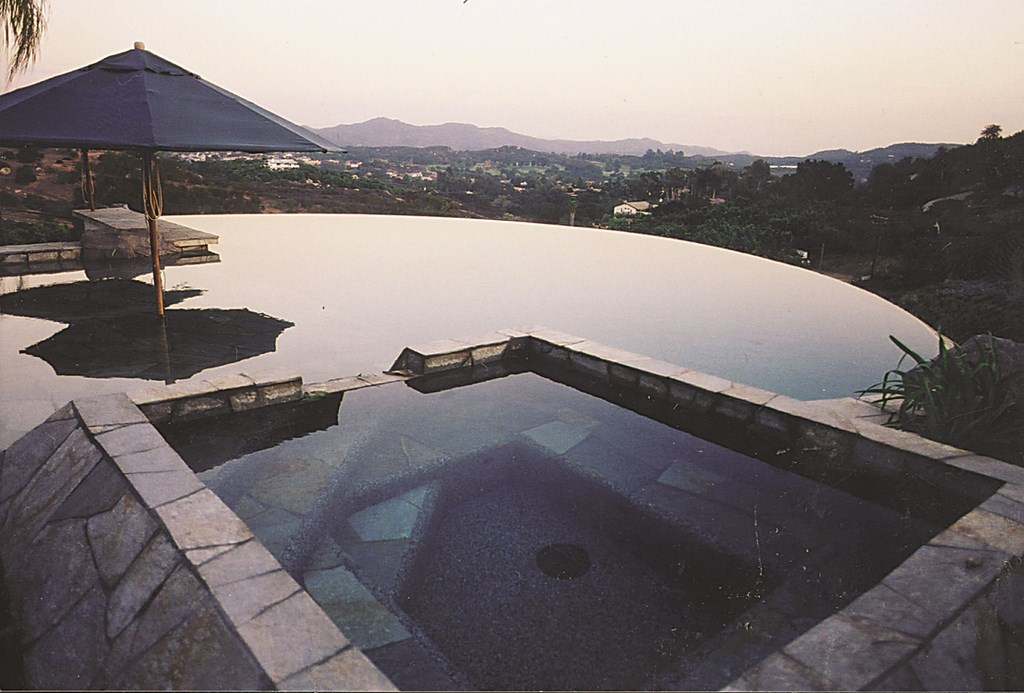
Most of the design decisions came as a result of applying my preferences and experience in a way that’s appropriate to the setting. For example, the square, seven-by-seven-foot spa is tucked away among some rocks on one end of the pool for a sense of privacy. On the other end of the pool is a barbecue area on a deck that’s set about four feet below the waterline and nestled among some granite boulders and artificial rocks. Between these points, which together lend the pool a sense of visual balance, stretches a gently arced, 55-foot vanishing edge.
On the house side, a broad beach entrance gently transitions from the patio into the pool, which reaches its maximum depth of six feet at the base of the outer wall. The pool’s exterior walls and the surrounding deck areas are finished in a shimmering gold quartzite, perfect against the amber-grass-covered hills beyond. The interior of the pool is finished in Pebble Tec’s subtle Tahoe Blue.
A GROUP EFFORT
In terms of the physical location, layout, shape and orientation of the pool, I really think it’s just about perfect – simple, elegant and very accessible – and a beautiful accent for our home’s exterior. It was also a team effort.
My wife, kids and I had talked about the pool from the beginning – a process that made the project even more fun for all of us. Early on, in fact, my daughter, who was nine at the time, came up to me and said, “I’m going to help you draw the pool.”
“Sure,” I said. “What do you think it should look like?”
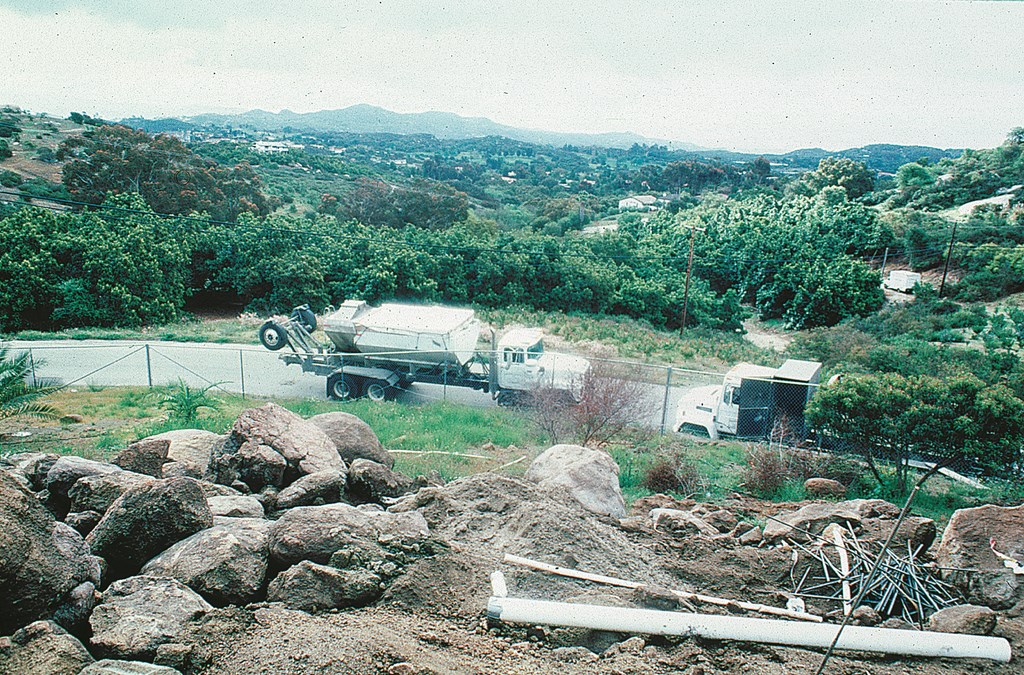
| The site had lots of advantages compared to many hillside spots. We were working on competent soil and had complete control of how the fill beneath the pool was graded and compacted in preparation for the footings and keys that now hold the structure seven feet above grade. |
Being the custom designer I am, I’ve grown to detest traditional dimensions – 15-by-30, 16-by-32, 20-by-40. I even hate the sound of them. I was in for a shock when my daughter said, “The pool should be 20-by-40, ten-feet deep, with a diving board and a slide.”
I was dumbfounded. I wanted to ask her, “Where did you hear that? Have they been teaching bad things at school?” But having more patience with her than I do with most of my clients, I decided not to stamp out her early enthusiasm for pool design – even though there were a couple of fatal flaws in her design, including the diving board in the spa.
With that kind of instinctive input and my own practical experience, I did the first drawings and came up with the set of features we wanted.
Once I established the basic positioning of the beach entrance off the patio and had placed the spa and barbecue on opposite ends of the pool, it all came together pretty easily. I gave some thought to more complex edge designs, but they didn’t really fit the contour of the hillside, so I stuck with a simple arc for the vanishing edge. I’m glad I did: The whole thing has a very nice fan-shaped symmetry and balance to it – and it fits the surroundings perfectly.
When I finished, the overall dimensions ended up being almost exactly 20-by-40. My kid has talent!
ABOVE GRADE
We began construction in February 1999, and the process took quite a while because we fit work on this pool into narrow time frames that fell between other projects. Working with all the same crews and the same suppliers I do business with normally, we slowly pulled things together in a ten-month period.
The first step involved some fairly heavy-duty site preparation, because the pool was to sit about seven feet above grade.
We brought in fill material, compacted it and then dug the footings and keys (on the house side and down the slope, respectively). We were working on competent soil, so despite the hillside setting, there was no need for piles or grade beams. Still, we knew the fill-and-compaction phase would be critical for the long-term stability of the vessel.

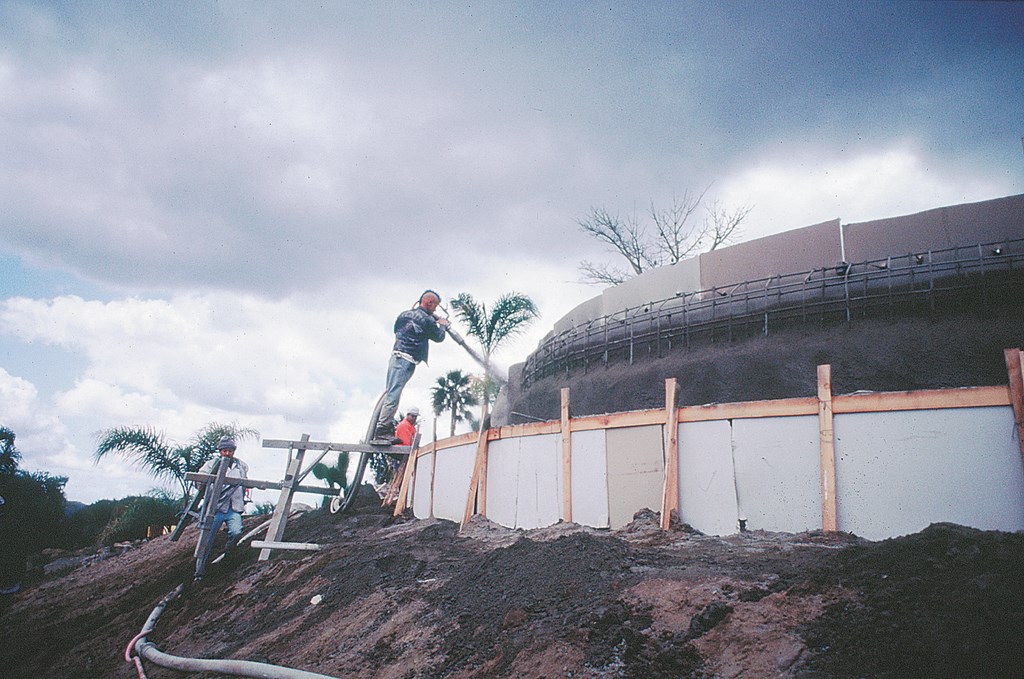
| The gunite shoot went smoothly in every detail and at every key dimension – especially critical in the spa, where I had designed a beveled edge detail that literally knocks the edge off the elevation change. |
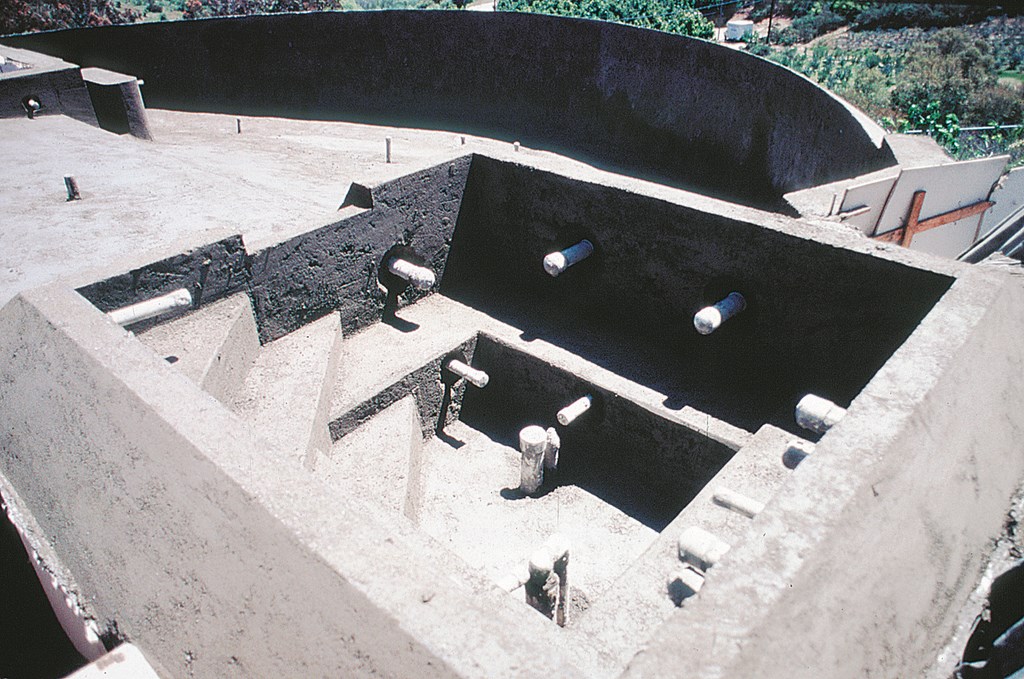
We went through about 150 cubic yards of material in building up the floor as much as three feet deep under the downslope side of the shell. After we raised the floor, we then had to dig back through the compacted surface material into the original material to cut the keys at both ends. The half-circle footprint of the edge and catch basin are vertical extensions of the outer key.
Next, we built the cage and set the plumbing. This was a non-expansive application, so we probably could have gotten away with using a lot less steel – but that’s not the way I work. Rather, I see steel as cheap insurance against structural failures, so I used plenty of it here and in every other job we do.
In this case, we used all #4 bars in both inside and outside cages. The grid on the inside cage is set at six inches on center, with 12-inch centers on the outside.
The plumbing is two- and three-inch schedule 40 PVC. We set returns in the floor for the vanishing edge, traditional returns in the wall for the primary system, and a skimmer and separate floor suction. I used three pumps, one for primary circulation, a second for the vanishing edge and a third as a booster for the spa.
At this point, we also ran the necessary conduit for the lighting and placed special sleeves in the structure to accept umbrellas – something I discuss in the sidebar on page 53.
FORMING THE SHELL
With the steel and plumbing in, we set our forms in preparation for the gunite.
In terms of pool industry standards, the level of construction for our forms is pretty good – but as you can see in the photographs, it’s not up to the level of what my good friend (and Genesis 3 co-founder) David Tisherman does with his forms. His forms always look as though they’re meant to be permanent structures – which makes sense when you look at the kind of weight he’s supporting.
No matter how you do it, the key to good forming is getting the important dimensions just right. If anything’s off here, everything that follows will be off as well, rolling downhill as mistakes that echo through the rest of the construction. Having good elevations and good, accurate dimensions in your forms is critical in avoiding problems later on.
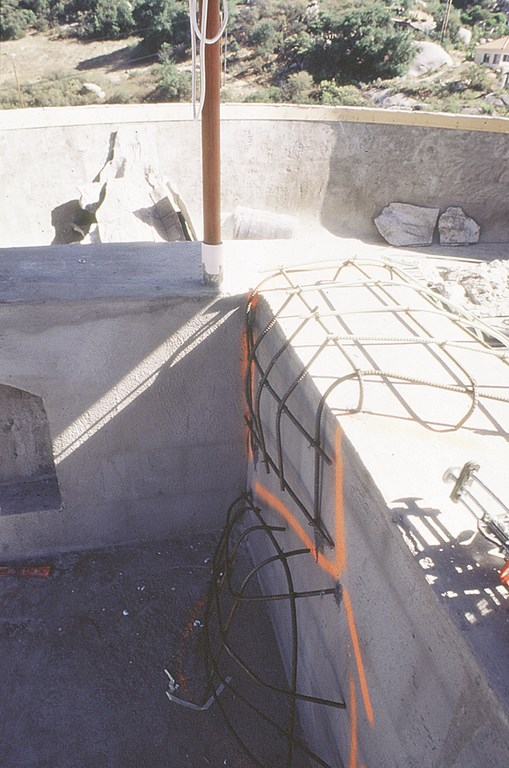
| The pool’s perimeter is ringed with rock, much of it natural granite boulders we found on the property, some of it manufactured on site. In forming the artificial rocks, we used epoxy-coated steel to prevent any future problems with rust caused by water migration. |
The gunite shoot was also pretty standard. With vanishing-edge pools, however, there’s always a question of how to shoot the edge wall. The crew I use decided at some point in their history that they like to shoot the catch basin first, inside out, then shoot the wall from the outside. Next, they strip off the forms from the inside of the wall and flash the pool’s interior. You can, of course, do this the exact opposite way, but I have enough confidence in the crew I use to let them do as they prefer.
The trough for the vanishing edge is three feet wide and two feet deep. (The broader-than-usual width is due to the six-foot height differential between the edge and the top of the surge tank.) The vanishing-edge wall itself is a full 12 inches thick, while the basin wall is eight inches thick.
A couple of key details: There’s a double-wall structure at the transition between the pool and barbecue that helps support the countertop for the bar. Also, I’m not really a fan of big elevation changes in my designs, so I raised the spa a mere 12 inches – just enough to accommodate the beveled contour of the spa walls. That’s a detail I’ve really grown to love.
Finally, we set up a continuous bench instead of individual barstools for in-pool seating along a bar area on the left side of the pool; we did so mainly to accommodate the lighting system. An important point to make here is that we use absolutely no rebound in our pools: We don’t use it for benches, we don’t use it for steps, we don’t use it anywhere – period.
CUSTOM TOUCHES
One of the things that really distinguish high-end custom pools from the run of the mill is the selection of materials used for finishing.
Key to the design here was the use of the aforementioned gold quartzite. As it turned out, our desire to use this material slowed our progress down quite a bit, because during the time that we were building this pool there was a shortage of the material in my area. I’m really glad we were able to wait: It’s pretty dazzling stuff.
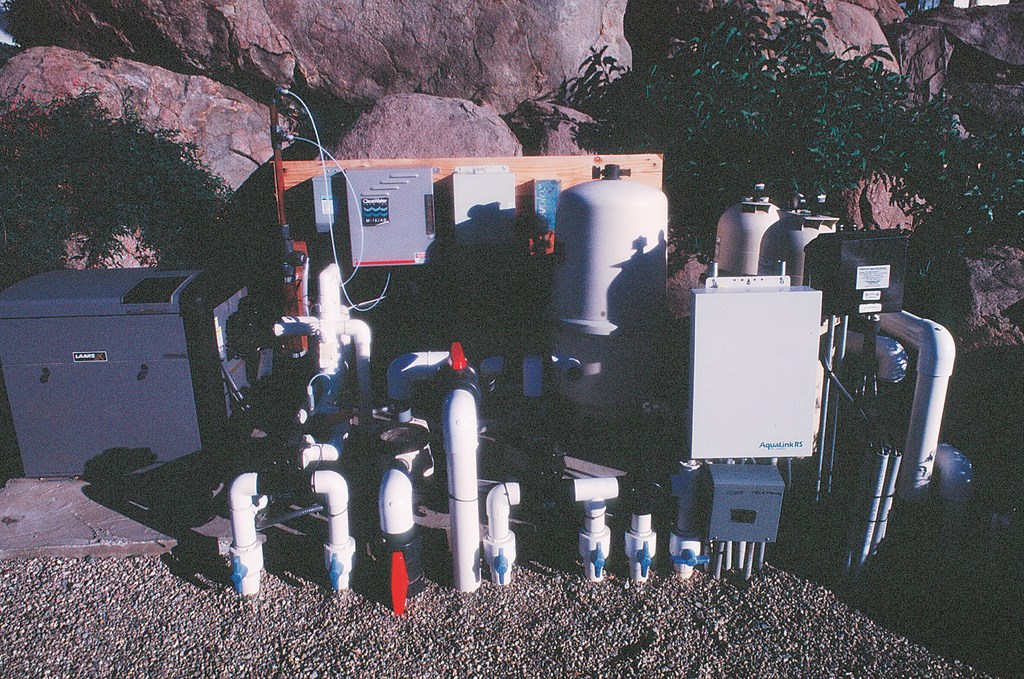
| We pride ourselves on precision execution, and that extends to everything we do – including an equipment pad that’s neat as a pin and provides easy access for routine monitoring and maintenance. |
Another key was tying the new watershape in with the existing structures and patio. Here, we saw-cut and removed small portions of deck and replaced them with some of the gold quartzite. We also put some quartzite in the courtyard area on the opposite side of the house by the front door and also at the entrance to the business. It was a lot of extra material and effort, but we did it to justify and ease the presence of such outstanding material in and around the pool itself.
We also used this rock sheeting on the edge – a challenge because it presents a distinctly irregular surface for operation of a vanishing-edge detail at just three gpm per foot. We ended up filling the pool early so that we could identify all the high points and grind them down. The flow over the edge is now quite uniform.
Lighting is also a big factor in the impression a watershape makes. In this case, we used two lighting systems in the job: a set of three fiberoptic boxes – one for the vanishing edge, one for the spa and one for the rest of the pool – and a household-voltage halogen system to provide more traditional illumination.
As for the equipment set, I used the components I install with most of my projects. The chlorine-generation system comes from Autopilot (Fort Lauderdale, Fla.), the heater, lighting and valves from Laars/Jandy Pool Products (Novato, Calif.) and the filters and pumps from PacFab (Sanford, N.C.). Clearwater Tech (San Luis Obispo, Calif.) provided the corona-discharge ozonator.
|
In Pursuit of Shade One of the things I now try to factor into all of my swimming pool designs is shade. In fact, I’m of the opinion that shade structures are rarely given their due – and I was determined that my own pool would take this factor into full (and creative) consideration. For me, the choice was easy. I wanted umbrellas – big, happy umbrellas that invite you to cool off beneath them. I love the way they look in architectural terms, and I also like the fact that they seem so festive. To that end, I picked up four market umbrellas and worked them into the design. As we worked, I moved the umbrellas around to different locations, hoping to find optimum placements based on the sun and where I wanted them to be. As it turns out, the two in the beach and the others over the bar are in a straight line, which makes it look like I planned it that way. The umbrellas can easily be removed and stored or put in place and raised quickly.
I really like what this does for the beach entrance. Rather than simply use that area as a means to enter and leave the pool, the umbrellas create a perfect place for lounging in the shallow water. And although we haven’t done this yet, when we’re not using the umbrellas at night, the receptacles can be used to hold torches. As I mentioned in the adjoining story, pools need to be fun, and I think the umbrellas really add a vacation-like element to the whole setting. – S.P. |
For installing the equipment, we approach the task with the same level of care that goes into the rest of our pools: very logical and orderly, all level and square, with an efficient plumbing layout and plenty of space for access to all the valves and other controls.
Finally, we ringed the perimeter of the pool with several outcroppings of artificial rock mixed in with natural granite boulders we found on the property. Through the years, we’ve found that most simulated-rock failures happen as a result of water migration. To beat the problem, we use epoxy-coated steel in the rocks to help seal the ties and dodge the rust problems often associated with artificial rock.
PRIDE OF OWNERSHIP
The pool was finished on December 1 and filled shortly thereafter. We heated it for Christmas and everybody went swimming. So far, that’s the only time that I’ve been in the pool itself – but everything works as intended, the pool looks great and the equipment set purrs like a kitten.
The one thing I really wasn’t prepared for was just how much fun this pool has brought us even though (at this writing) summer is still more than three months away. Even when it’s been cold, we’ve managed to have a good time. We use the spa a lot, and the pool has played host to three remote-control boats my daughters and I play with. We’ll heat the spa, sit in there and operate the boats as they drive around in the pool.
It’s a blast – and even when we’re not actually using the pool, we’ve found that it provides a wonderful backdrop for relaxation, entertaining, dining and conversation.
It’s been good for business, too: The pool is so representative of my work, it serves as a perfect showroom.
I’ll have clients over and we’ll sit out on the patio with glasses of wine and talk about possibilities. They get to hear the water spilling over the edge, watch the sun set over the edge and get a good sense of the beauty and tranquility you can have just by being next to a beautiful body of water. I’ve had some really cerebral conversations about pool design and how we can apply these ideas in their homes. It’s very productive time – and it sure doesn’t feel like work.
The bottom line is that I’m really proud of this swimming pool. And it’s funny: No matter how many of these things you build for other people, there’s always something new and exciting on just about every job. When it came down to building my own, well, in a lot of ways it really drove home the point that pools provide a kind of excitement and pleasure that never changes.
Skip Phillips is president of Questar Pools, a high-end swimming pool design-and-build firm based in Escondido, Calif. He started his business in 1975 as a service/supply/repair operation, moving quickly into renovations and new construction. Now a veteran designer and builder of high-end, custom swimming pools, Phillips has won more than 100 local, national and international design awards. His reputation is tied closely to hillside pools featuring vanishing-edge designs; he is one of only two U.S. instructors currently teaching classes on vanishing-edge pools and has written and participated in numerous magazine articles on the subject. Phillips is a past president of the National Spa & Pool Institute and co-founder of the Genesis 3 Design Group.